How to Prune Dill for Leaves, Flowers, and Seeds
Learn how to prune dill for leaves, flowers, or seed. See when to pinch, where to cut, how much foliage to leave, and when pruning stops delaying flowering.
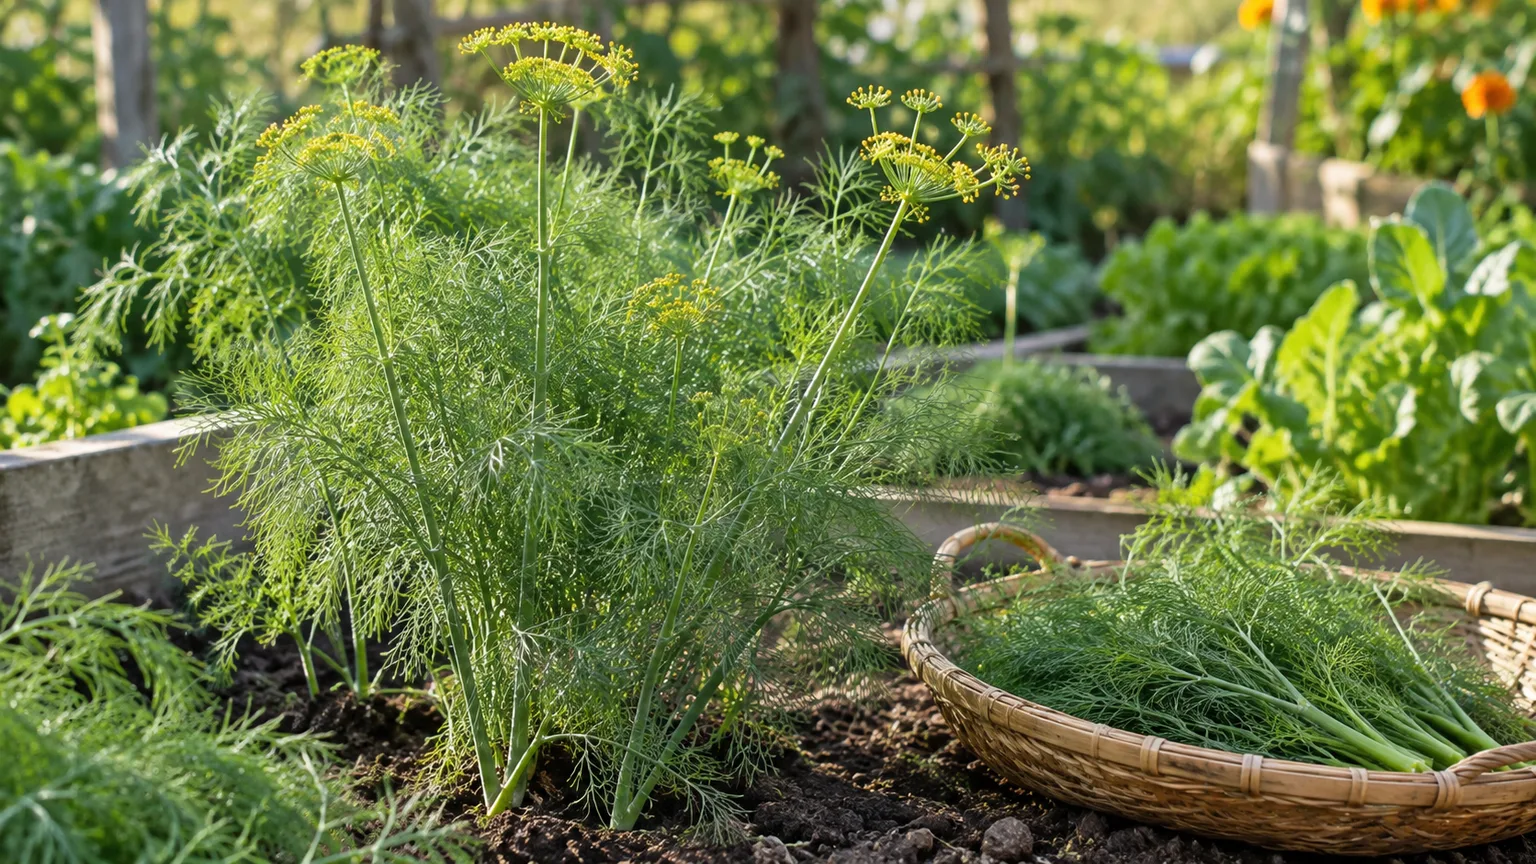
Dill is an annual herb, so pruning is a way to steer a harvest, not keep the same plant alive forever. A careful pinch can encourage side growth and give you tender leaves; removing a developing flower stalk can buy a little more leafy time; leaving selected stems untouched is the route to flowers and seed. The right cut depends on which of those outcomes matters most today.
Start by deciding whether you want dill weed, yellow flower umbels, or mature seed. Then make a small, clean cut while enough green growth remains to support recovery. If the plant has already begun flowering, do not panic or cut it to the ground: you can still harvest leaves, use flowers, collect seed, or start a new sowing for a later leafy crop.
Decide what you want the plant to produce
Before reaching for scissors, look at the plant and name the harvest goal. Dill has a short annual cycle: soft foliage comes first, then a taller flower stalk, yellow umbels, and seed. One plant can provide more than one of those, but pruning every stem toward leafy growth conflicts with letting that same plant mature seed.
| Your goal | The cut to make | What to leave |
|---|---|---|
| Fresh dill leaves | Pinch or snip a leafy tip or outer stem | Several healthy green stems and active growing points |
| Delay flowers for a while | Remove a visible flower stalk before its umbel opens | The leafy framework; expect a delay, not a reset |
| Flowers or seed | Harvest only selected foliage; leave reproductive stalks | At least one vigorous flower stem and its umbel |
| Stop volunteers next year | Cut spent seed heads before seeds scatter | Nothing needs to remain once seed is collected |
Use a separate plant or a separate group of stems for seed when you can. That small bit of planning is more reliable than repeatedly cutting a plant back and hoping it will remain in its leafy stage. It also means a single recipe does not accidentally cost you the flower heads you wanted for pickling or seed saving.
When dill is ready for a first trim
Wait until a seedling is established and has several healthy, leafy stems before taking more than a tiny taste. A plant only a few inches high can be sampled, but removing its only central growth point or most of its leaves slows the young plant at the moment it is building roots and stems. A stronger cue than a fixed calendar date is that the dill has enough foliage to spare a small tip while still looking full afterward.
Penn State Extension recommends cutting dill foliage before flowering and describes repeated foliage cuts as one way to delay bloom. Wisconsin Extension notes that leaves can be cut once the plant is a few inches tall, up until the seed stalk begins to form. Those are compatible cues: begin lightly once the plant is established, then shift your method as the flower stalk emerges.
Dill can be direct-sown in short successions, so you do not need to preserve one plant at all costs. Utah State University Extension suggests repeated plantings because dill takes several weeks to reach harvest. A new sowing is usually a better way to maintain a steady supply than aggressive pruning of an old, heat-stressed plant.
Get clean tools and pick a good time
For soft young tips, clean fingers or herb scissors are enough. Use sharp, clean snips for thicker stems or a developing flower stalk; a clean cut is easier to control than twisting or tearing the hollow stem. If you are harvesting several plants, brush off soil and plant debris and clean the blades before moving from a diseased plant to healthy ones.
Choose a cool, dry part of the day when foliage is not wet with rain or heavy dew. This timing mainly helps you handle the harvest cleanly and reduces wet plant material in storage; it does not change dill’s life cycle. If the plant is wilted from heat or dry soil, water the root zone and let it recover before taking a substantial amount of growth.
Keep a small basket or bowl nearby and sort cuttings as you go. Set aside tender fronds for fresh use, discard yellow or damaged foliage, and place seed heads in a paper bag before carrying them through the garden. Separating the harvest from the start prevents the common rush of cutting too much and deciding later what to do with it.
Method 1: Pinch leafy tips for a small, repeatable harvest
Pinching the growing tips is the lightest method and best for a handful of fresh dill or for encouraging a young plant to branch. Choose a vigorous stem with plenty of green foliage, then remove just the soft top growth rather than taking every stem to the same height. Regular kitchen harvesting can serve the same purpose when you take several tips selectively instead of stripping the whole plant.
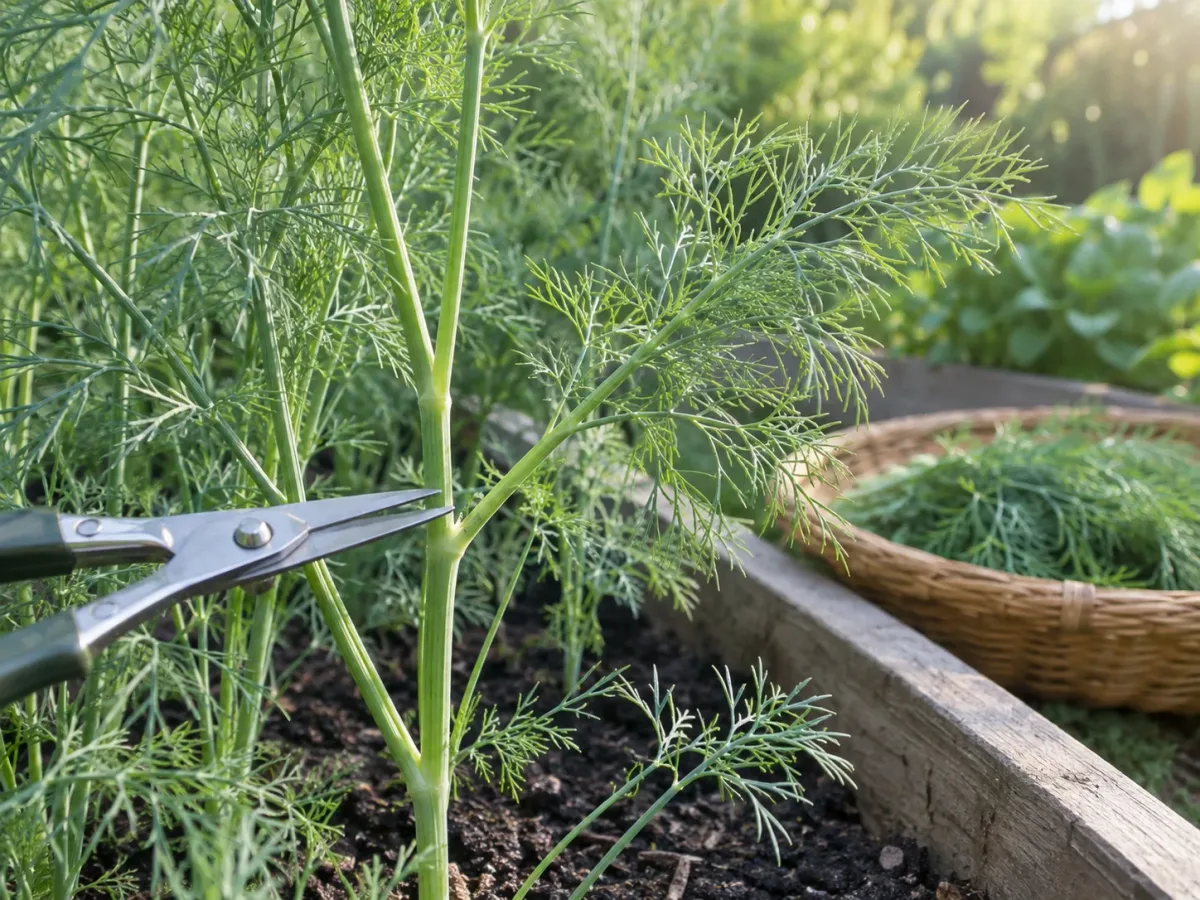
The basic rhythm is simple: select a healthy leafy stem, find the nearest useful leaf junction below its tip, and snip just above that junction. Leave the lower leaves and nearby growth intact. The plant may push side shoots from surviving nodes, but the amount of branching varies with the variety, light, temperature, and how far the plant has advanced toward flowering.
Where the cut belongs
Dill’s leaves are feathery, so the “leaf set” can be easy to miss. Trace a full leafy frond back to the point where its stalk joins the main stem; that joint is the node. Take the tender top portion above a leafy node, not a long bare section below every frond, and do not shear the entire plant into a flat hedge.
This distinction matters because a bare stem has little foliage left to support new growth. If you cut below all the leaves on a shoot, do not count on that same section to quickly refill with dill. Keep active green growth below the cut and leave the central crown of a small plant untouched. Savvy Gardening likewise emphasizes cutting above a leaf set and retaining fronds on the stem.
After the pinch, give the plant ordinary care and watch the node over the next several days. If new side growth appears, harvest from a different stem next time so that shoot can continue developing. If nothing emerges and the plant is already sending up a flower stalk, the plant may simply be moving into reproduction; that is the point to decide whether to accept flowers or sow another crop.
Method 2: Thin stems and manage flower stalks
Selective thinning removes a whole crowded or overlong stem instead of trimming every top. Use it when stems overlap, the center is difficult to inspect, or one plant is shading its neighbor. Cut a few of the weakest stems at the base only if the remaining stems are vigorous and leafy; on a small plant, remove individual outer leaves rather than taking whole stems.
Avoid shaping dill for symmetry. It is a loose, upright annual with fine foliage, not a dense woody shrub that needs a rounded outline. Shortening every stem to the same line may remove the youngest growth, leave blunt bare stubs, and reduce the plant’s leaf area without correcting the cause of legginess. If stems lean because they are tall, crowded, or shaded, use a light stake, improve spacing around the plant, or harvest selectively instead of giving it a severe haircut.
Remove a flower stalk only if you are choosing foliage
When a central stalk rises above the leafy canopy or a tight umbel appears, you have a choice. If this plant is reserved for leaves, snip the developing flower stalk while it is still small, cutting it back to a leafy junction rather than leaving a long, bare stump. This can postpone flowering and keep the plant useful for foliage for a little longer, but it cannot make an old annual young again.
Penn State Extension notes that dill declines after flowering and that cutting foliage often can delay bloom; Wisconsin Extension similarly says continual foliage cutting can delay flowering. Both describe a limited effect, not a permanent way to stop seed production. If the plant has several open umbels or plumping seeds, take the leaves you can use, then treat it as a flower or seed plant instead of repeatedly removing stalks that quickly return. Practical guides from Homes & Gardens also advise removing flower buds only on dill grown for foliage.
If several shoots have flowered, remove only the stalks that conflict with your goal. Leave green lower leaves and any stems you still need. For a sparse, stressed, or container-grown dill, one flower-stalk cut may be enough for that session; give the plant time to respond before making another substantial cut.
Keep some plants flowering for pollinators and seed
Flowers are not a defect to correct. Dill’s yellow umbels provide a useful garden feature, and Wisconsin Extension notes that they attract beneficial hover flies and other insects. Utah State University Extension identifies swallowtail larvae among the insects associated with dill, so inspect the foliage and stems before removing a flowering branch. If you find caterpillars and can spare the plant, leave that section or move your leaf harvest to another dill plant.
If you want seed, do not cut off every flower bud. Mark one or more sturdy plants and leave their flowering stems intact while pruning only the plants set aside for foliage. This simple separation avoids the frustrating cycle of removing the blooms, waiting for seeds, and discovering that no seed head remains to mature.
You can still harvest a few leaves from a seed plant, but do it sparingly. Keep the main flowering stem and most of its leaves; repeated hard cuts compete with the seed crop and may reduce the number of mature heads. A mixed patch can give you fresh leaves, flowers, and seed without asking every individual plant to do all three jobs.
Method 3: Prune dill for seed and clear it after harvest
For a seed crop, the main pruning job is knowing what not to remove. Let the chosen flower stalks open and develop seed. You may trim a few outer leaves for cooking, but avoid cutting the terminal stalk or the umbels that will carry the seed. If you do not want dill to reseed freely, plan to collect or remove the heads before ripe seed scatters.
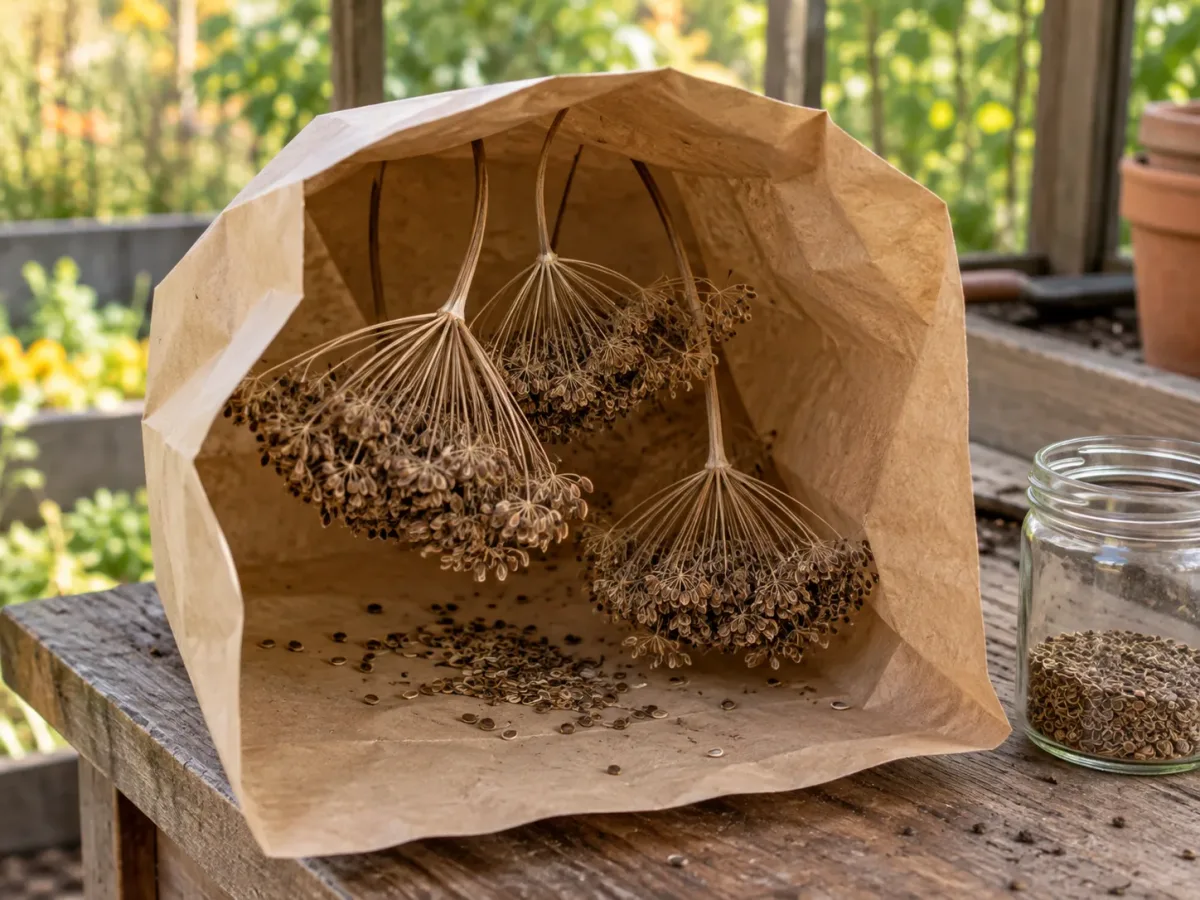
Seed maturity is visible. The flower umbel dries, the seed changes from green toward tan or brown, and individual seeds loosen when the head is disturbed. Wisconsin Extension cautions that ripe dill seed can shatter, so gardeners saving it should cut heads once seeds are fully developed but before they dry completely on the plant. Utah State University Extension advises collecting mature heads in a paper bag and drying them in a cool, ventilated place.
Cut the seed head with a short length of stem and hold it upright. Place it directly into a paper bag or over a tray, then finish drying the head in a dry, airy spot. Once the seeds release, separate them from stems and chaff and store only fully dry seed in a labeled, airtight container. If the seeds are for sowing, note the variety and year; if they are for cooking, still let them dry before sealing them away.
When to remove a seed head
Do not use the color of the whole flower head alone. An umbel can contain seeds that mature at slightly different rates, so check a few of the central and outer seeds. When most are firm and beginning to brown but have not scattered, bag the head and cut it. If the heads are still green and soft, leave them longer; if they are already dropping seeds, collect what remains and expect a few volunteer seedlings next season.
After you collect seed, cut the spent stalk near its base if the plant is yellowing or no longer producing useful foliage. There is no need to keep a bare seed stem for regrowth once the annual has completed its cycle. If the plant is still green and you want flowers for a vase or insects, keep selected umbels and remove only the heads you have harvested.
Deadheading has two different meanings in a dill patch. Removing a fading flower before any seed develops prevents that head from producing volunteers, while leaving a mature head until seed drops encourages self-sowing. Choose deliberately: either collect seed, cut the head, or let a marked section reseed. Wisconsin Extension notes that dill readily self-seeds and that spent flowers can be deadheaded to prevent a large volunteer crop.
How much dill can you cut at once?
For a healthy, established plant, take a modest portion and leave most of its leafy framework. Savvy Gardening uses one-third as a general pruning limit; here it is best treated as a cautious ceiling for a typical session, not a biological law or a guarantee that every plant will recover at the same speed. Homes & Gardens also stresses allowing the plant to recover before trimming again. A small seedling, heat-stressed plant, plant in a tiny pot, or dill already losing leaves should be cut much less—or left alone until it is growing actively again.
Harvest across several plants when a recipe needs a large amount. That spreads the loss of leaf area and keeps some stems at the leafy stage while others flower. On a single compact plant, remove a few outer stems, wait for new growth, and reassess rather than repeating a large cut every few days.
The amount to remove also depends on what the plant is doing. A vigorous plant grown for leaves can tolerate more frequent light pinches than a seed plant that needs its flowering stalks and foliage to mature umbels. If the center has already become a flower stem, a hard cut will not restore the same leafy plant; use the remaining leaves and start a succession sowing instead.
Does pruning make dill bushier?
Pinching can encourage side growth, and Utah State University Extension describes pruning as a way to promote lush, bushy growth. That is a helpful possibility, not a promise that dill will form a dense, symmetrical mound. Cultivar and growing conditions matter: compact types such as Fernleaf tend to stay shorter, while taller varieties may produce a more open, upright plant. Gardening Know How describes a similar response from cutting upper foliage and flower buds, though individual plants will vary.
The strongest practical benefit of pinching is controlled, repeated harvest. By cutting a tip above a leafy junction and leaving the lower foliage, you may prompt shoots from nearby nodes while keeping enough leaf area for the plant to keep growing. When you cut too low, remove every tip at once, or prune after flowering is well underway, you may get less regrowth than expected.
Dill also responds to its environment. Low light can make stems tall and thin, crowding can make the canopy tangle, and excess water or fertility can create soft growth. A cut cannot correct those conditions. Give the plant enough sun and root room, keep moisture steady without waterlogging the soil, and use a compact cultivar if you need a tidy container plant.
Why dill bolts, and what pruning can change
Bolting is the shift from leaf production to flowering and seed production. Heat, dry spells, long days, and normal plant maturity can bring the transition sooner; Penn State Extension specifically notes that hot weather and dry conditions cause dill to flower, while Wisconsin Extension describes a tall flower stalk forming in hot or dry weather. Pruning is only one part of managing that transition.
Removing a small flower stalk or pinching tips early may delay flowering, but each plant still follows an annual life cycle. Once a mature stalk is forming umbels or the plant has begun to set seed, repeated cutting cannot reliably return it to the earlier leafy phase. Removing a bud can buy time; it cannot reverse hot weather, restore a damaged root system, or extend the season indefinitely.
Extension recommendations also vary on the exact “best” flavor stage. Penn State advises cutting dill weed before it flowers, while Utah State says dill flavor is best as flowering begins. The difference is useful rather than confusing: taste a small frond from your plant and decide whether you prefer the tender pre-flower foliage or the stronger flavor around early bloom. For a steady supply, sow another short row every few weeks while your climate allows, and let older plants flower or set seed.
Pruning dill in containers or crowded beds
Container dill has less root volume and soil moisture than a garden-bed plant, so prune it more lightly and check the pot before taking a large harvest. Choose a deep container with drainage, keep it in strong light, and let the top layer begin to dry before watering again. If the plant wilts on a hot afternoon or the mix dries quickly, water first and postpone substantial cutting until the leaves look firm again.
In a crowded bed, remove only stems that are truly rubbing, shaded, or blocking access to the remaining plants. Do not clear the whole interior just to create airflow if the plants are small; the leaves themselves are the plant’s energy source. Thin nearby seedlings early and leave enough room for mature stems instead of trying to solve crowding by cutting away much of an established plant later.
Tall dill often needs support more than pruning. A light stake placed before a heavy umbel leans is safer than shortening every stem. If a stem has already bent but remains healthy, tie it loosely to the support; if it has split or gone limp, cut that damaged section above a healthy leafy junction and leave the rest of the plant intact.
What to do with cut stems
Use tender fronds promptly when flavor and texture matter. The fine leaves wilt quickly, so put them in a cool place while you finish pruning and wash them only when you are ready to use them. For longer storage, freeze clean, dry dill in small portions; drying is possible, but it produces a different, less fresh flavor.
Thicker, fibrous stems are less pleasant as a garnish, but they can flavor broths, sauces, or pickling preparations if a recipe calls for them. Do not confuse a green flower umbel, a plump green seed head, and fully dry seed; they have different moisture and culinary uses. If you want a full comparison of leaf, flower, green-seed, and dry-seed harvest timing, see our dill harvesting guide.
If a cut piece carries a flower bud and you want seed, it cannot mature seed once it has been separated from the plant. Put it in the compost or use it as a fresh flower, and leave the next intact umbel on the plant. After any larger harvest, give the remaining dill ordinary light, water, and room rather than applying extra fertilizer in an attempt to force immediate regrowth.
Pruning mistakes that set dill back
Cutting a seedling like a mature herb: A tiny plant has little stored leaf area. Wait until it has several healthy stems, then start with one light pinch.
Removing the entire growing tip from every stem: That can stall the plant and leave no active leafy growth. Take a few tips at a time and keep lower fronds intact.
Cutting below all leaves: A bare stem is not a reliable source of quick new dill. Make the cut above a healthy leafy junction and leave green growth below it.
Removing every flower automatically: That eliminates the seed crop and the open umbels that benefit insects. Reserve some plants for flowering if those outcomes matter.
Treating pinching as a cure for bolting: Early cuts may delay flowers, but heat, drought, and maturity still move an annual toward seed. Correct the stress where possible and sow a new batch for later leaves.
Taking too much from a stressed plant: Wilted, yellowing, crowded, or container-bound dill has less capacity to replace cut foliage. Fix the growing condition first and harvest lightly after it recovers.
Letting dry seed scatter unintentionally: Mature dill seed shatters easily. Bag heads as they turn tan or brown, or remove them before they spill across a narrow bed.
Conclusion
Prune dill according to the harvest you want. Pinch a few leafy tips above a healthy junction for fresh fronds and possible side growth, remove an early flower stalk only when you want to favor foliage, and leave selected umbels intact when you want flowers or seed. Keep most of the green canopy, make clean cuts, and let the plant recover before taking more.
Pruning can steer dill for a while, but it cannot stop an annual from reaching its flowering stage. When the plant is mature or heat is pushing it to bolt, harvest the useful leaves, collect or remove the seed heads on purpose, and sow another small batch for a fresh round of leafy growth.



