Spider Mites on Houseplants: ID, Treatment, Prevention
Identify spider mites on houseplants by stippling, silk, and the tap test. Follow isolate → rinse → humidity → 5–7 day sprays until inspections stay clean.
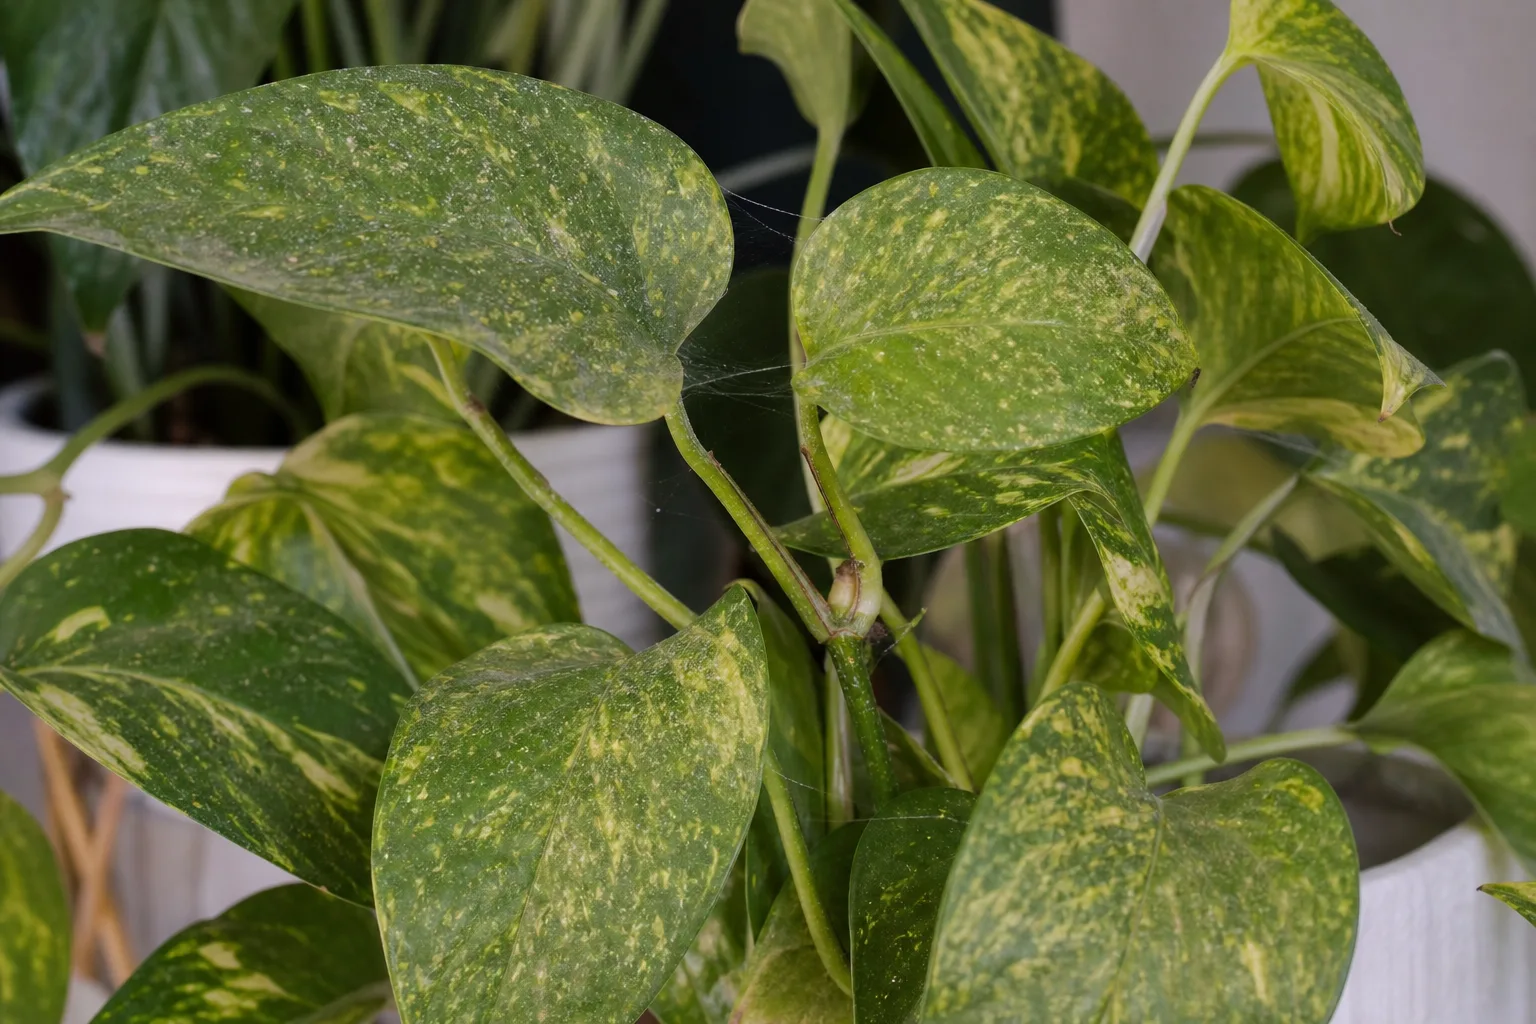
Your calathea looks dusty. The leaves feel slightly rough, the color has gone flat, and when you tip a leaf you catch a glimmer of silk between the petiole and the blade. That is not dust. That is usually spider mites — tiny sap-feeding arachnids that thrive in the warm, dry air of most homes and can rebuild a colony in days if you stop treatment too early.
This guide covers identification (stippling, bronzing, webbing), why humidity and treatment order matter, and a practical indoor control plan you can finish without guessing. Written by Sai Ananth (B.Pharmacy, pharmacognosy background; LeafyPixels lead writer and indoor grower) and reviewed by Dr. Priya Menon (botanist and indoor plant specialist) on the LeafyPixels Review Board. Outbreak notes below come from mite outbreaks we treated on living editorial plants in a north-central Ohio apartment (USDA zone 6a) during heating season and summer AC dry-down — your rooms will differ.
For a collection-wide pest workflow, use the indoor plant pest guide. For a symptom-first checklist, start at the spider mites symptom hub.
What Spider Mites Are (and Why Dry Indoor Air Favors Them)
Spider mites are not insects. They are arachnids — relatives of spiders and ticks — with eight legs as adults and bodies small enough to look like moving pepper on a leaf. The species you are most likely to meet indoors is the two-spotted spider mite (Tetranychus urticae), also called glasshouse red spider mite. Adults are usually yellowish green or straw-colored with two darker blotches, though they can turn reddish-orange when conditions change or plants become uninhabitable. Washington State University notes they are about the size of a period and are best confirmed with magnification.
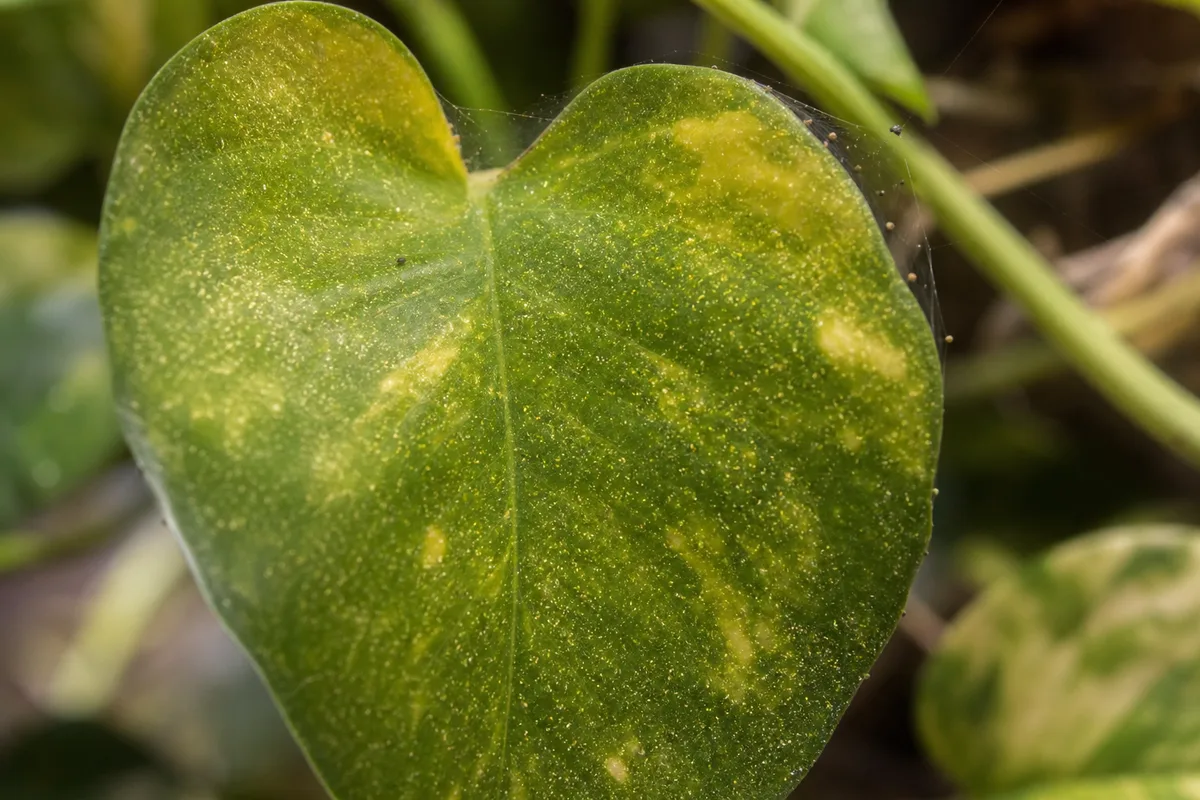
Early stage — pale stippling and fine silk on a pothos underside before heavy tip webbing.
Indoors, mites win the environment game. Central heating, AC, and sunny windows create the warm, dry microclimate they prefer. Colorado State University Extension explains that dry conditions favor spider mites because lower humidity helps them manage water excreted while feeding, while many natural enemies are stressed by arid air. Natural predators that keep outdoor populations in check are almost never present in a living room. The result is year-round breeding on houseplants that stay inside, especially when foliage is dusty and plants sit near heat vents.
How Feeding Creates Stippling, Bronzing, and Webbing
Spider mites puncture individual leaf cells and suck out the contents. Each feeding puncture kills a tiny patch of tissue, which is why damage starts as fine pale dots rather than large chewed holes. As feeding continues, those dots merge into a faded, mottled look, then bronzing, yellowing, and leaf drop. Clemson HGIC describes light-colored speckling on the upper leaf surface, an overall faded appearance, and eventual bronzing or plant death if colonies are left unchecked.
Heavy colonies also spin silk webbing on undersides, between leaves and stems, and across growing tips. The webbing shelters eggs and mites from sprays and from drying air. UC IPM notes that when numbers are high, dense webbing can cover leaves and stems, and that damage is usually worst in hot, dusty conditions and on water-stressed plants. A few mites are easy to miss. A webbed tip means the population has already scaled up.
How to Confirm Spider Mites on Houseplants
You will usually see the plant’s reaction before you see the pest. That is normal. Adults are under 1/20 inch long, they cluster on leaf undersides, and early colonies hide along veins where casual inspection never looks. Confirm before you treat — pale leaves can also mean underwatering, low light, or thrips scarring — but treat quickly once mites are confirmed because indoor generations overlap.
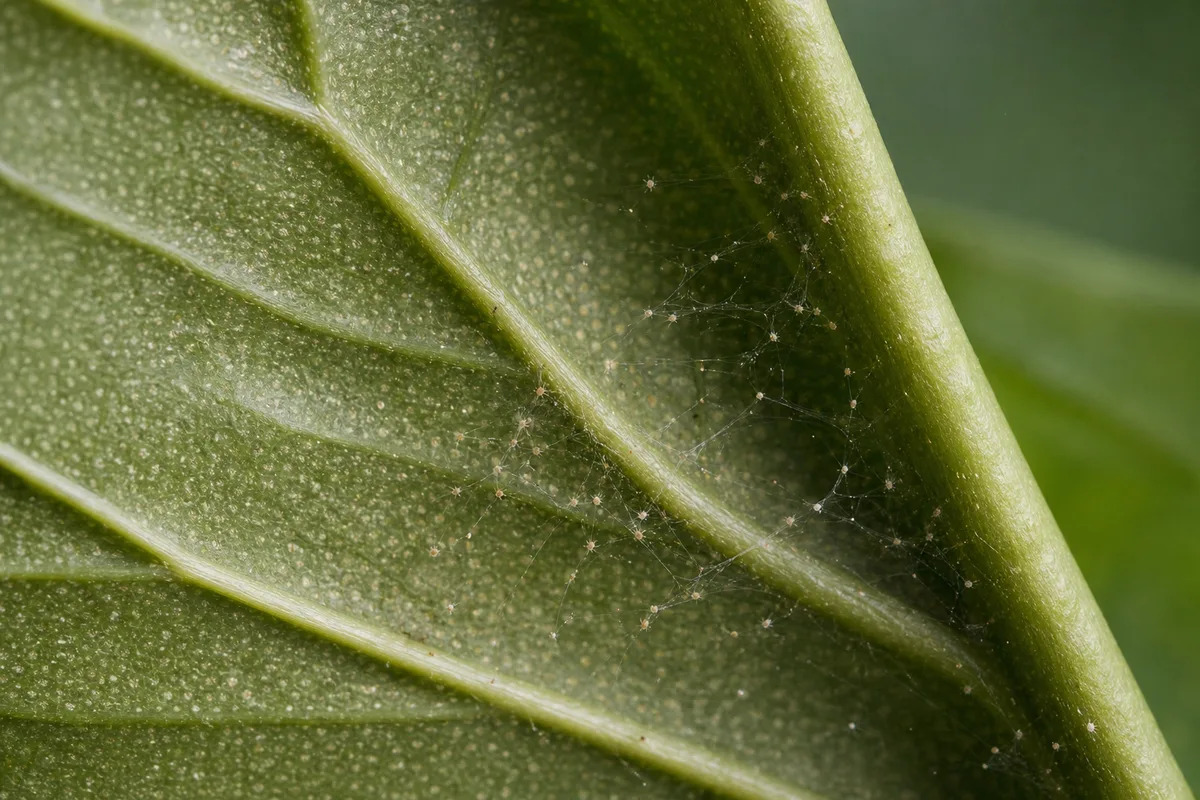
Diagnostic stage — uniform pinprick stippling on a peace lily before obvious webbing.
White Paper Tap Test and Magnifier Checks
Hold a sheet of white paper under a suspicious leaf and tap the foliage firmly. If tiny moving dots fall onto the paper and begin crawling, you are looking at mites or another micro-pest. Use a phone macro photo or a cheap magnifier to confirm eight legs and oval bodies. Check the undersides of several leaves, not just the worst one, and inspect neighboring plants that were touching the suspect.
Empty round egg shells and shed skins on the underside are useful corroboration even when live mites are sparse after a rinse. Colorado State University Extension notes that empty egg shells remain after hatch and help diagnose spider mite problems. RHS describes fine pale mottling on the upper surface, with yellowish-green mites, white cast skins, and empty egg shells on the underside — easier to see with a 10× hand lens.
Underside Coverage Checklist
Before you declare a plant “probably fine,” scan these spots on every suspect and every neighbor that shared a shelf:
- Mid-leaf undersides along the main veins
- Petiole joints where the leaf meets the stem
- Newest tips and soft emerging leaves
- Crowded leaf overlaps where silk can bridge foliage
- Dusty, south-facing leaves near heat vents or AC drafts
A clean inspection means: no moving mites on a tap test of at least five leaves, no new stippling on expanding growth, and no fresh silk at tips or petiole joints — checked on two dates at least five days apart. Old stippled tissue often stays pale; judge recovery by new growth, not by whether scarred leaves suddenly green up.
Spider Mites vs Thrips and Other Lookalikes
Spider mite stippling is fine and relatively uniform. Thrips damage is usually more irregular, silvery, and streak-like, often with tiny black tar-like frass droplets and distorted new growth. Thrips do not produce the fine silk webbing that marks a heavy mite colony. If you see silvery streaks plus black specks without webbing, compare against the thrips on houseplants guide before you choose a product.
Other lookalikes include hard-water residue (does not move), dust (wipes off without silk), and nutrient fade (usually pattern-driven, not dotted). Edema and sun scorch create larger blotches, not pinprick stippling. When in doubt, confirm moving mites on the underside before you escalate to oils or miticides.
| Clue | Spider mites | Thrips | Dust / hard-water residue |
|---|---|---|---|
| Leaf pattern | Fine uniform stippling, later bronzing | Irregular silvery streaks or scars | Film or spots that wipe or flake off |
| Webbing | Common in heavy infestations | None | None |
| Specks | Moving pale/tan dots on undersides | Black frass droplets near scars | Static grit; no crawling |
| New growth | Faded, dusty, may drop leaves | Often curled, scarred, or distorted | Usually unaffected once wiped |
Life Cycle Speed Indoors (Why One Spray Fails)
Understanding the life cycle is what stops the “I sprayed once and they came back” loop. Spider mites develop from eggs laid near leaf veins. After hatch, nymphs feed and molt into adults. Females can lay many eggs over consecutive days. CSU notes that mites can become full-grown in as little as a week in warm weather, and that rapid development plus high egg production can create extremely fast population spikes. UC IPM similarly notes that when temperature and food supplies are favorable, a generation can be completed in less than a week.
RHS biology for glasshouse red spider mite is useful for indoor timing: at about 10°C (50°F) the life cycle takes roughly 55 days, but at 21°C (70°F) development can complete in about 12 days. Most homes sit in the warmer range for long stretches, so overlapping generations are normal. Eggs are poorly hit by many contact sprays, which is why a single application fails. You treat the mobile stages you can hit, wait for the next hatch, and treat again until inspections stay clean.
5–7 Day vs 1–2 Week Reapplication Rule
Extension sources use two overlapping cadences, and both can be right:
- CSU houseplant guidance recommends reapplying rinse/soap/oil-style treatments at one- to two-week intervals while populations persist, and notes chemical miticides often need a follow-up about 10–14 days later because eggs survive.
- Warm-home hatch logic (RHS ~12-day cycle near 21°C / 70°F, plus overlapping eggs) pushes many indoor growers toward every 5–7 days for contact soaps and oils so newly hatched mites are hit before they become egg-layers.
Use this decision rule indoors:
- Room regularly ≥70°F (21°C) and dry (especially heating season): treat every 5–7 days for at least three to four cycles.
- Cooler rooms closer to the low 60s°F, or after the first two knock-downs have clearly slowed stippling: 7–10 days is often enough, still inside CSU’s 1–2 week band.
- Stop only after two clean inspections spaced at least five days apart — not after one “quiet” look the morning after a spray.
Hosts That Show Damage Fastest
Almost any indoor plant can host two-spotted spider mites, but some species show damage faster and hold colonies longer. Clemson flags palms and English ivy as frequent indoor problems. Thin-leaved tropicals under dry air — calathea, maranta, alocasia — often show stippling early because their soft tissue scars quickly and they already struggle when RH collapses. Dusty, leathery foliage such as croton, fiddle leaf fig, and monstera can hide colonies on undersides until bronzing is obvious. English ivy and areca palm are classic dry-room hosts.
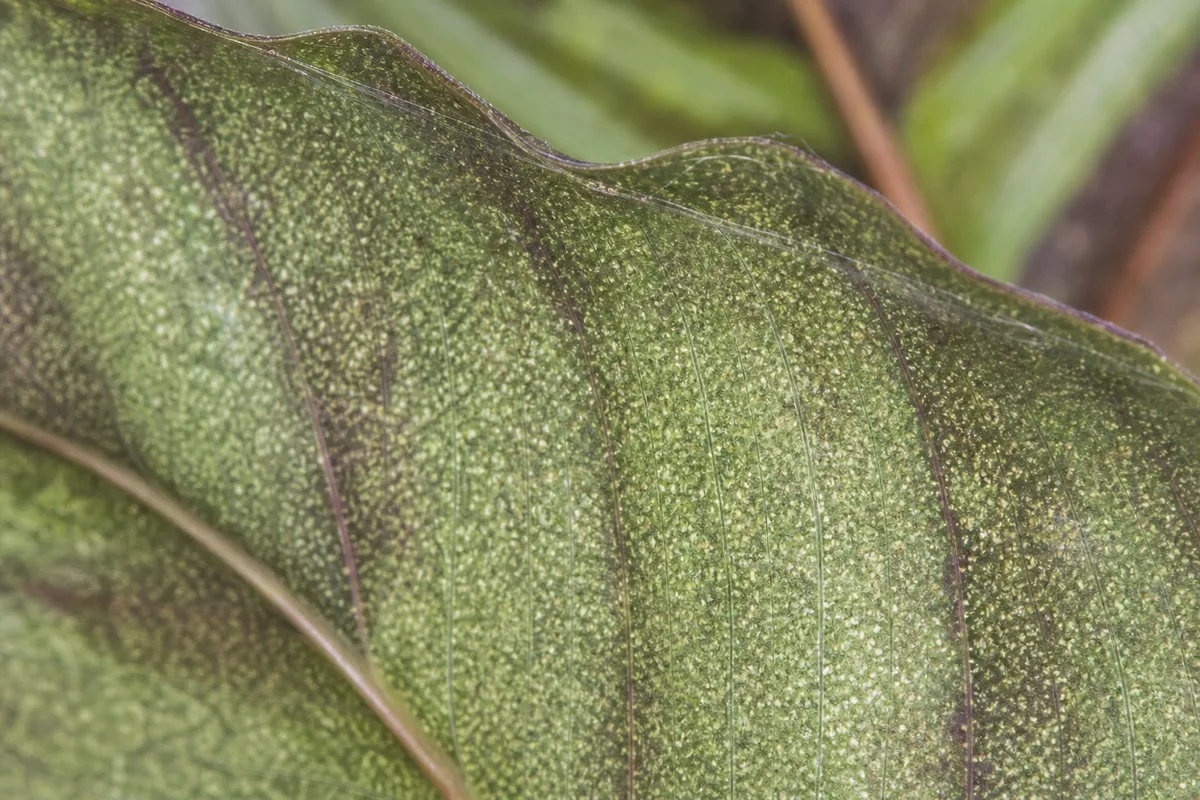
Later stage — bronzing and dusty roughness on calathea after dry-air acceleration.
Crowded shelves make transfer easy. Mites move by walking, leaf-to-leaf contact, and drifting on silk strands. WSU notes those pathways explicitly, which is why isolation is step one, not step four.
Open a plant-specific mite page when one host is already webbed, repeatedly reinfects neighbors, or needs cultivar-specific recovery notes. Keep this guide as the collection-level order.
Treatment Order That Stops Hatch Waves
Do not start with a random bottle. Start with a sequence that cuts the live population, removes webbing, worsens the dry-air advantage, and then repeats contact treatment through the egg hatch window. CSU’s houseplant advice matches this order: treat susceptible plants together, remove heavily infested leaves, hose or wipe foliage, and reapply at one- to two-week intervals while populations persist. Soft options (water, soap, oil) are the realistic indoor toolkit for most homes.
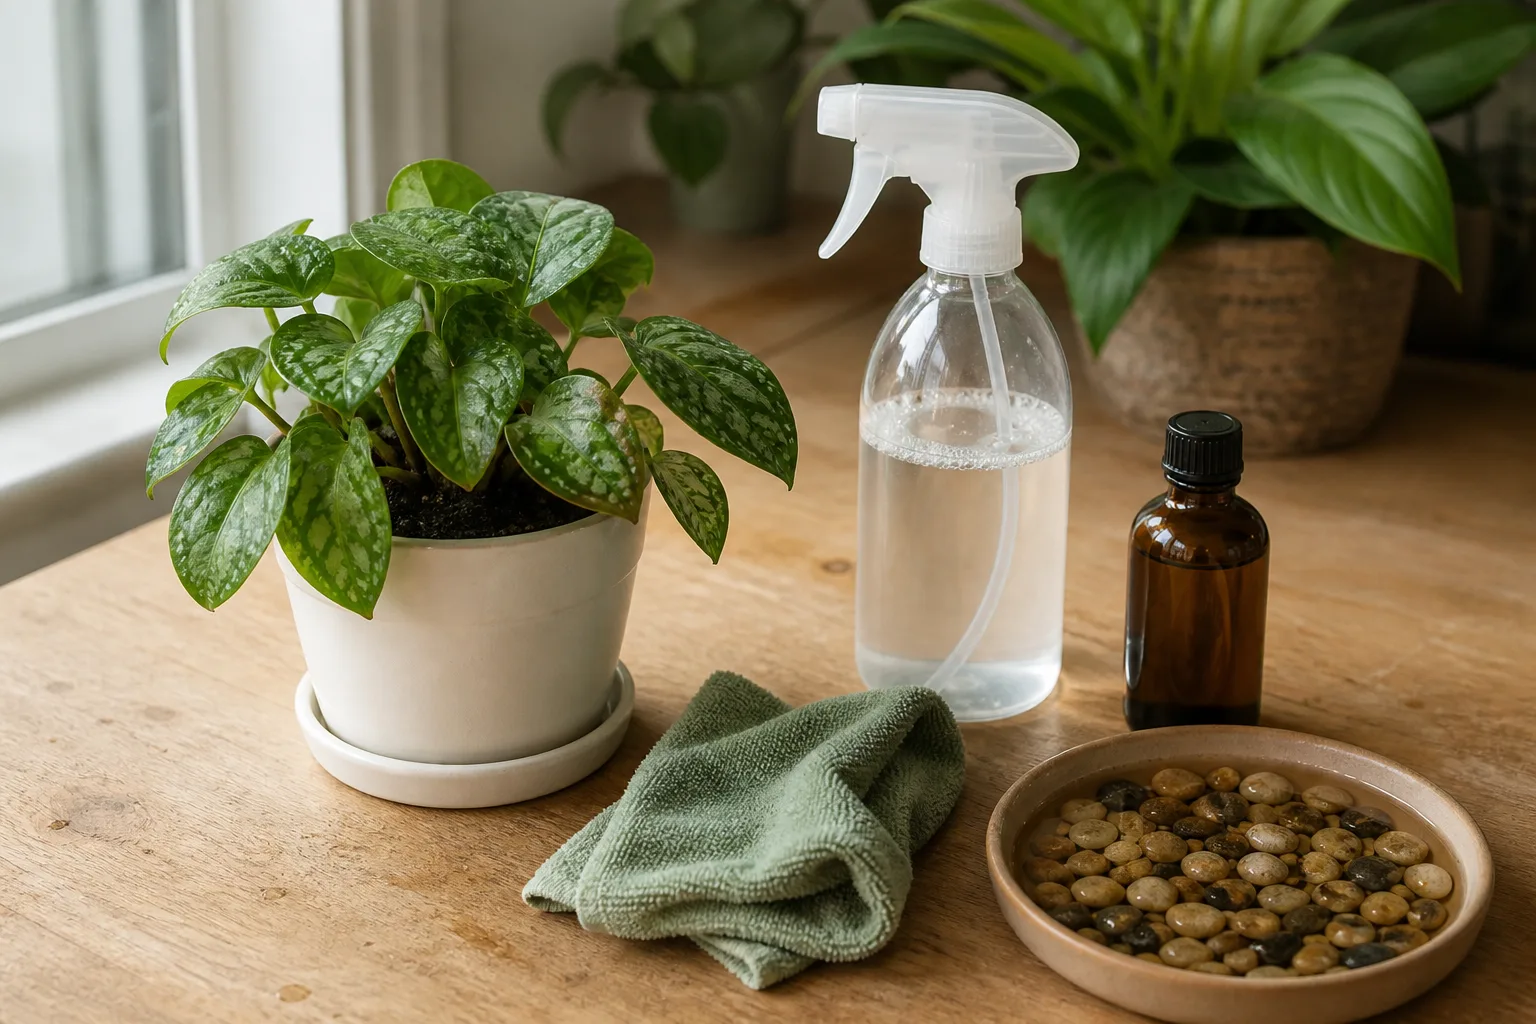
Treatment stage — rinse undersides first so soap or oil contacts what remains.
Isolate, Inspect Neighbors, and Quarantine
Move the plant away from the rest of the collection immediately — ideally to another room. Check every plant that shared a shelf, especially ones whose leaves were touching. Quarantine new purchases and outdoor plants coming inside for about a month; Clemson recommends isolating new plants for six weeks and inspecting undersides weekly with magnification. Keep the infested plant isolated until you have completed multiple treatment cycles and several clean inspections.
Rinse, Raise Humidity, Then Repeat Contact Sprays
Before any spray, physically remove as many mites and as much webbing as you can. For sturdy plants, a lukewarm shower or sink rinse aimed at leaf undersides dislodges mites and breaks silk. WSU recommends repeating thorough rinses at least weekly for light to moderate infestations, with a bag around the pot to keep soil in place. For larger plants, wipe undersides with a soft damp cloth. Prune and bag the worst leaves instead of leaving a webbed tip as a nursery for eggs.
After the first rinse, correct the environment that made the outbreak easy. Move the plant off heat vents. Group plants with space for airflow, use a humidifier, or set pots on pebble trays with water below the pot base — not soaking the soil. WSU warns not to overwater plants in an attempt to raise humidity. Overwatering trades a mite problem for root stress — see overwatered plant signs if the soil stays heavy while you chase humidity. For broader humidity tactics, see the houseplant humidity guide. Winter heating season is when RH collapses fastest; pair mite scouting with winter houseplant care habits.
Raising humidity reduces the advantage mites have, but humidity alone will not wipe out an established colony. RHS is explicit: regular syringing and high humidity reduce risk but will not, on their own, control the mite. Use humidity as part of the treatment order, not as a substitute for contact control.
Once foliage is rinsed, apply a labeled insecticidal soap, horticultural oil, or neem oil product that lists spider mites, with complete coverage of leaf undersides. UC IPM recommends insecticidal oil or soap (or both), full underside coverage, and avoiding sprays on water-stressed plants or in extreme heat. Clemson notes insecticidal soaps work only on contact and lose effect when dry, so hidden mites and eggs require more than one treatment. Track applications with the integrated pest management indoors workflow so you do not lose the schedule. For oil technique details, see neem oil for indoor plants.
Avoid broad-spectrum insecticides that kill mite predators outdoors and can flare mite populations. UC IPM warns that some organophosphates and pyrethroids are poor against mites, kill natural enemies, and can spike spider mite numbers. Indoors you rarely have predators anyway, but product choice still matters for plant safety and repeatability.
Soap vs Oil, Sensitive Plants, and Escalation Limits
| Option | Best when | Limits indoors |
|---|---|---|
| Rinse / wipe only | Light colonies, sturdy foliage, early catch | Misses eggs; must repeat weekly |
| Insecticidal soap | Soft foliage, good rinse access, early–moderate pressure | Contact-only; poor on heavy webbing; some plants are soap-sensitive |
| Horticultural / neem oil | Heavier silk, soap failed after honest coverage, plant tolerates oil | Do not use on water-stressed plants or in hot sun; test first |
| Stronger labeled miticide | Multiple soap/oil cycles failed; valuable plant; label allows indoor/outdoor use | Eggs often survive; follow label interval (~10–14 days for many miticides); resistance is common |
Test sensitive plants first. Clemson lists several soap-sensitive houseplants, including ornamental ivy, maidenhair fern, dieffenbachia, schefflera, jade plant, begonia, and certain palms. Apply outdoors in shade when practical, let foliage dry, then bring the plant back inside.
If weekly rinse-and-soap cycles fail after three to four honest rounds, reassess coverage, quarantine, and humidity before reaching for stronger labeled miticides. CSU notes that few insecticides work well on mites, resistance is common, and many miticides miss eggs — so a follow-up application about 10–14 days later is often required for chemical miticides. Use only products labeled for the plant type and setting, and prefer treating outdoors when the label allows.
Predatory mites such as Phytoseiulus persimilis are classic greenhouse tools, but typical dry apartments are a poor release environment unless humidity and prey density are carefully managed. Treat them as optional greenhouse/IPM tools, not a living-room shortcut.
When to Discard a Plant to Save the Collection
Discard is a valid IPM decision. WSU and Clemson both support getting rid of heavily damaged plants that threaten the rest of the collection. Bag the plant and trash it; do not compost webbing-laden foliage indoors. Saving one skeletonized ivy is not worth losing a shelf of calatheas.
Discard when any of these are true:
- Tips and undersides are heavily webbed or the canopy is skeletonized
- You completed three to four thorough rinse-and-contact cycles with no lasting drop in live mites
- The plant keeps reinfecting healthier neighbors despite isolation
- The plant is low-value relative to the rest of the collection
Prevention and Quarantine Habits
Prevention is mostly inspection discipline and dry-air management. Wash smooth-leaved plants every few weeks. Clemson recommends washing every two to three weeks to discourage pests and improve foliage. Inspect leaf undersides weekly in heating season, especially on mite magnets near windows and vents.
Quarantine every new plant and every plant coming in from outdoors. Keep cut flowers away from the collection. Avoid packing plants so tightly that leaves form bridges. Keep plants adequately watered for their species — drought stress and dust both favor mites — without creating soggy soil.
Common Mistakes That Restart Outbreaks
- Treating once, seeing fewer moving dots, and stopping while eggs are still hatching
- Spraying only the tops of leaves
- Raising humidity by drowning the root ball
- Returning an “almost clean” plant to a crowded shelf before the quarantine window ends
- Confusing thrips scarring for mite stippling and using the wrong product cadence
Fix those five and most indoor outbreaks become manageable. Miss them and even a good soap will look like it “does not work.”
First-Hand Notes From Treating Indoor Outbreaks
These notes are from LeafyPixels editorial plants in a north-central Ohio apartment. They are lived benchmarks, not universal recipes.
Winter heating-vent calathea (Jan–Feb). A Calathea on a shelf about four feet from a forced-air vent developed dusty roughness and tip silk within two weeks after nighttime RH near the foliage sat around 28–32% (cheap hygrometer at leaf height) while room air hovered near 70–72°F. We moved it to a spare bathroom, bagged the pot, rinsed undersides in the shower twice in the first week, then ran insecticidal soap every six days for four cycles while a small humidifier held RH nearer 45–50%. Live mites were gone on tap tests after cycle three; we required two clean inspections five days apart before the plant rejoined the shelf. Old stippled leaves never fully greened — new growth did.
English ivy soap success. A trailing ivy that shared a south window with a croton showed moving dots on white paper and light underside silk. Four soap sprays at six-day intervals plus weekly undersides rinses cleared tap-test mites. We kept the ivy isolated for 21 days after the last live mite sighting. Coverage mattered more than product brand: the first spray missed crowded leaf overlaps and rebound started within a week until we spread the vines during treatment.
Discard that protected a shelf. A second, heavily webbed ivy kept seeding silk onto neighboring maranta leaves despite isolation attempts in the same room. After three honest rinse-and-soap rounds failed to stop transfer, we bagged and trashed the ivy. Neighbor inspections stayed clean afterward. That discard was the successful IPM move — not another bottle.
Related Guides
- Spider mites symptom hub — symptom patterns, fix steps, and when to escalate
- How to tackle indoor plant pests at home — collection-wide pest ID and first response
- Integrated pest management indoors — repeat-treatment schedule and logging
- Houseplant humidity guide — dry-air fixes that slow mite reproduction
- Neem oil for indoor plants — safe mixing and coverage for oil sprays
- Thrips on houseplants — lookalike silvery scarring and black frass
- Calathea spider mites — species-specific mite recovery notes
- English ivy spider mites — a classic dry-room host case
Conclusion
Spider mites win when rooms stay dry, inspections skip leaf undersides, and treatment stops after one spray. You win with a fixed order: isolate, rinse and remove webbing, raise humidity without overwatering, then repeat contact sprays through every hatch wave until new growth stays clean.
Recovery checklist before you end quarantine
- Two clean inspections at least five days apart (no live mites, no new stippling, no fresh silk)
- Undersides of mid-leaves, petiole joints, and tips all checked — not just the prettiest face
- Neighbor plants that shared the shelf still clean
- Humidity no longer collapsing into the high-20s% RH near heat vents
- Judge success by clean new growth, not by old stippled leaves turning perfect again
Confirm the pest, protect the rest of the shelf, and keep the hatch schedule until those checks pass.