How to Spot Stink Bug Damage on Tomatoes
Learn how stink bug damage looks on green and ripe tomatoes, how to confirm the pest, and which prevention and treatment steps are safest for an edible garden.
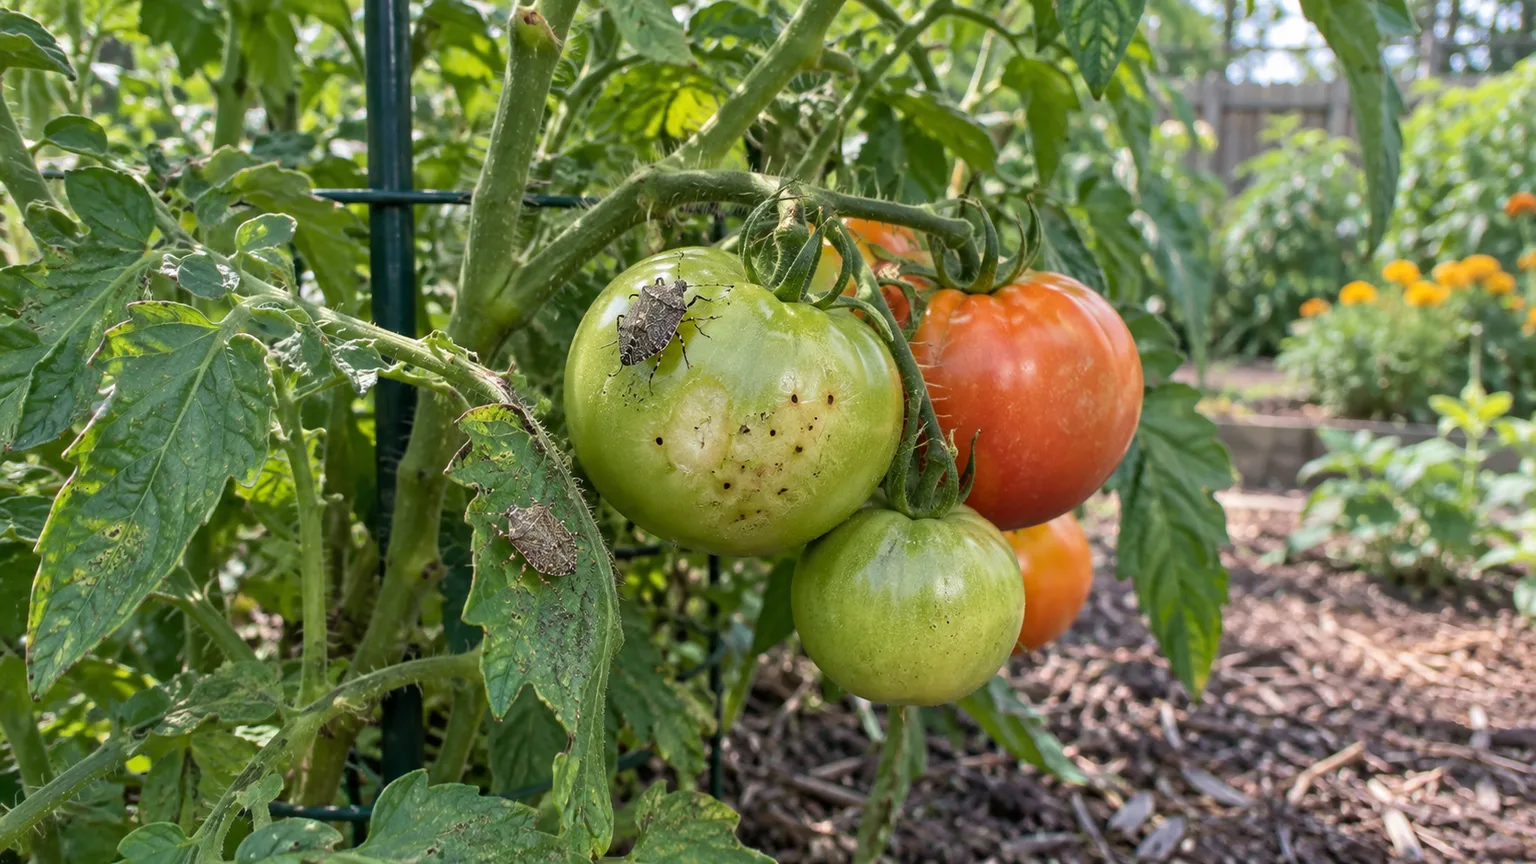
The quickest clue is a cloudy spot: a pale white, yellow, or light-green patch on a tomato, often with a tiny dark puncture at its center. The patch may feel firm or slightly sunken, and the flesh underneath can turn white, spongy, or corky. That pattern points to a piercing-sucking bug, but it does not identify one species by itself.
That distinction matters because stink bugs, leaf-footed bugs, and several related shield-shaped insects can leave similar fruit injury. Before you reach for a spray, inspect one affected tomato, search the canopy for the insect or its eggs, and check whether new damage is still appearing. A blemish that is old and isolated calls for different action than fresh cloudy spots plus live nymphs throughout the plant.
The fast diagnosis: cloudy spots are the main clue
Stink bugs do not chew holes in tomatoes. They insert straw-like mouthparts through the skin, remove plant juices, and inject saliva containing enzymes that damage cells around the feeding site. Extension specialists describe the resulting injury as cloudy spot because the affected tissue looks pale and hazy from the outside rather than like an open wound. See the Utah State University Extension description of stink bug damage and the University of Arkansas diagnosis of tomato injury.
Use this quick rule at the plant: a pale, hard, cloudy patch with a tiny dark entry point is more suggestive of stink bug feeding than a spreading disease or a watering problem. You have stronger confirmation when you also find brown liquid frass, shield-shaped adults, clustered nymphs, or egg masses on the undersides of leaves. If the tomato only has one symptom and no live insect evidence, keep the diagnosis provisional and compare it with the look-alikes below.
Identify the likely pest before you treat
“Stink bug” is a useful garden name, not a precise diagnosis. Many species feed on tomato fruit, and some insects that gardeners call stink bugs are actually leaf-footed bugs. The damage pattern overlaps, but the life cycle, markings, and response to control can vary by species and region. Treat the fruit symptom first, then identify the visitor as closely as you reasonably can.
Adult stink bugs have a broad, shield-like outline, six legs, and piercing-sucking mouthparts. They may be green, brown, mottled, or marked with red, yellow, or pink. The brown marmorated stink bug is a particularly common look-alike in some areas; NC State Extension says adults are mottled brown and can be recognized by pale bands on the antennae, while native brown stink bugs lack those bands. Do not assume every brown shield-shaped insect is the invasive species.
Adults, nymphs, and egg masses look different
Adults are the easiest stage to recognize by body shape, but they are also good at disappearing into dense tomato foliage. Nymphs are smaller, rounder, and often more colorful or patterned; they may gather near one another when young and spread out as they grow. Utah State Extension describes stink bug eggs as barrel-shaped clusters, commonly on leaf undersides, with roughly 10 to 30 eggs in a cluster. Brown marmorated stink bug egg masses may contain more, so count is a clue rather than a rule.
Look for three kinds of evidence rather than relying on color alone:
- The insect: a shield-shaped adult or a small, rounded nymph with a piercing beak.
- The eggs: a neat cluster of barrel-like eggs attached to a leaf, often tucked beneath foliage.
- The residue: tiny brown spots of liquid frass on fruit or leaves near feeding sites.
Some stink bugs are predators that eat caterpillars, aphids, or other insects. A predatory stink bug can be valuable in the garden, so do not destroy an unfamiliar insect solely because it has a shield shape. If it is sitting on a damaged tomato, has a beak inserted into fruit, or is surrounded by fresh cloudy spots, photograph it from above and below before removing it. A local extension office can often help with a regional identification.
How stink bugs create cloudy spot injury
The damage begins below the skin, which is why a tomato can look almost normal from a distance. As the bug feeds, cells around the puncture collapse and the tissue loses its normal translucent, juicy appearance. The wound may remain small, but the affected patch can become firm, pale, and irregular as the fruit grows and ripens.
Fruit age changes what you see. A very young tomato may stop developing or drop from the plant after feeding. A medium-sized fruit may continue to enlarge but develop scars, depressions, uneven color, or tough internal tissue. A nearly ripe tomato often shows a smaller cosmetic blemish, although a puncture can still become a point of entry for decay under wet conditions. Gardening Know How summarizes this maturity effect in its tomato stink bug damage guidance, while the University of Delaware’s crop update documents the white-to-yellow shift as fruit ripens.
The injury may also be delayed. NC State Extension notes that brown marmorated stink bug damage can take two to three weeks to become visible on some fruit. That is why removing every insect you see today will not erase yesterday’s damage, and why a clean-looking tomato should not be assumed to be safe just because no bug is sitting on it at the moment.
The four signs of stink bug damage
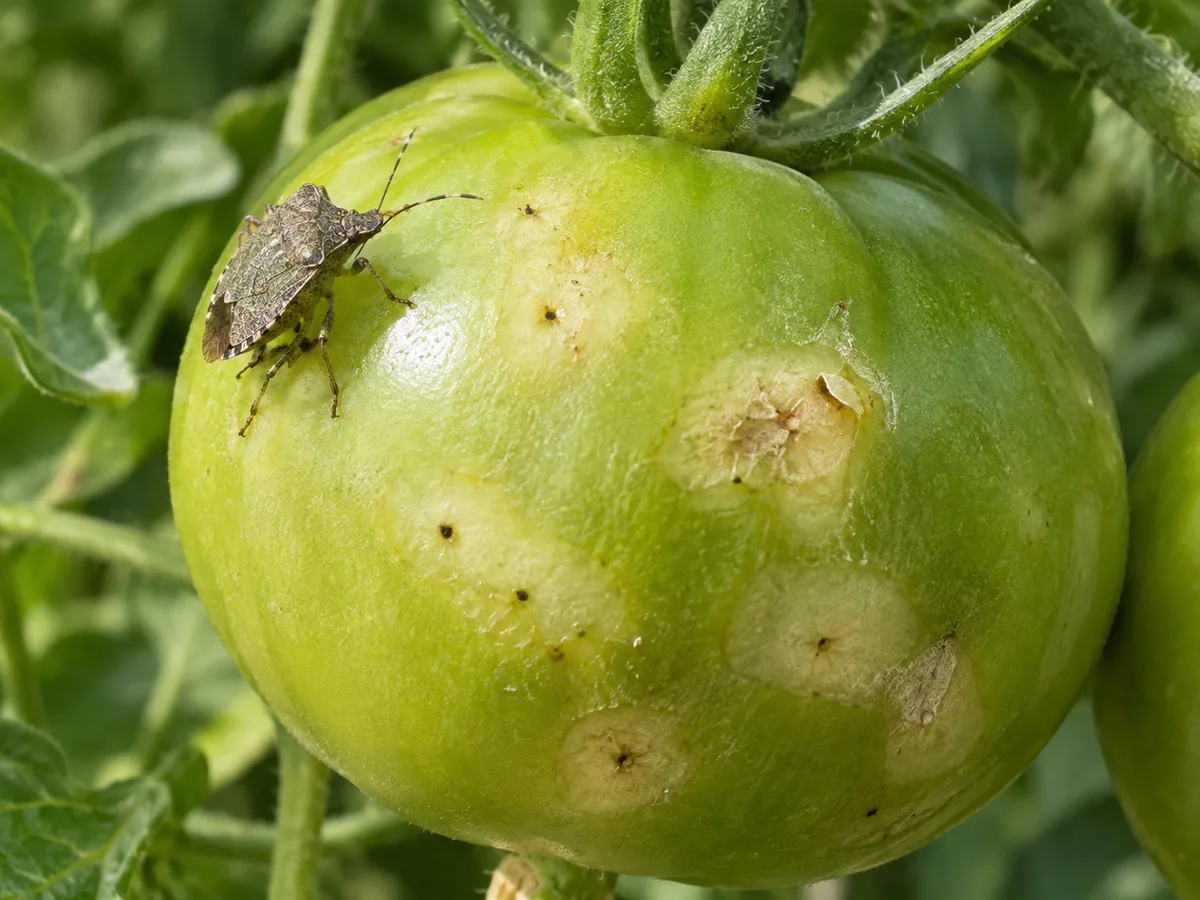
When you inspect the plant, look for a pattern across several fruit rather than one mark in isolation. The more signs that occur together, the more useful the diagnosis becomes.
Green fruit shows a pinprick and pale halo
On a green tomato, the earliest visible sign is often a tiny dark pinprick surrounded by a white, pale-green, or yellowish area. The border may be indistinct, so it does not look like a clean circular lesion. Under a fingertip, the spot can feel harder or slightly sunken than the surrounding skin.
The dark dot is the mouthpart entry point, not a typical caterpillar hole. If you slice the fruit through the affected area, the tissue just below the skin may look white, shiny, spongy, or cork-like. Delaware Extension reports individual cloudy spots from about 1/16 to 1/2 inch, with spots sometimes merging into a larger patch; home-garden fruit can vary, so use the internal texture and insect evidence too.
Ripe fruit develops yellow, hard, corky patches
As a damaged tomato colors, the pale green or whitish spot may turn yellow or golden while the rest of the fruit becomes red, orange, or pink. The patch can look like an area of uneven ripening, and the flesh below it may remain firm, dry, or corky instead of soft and juicy.
You may find several marks clustered near the shoulder or upper sides of the fruit, but location is not a guarantee. Stink bugs feed wherever they can reach suitable tissue, and dense foliage can hide fruit damage until harvest. If a discolored patch smells fermented, is wet and collapsing, or has visible mold, treat it as spoiled fruit rather than assuming the entire problem is merely cosmetic.
Other clues include small brownish frass spots on the fruit or nearby leaves, a cluster of blemishes on multiple tomatoes, misshapen young fruit, and fresh marks appearing on fruit at different stages. Foliage damage is usually less dramatic than fruit damage; a tomato plant can remain green and vigorous while the harvest quality declines.
Inspect a tomato plant in five minutes
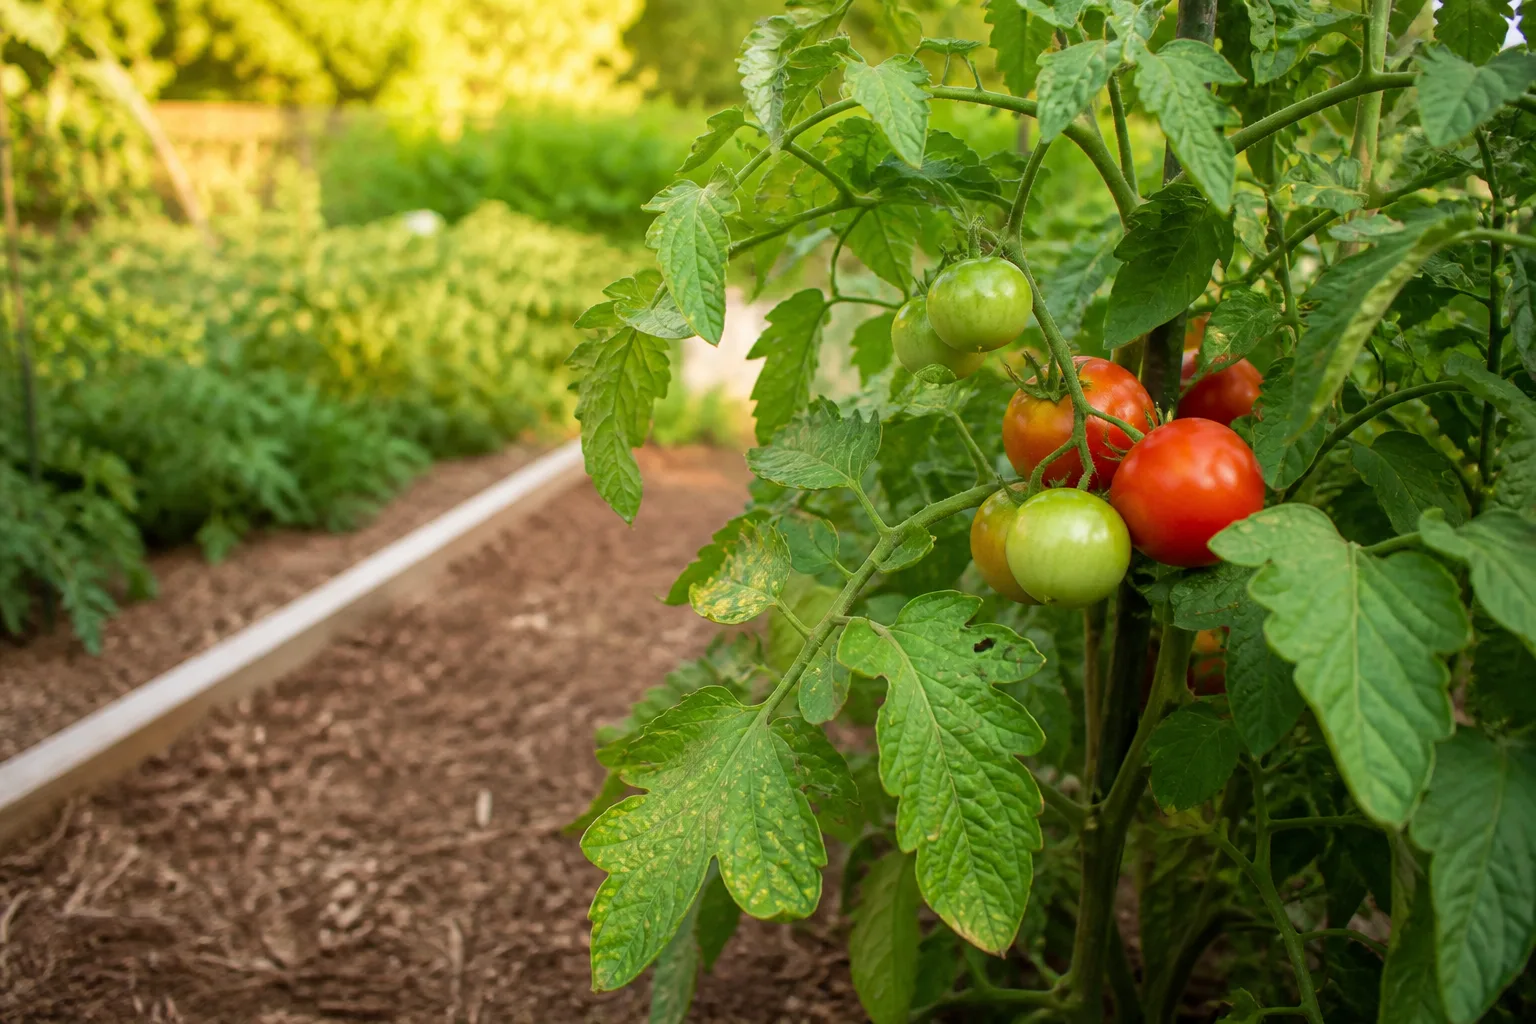
Scouting works best as a repeatable routine. Stink bugs can drop to the soil or move deeper into the canopy when disturbed, so a quick glance from the garden path often misses them. Inspect when the foliage is dry, carry a white tray or sheet of cardboard, and avoid crushing a suspected bug until you have checked its markings.
Check fruit, leaf undersides, and stems in that order
Start with the fruit because that is where the economic or eating-quality damage shows first. Lift each cluster gently and turn the tomatoes enough to see the shoulder, sides, and areas hidden by leaves. Mark or photograph suspicious fruit so you can tell whether the spots are enlarging or whether new fruit are being affected.
Next, inspect the undersides of leaves in the same clusters. Check along the midrib, near leaf joints, and around the green fruit rather than searching only on top of the foliage. Look for adults, small grouped nymphs, eggs, and brown frass. A small mirror can help with a large container-grown plant, but your fingers and eyes are usually enough.
Finally, follow the stems down toward the soil line and look beneath low foliage, mulch edges, weeds, boards, and nearby ground cover. Stink bugs can hide in the canopy by day and retreat to protected debris. If the damage is concentrated along the edge of your garden or next to a weedy border, inspect those areas first; both USU and UC IPM note that surrounding weeds and alternate hosts can support populations.
Use a shake test and record the pattern
Place a white cafeteria-style tray, shallow box, or sheet of cardboard under a branch. Tap or shake the foliage over it, then watch the tray and soil surface for moving adults and nymphs. UC IPM recommends beating or shaking vines because many stink bugs are not visible until the plant is disturbed; it also notes that bugs may be on the ground at different times of day.
For a home garden, treat the shake test as a trend tool rather than a magic number. Write down the date, plant location, number of adults and nymphs, egg masses, and fresh cloudy spots. Repeat on the same plants every few days during fruit development. A single adult after a windy day is not the same situation as several nymphs plus new injury on every inspection.
Commercial extension thresholds can provide perspective: UC IPM and USU describe roughly one-third to one-half of a stink bug per tray shake as a level associated with about 5% damaged fruit under particular production conditions. That figure is not a universal backyard prescription. Variety, fruit use, sampling method, region, and whether you can remove an infested branch all change the decision.
Separate stink bug injury from look-alike tomato problems
Tomatoes often show more than one problem at the same time. Weather, irrigation, disease, insects, and ripeness can overlap, so diagnose the pattern before treating the plant. These comparisons are especially useful when you see a spot but cannot find an insect.
Blossom-end rot, cracking, and sunscald have different patterns
Blossom-end rot begins at the blossom end—the end opposite the stem—and creates a dry, sunken, tan-to-black lesion. It is associated with inconsistent water supply and the plant’s inability to move enough calcium into rapidly expanding fruit, not with a puncture on the shoulder. A stink bug spot can occur anywhere, often has a tiny entry point, and may reveal hard, pale tissue below the skin.
Growth cracks split the skin in lines or concentric rings, usually after a rapid change in water availability. They are open fissures, not closed cloudy halos. Sunscald creates a bleached, papery, often sunken patch on the side exposed to intense sunlight, commonly after the plant loses protective leaf cover. It does not usually produce a dark pinprick or a cluster of frass.
| Problem | Typical location or pattern | What to check next |
|---|---|---|
| Stink bug feeding | Pale or yellow cloudy patches, tiny punctures, firm or corky tissue | Undersides of leaves, fruit clusters, frass, bugs, eggs |
| Blossom-end rot | Sunken dark lesion on the blossom end | Water consistency, root-zone stress, whether every affected fruit starts at the same end |
| Cracking | Open radial or concentric splits | Recent heavy rain or irrigation and rapid fruit swelling |
| Sunscald | Bleached papery patch on the exposed side | Missing foliage, intense direct sun, heat exposure |
Chewing pests and diseases leave different evidence
Hornworms, fruitworms, slugs, and beetles remove tissue with chewing mouthparts. They leave ragged holes, tunnels, frass piles, skeletonized leaves, or obvious bite marks. Stink bugs generally leave the skin intact and damage the tissue underneath, so an open hole should send you toward a different line of investigation unless decay has enlarged an original puncture.
Leaf spots caused by fungal or bacterial diseases are more likely to multiply across foliage, show defined margins, or affect leaves and stems before fruit in a broad pattern. Powdery growth on leaves is not cloudy spot fruit injury. Fine Gardening’s tomato diagnostic coverage is useful as a reminder to identify the affected plant part—leaf, stem, flower, fruit, or root—before choosing a cause or treatment. The same discipline prevents a spray aimed at insects from being used on a disease problem.
Leaf-footed bugs deserve special attention because they can produce similar cloudy fruit spots. They often have a more elongated body and may show expanded, leaf-like areas on the hind legs. If you cannot distinguish one from a stink bug, describe the damage as shield-bug or leaf-footed-bug feeding and send a clear photograph to your local extension service rather than claiming a species you have not confirmed.
Save the harvest and stop fresh damage
You cannot reverse a cloudy spot. The practical goal is to stop additional feeding, harvest fruit at a useful stage, and keep damaged tissue from spoiling beside healthy tomatoes.
Handpick insects and remove egg masses
For a small garden, hand removal is usually the best first move. Hold a cup or bucket of water with a little dish soap beneath the insect, then brush or drop the bug into the solution. Avoid crushing it on the plant; the odor is unpleasant, and crushing can smear residue over leaves and fruit. A hand vacuum can work on a large plant if you empty it promptly outdoors and do not use the same vacuum inside your home.
Remove egg masses by clipping the small piece of leaf that carries them or scraping them into soapy water. Do not casually destroy dark egg masses without looking at them: some may have been parasitized. UC IPM explains that naturally parasitized eggs can turn dark and may show irregular emergence holes. You will not identify every mass perfectly, but preserving suspiciously parasitized eggs can help keep beneficial control agents in the garden.
If young nymphs are clustered, act quickly and revisit the plant. Nymphs are generally easier to remove while concentrated, but new adults can fly in from surrounding vegetation. Handpicking reduces the local population; it does not create a permanent barrier around the garden.
Use sprays only when the label and timing fit
Skip homemade mixtures of dish detergent, essential oils, nicotine, vinegar, or kitchen ingredients on edible tomato plants. “Natural” does not mean non-irritating: improvised soap and oil concentrations can burn foliage, leave residues, harm beneficial insects, or fail to affect adult stink bugs. Use a product formulated and labeled for vegetables, and read the current label for tomatoes, the target pest, dilution, protective equipment, reentry interval, and preharvest interval.
Insecticidal soap is mainly a direct-contact tool for small, exposed nymphs, not a reliable adult stink bug solution. UC IPM specifically notes that thorough coverage is needed and that insecticidal soap is not effective against adults in its tomato guidance. Spray only when the label permits it, target the insects rather than coating the entire garden, and remember that a contact spray cannot reach bugs hidden inside a dense canopy.
Kaolin clay works differently. It leaves a mineral film that can protect fruit surfaces from feeding; UC IPM lists it as an organically acceptable option and notes that it does not kill stink bugs directly. It must be applied before or as fruit enters a susceptible stage, repeated according to the label after growth or rain, and washed from harvested fruit. The white coating is a trade-off, especially if you sell or display tomatoes.
If damage is severe enough to justify an insecticide, use only a product registered for your location and crop. NC State Extension lists active ingredients that may be used against brown marmorated stink bug in some home-garden contexts, but availability and labels change. Broad-spectrum products can kill pollinators, predators, and parasitoids while new stink bugs continue to fly in. Never spray open tomato flowers or flowering weeds, and do not infer a safe harvest date from a product used on another crop.

Prevent the next wave without losing beneficial insects
Prevention is less about finding a magic companion plant and more about making the crop easier to inspect and the surrounding habitat less favorable for a damaging buildup. Keep weeds from forming a dense border around the tomato patch, remove spent annual plants after the season, and clear loose debris that can shelter adults. UC IPM identifies weeds such as legumes, blackberries, Russian thistle, mustards, and little mallow as important hosts in some production regions; your local species mix may differ.
Space and support tomato plants so you can reach the fruit and see through the canopy. Overcrowding does not cause stink bugs, but it makes scouting and spray coverage worse. Water at the soil line, remove only unnecessary foliage, and avoid stripping every leaf because sudden sun exposure can create sunscald that looks like another fruit problem.
Floating row cover can exclude flying pests from young plants, but it is not a universal answer once tomatoes flower. The cover must be installed before insects are inside, secured at the edges, and removed when pollination is needed unless you are hand-pollinating or growing a self-fertile crop under a method that still permits fruit set. Use it strategically for a vulnerable establishment window, not as a substitute for scouting a mature fruiting plant.
Trap crops and flowering plants can help as part of a broader plan, but do not plant an unmonitored “trap” next to tomatoes and assume the insects will stay there. Corn, okra, mustard, sunflower, and other hosts may attract stink bugs as well as beneficial insects. A trap crop is only useful if it is separated enough to protect the tomato bed and checked frequently so you can remove or manage the concentration safely.
Natural enemies—birds, spiders, assassin bugs, predatory stink bugs, parasitic wasps, and other insects—are part of the system. Avoid routine broad-spectrum spraying when the evidence shows only a few pests. Inspect egg masses, provide small-flowered nectar plants where appropriate for your region, and accept a small amount of insect activity when fruit remains healthy. The goal is not an insect-free garden; it is fruit damage below the level you can tolerate.
Decide when the infestation needs escalation
Escalate your response when three facts line up: fresh cloudy spots are increasing, live stink bugs or nymphs are present, and physical removal is no longer keeping pace. If you see one damaged tomato late in the season but no insects, harvest and monitor before spraying. If every inspection finds new injury on green fruit, concentrate on the plant edges, nearby weeds, and egg masses immediately.
Your intended use matters. A backyard gardener may accept a few trimmed spots that a fresh-market grower cannot. Processed tomatoes may tolerate more cosmetic injury than fruit destined for a farmers-market display, but decay risk still matters. The one-third-to-one-half-per-tray figures published in extension materials are decision aids for specific sampling and production conditions, not a command to spray every time a bug lands on a plant.
Call your county or university extension service when the fruit symptom is widespread but you cannot find a pest, the insect does not match your field guide, plants are wilting or collapsing, or rot is spreading rapidly. Send a sharply focused photograph of the insect, the whole tomato plant, the fruit exterior, and a cut section of the affected tissue. Record when the spots appeared, the recent weather, and whether damage is concentrated on the garden edge. That evidence is far more useful than a picture of one blemished tomato with no context.
Conclusion
Stink bug damage on tomatoes is easiest to catch when you connect the fruit symptom to the insect evidence. Start with the pale cloudy spot and dark pinprick, check for firm or corky tissue beneath the skin, then inspect leaf undersides, egg masses, frass, and the soil below the canopy. Compare the pattern with blossom-end rot, cracks, sunscald, chewing injury, and disease before you treat.
For a small crop, handpick adults and nymphs, remove suspicious egg masses thoughtfully, clear hiding places, and protect new fruit only with products and barriers that fit the crop and timing. Damaged tissue will not heal, but a disciplined scouting routine can keep one blemished tomato from becoming a season-wide harvest problem.