How to Grow and Care for Tiger Lilies
Learn how to grow tiger lilies with the right planting depth, light, water, feeding, division, winter care, and lily-beetle prevention.
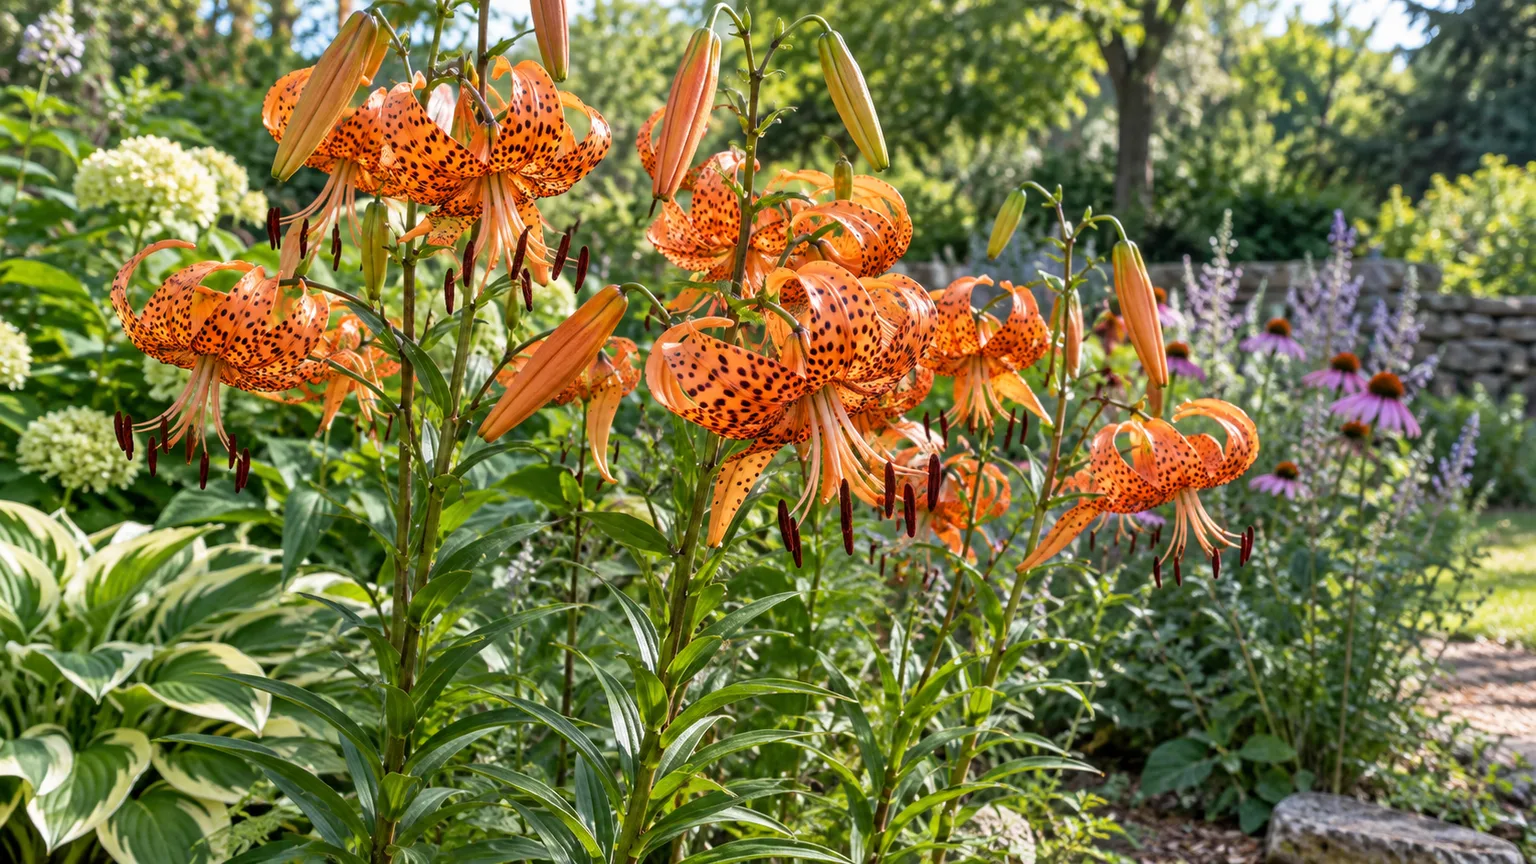
Tiger lilies (Lilium lancifolium, also sold under the older name Lilium tigrinum) are tall, clump-forming true lilies with recurved petals and dark spots. Their familiar orange flowers are the usual form, but cultivated plants can also carry red, yellow, pink, or white blooms. The stems return from perennial bulbs, often reaching 3 to 5 feet, and the flowers arrive in the middle or later part of summer.
The secret to reliable tiger lily care is not constant attention. It is getting three decisions right at the beginning: plant the bulb in soil that drains, give the stem enough light without baking the root zone, and keep the foliage intact until it has finished feeding the bulb. Once those conditions are in place, the plant is forgiving. A mature clump can handle a short dry spell, winter cold, and ordinary garden humidity, but it cannot negotiate with a soggy planting hole or a cat that chews a leaf.
Know the true tiger lily before you plant
Tiger lily is a true lily, not a daylily, and that distinction changes how you handle it. A true lily grows from a scaly bulb, carries leaves along a relatively upright stem, and produces flowers at the top. A daylily grows from a clump of fleshy roots, has a fan of leaves at the base, and sends up separate, leafless flower scapes. The orange flowers can look similar at a glance, but the underground structures and care are different.
The tiger lily’s small black or brown bulbils are another useful identification clue. They form in the leaf axils—the points where leaves meet the stem—and may drop to the ground to make new plants. That makes an established clump generous, but it also means a narrow bed can fill more quickly than expected. Remove the bulbils if you want to limit spread; collect them if you want inexpensive new plants and have patience for their slower development.
This is a herbaceous perennial. The foliage appears after winter, flowers during the warm season, and then retreats underground. Do not judge the plant’s health by its dormant winter appearance. The bulb is the long-term plant; the green stem is the season’s temporary solar panel.
Choose a site that keeps bulbs cool and dry enough
Start with the soil, not the flower color. Tiger lilies want even moisture during active growth, but their bulbs need air spaces around them. A low pocket that holds rainwater is a poor site even if it receives perfect sun. If a hole stays glossy with water several hours after a storm, plant on a raised mound or choose another location.
Light, soil, and spacing decisions
Aim for about six hours of direct sun, especially morning or gentle afternoon light. Tiger lilies tolerate partial shade, and afternoon shade is helpful in very hot climates, but deep shade usually produces weaker stems and fewer flowers. A practical compromise is sun on the upper plant and light shade over the soil surface from nearby, lower-growing perennials or a thin mulch layer.
Work compost into compacted ground, but do not turn the planting hole into a rich, water-holding bowl. Organic matter should improve structure across the bed, not form a saturated pocket around the bulb. A loamy, slightly acidic soil is a good target, yet drainage is more important than chasing a precise pH number. If your soil is heavy clay, a raised bed or broad mound is usually safer than adding a little sand to one hole.
Space bulbs so mature stems have air around them and nearby plants cannot trap wet foliage. A crowded clump is not automatically unhealthy, but crowding becomes a problem when leaves stay damp, stems lean into one another, or flowering declines. Leave enough room to see the plant’s base and dig it later if division becomes necessary.
Plant tiger lily bulbs for a strong first season
Plant firm bulbs as soon as possible after purchase, before their scales dry. Fall is an excellent planting window in regions where the ground remains workable; the bulb can make roots before winter and then use that head start in spring. Early spring is a sound alternative when bulbs arrive late or the soil was frozen. Avoid planting into cold, saturated ground simply to meet a calendar date.
Timing and planting depth
Use the bulb’s size as the depth guide rather than treating one number as universal. Set the pointed growing tip upward, place the bulb at roughly two to three times its height below the soil surface, and check the label if the seller gives a cultivar-specific recommendation. Deeper planting can help anchor tall stems and buffer the bulb from heat, but extremely deep, wet planting slows emergence and encourages rot.
Loosen the soil below the bulb so roots can move downward, then backfill gently without leaving air pockets. Water once to settle the soil, label the spot, and add a light mulch layer after the surface cools. Keep mulch pulled slightly away from the stem as it emerges; a thick, permanently wet collar around the base is an invitation to disease.
Watering in the establishment year
For the first growing season, check the soil with a finger or narrow trowel rather than using a fixed weekly schedule. Water deeply when the upper layer has begun to dry, then let excess drain. The aim is moisture at root depth, not a constantly wet surface. Newly planted bulbs need help while roots establish, but watering again into already saturated soil is not helpful care.
In a hot, windy site, the plant may need more frequent checks than one in a cool bed with mulch. Container-grown lilies dry faster than garden bulbs. Rain also counts: after a storm, test the soil before adding water. The clearest warning sign is not a single drooping leaf but a combination of soft yellow foliage, slow growth, and soil that remains wet for too long.
Build a simple seasonal care routine
Tiger lily care becomes easier when each season has one main job. Spring is for emergence and root-zone assessment, summer is for steady moisture and flower support, and fall is for letting the bulb reclaim nutrients before cleanup.
Spring emergence and feeding
As shoots appear, remove winter debris that is pressing against them and check whether runoff flows away from the planting site. A thin compost top-dressing is usually enough for an established clump. If soil testing shows a real nutrient deficiency, use a balanced, slow-release fertilizer according to its label, but do not assume more nitrogen means more flowers. Excess nitrogen can produce lush, floppy growth at the expense of sturdy stems and can increase salt stress around bulbs.
Stake only when necessary. A stake installed early, before the stem is tall, is less conspicuous and avoids pushing through the bulb later. Place it near—not through—the growth point, and tie the stem loosely with a soft material. A plant that leans toward light may need a better site next season rather than a tighter tie this season.
Summer flowering and moisture
Maintain consistent moisture while buds are developing and flowers are open. Water the soil at its base instead of repeatedly wetting the flowers and leaves, especially late in the day. A layer of organic mulch moderates temperature and evaporation, but the mulch should be airy and not piled against the stems.
Tiger lily flowers are generally unscented and can face downward as the petals curl back. The display can last for several weeks, but each individual bloom is temporary. Remove spent flowers if you want the bed to look tidier or want to prevent seed formation; cut just below the flower, leaving as much green stem and foliage as possible. Deadheading is optional and does not replace good light or healthy bulbs.
Fall cleanup and winter protection
The most important fall rule is to wait. When the lower leaves yellow after flowering, the plant is moving stored carbohydrates back into the bulb. Do not cut a still-green stem to the ground because it looks untidy. Remove the stem only after most or all foliage has turned yellow or brown, then cut near ground level with clean shears and remove diseased material from the bed.
In cold regions, a few inches of loose mulch over the site can buffer freeze-thaw swings. The bulb is better protected by well-drained soil than by a heavy blanket that stays wet. During dormancy, reduce irrigation sharply and make sure downspouts or winter runoff do not flood the planting area. A dormant bulb has little use for frequent water.
Keep tall stems attractive without weakening the bulb
Pruning a tiger lily is mostly a matter of timing. Remove broken or diseased leaves as soon as you notice them, deadhead flowers above the foliage, and delay the final cut until the stem has completed its seasonal work. Never strip healthy leaves simply because the lower part of the stem looks sparse.
If the lower leaves yellow while the upper leaves remain green, inspect the soil before reaching for fertilizer. Late-season lower-leaf yellowing can be normal, while early yellowing combined with wet soil suggests root stress. If only a few leaves show damage and the plant is flowering normally, remove those leaves cleanly and observe the pattern rather than treating the entire plant.
Grow tiger lilies in containers
Container culture works when the pot is heavy enough for tall stems, deep enough for the bulb and roots, and fitted with generous drainage holes. Choose a well-drained potting mix rather than garden soil, and never rely on a decorative cachepot to drain excess water. Set the container where it receives strong light and good air movement, but protect it from the hottest reflected afternoon heat if the pot becomes oven-hot.
The small root zone of a pot dries and warms faster than garden soil, so check it more often during active growth. Water thoroughly until it drains, then empty the saucer. Do not water by calendar if the mix is still wet at bulb depth. A pot that stays damp for days needs a better mix, better drainage, less frequent watering, or a brighter and more ventilated location.
Containers also expose bulbs to colder temperatures than the ground. In a cold winter, move the pot to an unheated but protected space, sink it into the ground, or insulate it while keeping drainage open. A warm indoor room is not automatically a better winter home: low light and excess warmth can disrupt dormancy and encourage weak early growth. Repot or divide when bulbs are tightly packed, roots circle heavily, or the pot dries unevenly—not merely because a certain number of years has passed.
Propagate from bulbils or divide mature bulbs
There are two useful propagation routes, and they serve different goals. Division gives you larger plants sooner. Bulbils give you more plants with less disturbance to the parent, but they need additional seasons before they flower.
To divide, wait until the plant is dormant or the foliage has naturally declined. Lift the clump carefully with a fork placed away from the stem, brush off enough soil to see the bulbs, and separate offsets without tearing roots unnecessarily. Replant firm bulbs immediately at the same depth, pointed end up, and keep the new sites lightly moist while roots reestablish. Discard bulbs that are soft, foul-smelling, or badly damaged.
To grow bulbils, collect plump ones from the leaf axils after they loosen or begin to drop. Plant them in a nursery pot or prepared bed with the root end down and only shallowly covered—around half an inch to an inch is a reasonable starting range for small bulbils. Keep the medium lightly moist, never waterlogged, and label the planting. They may make a small leaf the first season and take several years to reach flowering size.
Seeds are possible, but they are a slower and less predictable way to reproduce a named garden plant. Seedlings may differ from the parent, while bulbils and offsets are clones. If your goal is the same flower form in a new location, division or bulbils are the more practical choice.
Solve yellow leaves, weak stems, and missing blooms
Start with the timeline. A symptom that appears after flowering means something different from one that appears while buds are forming. Then check the root zone, the light pattern, and the undersides of leaves before changing fertilizer.
Separate normal senescence from stress
Yellow leaves late in the season, beginning low on the stem while the plant has already flowered, are often normal senescence. Keep watering modestly, let the foliage finish, and cut it only when it is spent. Yellowing early in the season, especially across many leaves with limp growth and wet soil, points more toward excess moisture or damaged roots.
Few or no flowers can result from too little light, a newly planted bulb still establishing, a clump that needs division, severe drought during bud formation, or premature cutting the previous year. Do not solve every non-blooming problem with fertilizer. A sunny site, intact foliage, and a bulb planted at a sensible depth are usually more important.
Floppy stems may reflect shade, excessive nitrogen, crowded growth, wind, or simply a tall variety that needs support. Add a discreet stake while stems are young, but also plan to improve light and drainage before next season. Brown leaf edges can follow drought, heat, salt buildup, or physical damage; inspect the soil and irrigation pattern rather than diagnosing from color alone.
Manage pests, disease, and virus risk
Inspect new growth and leaf undersides for aphids, and check the whole plant for holes or chewed edges. Lily leaf beetles and their larvae can strip leaves quickly; hand-pick adults and larvae when practical and use only a product labeled for lilies and the specific pest if further control is needed. Follow the label, protect pollinators, and do not spray open flowers indiscriminately.
Virus symptoms can include mottled or streaked leaves, distorted growth, and flowers that look unusually broken in color. Because viruses can move through sap, tools, or shared planting material, isolate a suspicious plant and avoid propagating from it. Clean tools between plants, remove severely affected material rather than composting it, and be cautious about passing bulbs to another gardener. A single strange leaf is not proof of a virus, but a repeating pattern across new growth deserves restraint and inspection.
Good spacing, base watering, removal of dead tissue, and clean tools reduce many avoidable problems. Avoid burying the crown under mulch, keeping the bed constantly wet, or moving soil from a diseased clump into a healthy one. Prevention is less dramatic than rescue, but it is much easier on a bulb that may take a full season to rebuild.
Protect cats and handle lily safety carefully
Tiger lilies are dangerous to cats. The ASPCA lists tiger lily among plants that can cause severe, potentially life-threatening kidney injury in cats, and pollen, leaves, petals, and water from a vase can all create exposure routes. Dogs and other animals do not face the same characteristic risk, but that is not a reason to let a pet chew any ornamental plant.
If a cat may have eaten any part of a tiger lily, treat it as an emergency: remove the plant, prevent further access, and contact a veterinarian or animal poison service immediately. Do not wait for symptoms such as vomiting, lethargy, or reduced urination. Wear gloves if you are sensitive to pollen, keep cut flowers away from food-preparation areas, and choose a truly cat-safe alternative for homes where separation is unreliable.
Tiger lilies versus daylilies and other lilies
Tiger lilies are often confused with orange daylilies because both can make a summer garden glow. The difference is visible in the plant’s architecture: tiger lilies have an upright leafy stem from a bulb, while daylilies have grasslike basal leaves and individual flowering scapes. Daylily flowers also open for about a day each, whereas a true lily carries several flowers on a leafy stem.
Within true lilies, tiger lilies are closest in care to many hardy Asiatic lilies: they appreciate sun, drainage, and a cool root zone, and they do not need the intensive feeding associated with forcing a container plant into bloom. Oriental lilies are often more fragrant and can be more particular about conditions. The label matters because “lily” describes a large group, not one universal care schedule.
Conclusion: let the bulb set the pace
Grow tiger lilies in a bright, well-drained site, plant bulbs with the tip up at a sensible depth, and water deeply enough to establish roots without leaving the bed saturated. Feed lightly, support tall stems only when necessary, and leave green foliage in place until it has finished returning energy to the bulb.
The most reliable improvement is usually not more fertilizer or more pruning. It is correcting the root zone, preserving the leaves, and responding to symptoms according to their timing. Divide crowded clumps while dormant, collect bulbils if you want patient propagation, and keep every part of the plant away from cats. With those habits, a tiger lily clump can return each summer with more stems and a better display than the year before.



