Poor Potting Setup on Marble Queen Pothos: Causes, Checks &
Quick answer
Poor potting setup on Marble Queen Pothos means the container, drainage, or mix keeps roots too wet, too dry, or short of air for this slow variegated vine. First step: empty all standing water and confirm water can exit the drainage holes within minutes.
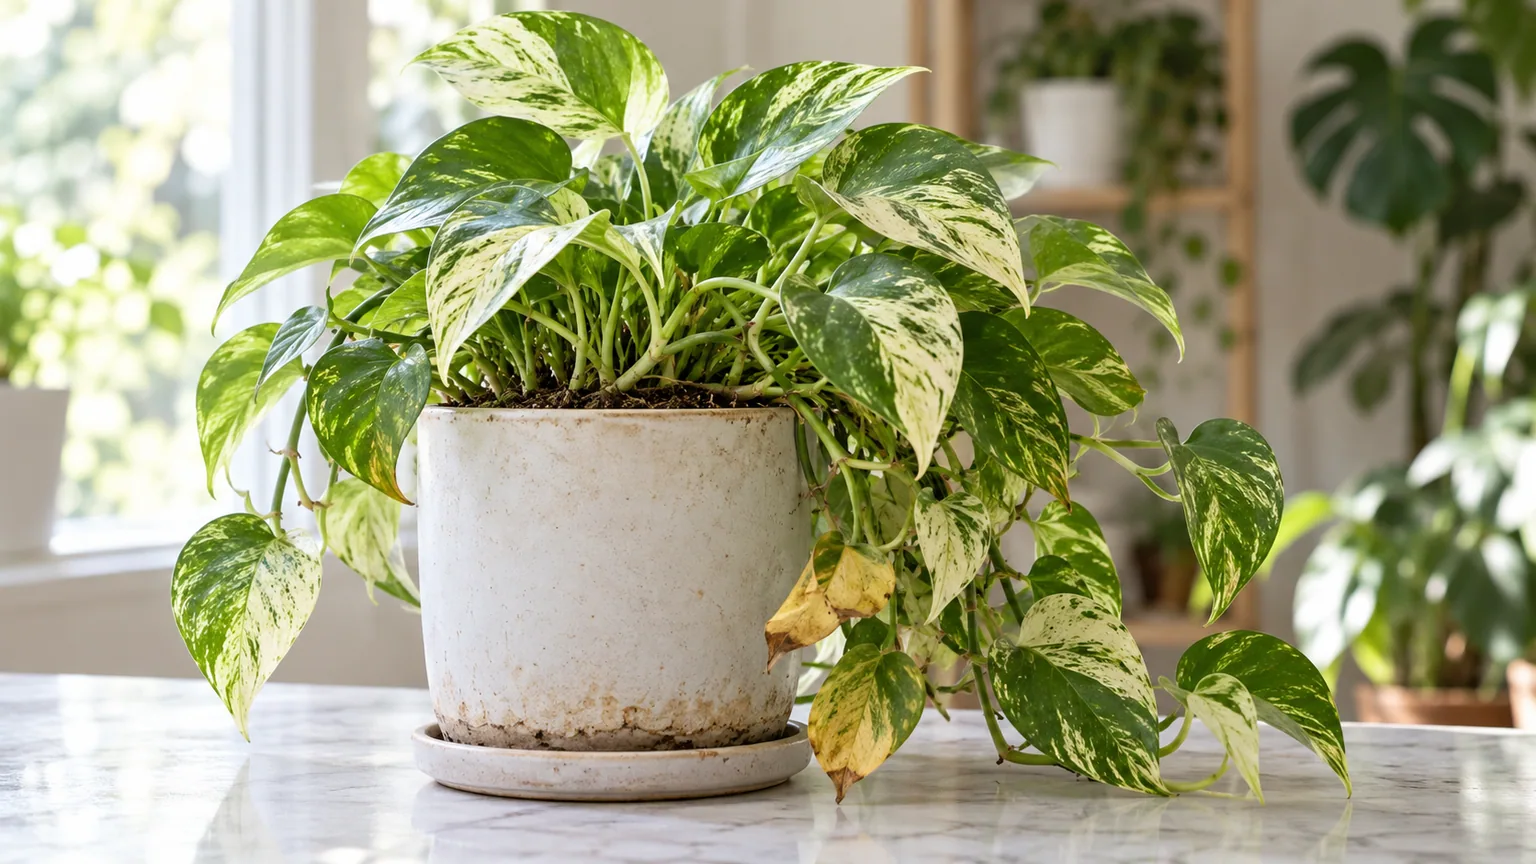
Poor Potting Setup on Marble Queen Pothos: Causes, Checks & Fixes
This guide covers poor potting setup on Marble Queen Pothos. See also the general Poor Potting Setup guide, watering, and light pages for this plant.
Poor Potting Setup on Marble Queen Pothos: Causes, Checks & Fixes
Quick answer
Poor potting setup on Marble Queen Pothos (Epipremnum aureum ‘Marble Queen’) means the container, drainage, or mix keeps this slow variegated vine’s roots too wet, too dry, or short of air. Typical faults stack together: no drainage holes, a nursery pot drowned inside a sealed cachepot, a container sized to the vines instead of the roots, dense peat with no perlite, or a crown buried under extra mix. Growth stalls, lower leaves yellow one by one, and the pot stays heavy far longer than the plant’s drinking pace justifies.
First step: empty all standing water and confirm water can exit the drainage holes within minutes. Water the pot once and watch — runoff should appear quickly and the saucer should be emptied within 30 minutes. Until drainage is open, no mix change or repot can work. For how faulty containers damage roots in general, see our poor-potting-setup symptom hub. On Marble Queen, the pattern usually shows up as stalled marbled tips plus a heavy pot in dimmer light than the variegation demands. Cultivar baseline lives in the overview; daily moisture rhythm in the watering guide.
Reviewed by the LeafyPixels Review Board against Clemson HGIC, NC State Extension, Penn State Extension, Missouri Botanical Garden, The Spruce, and Bob Vila guidance before publication.
What poor potting setup looks like on Marble Queen Pothos
The signature is a stalled vine in a pot that never behaves predictably. New marbled tips stop emerging for weeks even in the growing season. Lower leaves yellow and drop with a gentle tug while the mix still feels moist — oxygen-starved roots cannot move water, so the plant looks thirsty in wet soil. The pot feels cool and heavy many days after watering, the surface may crust, grow white mold, or attract fungus gnats, and water may sit visibly in the saucer or outer cachepot.
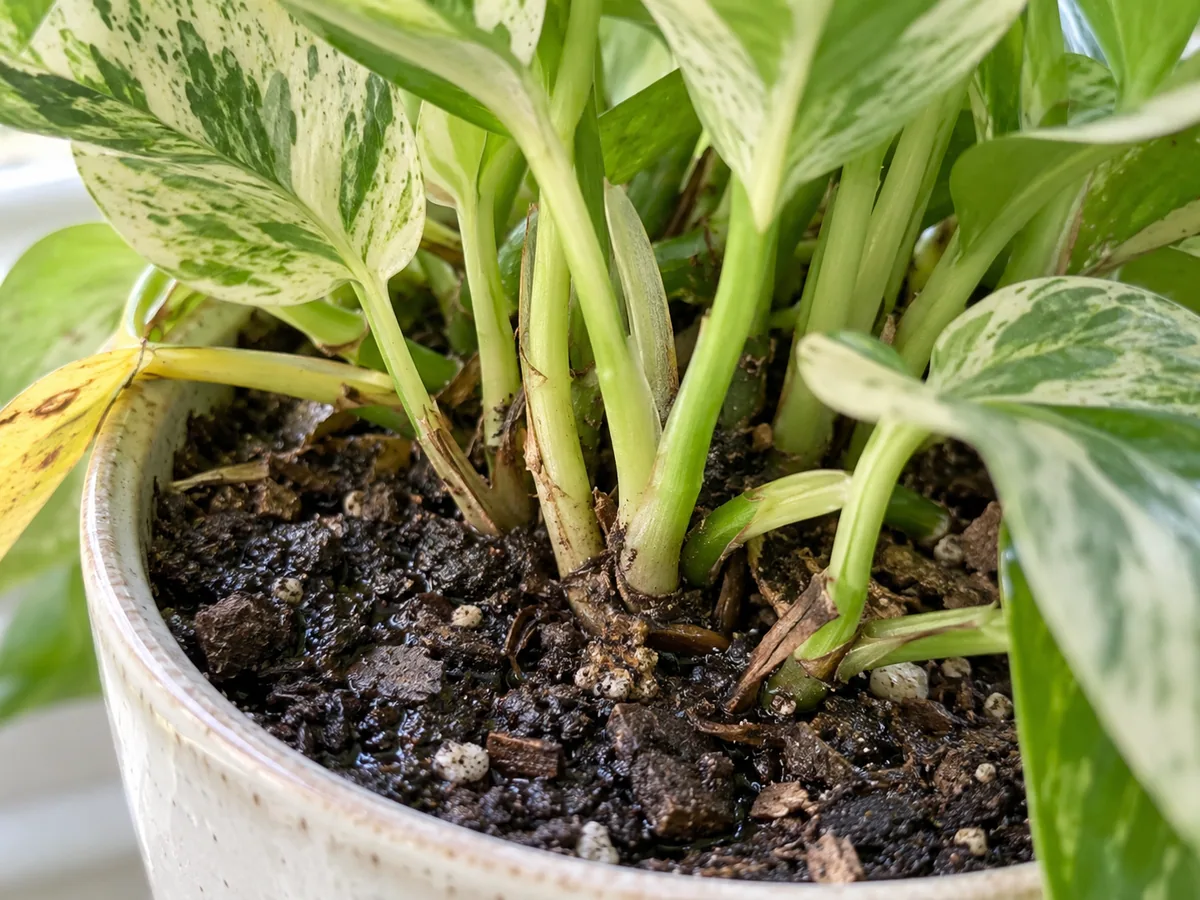
Dense compacted mix and poor drainage at the Marble Queen crown — compare with loose airy mix on a healthy plant.
White-marbled sections usually dull first because pale tissue photosynthesizes less and shows stress earlier, and new leaves may emerge smaller or greener. Check the crown where stems meet the mix: a buried crown stays damp and softens, while aerial root nubs along trailing nodes dry out and go brown when the setup swings between soggy and bone-dry. A healthy Marble Queen, by contrast, pushes firm variegated tips on schedule and its pot lightens noticeably within about a week of watering.
Why this slow variegated vine exposes bad potting fastest
Marble Queen drinks slowly. Its white-marbled sectors carry less chlorophyll than solid-green Golden Pothos foliage, so growth is moderate even in good light and water uptake lags behind a Golden in the same room. Any setup that holds extra water — an oversized pot, sealed cachepot, or dense peat — stays saturated days longer than the plant needs. NC State Extension directs growers to let the well-drained potting medium dry out between watering on Marble Queen, which is only possible when the container and mix actually drain.
Pothos habit makes sizing errors almost automatic. Buyers size the pot to the vines — two-foot trailers spilling off a shelf practically beg for a big statement container — but the pot must fit the root ball, not the vine length. Bob Vila warns that the new pot should be no more than 2 inches larger than the root ball, otherwise the plant turns susceptible to root rot. A long trailer can hide a teacup-sized root system, and that small root mass cannot drink a large volume of mix dry.
The third accomplice is peat collapse. Peat-based mixes compact over one to two years until water sheets off the top or pools while the core stays soggy — and Marble Queen’s repotting interval is every one to two years, so a plant that was “fine” can slide into chronic wet feet without any change in watering. Missouri Botanical Garden notes that pothos roots may rot in poorly drained soils, which is exactly what compacted peat plus blocked holes delivers.
How to confirm the cause
Work through these checks in order before changing several variables at once:
- Drainage-path test — Water the pot and time the runoff. Free flow within minutes means the path is open; a trickle, overflow over the rim, or no runoff at all means blocked or missing holes. This decides everything else.
- Standing-water check — Lift the nursery pot out of any cachepot or saucer. Standing water that has sat for days confirms a reservoir fault even if the inner pot drains.
- Root-ball fit test — Slide the plant out and compare roots to container. A small root ball swimming in excess mix points to pot too large; a solid brick of circling roots that sheds water instantly points to pot too small. Clemson HGIC advises repotting when roots show through drainage holes or the plant turns overcrowded and root-bound.
- Mix squeeze test — Squeeze a handful of moist mix. An airy Marble Queen mix with 20–30% perlite crumbles back open; dense peat stays in a wet clod. A sour smell means anaerobic decay has started — compare with compacted soil and wrong soil mix.
- Crown depth — The stem bases should sit at the surface, not buried under a centimeter of top-dressed mix. Buried crowns stay damp and soften first.
- Light and variegation — Fading marbling plus a heavy pot means a dim corner is slowing water use on top of the setup fault. NC State notes Marble Queen prefers bright, indirect light; cross-check the light guide before blaming the pot alone.
- Root condition — Firm pale roots mean correcting the setup will fix it. Brown mushy roots with a sour smell mean rot has begun — follow the root rot guide after the drainage rescue.
Lookalike symptoms
| Pattern | Leaf / vine look | Soil / pot | Likely cause | Next step |
|---|---|---|---|---|
| Stalled tips, heavy pot, blocked holes or cachepot reservoir | Lower leaves yellow one by one | Water cannot exit freely | Poor potting setup (this page) | Open drainage first |
| Small root ball in a large volume of damp mix | Stalled growth, wet outer ring | Roots fill under half the pot | Oversized container | Downpot → pot too large |
| Brick of circling roots, water runs straight through | Droop hours after watering | Root-packed, dries in a day | Undersized container | Pot up → pot too small |
| Dense sour peat, gentle watering still soggy | Dull marbling, surface mold or gnats | Compacted, no perlite visible | Bad mix structure | Refresh mix → wrong soil mix |
| Limp vines, wet soil, firm crowded roots in a right-sized pot | Bottom yellowing on a full pot | Correct size, watered too often | Overwatering habit | Dry-down → overwatering |
| Sour smell, fast-spreading yellow, soft base | Collapse from the base | Soggy, any pot size | Advanced root rot | Unpot now → root rot |
| Wilt within days of moving to fresh mix | Limp after repotting | Fresh oversized mix, soaked once | Repotting shock | Stabilize → repotting stress |
First fix for Marble Queen Pothos
Empty all standing water and restore an open drainage path today.
Lift the nursery pot out of its cachepot or saucer, pour off every bit of collected runoff, and confirm holes are open — poke clear roots or debris blocking them. Do not fertilize, prune hard, or repot on the same day. One targeted correction first, so you can read the plant’s response.
Step-by-step recovery
Once water can exit freely, work through the remaining faults in this order:
- Dry to the checkpoint — Hold all water until the top 3–5 cm of mix dries. Penn State Extension’s rule is to water when the soil is dry, since too much water leads to root rot — a pot that never reaches dry is still telling you something is wrong.
- Fix the size mismatch — If the root ball fills less than half the pot, downpot into a container only 1–2 inches wider than the roots; The Spruce recommends moving pothos into a container just one or two sizes larger with sufficient drainage. If roots are a solid circling brick, pot up one size instead.
- Rebuild airy mix — Use standard potting mix with 20–30% perlite at pH 6.0–6.5. Clemson HGIC recommends an airy, well-draining soil mix for pothos — peat alone compacts and suffocates Marble Queen’s fine roots within a season or two.
- Unpot and inspect — Shake and rinse old mix from the roots. Trim brown or mushy roots with sterilized scissors, keeping firm pale ones. Wear gloves and keep trimmings away from pets: all pothos parts contain calcium oxalate crystals that irritate mouths, and pothos is toxic to cats and dogs.
- Replant at the same depth — Settle the root ball so stem bases sit at the surface, never buried. Water once lightly to settle the mix, then stop — Penn State Extension cautions that excess water upon repotting adds additional stress.
- Save insurance cuttings — If the base looks doubtful, snip firm variegated nodes and root them in water. Pothos nodes root readily, so a failing pot never has to mean losing the cultivar — see the propagation guide.
- Hold fertilizer — Skip feeding until new marbled leaves have grown cleanly for two weeks. Fertilizer cannot compensate for a root zone that is still rebalancing.
Recovery timeline
Mild cases — firm roots, just stalled growth and a heavy pot — often stabilize within two to four weeks of correction, with fresh marbled tips the proof. Judge success by new variegated growth and a pot that lightens within about a week of watering, not by old yellow leaves turning green again; they will not.
If you trimmed significant rot or rebuilt most of the root zone, recovery may take a full growing season, and vines may need pinching back to encourage bushy regrowth per the pruning guide. Warm bright indirect light shortens every timeline; cool dim rooms stretch them.
Mistakes to avoid
- Do not leave the nursery pot sitting in a sealed cachepot “for humidity” — it becomes a reservoir that drowns roots.
- Do not size the new pot to the vine length — size it to the root ball, 1–2 inches wider, no more.
- Do not bury the crown under fresh mix when topping up — damp stem bases soften first.
- Do not water on a calendar schedule in a corrected pot — let the top 3–5 cm dry first, since Marble Queen drinks slower than solid-green pothos.
- Do not stack drainage rescue, hard pruning, repotting, and fertilizing in the same week on a stressed vine.
- Do not use a pot with no drainage holes as a permanent home — drill holes or treat it as a temporary sleeve only.
Marble Queen care cross-check
Pair the corrected setup with the basics this cultivar needs: bright indirect light strong enough to hold white marbling, standard potting mix with 20–30% perlite, open drain holes, and reduced winter watering when growth slows. A trailing Marble Queen in a small hanging basket dries far faster than one in a deep cachepot on a dim shelf — adjust checks to your setup. Full rhythm detail lives in the watering guide, mix detail in the soil guide, and container method in the repotting guide.
How to prevent poor potting setup next time
Always buy the pot for the roots, not the vines. Move up one size only when roots circle the pot or water runs straight through a root-packed container. Always empty saucers and cachepot reservoirs within 30 minutes of watering. Refresh peat-based mix every one to two years before it compacts into a sponge. If fungus gnats or surface mold appear, treat them as a moisture warning — see fungus gnats on Marble Queen and mold on soil — and lengthen the dry-down interval before reaching for sprays.
When to worry
Unpot immediately — do not rely on drying alone — if stems soften at nodes, several leaves yellow within a week, the mix smells rotten, or the base collapses. At that stage, follow the root rot guide and salvage variegated node cuttings in water as insurance. If the entire root ball is mushy, restarting from cuttings is more realistic than expecting the original pot to rebound.
Related Marble Queen problems
Use this page when the container, drainage, or mix is the fault. Follow the link that matches what you confirmed:
- Marble Queen overview — cultivar baseline and Golden Pothos comparison
- Marble Queen problems hub — browse all common issues on this species
- Pot too large on Marble Queen — container dwarfs the root ball
- Pot too small on Marble Queen — the opposite sizing error
- Root rot on Marble Queen — mushy roots, trim, and salvage cuttings
- Overwatering on Marble Queen — wet-soil stress in a right-sized pot
- Underwatering on Marble Queen — dry wilt versus wet-pot stall
- Wrong soil mix on Marble Queen — dense mix structure deep-dive
- Compacted soil on Marble Queen — aged peat that holds water like a sponge
- Yellow leaves on Marble Queen — symptom deep-dive and lookalike table
- Marble Queen watering — prevention rhythm once rescue is complete
- Marble Queen soil — airy mix that forgives small sizing errors
Conclusion
On Marble Queen Pothos, poor potting setup is a root-zone system fault — drainage, container size, and mix structure acting together on a slow variegated drinker — not a single watering mistake. Open the drainage path first, size the pot to the root ball in airy perlite mix, keep the crown at the surface, and pair the fix with enough light that the plant actually uses water. Recovery shows up in new marbled tips and a pot that dries on schedule.
How we wrote and verified this guide: Recommendations were checked against Clemson HGIC, NC State Extension, Penn State Extension, Missouri Botanical Garden, The Spruce, and Bob Vila references cited inline. Author: sai-ananth. Reviewer: LeafyPixels Review Board. Methodology: plant problem guidance is reviewed against botanical references, extension resources, and LeafyPixels plant-care data before publication. Claims validation: claims-validator-v1 pass with inline external links documented below. Last reviewed: 2026-09-02.
When to use this page vs other Marble Queen Pothos guides
- Marble Queen Pothos watering guide — Use for routine moisture checks before assuming the pot itself is the main issue.
- Marble Queen Pothos problems hub — Browse all common issues on this species.
- Root Rot on Marble Queen Pothos — Different entry point when mushy roots or sour smell dominate.
- Yellow Leaves on Marble Queen Pothos — Different entry point when yellowing is the main symptom.
- Overwatering on Marble Queen Pothos — Different entry point when the pot setup is right but watering is too frequent.
Related Marble Queen Pothos guides
- Marble Queen Pothos overview
- Marble Queen Pothos watering
- Marble Queen Pothos light
- Marble Queen Pothos soil
- Marble Queen Pothos repotting
- Marble Queen Pothos propagation
- Root Rot on Marble Queen Pothos
- Overwatering on Marble Queen Pothos
- Pot Too Large on Marble Queen Pothos
- Pot Too Small on Marble Queen Pothos
- Marble Queen Pothos problems
Related tool
Use the Plant Problem Diagnosis Tool to narrow causes for poor potting setup on this plant before changing multiple variables at once.