Black Spots on Spider Plant: Causes, Checks & Fixes
Quick answer
Black spots on Spider Plant are usually fungal or bacterial leaf spot on wet strap-shaped leaves, or soft dark patches from chronically wet mix rotting tuberous roots—not fluoride tip burn. First step: stop misting and overhead watering, then note whether spots are dry and single or wet with yellow halos and spreading.
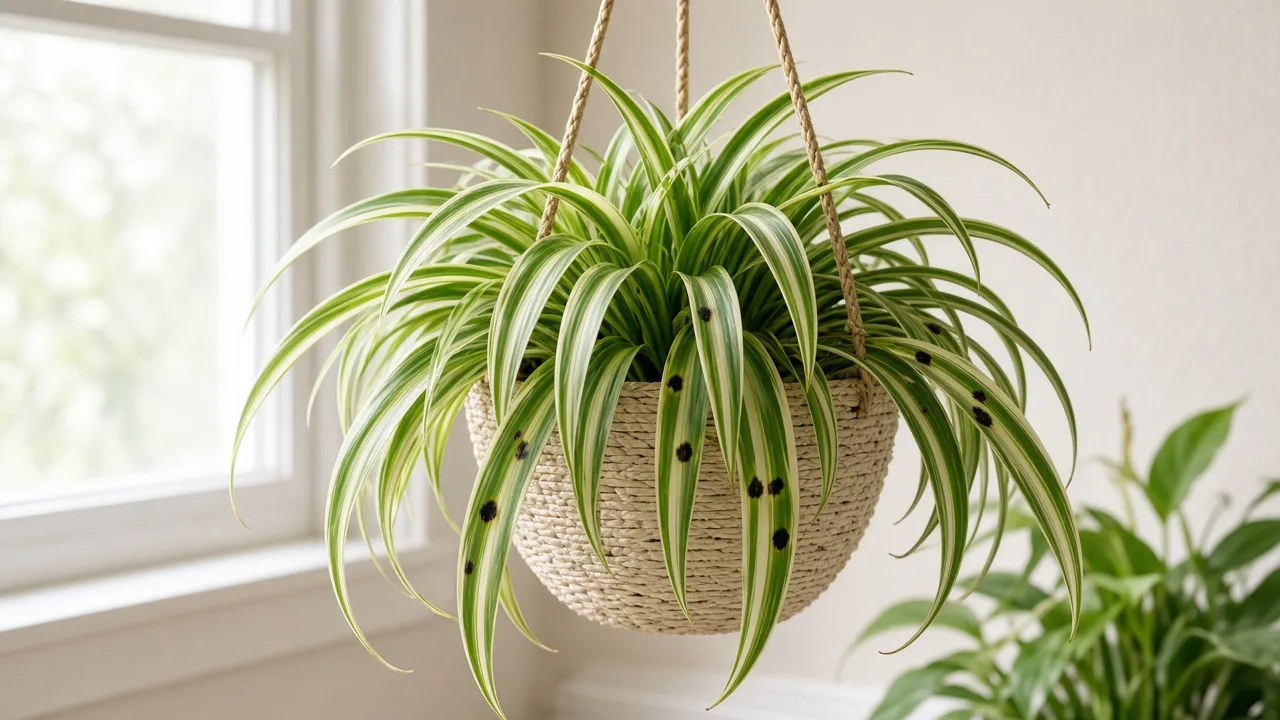
Black Spots on Spider Plant: Causes, Checks & Fixes
This guide covers black spots on Spider Plant. See also the general Black Spots guide, watering, and light pages for this plant.
Black Spots on Spider Plant: Causes, Checks & Fixes
Quick answer
Black spots on Spider Plant (Chlorophytum comosum) are localized tissue death—small patches where a strap-shaped leaf has died and turned dark brown to black. On this arching, clump-forming species, the pattern usually splits two ways: wet spots with yellow halos on mid-leaf tissue point to fungal or bacterial leaf spot after foliage stays damp, while soft dark patches starting at the crown or base of older blades often track chronically wet mix rotting thick tuberous roots instead. For general spot-disease mechanics, see our black spots guide. On Spider Plant, long arching blades hang below the pot rim into the splash zone, and overhead misting in a dim corner keeps channelled strap leaves wet longer than smooth succulent foliage.
A few isolated dry black marks from physical damage are cosmetic. Spreading wet-looking spots on multiple blades and spiderettes need action the same week—not extra fertilizer.
First step: stop wetting foliage and improve airflow around the arching canopy. Water at soil level only, empty saucers, and give hanging baskets room to breathe. Then decide whether you are dealing with leaf-surface pathogens, overwatering, or tuber failure at the crown—see root rot when the base feels soft on damp mix.
When to use this page vs other Spider Plant guides
| Your question | Best page |
|---|---|
| Dark spots on leaf blades | This page |
| Brown or black tips only, no mid-leaf circles | Brown tips |
| Whole leaves yellowing on wet soil | Overwatering |
| Mushy tubers, sour smell, wilt on wet mix | Root rot |
| Crisp dry patches after south-window sun | Brown leaves |
| Fine stipple with webbing on arching blades | Spider mites |
| White crust on soil surface | Mold on soil |
What black spots look like on Spider Plant
Healthy Spider Plant leaves are firm, strap-shaped, and often striped green-and-white. Black spotting breaks that pattern in recognizable ways:
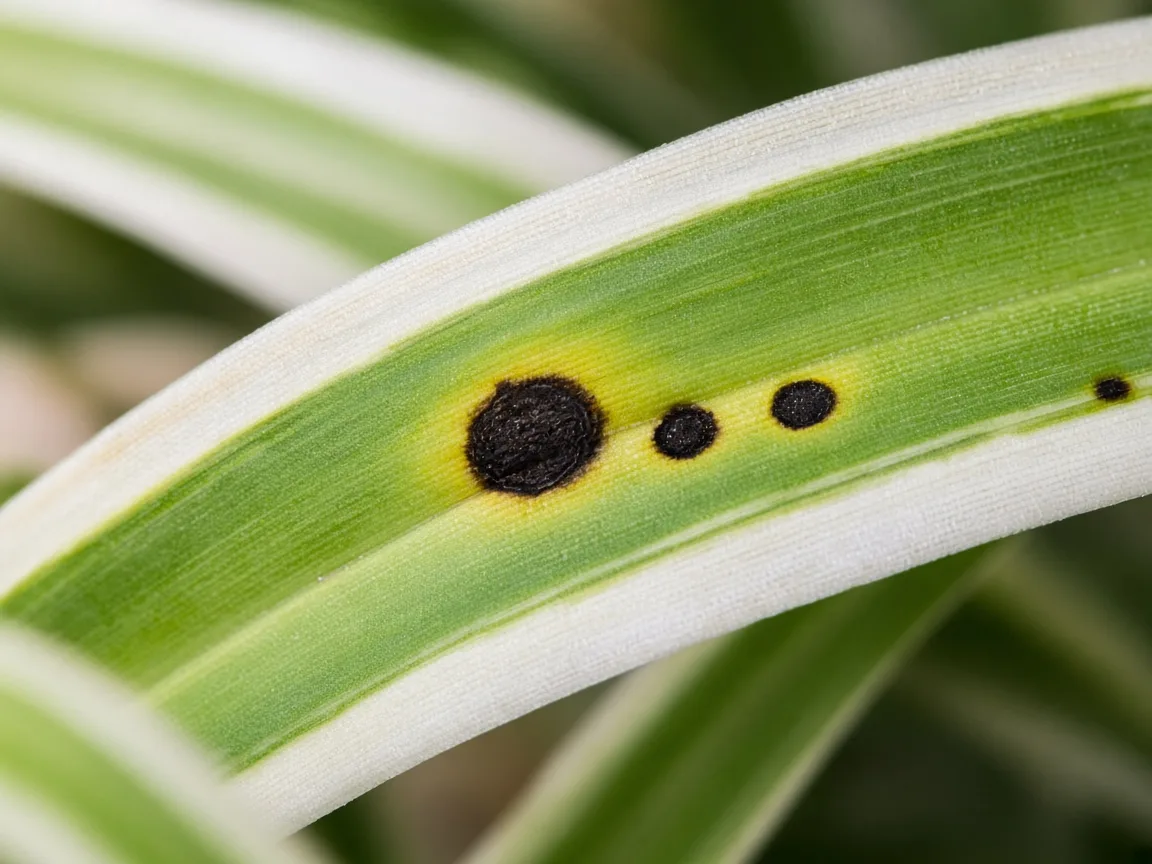
Black spot lesions on Spider Plant—compare wet halos and lesion edges with healthy green-and-white tissue on the same blade.
- Small dark brown to black circles with yellow halos — Often start water-soaked, then crisp at center. Classic fungal or bacterial leaf spot on wet foliage.
- Irregular soft black patches on lower arching blades — Lesions spread when humidity stays high and channelled leaves hold moisture overnight, especially on blades draped over pot rims.
- Dark mushy tissue at the crown or leaf base — Wisconsin Extension notes overwatering in poorly drained soils can lead to root rot on spider plants; lower blades blacken from the base upward while mix at 2 inches depth stays damp for days.
- Single dry black mark, no halo, no spread — Bumping, pet damage, or a healed mechanical wound on one strap. Stable for months.
- Stippled darkening with fine webbing — Spider mites in dry winter rooms—not classic leaf spot.
- Black smear that wipes off — Sooty mold on sticky honeydew from scale or mealybugs, not fixed lesions inside the leaf.
Spots on new leaves emerging from the central crown or young spiderettes on trailing stolons are more urgent than one old mark on the lowest outer blade.
Why arching strap leaves get black spots on outer blades first
Spider Plant is usually grown as a hanging mound with long arching blades, not an upright rosette. That growth habit changes where spots start:
Soil splash on hanging blades. Outer strap leaves rest near the pot rim or saucer. Water running off dense peat, mold on soil debris, or overflow from a cachepot splashes onto channelled blades and carries fungal spores from the surface.
Channeled leaf shape holds moisture. Each strap leaf folds slightly down the middle. Misting or shower-rinsing foliage in a north-facing room keeps the groove wet long enough for leaf-spot pathogens to germinate—especially on variegated white sectors that dry slower than all-green tissue.
Dim corners slow drying. Spider Plant tolerates medium to bright light but transpires slowly in deep shade. Wet blades in low light stay damp overnight—the exact culture leaf spot favors.
Why spiderettes on stolons show spots before the mother crown
Spider Plant spreads by trailing stolons with baby plantlets at the tips. Those spiderettes are diagnostic real estate:
Stolons sit in the airflow dead zone. Plantlets and their small leaves hang below the main mound where air is still and humidity pools. A mother rosette can look clean while spiderettes on the same stolon develop wet halos first.
Shared vascular supply moves pathogens. Bacterial spotting can travel along a stolon from an infected plantlet back toward the crown. If only spiderettes spot while inner mother blades stay clean, isolate the plant and inspect the full stolon length before trimming just the babies.
Propagation pause during active disease. Do not root spotted spiderettes in water or soil until at least two weeks pass with no new lesions on emerging tissue—otherwise you multiply the infection into your collection.
Tuberous root stress vs leaf-surface disease
Spider Plant stores water in thick fleshy roots and rhizomes at the crown. That anatomy separates two black-spot lookalikes many generic articles merge:
Leaf-surface pathogens create discrete round or oval lesions scattered across the mid-blade, often with yellow halos. Tissue feels papery or greasy but the crown stays firm. Fix culture first—dry foliage, airflow, sanitation.
Tuber stress from chronic wet mix produces soft, irregular dark patches starting at the base of older lower blades and moving up. Press the crown gently: mushy rhizomes on a heavy wet pot mean overwatering and possible root rot—fungicide on leaves will not fix anaerobic roots.
Wisconsin Extension describes thick roots evolved to store water through dry periods—which makes spider plants forgiving of missed drinks but vulnerable when soil stays saturated for days.
Why Spider Plant gets black spots
Fungal leaf spot
Fungal spores germinate on persistently wet leaves and create brown to black lesions, sometimes with yellowish margins and tiny black fruiting dots in dead tissue. Splash from infected soil or shared watering cans spreads spores between pots on a shelf.
Bacterial spotting
Bacterial infections produce water-soaked spots that may show yellow halos and can spread quickly in warm, humid, stagnant air. Contaminated pruning tools or wet leaves at night move bacteria along shared arching blades and stolons.
Overwatering and crown blackening
This is the spider-plant-specific branch many generic spot articles miss. When owners water on a calendar instead of the top-2-inch dry-down check, tuberous roots stay saturated. Root rot and blackening lower leaves follow—the patches look like edge rot but track back to oxygen-starved rhizomes, not airborne leaf pathogens.
Fluoride tip burn is usually not mid-leaf black spots
Spider Plant is particularly sensitive to fluoridated water among common houseplants. Fluoride and salt damage typically show as tan-to-brown crispy tip necrosis on strap margins—not scattered black circles on the mid-blade. If every leaf tip burns but the middle stays clean, use the brown tips guide instead of this page.
NC State advises avoiding tap water because chlorine and fluorides cause leaf tip burn on this species—relevant when spots are tip-only, not haloed mid-leaf lesions.
Environmental blackening
Direct sun after a dim corner move can scorch patches dry and crisp—NC State notes spider plant is intolerant of direct sunlight. Cold drafts on exposed hanging strands near winter windows can darken tissue. Compare with brown leaves if spots follow a light or temperature shock, not misting.
Pest and honeydew stains
Scale and mealybugs leave sticky residue that grows sooty mold—black smear that wipes off differs from fixed lesions inside the leaf. Check leaf axils at the crown and along stolons where new blades emerge.
How to confirm the cause
Work through these checks before repotting or spraying:
- Spot texture — Wet, greasy, or water-soaked margins suggest active disease. Dry, papery black patches suggest sun, cold, or old mechanical damage.
- Halo presence — Yellow ring around a dark center fits pathogen spotting.
- Location on the plant — Spots clustered on lowest arching blades after top watering point to splash; random spots on mid-blade new growth with misting habit point to wet-blade culture.
- Spread rate — New spots weekly on multiple blades = disease or pest. One mark stable for months = mechanical.
- Soil moisture at 2 inches — Wet for many days after one drink plus base blackening fits overwatering more than airborne fungus.
- Crown and tuber test — Slide the plant partly out of the pot. Firm white or tan rhizomes support leaf-spot culture fixes. Brown mushy tubers on wet mix mean root triage.
- Underside inspection — Webbing, thrips silvering, or scale bumps differ from uniform round lesions.
- Spiderette check — Spots only on stolon plantlets suggest splash or stolon-level infection; crown-only spots with dry spiderettes point elsewhere.
First fix for Spider Plant
Stop wetting foliage and increase airflow—then remove the worst spotted blades with clean tools.
That single environmental correction slows most leaf-spot spread before you reach for sprays.
- Switch to soil-level watering only when the top 2 inches of mix are dry; water early in the day so incidental splash dries quickly.
- Lift arching blades off saucers and pot rims so outer leaves are not bathing in runoff.
- Space hanging baskets away from walls and crowded shelves; run a fan on low if air is stagnant.
- Prune heavily spotted blades into a sealed bag; disinfect pruners between cuts if you have multiple plants.
- Avoid misting until at least two weeks pass with no new spots on emerging leaves or spiderettes.
Do not fertilize spotted, stressed foliage on day one. Do not repot unless the crown softens or a tuber spot-check shows mushy tissue.
Step-by-step recovery
Active leaf spot (spreading wet lesions)
- Isolate from dense plant shelves if your collection is large.
- Remove worst affected blades; keep partially green straps if spots are few and stable.
- Water at soil line; keep saucers empty.
- Wipe dust from remaining leaves with a damp cloth, then let surfaces dry fully.
- Monitor new leaves at the crown and clean spiderettes weekly—they should open without fresh spots within two to three weeks.
- If spread continues, use a species-safe fungicide or bactericide labeled for ornamental foliage per product directions after removing infected tissue.
Base blackening on wet soil
- Stop watering until the top 2 inches of mix are dry throughout the pot.
- Confirm drainage holes are open and no cachepot is holding water.
- Move to brighter indirect light if the plant has been in deep shade—faster photosynthesis helps mix dry evenly. See not enough light if the mound is pale and stretched.
- Follow the full overwatering protocol if yellow lower blades and limp arching leaves accompany base blackening.
Salvage when outer blades are heavily spotted but the crown is firm
Spider Plant propagates easily from spiderettes with aerial roots. If outer arching sections are more than half spotted but firm green tissue remains at the crown, detach clean plantlets from unspotted stolon tips, root in water or moist mix, and quarantine new starts before returning them to the main collection. Discard the mother plant if the crown feels soft and tubers collapse—see root rot for trim-and-repot steps.
Recovery timeline
Environmental correction alone: New spot formation should slow within seven to ten days; clean new blades at the crown within two to three weeks.
After pruning plus dry foliage culture: Existing black tissue remains visible permanently until you trim that blade or it is eventually replaced by new growth from the crown.
Worsening: Spots on every new leaf within a week, soft crown on wet mix, sour soil, or widespread base collapse mean layered root problems—escalate beyond leaf-spot protocol.
Lookalike symptoms
| Pattern | Likely cause | Page |
|---|---|---|
| Wet spots with yellow halos, spreading | Leaf spot pathogens | This page |
| Base blackening, wet heavy pot | Overwatering | Moisture triage |
| Mushy tubers, sour smell | Root rot | Root inspection |
| Tip-only tan or brown necrosis | Fluoride / salt | Brown tips |
| Dry crisp patches after sun move | Light injury | Brown leaves |
| Fine stipple + webbing | Spider mites | Pest rinse first |
| Dry single mark, stable | Mechanical damage | Monitor only |
| Black smear that wipes off | Pest honeydew / sooty mold | Scale or mealybugs |
What not to do
Do not mist heavily to “help humidity” while spots are spreading—channelled spider plant blades stay wet too long in low light. Use a humidifier or pebble tray instead.
Do not compost infected spider plant leaves indoors; bag and discard.
Do not share unclean pruners between spider plants on a propagation shelf.
Do not assume fungicide alone fixes chronically wet leaves or calendar watering without changing habits.
Do not confuse fluoride tip burn with mid-blade fungal spots—water-quality fixes help the first; dry foliage culture fixes the second.
Do not root spotted spiderettes into your collection while active lesions are still spreading on the mother plant.
How to prevent black spots next time
Water at soil level when the top 2 inches of mix are dry. UF/IFAS recommends allowing the upper inch of soil to dry briefly between waterings—spider plants use moisture steadily but hate saturated rhizomes. Use well-draining general-purpose mix so saucer splash is less frequent. Keep spider plants in bright to medium indirect light with good air movement—leggy dim corners slow drying. Use a humidifier instead of foliar misting for dry winter air. Remove fallen leaf debris from the pot surface. Quarantine new plants before placing them beside a hanging specimen.
When to worry
Urgent when spots appear on most new leaves within days, lesions merge across half a strap blade, the crown blackens and softens on wet mix, or lower blades collapse while soil stays damp for a week. A single stable mark on one outer arching leaf with firm tubers and appropriate dry-down is low urgency.
Related Spider Plant guides
- Spider Plant overview
- All problems hub
- Watering guide
- Light guide
- Overwatering
- Root rot
- Brown tips — fluoride and salt tip necrosis, not mid-blade spots
Use this page when you see discrete dark lesions on strap-shaped blades and need to separate wet leaf-spot culture from base blackening on soggy mix. Use brown tips when necrosis is tip-only with no yellow halos on mid-leaf tissue. Use root rot when the crown softens and tubers smell sour despite your best dry-down efforts.
Conclusion
Black spots on Spider Plant are manageable when you keep strap-shaped blades dry, improve airflow around arching foliage and stolons, and route base blackening on wet mix to tuber triage. Old black tissue will not revert; success is measured by clean new blades emerging from the crown and unspotted spiderettes on trailing stolons. Match mechanical marks with monitoring, pathogen spots with sanitation, and crown softening with root inspection—not a generic “water more” response.
Related tool
Use the Plant Problem Diagnosis Tool to narrow causes for black spots on this plant before changing multiple variables at once.