How to Grow and Care for Alocasia Jacklyn
Learn how to grow and care for Alocasia Jacklyn with the right light, watering, soil, humidity, feeding, propagation, and fixes for yellow or brown leaves.
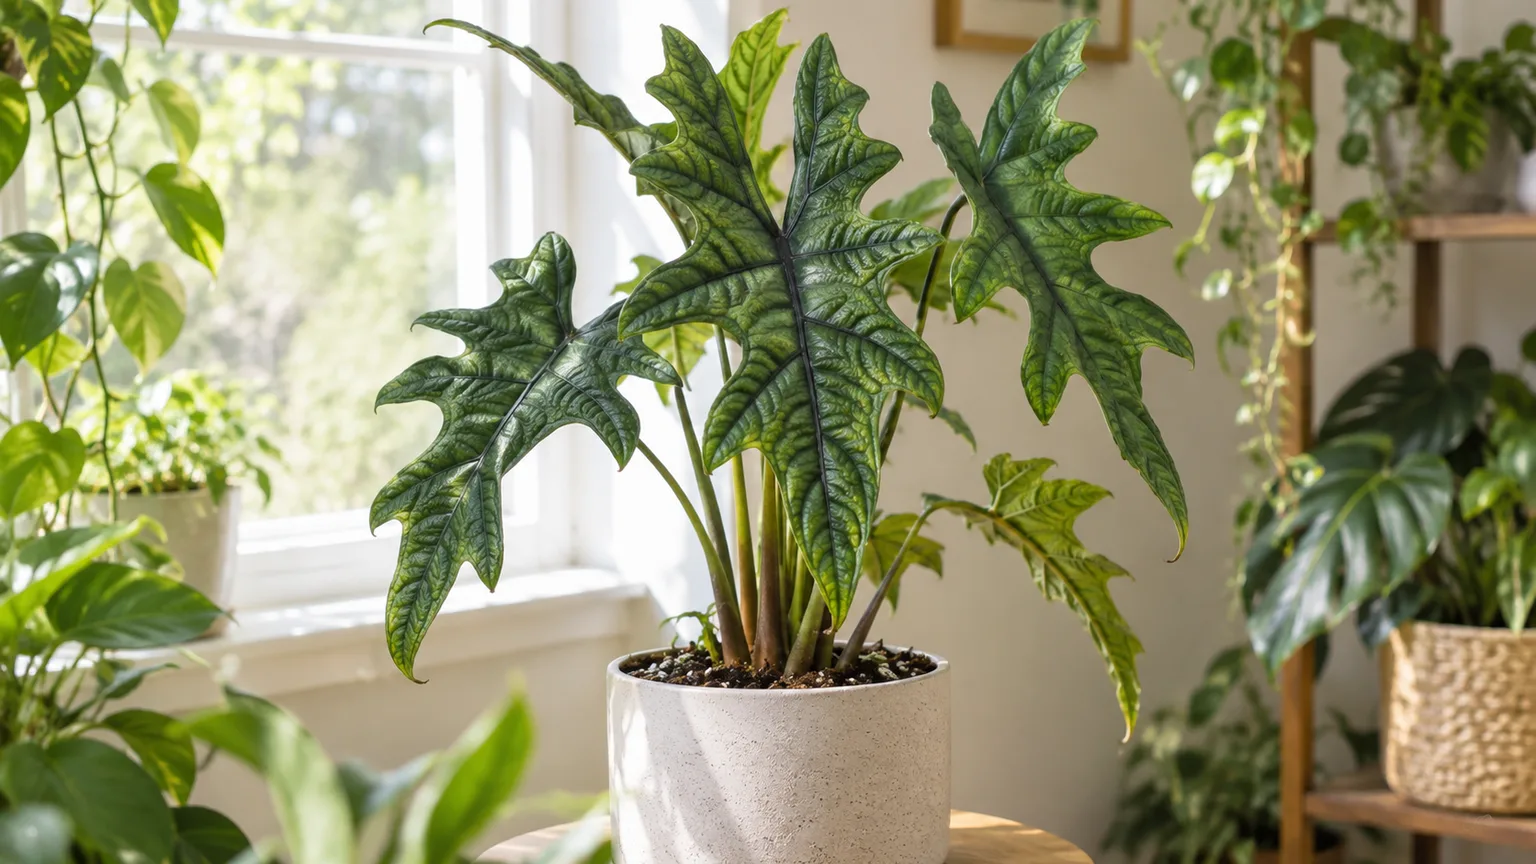
Alocasia Jacklyn is a collector-style tropical aroid with deeply lobed leaves, dark veins, and an upright silhouette that looks more like antlers than a typical elephant ear. It is often sold under names such as Alocasia tandurusa or Alocasia sulawesi, and plant tags are not always consistent. The care target is consistent, though: bright filtered light, a warm root zone, a loose mix, and enough humidity to keep the thin leaf lobes from crisping.
This plant is not difficult because it needs a complicated schedule. It is difficult when several small stresses arrive together: a dim window slows growth, dense soil stays wet, dry air browns the edges, and a cold draft turns a normal watering into a rot problem. The best routine is therefore based on what the plant and pot are telling you, not a promise that it needs water on the same day every week. For general context, compare this species-focused guide with our broader guide to growing Alocasia indoors.
Is Alocasia Jacklyn a Good Indoor Plant?
Yes, if you can provide stable indoor conditions and are willing to inspect it regularly. The genus Alocasia contains tuberous or rhizomatous perennials from tropical and subtropical regions, and NC State Extension describes Alocasia as a plant that prefers moisture with good drainage, shade or partial shade, and warm growing conditions. Jacklyn stays more manageable in a container than many outdoor elephant ears, but it is less forgiving of soggy soil, low humidity, and sudden temperature changes than a tough foliage plant.
Expect a plant that may pause rather than grow continuously. A healthy Jacklyn can spend weeks making roots before a new leaf appears, and an older leaf may yellow as the plant reallocates energy to newer growth. That is different from a clump that loses several leaves while the soil remains wet, the rhizome feels soft, or the plant is sitting in cold air.
What the Jacklyn, Tandurusa, and Sulawesi Names Mean
“Jacklyn” is primarily a trade name, while “tandurusa” is commonly used for the botanical identity associated with this plant. Some sellers use “sulawesi” as a shorthand for its Indonesian origin, and some labels use alternate spellings. Because the naming history is still messy in the houseplant trade, do not judge a purchase by a label alone; look for the deeply divided, upright leaves and confirm that the seller shows the exact plant you will receive.
The name also affects expectations around size and price more than it changes the basic routine. A green plant sold as Jacklyn does not need a special fertilizer or a sealed terrarium simply because it is rare. It needs the same root-zone discipline that makes other Alocasias successful, with extra attention to leaf-edge damage and environmental swings.
The Ideal Indoor Setup at a Glance
Use the following as starting targets, then adjust for pot size, season, and the speed at which your mix dries.
| Care factor | Practical starting point | What to watch |
|---|---|---|
| Light | Bright, indirect or filtered light | Smaller new leaves mean the plant may need more light; bleached patches mean too much |
| Water | Thoroughly water when the upper 1–2 inches of mix are dry | A pot that stays wet for many days is a drainage warning, not a sign to water less often forever |
| Soil | Chunky, airy aroid mix in a pot with a drainage hole | Dense mix and a cachepot full of runoff can suffocate roots |
| Humidity | About 60–70% near the foliage if practical | Humidity cannot compensate for cold roots, wet soil, or poor airflow |
| Temperature | Roughly 65–85°F (18–29°C); avoid sustained readings below 60°F (15°C) | Drafts and rapid swings matter as much as the room average |
| Feeding | Diluted balanced liquid fertilizer every 3–4 weeks during active growth | Pale new leaves may need nutrition; crispy edges after feeding can signal salt stress |
| Repotting | When roots circle, drainage changes, or the clump is crowded | Oversizing the pot lengthens the wet period and raises rot risk |
Species-specific care notes such as Plantjai’s Jacklyn guide use higher humidity targets and slightly different moisture thresholds than general genus guides. Treat 60–70% as a useful comfort range rather than a pass/fail threshold; a stable 55% room with good light can outperform an 80% room with cold, stagnant air.
Choose Light for Leaf Shape, Not Just Survival
Place Alocasia Jacklyn close to a bright window where sunlight is softened by a sheer curtain or reaches the plant after bouncing off a wall. An east-facing window is an easy starting point. A south- or west-facing window can work if the plant is set back from the glass or protected from intense afternoon rays. The RHS Alocasia growing guide also recommends bright, indirect light and warns that strong sunlight can scorch foliage.
Light changes the quality of new growth, not just whether the plant stays alive. If several new leaves are successively smaller, the petioles stretch toward the window, or the dark venation looks less pronounced, move the pot closer to filtered light or add a full-spectrum grow light. Run a grow light on a consistent daily cycle according to its instructions, keep it far enough away that the leaves do not heat up, and change one variable at a time so you can tell whether the plant responds.
Direct sun damage usually appears as pale, tan, or crispy patches on the side of a leaf facing the glass. Do not respond by putting the plant in a dark corner; move it a little farther from the window, add a curtain, and let healthy new leaves show whether the new position is working. Rotate the pot every week or two if one side is leaning, but avoid repeatedly moving it between dramatically different light levels.
Water After the Upper Soil Dries
Water Alocasia Jacklyn thoroughly when the upper 1–2 inches of mix feel dry, while the lower root zone still holds some moisture. Insert a finger or wooden skewer near the pot’s edge rather than judging by the surface alone. When it is time, pour slowly over the mix until water runs from the drainage hole, allow the pot to drain fully, and empty the saucer or cachepot.
This cycle gives the rhizome both water and air. Watering a little every day can leave the center of the pot permanently wet, while waiting until the entire root ball becomes bone-dry can cause curling, drooping, and broken leaf edges. Fine Gardening’s Alocasia profile summarizes the genus preference as moist but well-drained soil, which is the useful middle ground here.
The calendar will change with conditions. A small pot in bright light may need water every several days in warm weather; a large pot in a dim room may remain damp for more than a week. In autumn and winter, check more deeply and water less often as growth slows. Do not keep following a summer schedule after the plant has stopped producing leaves.
Water quality is worth considering when brown tips continue despite good moisture and humidity. If your tap water is hard or leaves develop a crust of mineral residue, try rainwater, filtered water, or another consistent low-mineral option for a few weeks. Room-temperature water reduces the shock of watering a plant sitting near a cold window. Water quality is not the first thing to change when the soil is soggy, but it is a sensible second check once drainage and light are correct.
Build a Breathable Aroid Mix and Pot
Use a mix that holds a little moisture while leaving large air spaces around the roots. A practical home recipe is two parts quality indoor potting mix or coco coir, one part perlite or pumice, and one part fine-to-medium orchid bark. If your base mix is already rich and moisture-retentive, increase the chunky and mineral portions; if it dries in a day, add a little more moisture-holding material rather than watering constantly.
The correct mix should become evenly moist when watered, drain readily, and begin to lighten as it dries. Avoid garden soil, pure peat, or a dense seed-starting mix in a houseplant pot. Those materials can collapse around the roots, especially when the plant sits in a low-light room. A mildly acidic mix is a reasonable target, but do not chase a pH number before fixing compaction, drainage, and watering behavior.
Use a nursery pot or inner pot with an open drainage hole, then place it inside a decorative cachepot if you want a cleaner look. Never leave the nursery pot standing in runoff. A layer of stones in the bottom of a pot does not replace a drainage hole; it can simply move the wet zone higher in the container.
Balance Warmth, Humidity, and Airflow
Keep the plant in a warm, stable room, ideally around 65–85°F (18–29°C). Protect it from air-conditioner outlets, heaters, drafty doors, and windows that become cold at night. The RHS guidance for alocasias notes that plants should be kept warm during growth and given cooler, drier conditions in winter; in an ordinary home, “cooler” should still mean protected from chilling.
A hygrometer placed beside the leaves is more useful than guessing from how the room feels. Aim for approximately 60–70% relative humidity when possible, especially while a new leaf is unfurling. If the room stays below about 45–50%, the thin tips and outer lobes may brown more quickly. The solution is not always more water: place the plant near a properly sized humidifier, group compatible plants, or use a correctly built pebble tray.
A pebble tray only creates a small local effect, and the pot must sit above the water on the stones. The RHS explains this setup as a tray of gravel with water below the surface, not a pot standing in water. Keep some air movement around the foliage so high humidity does not become stagnant, and clean the tray regularly to prevent algae and odors.
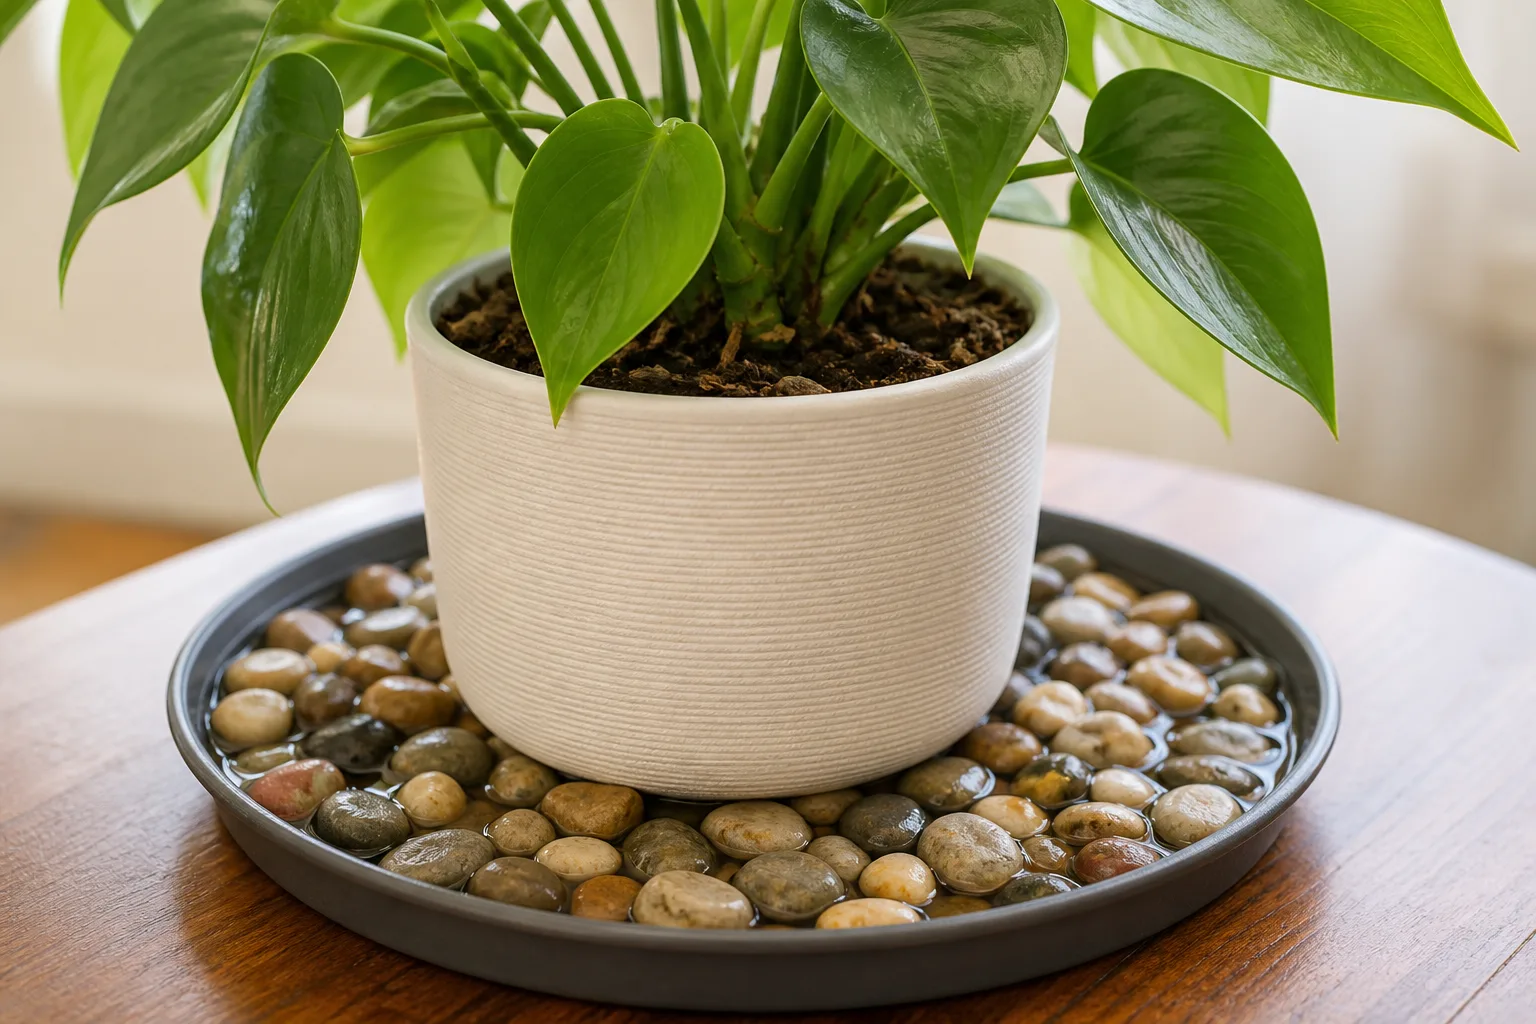
Humidity helps most when the other variables are already close. A humidifier cannot rescue roots in a waterlogged mix, and a closed cabinet without ventilation can turn leaf moisture into fungal or bacterial trouble. Raise humidity gradually after moving a dry-air plant, particularly if the room is cool.
Fertilize Lightly During Active Growth
Feed only when Jacklyn is actively growing. A balanced liquid houseplant fertilizer diluted to one-half the label rate every three to four weeks is a cautious starting point in spring and summer. Apply it to already-moistened soil rather than dry roots, and follow the product label if it gives a different interval or dilution.
Pause or reduce feeding during a winter slowdown, after repotting, or when the plant is stressed by cold, root damage, or severe dehydration. Fertilizer is not a rescue treatment for drooping leaves. Extra salts around compromised roots can make the problem worse, and fertilizer applied to dry mix may burn the root tips.
Pale, small new leaves can reflect low light, weak roots, depleted mix, or a genuine nutrient shortage. Check light and the root zone before increasing fertilizer. If a white crust forms on the mix or pot rim, flush the container with plenty of plain water while it is actively growing and draining well, then return to a lighter feeding routine.
Repot and Prune Without Stressing the Rhizome
Repot when roots circle densely, emerge from the drainage hole, water runs straight through, or the plant dries far faster than it used to. Do not repot only because a calendar says two years have passed. Late spring or early summer is the least disruptive time because the plant can rebuild roots in warmth and stronger light.
Choose a container only one size larger, usually about 1–2 inches wider than the current root ball. Slide the plant out without pulling on the petioles, loosen only the outer roots, and set it at the same depth as before. The rhizome crown should not be buried under a thick layer of wet mix. Water once after repotting, let the excess drain, and keep the plant warm in bright indirect light while it settles.
Pruning is mostly sanitation. Remove a fully yellow or dead leaf by cutting its petiole close to the base with clean scissors, but do not remove a leaf that is still doing useful work just because its oldest edge is imperfect. Wipe dust from leaves with a soft damp cloth and inspect undersides and petiole joints at the same time. Clean foliage photosynthesizes more efficiently and gives you an early chance to find mites or scale.
Propagate Alocasia Jacklyn
Propagation works from the plant’s underground structures, not from an individual leaf. A leaf or petiole can stay green for a while after being cut, but without a viable node or rhizome section it does not have the growth point needed to become a new Jacklyn. The two useful routes are separating a rooted offset or dividing a mature rhizome; corms are possible but slower and more failure-prone.
Only propagate a plant that is actively growing and free of rot or a spreading pest outbreak. Water it normally the day before, gather a clean sharp knife, small pots, and fresh airy mix, and prepare a warm bright-indirect recovery spot. Wear gloves and keep cut plant material away from pets and children because Alocasia sap and tissue can irritate.
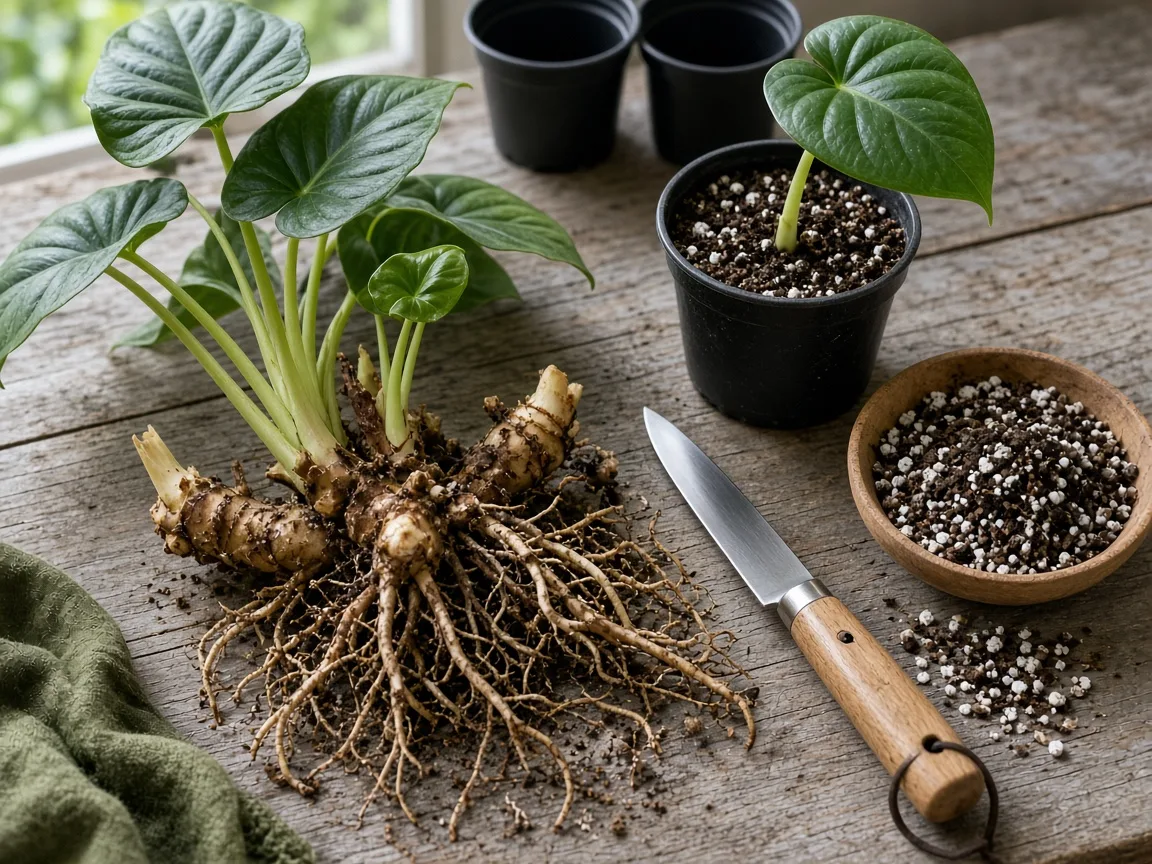
Division and Rooted Offsets
Offsets are small shoots attached to the mother plant’s rhizome. They have the best chance of establishing when they are large enough to show their own roots and at least one active growth point. Tiny offsets with no roots can survive, but they need more controlled humidity and are much easier to rot.
To divide the plant, slide the clump from its pot and brush away enough mix to see where the offset joins the rhizome. Separate a naturally loose pup by hand if it comes away cleanly; use a sterilized knife for a firmly attached section. Each division should retain a firm piece of rhizome, a visible bud or growing point, and as many healthy roots as possible.
Pot the parent and offset separately in containers that are only slightly larger than their root systems. Set the rhizome near the surface, firm the mix gently, and water just enough to settle it. Keep the divisions warm and humid in bright indirect light, but do not keep the mix saturated while roots are damaged. New growth is the clearest sign that a division has recovered.
Corm Propagation
Corms are small underground structures that may form around the rhizome. They can produce new plants, but they are not guaranteed to be viable, and a corm that is fully submerged or kept cold and wet can rot before it sprouts. Epic Gardening’s Alocasia propagation guide describes corm propagation as a separate, more involved process than division.
Remove corms gently during repotting and discard any that are soft, hollow, or foul-smelling. Set the lower portion against lightly moist perlite, sphagnum, or another clean rooting medium while keeping the top exposed to air. A clear covered container can hold humidity, but open it regularly for air exchange and place it in warmth and bright indirect light. Once roots and a leaf have formed, move the young plant into a small airy mix rather than leaving it in water indefinitely.
Do not start a corm project while the mother plant is already declining. Division is the more sensible method when you want one or two dependable plants; corms make sense when you are patient and want to experiment with several small propagules.
Diagnose Yellow, Brown, and Drooping Leaves
Read the pattern before changing care. One old lower leaf turning yellow while new growth is firm can be normal aging. Several leaves changing at once, a wet pot that never lightens, or a rhizome that feels soft points to a more serious root-zone problem. The NC State Extension Alocasia profile lists excess water, insufficient water, and inadequate light among causes of yellowing, so color alone is not a diagnosis.
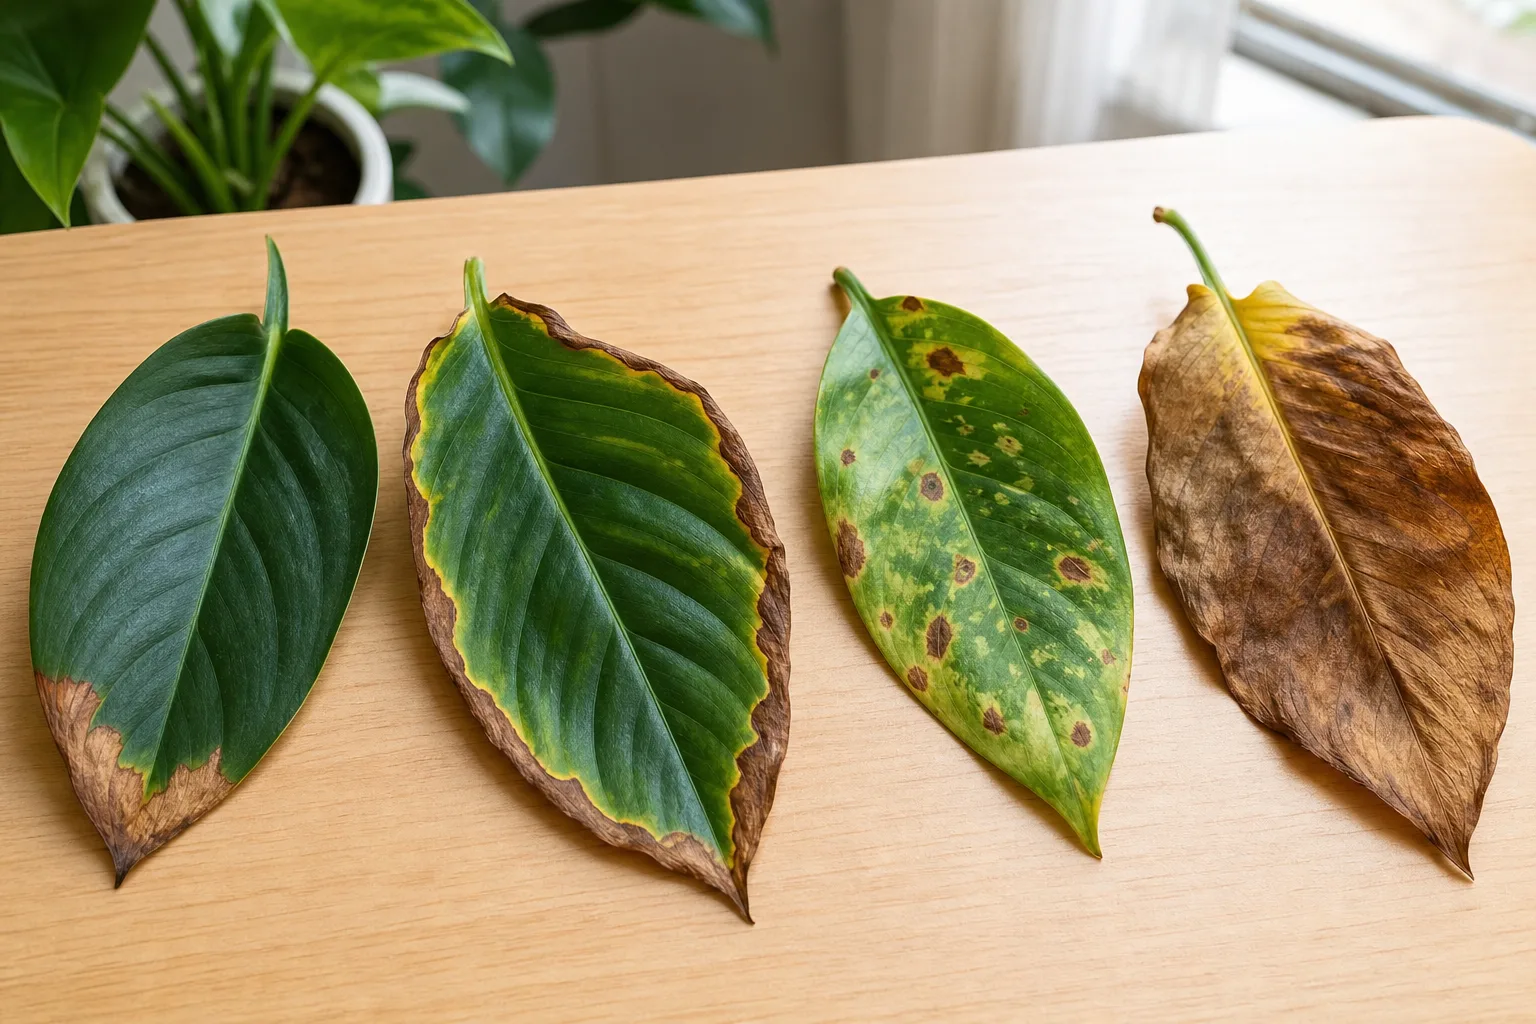
Yellow leaves: Check the soil first. If the mix is wet well below the surface, inspect drainage and roots before watering again. If the mix is dry and the leaves are limp or curling, water thoroughly and then shorten the interval slightly. If the newest leaves are pale while the plant is stable, check light and feeding; do not add fertilizer to a cold, waterlogged pot.
Brown tips or edges: Crispy margins usually mean the leaf is losing water faster than the roots can replace it. Check humidity, drafts, underwatering, direct sun, and mineral buildup in that order. Brown tissue will not turn green again, but corrected care will protect the next leaf. Cut only the dead edge with clean scissors, following the leaf’s natural outline.
Drooping or curling leaves: Feel the mix and the petioles. A dry pot with limp leaves needs a complete watering; a wet pot with a soft base needs root inspection, not more water. Sudden droop after moving, repotting, or a cold night can be shock. Restore stable warmth and light, then wait before making several new changes.
Small new leaves or no new leaf: Look at the newest growth as a report on recent conditions. Move a dim plant toward filtered light, check whether roots are crowded, and confirm that night temperatures are not dropping near a cold window. A pause of several weeks can be normal after repotting or during winter; a firm rhizome and healthy roots are reassuring signs.
Manage Pests and Root Rot Early
Inspect the undersides of leaves and the bases of petioles whenever you water. Spider mites can leave fine stippling and webbing in dry conditions, while mealybugs look like white cottony clusters and scale appears as fixed bumps with sticky residue. Aphids may gather on tender unfurling leaves. Isolate a suspect plant before treating it so pests do not spread through a collection.
Start with physical control: rinse leaf undersides with a gentle stream, wipe visible pests away, and remove badly damaged leaves. For a persistent infestation, use an insecticidal soap or other product that is labeled for the pest and the plant, following its directions and testing a small area first. Repeat treatment as the label requires because one application rarely reaches every life stage. Improve humidity and airflow, but do not treat dry air as the sole cause of mites.
Root rot is more urgent than cosmetic browning. Warning signs include soil that stays wet for an unusually long time, yellowing with wilting, a sour smell, and brown or mushy roots or rhizome tissue. Take the plant out of the pot, cut away only soft or blackened tissue with a sterilized tool, and repot the firm remainder into a clean, airy mix and a correctly sized draining pot. Keep the first post-repot watering modest and do not return to a normal schedule until the mix begins to dry.
Indoor Care Versus Summer Outdoors
Jacklyn can spend warm weather outdoors in a container if you transition it gradually. Start in bright shade or dappled light, shelter it from wind and heavy rain, and move it inward over several days if it must return to a dimmer room. Direct midday sun can scorch leaves that were grown behind glass, even if the plant enjoys brighter conditions after acclimation.
Bring it inside before nights become persistently cool, especially when temperatures approach 60°F (15°C). Check every leaf axil and the underside of the pot for pests before the plant joins your indoor collection. The UF/IFAS elephant-ear guidance distinguishes Alocasia from other plants sold as elephant ears and warns that some elephant-ear plants can spread aggressively; keep this collector plant in a container and never place elephant ears near a natural waterway without checking local guidance.
Outdoor rain does not remove the need for drainage. A pot left in a saucer, a waterlogged patio corner, or a storm followed by cool nights can create the same rot conditions as overwatering indoors. Protect the pot from standing water and return it to a warm, covered location before the weather turns cold.
Handle Alocasia Jacklyn Safely
Treat Alocasia Jacklyn as toxic to pets and unsafe to chew. The ASPCA Alocasia listing identifies insoluble calcium oxalates and lists oral irritation, pain and swelling of the mouth, drooling, vomiting, and difficulty swallowing among possible signs in dogs, cats, and horses. Put the plant behind a closed door, on a stable high shelf, or in another location that a climbing cat or curious child cannot reach.
Wear gloves when cutting leaves, dividing rhizomes, or handling sap, then wash your hands and clean tools. Do not taste any part of the plant or treat an Alocasia corm as an edible taro substitute. Poison Control’s Alocasia guidance explains that all parts contain calcium oxalate crystals and recommends removing visible plant material, rinsing and spitting, and seeking prompt medical advice if a person has symptoms such as swelling or trouble swallowing. For a pet exposure, contact a veterinarian or the ASPCA Poison Control number listed in its current guidance.
Conclusion
Grow Alocasia Jacklyn by keeping four things aligned: bright filtered light, a breathable root zone, steady warmth, and humidity supported by airflow. Water when the upper mix dries rather than by a fixed calendar, feed only during active growth, and size the pot to the roots instead of the leaves.
When the plant looks unhappy, check in this order: soil moisture and drainage, light, temperature and drafts, humidity, pests, then fertilizer. One yellow lower leaf is usually a small event; a soft rhizome, several yellow leaves, or a pot that never dries is a signal to inspect the roots. With those checks in place, Jacklyn’s dramatic foliage becomes much easier to maintain—and propagation by a healthy offset becomes a realistic next step.