How to Grow and Care for Alocasia Zebrina
Give Alocasia zebrina the right light, water, soil, warmth, and humidity—and learn how to propagate it and diagnose yellow or drooping leaves.
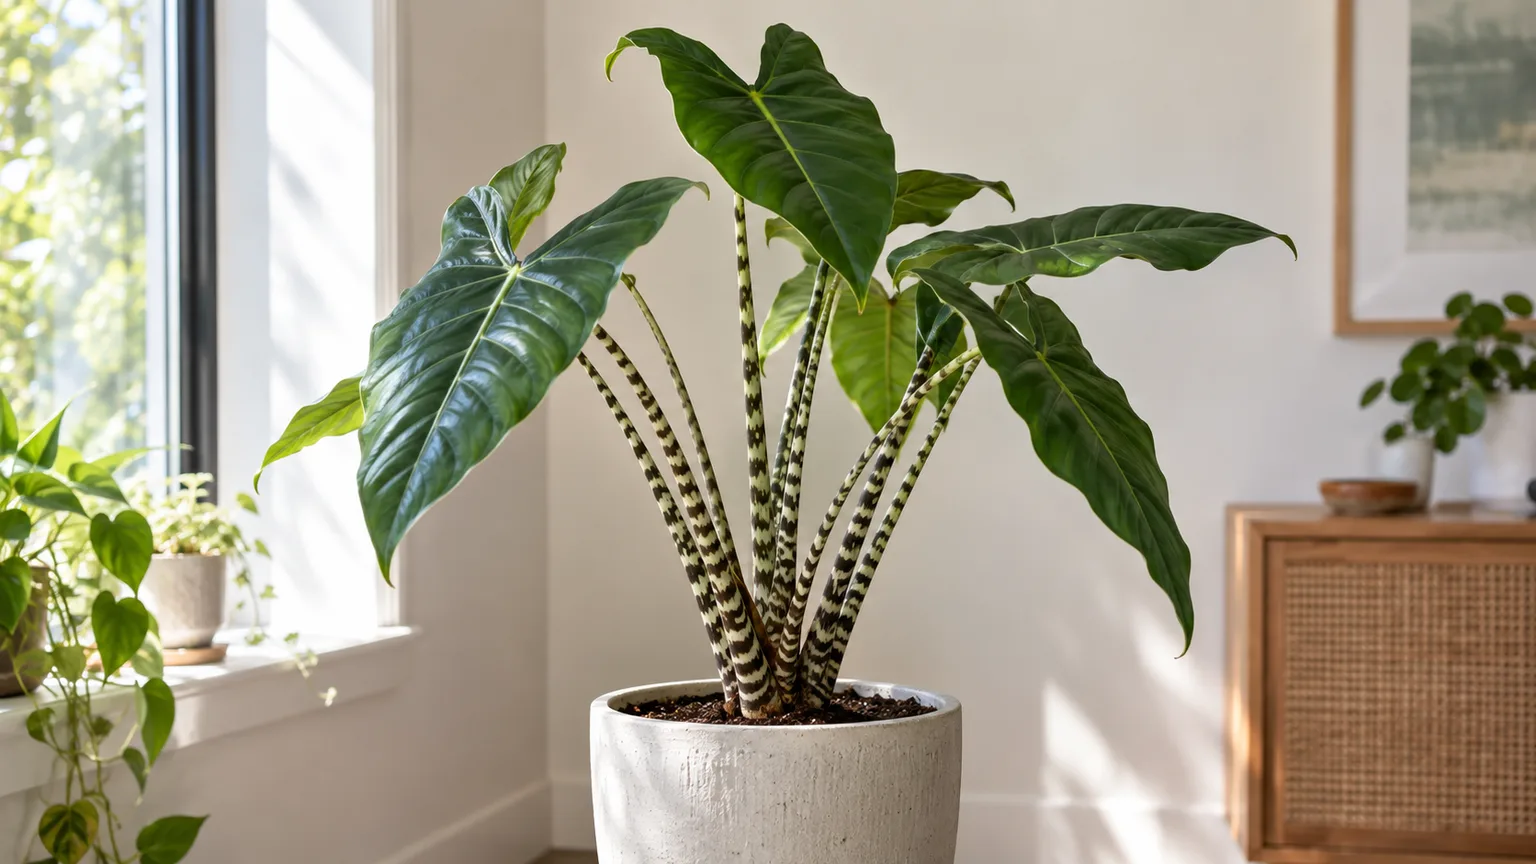
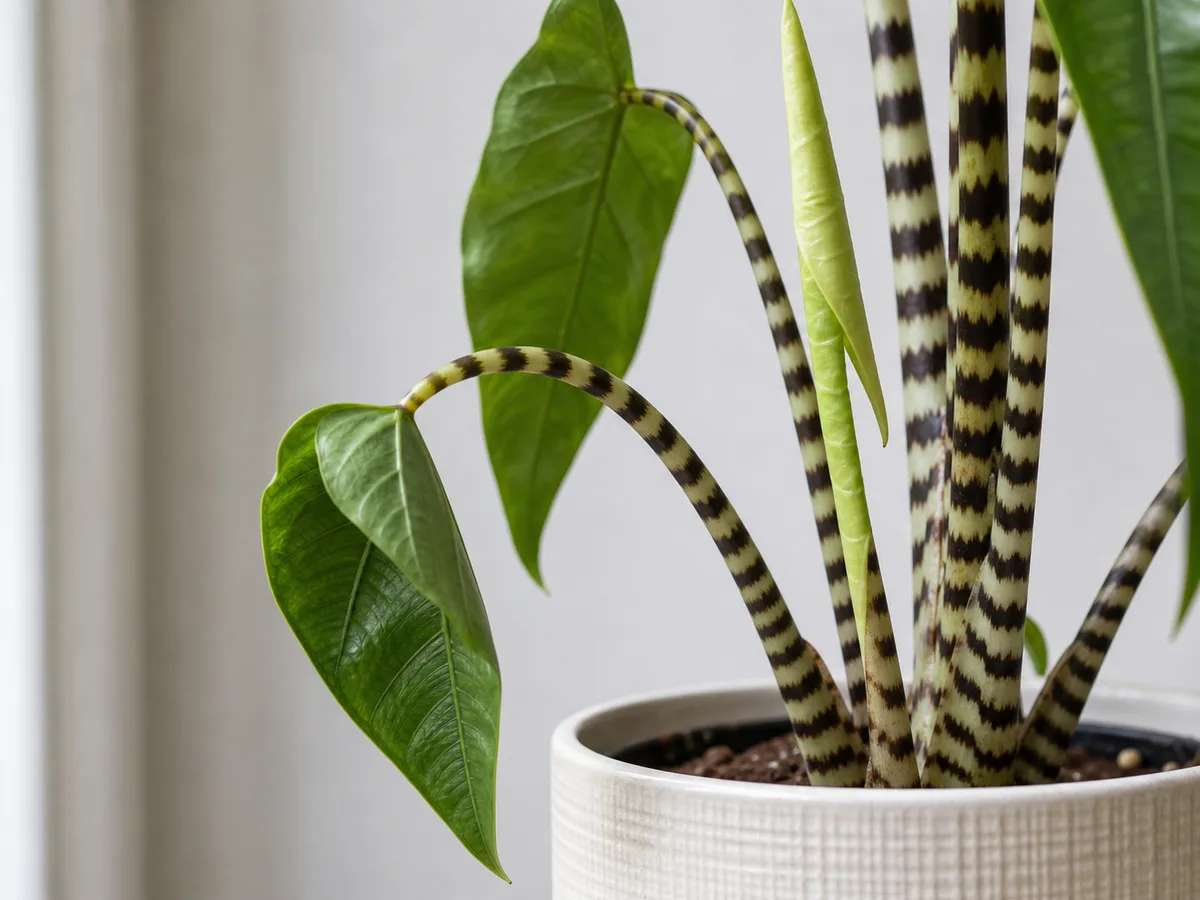
Alocasia zebrina is the alocasia people buy for the stems: its upright petioles carry bold black-and-cream striping beneath glossy, arrow-shaped leaves. It is often sold as the zebra plant or zebra alocasia, and it can become a spectacular indoor specimen when the root zone stays warm, airy, and evenly supplied with moisture.
The plant is not difficult because it needs a complicated schedule. It is difficult when bright light, warm roots, high humidity, and watering are treated as separate problems. The most reliable routine is to let light determine how quickly the pot dries, then adjust watering, pot size, and feeding to that pace.
What Alocasia zebrina is and how it grows
Alocasia zebrina is a tropical member of the arum family, Araceae. Its defining feature is the zebra banding on the petioles rather than stripes across the leaf blades. The RHS profile for Alocasia zebrina describes it as an indoor plant for bright, indirect light, moist but well-drained compost, warmth, and high humidity; the BBC Gardeners’ World profile likewise notes the dark arrow-shaped leaves and striped stems.
Indoors, expect an upright plant roughly 2 to 4 feet tall depending on the starting size, light, warmth, and growing season. The leaves emerge from a central crown, while the underground corm or short stem stores energy between flushes of growth. A plant may produce new leaves quickly in warm, bright conditions, then slow dramatically when days shorten or the root zone becomes cold.
That seasonal rhythm matters more than a promise of a particular weekly growth rate. One older leaf yellowing as a new leaf opens can be ordinary turnover; several leaves collapsing while the soil stays wet is a root-zone warning. If you are buying one, choose firm petioles, clean leaf undersides, an intact crown, and a pot that does not smell sour.
Choose bright filtered light before changing anything else
Give Alocasia zebrina bright filtered light for most of the day. An east-facing window is an easy starting point; a bright north window can work, while a south- or west-facing window usually needs a sheer curtain or some distance from the glass. The RHS Alocasia growing guide advises bright but indirect light because strong sun can scorch the foliage and weak light slows growth.
Direct morning sun is not automatically harmful. A plant acclimated gradually may handle a short period of gentle sun, but a plant moved from a dim shop into unfiltered afternoon rays can develop bleached patches or crisp brown edges within days. Increase exposure in small steps over one to two weeks and step back if the newest leaves look washed out or scorched.
Watch the newest growth rather than trying to repair old leaves. Long, weak petioles, small leaves, leaning, and soil that stays wet for too long all point toward insufficient usable light. Rotate the pot every week or two so the canopy does not become one-sided, and use a grow light on a timer if winter daylight is too weak for the pot to dry predictably.
Build an airy root zone and stable pot
Alocasia roots need both moisture and oxygen. A wet mix is not the same as a well-watered mix: water should move through the root ball, but the spaces between particles must reopen quickly enough that the corm and roots are not held in stagnant saturation.

Use a pot with open drainage holes and a saucer that can be emptied. A nursery pot inside a decorative cachepot is practical because you can lift the plant, inspect drainage, and discard runoff. Plastic and glazed ceramic hold moisture longer; unglazed terracotta dries faster and adds weight, which can help a tall Alocasia stay upright. Neither material is automatically best—the correct choice depends on how quickly the room, pot, and mix dry.
Keep the crown at the surface of the mix. Cover the roots, but do not bury the bases of the striped petioles to make the plant look more anchored. A permanently damp collar around the crown stays low in oxygen and can soften the tissue before the leaves make the problem obvious.
Mix and pot rules that prevent rot
Start with a quality peat-free houseplant mix and add drainage-building material such as perlite, pumice, or fine orchid bark. A useful starting blend is 2 parts potting mix, 1 part perlite or pumice, and 1 part fine orchid bark, then adjust it to your conditions. In a warm, bright room, use more moisture-holding mix; in a cool room or a large decorative pot, increase the airy fraction instead.
The NC State Extension Alocasia profile describes Alocasia as preferring moist, well-drained, humus-rich soil. That combination rules out both extremes: dense garden soil in a houseplant pot can stay airless, while a very coarse mix that dries completely in a day can create repeated drought stress.
Do not put gravel in the bottom of the pot as a drainage layer. It takes away root space without fixing a saturated mix above it. Choose a container only one size larger than the root ball, and make sure the drainage holes are not blocked by a compacted plug of old soil.
Water by moisture depth, not the calendar
During active growth, water when the top 2 inches of mix feel dry and the lower root ball is not bone-dry. Check with a finger or wooden skewer, lift the pot to learn its lighter dry weight, and look at the plant’s recent conditions. A bright, warm plant in a small pot may need water more often than a large plant in a dim room, even if both were watered on the same day.
When the plant is ready, water slowly over the full surface until excess runs from the drainage holes. Let the pot drain completely, then empty the saucer or cachepot. This is more reliable than adding a small splash every day, which keeps the center of the root ball unevenly wet and can leave salts concentrated in the mix.
If water races down the sides of a dry pot, the mix may have become hydrophobic. Water in two or three passes, pausing briefly so the first pass can soak in, rather than watering repeatedly on a fixed schedule. If the soil is already wet and the leaves are drooping, do not add more water until you have checked the crown, smell, drainage, and roots.
Winter changes the rule. As light and temperature fall, evaporation and growth slow, so the interval may lengthen substantially. The RHS guide recommends reducing watering to a minimum during winter dormancy because overwatering a resting Alocasia is a common route to root rot.
Balance warmth, humidity, and airflow
Keep Alocasia zebrina warm and away from cold glass, exterior doors, and heating or air-conditioning vents. Aim for roughly 65 to 80°F (18 to 27°C) during active growth, and do not expose it to frost. If the plant rests in winter, keep it above about 50°F (10°C) and let the mix dry more deeply between small drinks rather than keeping cold soil constantly damp.
Medium to high humidity helps the leaves hold their shape, especially in heated or air-conditioned homes. A hygrometer is more useful than guessing: if the room is consistently dry and the leaf edges turn crisp, group plants, move the pot away from a vent, or run a humidifier nearby. Humidity is support, not a substitute for adequate light or healthy roots.
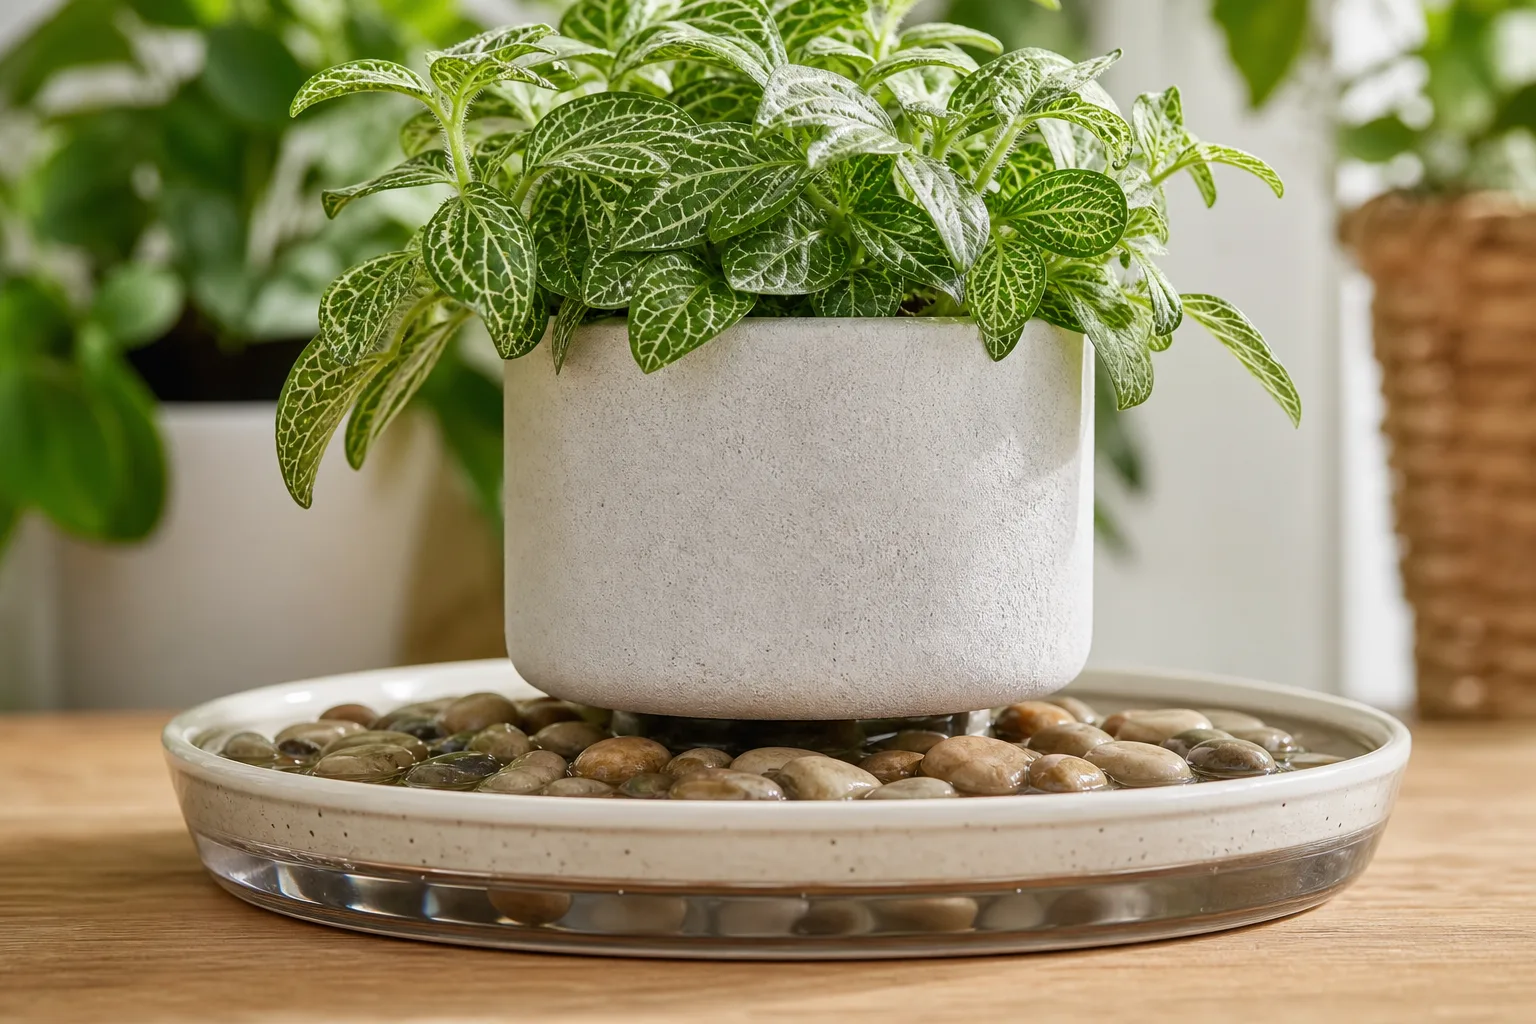
A pebble tray can modestly improve the air immediately around the foliage, but the pot must sit on the pebbles above the waterline. The RHS growing guidance shows the same principle: water can sit below the gravel surface, never against the pot base. A bright, ventilated bathroom can be useful; a dark bathroom is still too dark, no matter how steamy it feels.
Air movement prevents the canopy from becoming a stagnant, damp pocket. Give the leaves space from one another and from a cold window, and use only gentle circulation. Constant strong drafts dry the foliage unevenly and can create the same curling or crispy-edge symptoms that growers often blame on low humidity.
Feed only during active growth
Fertilize when the plant is producing new leaves and receiving enough light to use the nutrients. A complete liquid houseplant fertilizer at the label rate every two to four weeks during active growth is a sensible range; follow the product’s instructions rather than making a concentrated recipe. The RHS species profile recommends a general liquid fertilizer from spring into autumn.
Do not feed a cold, dormant, recently repotted, or badly wilted plant. Fertilizer cannot repair dead roots, and salts are more likely to accumulate when the plant is not drinking. If white crust appears on the mix or brown tips worsen after feeding, pause fertilizer and flush the pot with clean water only when the drainage path is open.
Large, fast-growing plants can use more nutrients than compact specimens, but fertilizer does not set the plant’s maximum size by itself. Light, warmth, root volume, and the health of the crown establish the conditions for bigger leaves; feeding only supports that system.
Repot with a low-shock sequence
Repot in spring or another reliably warm, bright period unless the current mix is failing or rot requires immediate action. A healthy Alocasia zebrina can stay slightly snug. Repot when roots circle densely, emerge from drainage holes, the mix has collapsed, or the pot dries dramatically faster than it used to.
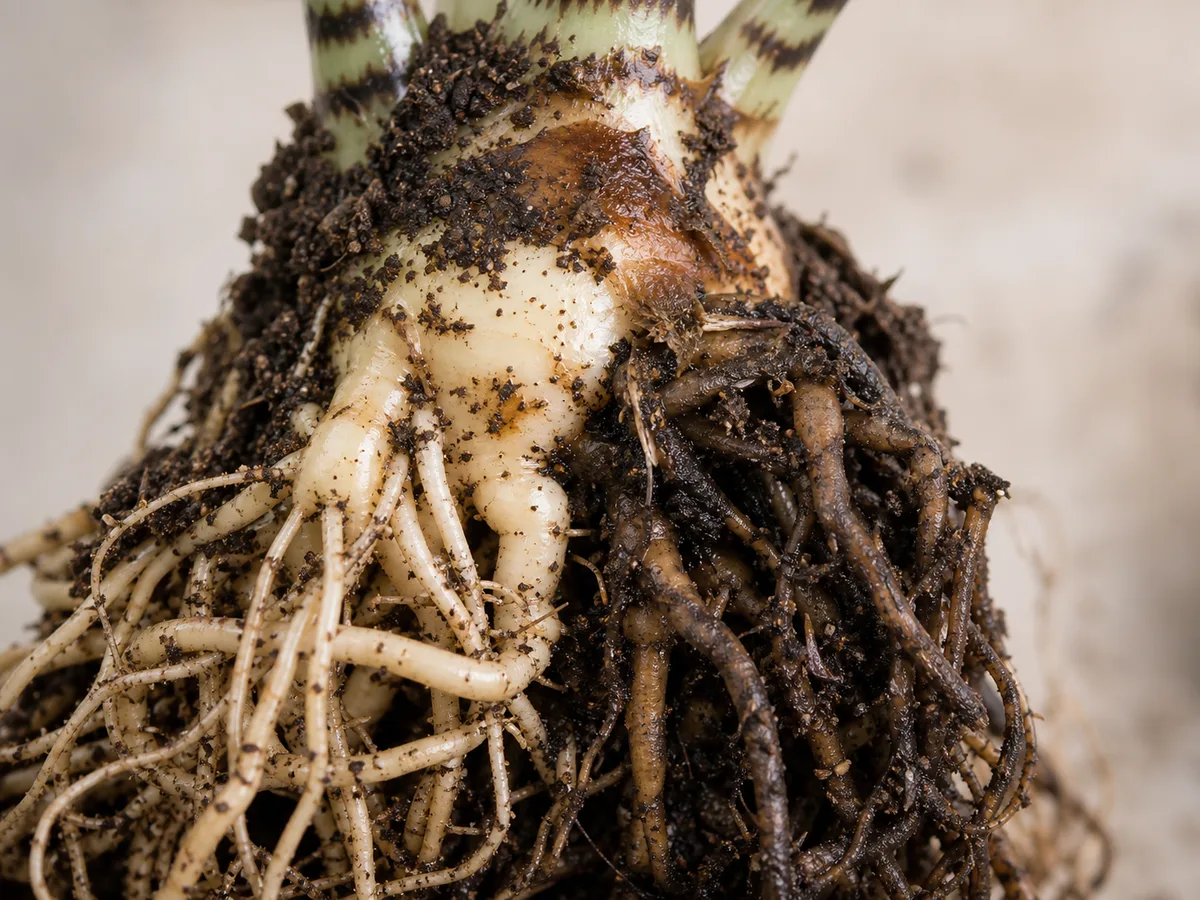
Water a day before planned repotting so the root ball is workable, not bone-dry. Slide the plant out, inspect the roots, and choose a container only one size larger. Firm cream, tan, or light-brown roots are generally usable; black, hollow, slimy, or sour-smelling tissue should be removed with a clean blade.
Set the crown at the same height it occupied before. Fill around the roots without packing the mix into a solid block, leave a little headspace for watering, and let the container drain fully. Afterward, place the plant in warm filtered light and keep the routine steady. Temporary drooping can follow root disturbance; repeated repotting to chase every bent leaf usually causes more stress.
Prune and clean without overworking it
Alocasia zebrina needs very little routine pruning. Remove a leaf when it is fully yellow or brown, badly damaged, or clearly diseased, cutting the petiole close to its base with clean scissors. Wear gloves, avoid touching your eyes, and wash tools afterward because the sap can irritate skin.
Do not remove a partly green leaf simply because it is old or less symmetrical. It is still sending energy to the crown. Wipe dust from the broad leaf surfaces with a soft damp cloth, supporting the underside as you work, and skip oily leaf-shine products that can mark the foliage and make pest inspection harder.
If the plant leans, correct the light and rotate the pot before adding a stake. A support can prevent a heavy canopy from tipping, but it cannot fix weak growth caused by low light or a collapsing crown.
Propagate from rooted offsets, division, or cormels
The dependable home methods are separating rooted offsets and dividing a mature clump. Alocasia does not make a new plant from a detached leaf because a leaf alone has no viable growth point. The RHS propagation guidance recommends separating offsets in spring and also describes division of the fleshy underground structure in late spring or early summer.
Choose a parent plant that is actively growing, free of rot, and carrying enough healthy foliage to recover. A tiny offset with no roots has a much narrower margin for error than one with a firm crown and several roots. Gardening Know How’s Alocasia propagation guidance also emphasizes spring or early summer division as the plant leaves its winter slowdown.
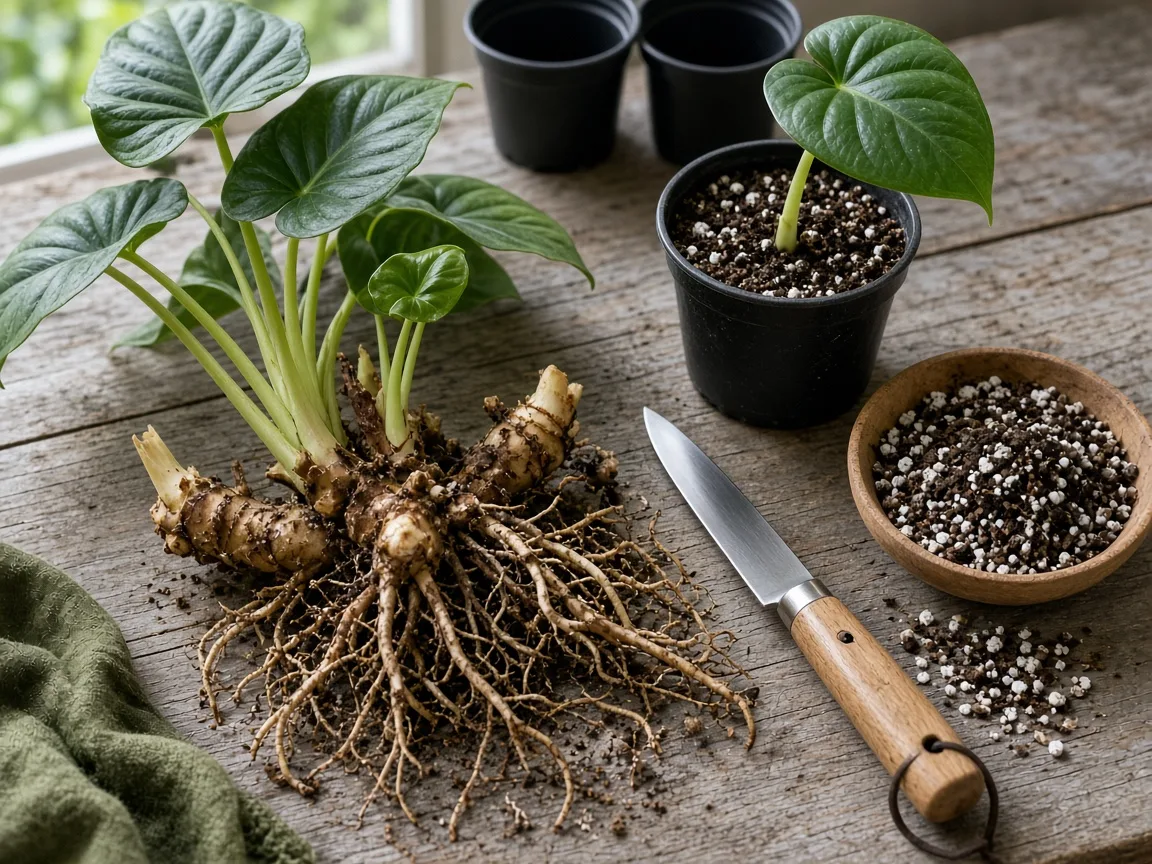
Cormels can be started in lightly moist sphagnum or another airy propagation medium, but they are easy to rot when sealed, cold, or drenched. Keep the container warm, provide regular air exchange, and pot up only after roots and a shoot are clearly developing. Seed is possible in theory, but indoor flowering and pollination are uncommon enough that division or offsets are more practical for most home growers.
How to divide an established clump
- Put on gloves and clean a sharp knife or pruners before you begin.
- Remove the plant from its pot and brush away enough mix to see where the crowns, roots, and offsets connect.
- Separate an offset only when it has a firm growth point and, ideally, its own roots. Make one clean cut through the connecting tissue instead of tearing the whole root ball apart.
- Pot the new division in a small, airy container with its crown at the surface. A snug pot is safer than a large pot full of wet mix.
- Place it in warm, bright filtered light and keep the mix lightly and evenly moist while roots establish.
- Wait to fertilize until you see active new growth.
After division, do not bury a leafless corm deeply or drench it to force growth. Warmth, oxygen, and patience give a small division a better chance than repeated watering. If the cut surface is soft or the parent shows sour-smelling mix, stop and address rot before propagating.
Plan for winter slowdown and dormancy
Many Alocasia slow down as daylight decreases. Some Alocasia zebrina plants keep a few leaves through winter, while others shed most or all of their foliage and return from a firm underground corm when light and warmth improve. The RHS Alocasia growing guide describes this cooler, drier winter rest as a natural part of the plant’s rhythm.
Leaf loss alone does not prove that the plant is dead. Dormancy is more likely when the crown is firm, there is no sour smell, and the decline follows a seasonal reduction in light. Rot is more likely when the base is soft, the pot remains wet for many days, leaves collapse in quick succession, or the roots are black and mushy.
During a likely rest, move the pot away from cold glass, stop fertilizer, and water only enough to keep the corm from shriveling. Do not repot, divide, or increase watering simply because the plant looks empty. When a firm crown begins to push a new shoot, return gradually to active-growth watering and feeding.
Troubleshoot symptoms from roots upward
Start diagnosis with the root zone, not the most visible leaf. Check how deep the mix is dry, whether water exits the drainage holes, whether the pot smells sour, whether the crown is firm, and whether recent light or temperature changed. A single old leaf is a different situation from a pattern of rapid leaf loss.
The most useful sequence is simple: inspect the soil, inspect the crown, inspect the leaf undersides, then change one condition at a time. Cutting every damaged leaf or moving the plant repeatedly can hide the original pattern and make recovery harder to judge.
Yellow leaves, curling edges, and crispy tips
One lower leaf turning yellow as a new leaf opens can be normal turnover. Several yellow leaves together usually point to a mismatch: soil staying wet too long, a dry root ball, weak light, cold stress, or a damaged crown. If yellowing comes with a sour smell or soft petioles, unpot the plant and inspect for rot before watering again.
Curling leaves and crispy brown tips more often indicate dry air, inconsistent moisture, a hot window, or roots that cannot supply water. Measure room humidity, move the plant away from a vent or harsh sun, and check the mix rather than misting on a loop. A pebble tray may help locally, but it cannot reverse a root system that is already failing.
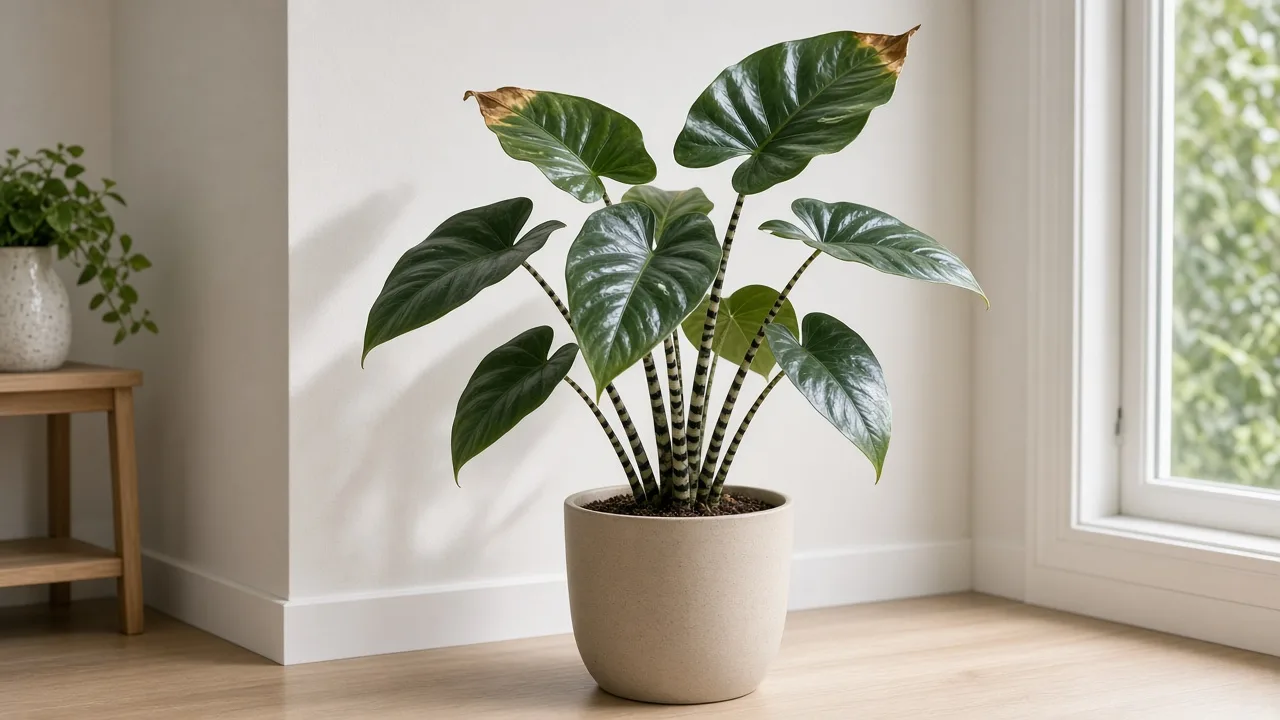
Old damage will not turn green again. Judge the correction by the next leaves: new growth should hold better color and texture after the plant has stable light, moisture, and warmth for several weeks.
Drooping stems, leaf drop, and suspected rot
Drooping with dry mix can mean thirst, but drooping with wet mix is a different diagnostic branch. Check whether the pot is heavy, the crown is soft, or the soil remains saturated. A plant with damaged roots can look thirsty because it cannot move water, so watering again often accelerates the problem.
Suspect root or corm rot when the base is soft, the mix smells sour, the plant collapses rapidly, or roots are black and slimy. Unpot it, remove only tissue that is clearly mushy or hollow, and repot the firm remainder in fresh airy mix and a clean, appropriately sized pot. Keep the crown at the surface and water sparingly while you wait for evidence of new roots or shoots.
Do not use a rigid “let it dry almost completely” rule for every drooping plant. That can injure a genuinely dehydrated plant, while a wet, rotting plant needs less water and more oxygen. The deciding evidence is the moisture depth and tissue condition together.
Prevent and manage common pests
The RHS Alocasia zebrina profile lists glasshouse red spider mite and mealybugs as pests to watch. Dry air, crowded foliage, and a plant weakened by low light make inspections more important. Look beneath leaves and around petiole joints at every watering: fine stippling or webbing suggests mites, while white cottony clusters suggest mealybugs.
Isolate a suspect plant from nearby houseplants. Rinse both leaf surfaces with lukewarm water when the plant can dry afterward, remove visible mealybugs with a cotton swab, and repeat inspections every few days. If you use insecticidal soap, horticultural oil, or another product, follow the label exactly, test a small area first, and keep people and pets away from treated foliage as directed. Do not substitute concentrated household soap or essential oils for a labeled product.
Pest control works better when the growing conditions are corrected at the same time. Move the plant into brighter filtered light, improve gentle airflow, and address very dry air, but do not keep the pot wetter in an attempt to solve mites. Wet soil does not raise leaf humidity in a controlled way and increases root-rot risk.
Handle Alocasia safely around pets and children
Alocasia zebrina should be treated as toxic to pets and unsafe to chew. The ASPCA Alocasia listing identifies insoluble calcium oxalates and lists Alocasia as toxic to cats, dogs, and horses. The National Capital Poison Center explains that chewing or swallowing plant material can cause painful mouth irritation, drooling, nausea, vomiting, diarrhea, or difficulty swallowing.
Keep the pot, fallen leaves, pruning waste, and propagation pieces away from pets, infants, and children. Wear gloves when pruning, repotting, or cutting rot, and wash your hands and tools afterward. A high shelf is not automatically safe if a cat can climb to it or a child can pull the pot down.
If a person chews the plant, remove visible material, have them rinse and spit, and contact a poison center for case-specific advice. If a pet chews any part, contact a veterinarian or animal poison service promptly, especially if swelling, drooling, vomiting, or breathing difficulty develops.
Conclusion
Good Alocasia zebrina care is a stable relationship between light, warmth, air, and moisture. Give the striped canopy bright filtered light, use an airy mix in a draining pot, keep the crown at the surface, and water according to the pot’s actual drying speed.
When the plant struggles, inspect before reacting. A firm crown and one aging leaf call for patience; a wet pot, sour smell, soft base, or rapid multi-leaf collapse calls for root-first triage. With seasonal watering, sensible humidity, clean handling, and careful propagation, this dramatic zebra-stemmed plant can become a long-lived indoor specimen rather than a cycle of emergency repotting.