How to Grow and Care for Blue Star Fern
Learn blue star fern care from light and airy soil to watering, humidity, propagation, mounting, and fixes for brown, yellow, or curling fronds.
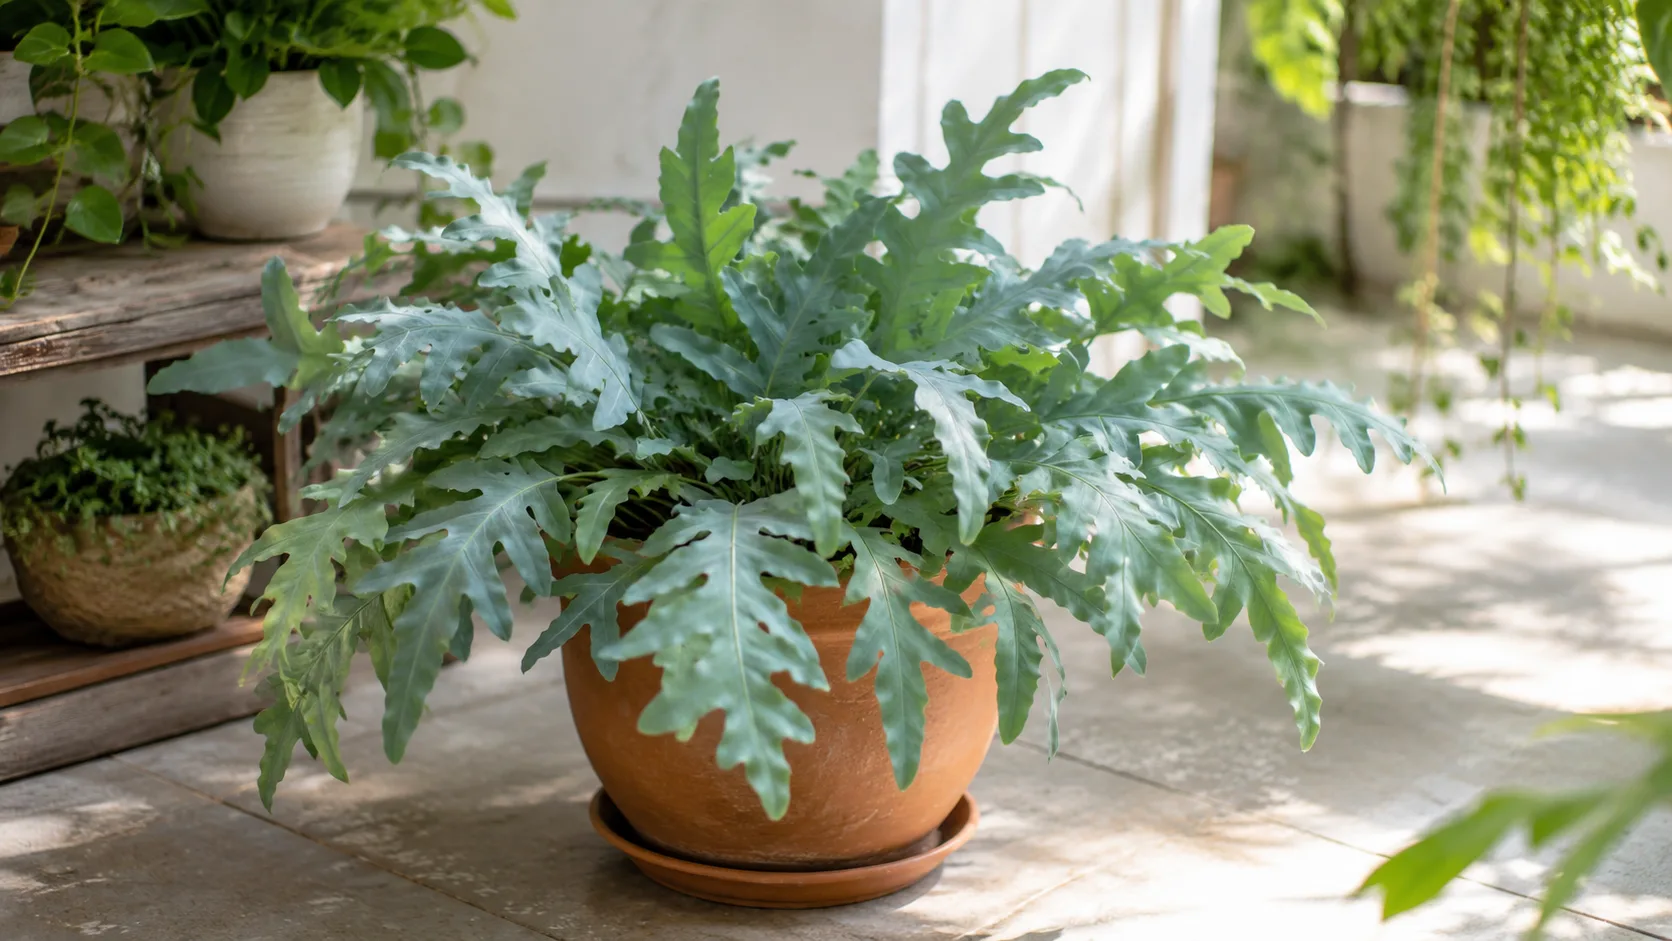
Blue star fern (Phlebodium aureum) looks unusual enough to seem demanding: its blue-green fronds ripple outward from fuzzy, golden-brown rhizomes instead of forming a tight crown. In practice, it is one of the more forgiving ferns for an indoor grower—as long as you give its roots oxygen, let the rhizomes breathe, and water the pot according to its mix rather than a calendar.
The plant’s epiphytic nature explains most of its care. In the wild, it can grow on bark, rocks, or organic debris rather than in deep, dense soil. That does not mean it should be left dry; it means moisture needs to arrive in a loose, fast-draining environment. The goal is a pot that becomes evenly moist when watered, then gradually returns to lightly moist before the next drink.
Blue Star Fern at a Glance
| Care factor | Practical target |
|---|---|
| Botanical name | Phlebodium aureum |
| Common names | Blue star fern, golden polypody, cabbage palm fern |
| Growth habit | Creeping, rhizomatous, epiphytic fern |
| Light | Bright to medium filtered light; partial shade outdoors |
| Water | Thoroughly water when the mix has partly dried; never leave the pot standing in water |
| Soil | Chunky, organic, airy, and well drained; mildly acidic to neutral is suitable |
| Humidity | Average homes can work; stable moderate humidity is better than repeated dry-to-wet swings |
| Temperature | Warm and stable; protect from frost, cold drafts, and direct heat |
| Feeding | Balanced houseplant fertilizer at reduced strength during active growth |
| Propagation | Rhizome division is the practical home method; spores are slower |
| Mature spread | Allow room for arching fronds and creeping rhizomes; size varies by cultivar and conditions |
North Carolina State Extension describes blue star fern as a rhizomatous epiphyte with blue-green to gray-green evergreen fronds, a preference for partial light, good drainage, and moist but not soggy conditions. The NC State plant profile also lists division as its recommended propagation strategy and notes that the plant reproduces by spores rather than flowers.
What Makes Blue Star Fern Different
The fuzzy structure at the soil line is a rhizome, not a root and not a sign of mold. It is a creeping modified stem covered in scales. Fronds emerge from it at intervals, and the rhizome slowly travels across the surface of the mix. The most common planting mistake is to bury it because it looks exposed; burying it in a wet, compact mix can keep the growth point too damp and hide early signs of rot.
Keep the rhizome resting on top of the mix or only lightly touching it. Roots can grow down into the medium, but the rhizome should remain visible enough that you can inspect it. A wide, shallow pot or hanging basket often suits the plant better than a deep container because its growth is horizontal and cascading.
The round brown dots that sometimes appear in rows on the underside of a mature frond are sori, the fern’s spore-producing structures. They are not automatically scale insects or disease. A useful distinction is pattern: sori are small, regular, and attached to the underside of otherwise healthy fronds; pests are irregular, raised, mobile, sticky, webbed, or associated with stippling and decline.
Choose Light by Watching New Fronds
Give blue star fern bright, filtered light or medium indirect light. An east-facing window with gentle morning sun, a north-facing window, or a brighter room with a sheer curtain is a reasonable starting point. A little early sun can deepen the plant’s color and support fuller growth, but hot afternoon rays through glass can scorch the fronds quickly.
Low light will not always kill this fern, but it usually changes the way it grows. New fronds may arrive slowly, petioles can stretch, and the plant may look open rather than full. If the pot stays wet for a long time and growth is weak, light is part of the watering problem: the plant is using moisture more slowly, so the mix has less opportunity to dry and re-aerate.
Use the newest growth as your light meter. Pale, bleached patches or crisp tan areas on the window-facing side suggest too much intensity; long, weak stems and a very slow flush suggest too little. Move the plant gradually over several days rather than from a dim corner into strong sun in one step. Rotate the pot a quarter turn every week or two if the fronds lean toward a window.
Build an Airy Mix Around the Rhizomes
Blue star fern needs a medium that can hold moisture without collapsing into a muddy block. A practical home mix is two parts fine orchid bark, two parts coco coir or peat-based mix, and one part perlite or pumice. You can add a small amount of compost or worm castings for organic matter, but keep the mix chunky enough that you can still see air spaces after watering.
The Royal Horticultural Society profile for Phlebodium aureum ‘Blue Star’ describes the plant as suited to moist but well-drained, acid or neutral conditions and recommends filtered light. Its more detailed growing medium is a reminder that bark and coarse organic material are not optional decoration for an epiphytic fern; they help prevent the root zone from staying airless.
Use a container with a real drainage hole. Plastic or glazed pots are helpful in a dry home because they slow water loss; terracotta is useful only if you tend to overwater or your room stays humid. Neither material fixes a poor mix. If water runs straight through the sides or the mix has become hydrophobic, rehydrate the root ball slowly and check whether the medium has shrunk away from the pot.
Do not pack the medium tightly around the plant. Set the root ball at its original depth, firm the mix just enough to eliminate large gaps, and leave the fuzzy rhizome exposed. A clean, slightly underfilled pot is safer than a full pot that buries the plant’s growth structure.
Water Thoroughly, Then Let the Pot Breathe
Water blue star fern when the upper part of the mix has started to dry, not automatically every seven days. For a soil-based mix, push a finger about an inch into the surface or use a wooden skewer to sample moisture below the crust. In a bark-heavy mix, the top may look dry while the center is still damp, so also lift the pot and compare its weight with the weight just after watering.
When it is time, water slowly over the surface until the entire root ball is wet and water exits the drainage hole. Water around the edge and between the fronds rather than pouring into the plant’s center. Let the pot drain completely before returning it to a cachepot or saucer, and empty any collected water. The Gardening Channel care guide similarly recommends deep watering followed by full drainage and a moisture check before watering again.
The right interval changes with season, light, pot size, and mix. A small plant in a warm room may need water every few days; a large fern in a cool, dim room may take much longer. In spring and summer, check more often as new fronds expand. In winter, the plant may use much less water, but do not let a heated room turn the mix bone-dry for weeks.
Watering problems tend to compound. A dry plant becomes more vulnerable to hot light and dry air; a wet plant loses roots, then wilts because damaged roots cannot move water. If the leaves look thirsty while the mix is wet, inspect the roots instead of watering again.
Set Up Humidity Without Keeping Leaves Wet
Blue star fern is more tolerant of ordinary indoor air than delicate maidenhair or button ferns, but it still responds to stable moderate humidity. A bathroom or kitchen with bright filtered light can work well, provided the plant is not trapped against a cold window or blasted by an exhaust fan. In a dry home, a hygrometer is more useful than guessing from the calendar.
Aim for consistency. Grouping plants, moving the fern away from a heating vent, or running a cool-mist humidifier nearby can help more than a quick spray of water. A correctly built pebble tray may modestly raise humidity immediately around the plant, but the pot must sit on the stones above the waterline; it should never stand in the tray water.
Misting is not a durable humidity system. It evaporates quickly, does little to change the room’s average humidity, and leaves the fronds or rhizome surface wet if repeated heavily. In a stagnant room, frequent wetting can also make leaf-spot problems harder to diagnose. Give the plant air movement and allow the foliage to dry after any incidental splash.
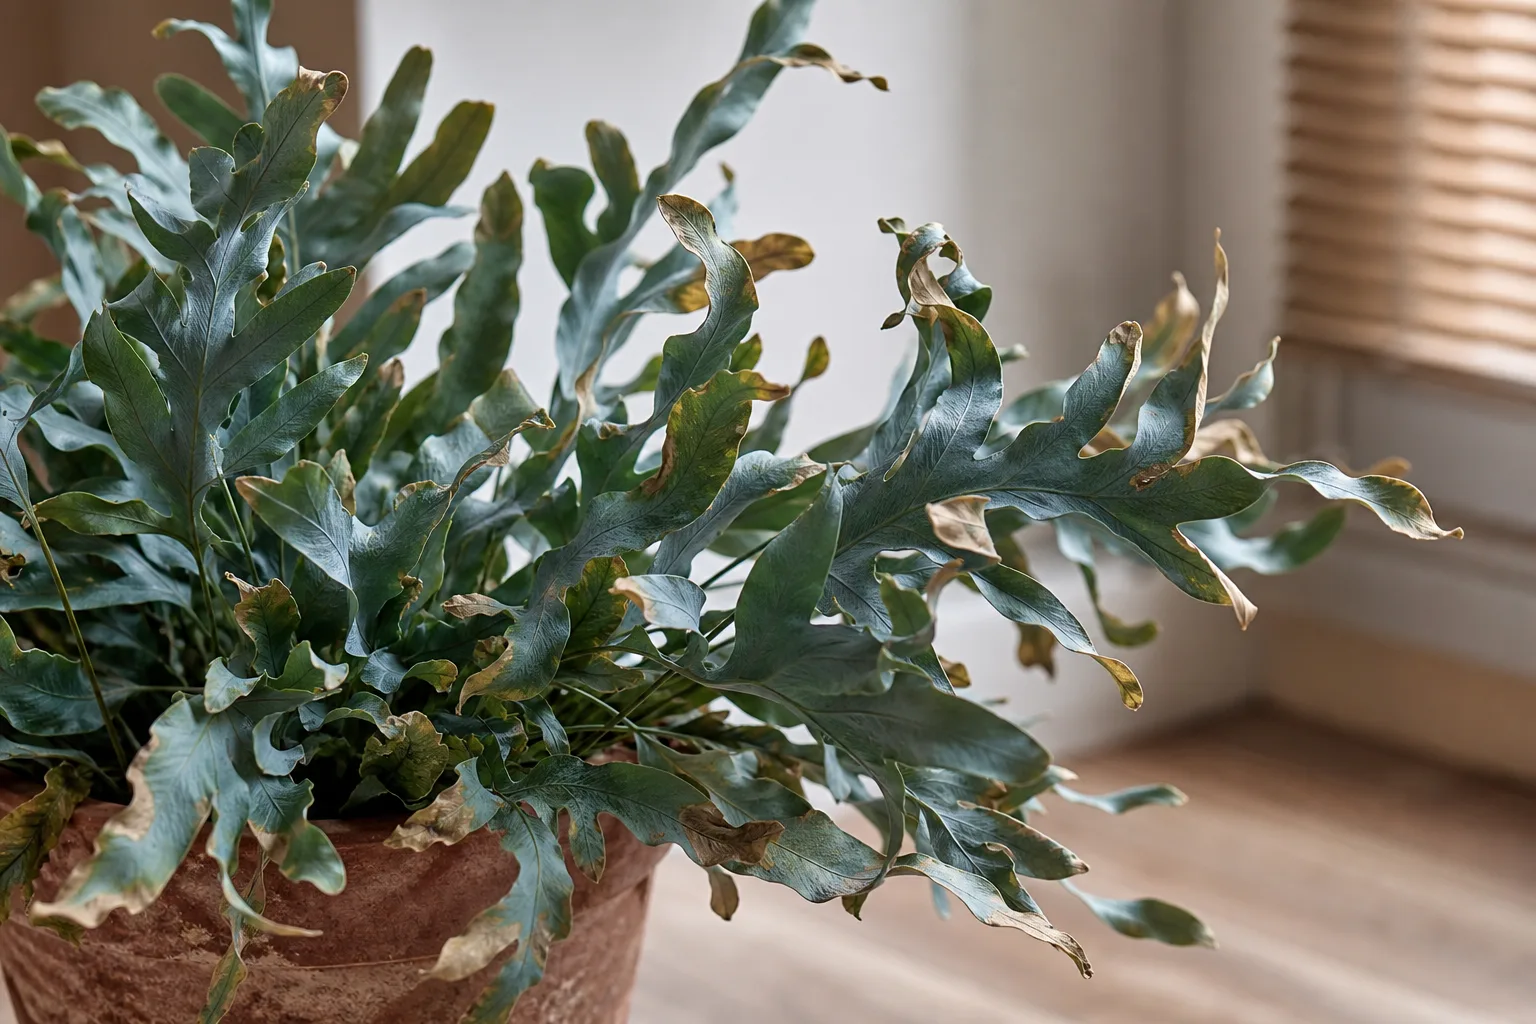
Low humidity is more likely when browning begins at the tips and margins, the mix is drying very quickly, and the plant is close to a vent. If the room is reasonably humid but only the window-facing fronds are damaged, test light intensity first. The Healthy Houseplants blue star fern guide also emphasizes moderate-to-high humidity while acknowledging that the species tolerates somewhat drier conditions than many ferns.
Keep Temperatures Steady and Air Moving
Keep the fern warm, sheltered, and away from abrupt changes. Ordinary indoor temperatures are usually suitable, but avoid cold drafts from frequently opened doors, direct blasts from air conditioners, and hot air from radiators or fireplaces. A stable room in the low-to-upper 60s Fahrenheit is safer than a spot that swings between heat and chill each day.
You can grow blue star fern outdoors in a frost-free climate, in a sheltered position with filtered light or light shade and well-drained soil. Do not treat an outdoor hardiness label as a guarantee for every cultivar or every winter. Oklahoma State University’s profile for wavy blue fern, Phlebodium aureum ‘Undulatum’, lists tropical American origins and a warm-climate zone 10 setting, while the RHS ‘Blue Star’ profile describes outdoor use only in frost-free areas.
Good air circulation is different from a strong draft. Leave space between the fern and neighboring plants, especially after watering. Airflow helps the surface dry at a reasonable pace and makes spider mites and leaf spots easier to spot, but a fan aimed directly at the fronds can dry the plant faster than its roots can replace moisture.
Fertilize Lightly During Active Growth
Blue star fern is not a heavy feeder. During active growth, use a balanced liquid houseplant fertilizer diluted to half strength—or weaker if the plant is newly potted, recovering, or growing in a nutrient-rich mix—about once a month. Apply it to already-moist medium; fertilizer solution on dry roots can be harsh.
Stop or greatly reduce feeding in winter when light and growth slow. Do not try to force new fronds with extra fertilizer if the plant is sitting in dim light or wet soil. Salt buildup can show as a pale crust on the mix, browned tips, or a plant that declines despite adequate moisture.
If salts are suspected, run plain water through the pot several times and let it drain thoroughly. Do this only when the container drains freely. If the pot is compacted or slow to drain, refreshing the mix is safer than repeatedly flushing a root zone that cannot shed water.
Prune for Health, Not Shape
Pruning is optional and mostly cosmetic. Remove a fully brown, yellow, or badly damaged frond by tracing its stalk to the rhizome and cutting it cleanly at the base with sanitized scissors. Do not trim every brown leaflet into a fringe; that leaves a patchy outline and does not restore tissue that is already dead.
If only the tips are brown, first correct the cause and keep the green portion. New fronds are the measure of recovery. Remove fallen debris from the pot surface, particularly when the plant has had pest or leaf-spot symptoms, and disinfect the scissors before moving to another plant.
Avoid cutting into the fuzzy rhizome unless you are deliberately dividing the plant. It is the structure that carries new growth points. A frond that has produced sori can remain on the plant; spores are part of the fern’s normal life cycle and do not need to be wiped off.
Repot Without Burying the Rhizome
Repot when the mix has broken down, water no longer wets the root ball evenly, roots are circling densely, or the rhizome has reached the edge of the container—not simply because two years have passed. Spring or early summer is the least stressful window because the plant can replace disturbed roots while it is naturally growing.
Choose a pot only one or two inches wider than the current root mass, with drainage holes. A much larger pot holds a larger volume of wet mix and can create the exact slow-drying conditions that lead to rot. A wide, shallow container is often more useful than a deep one for a spreading rhizome.
Slide the plant out and inspect before refreshing the mix. Healthy roots are firm and pale to tan; rotten roots are soft, dark, hollow, or foul-smelling. Trim only dead or mushy tissue with clean scissors, then set the plant at the same height. Keep the rhizome visible, water the fresh mix once, and give the fern bright filtered light while it re-establishes.
If the original pot drains well and the fern is not root-bound, simply replacing the upper layer of mix may be safer than a full repot.
Propagate by Rhizome Division
Division is the practical way to make another blue star fern. Wait until the parent plant is healthy and actively growing, ideally in spring. Each division needs a firm section of rhizome plus roots and at least one viable frond or visible growth point; a loose piece of leaf will not produce a new plant.
- Water the parent lightly a day before dividing so the root ball is pliable but not saturated.
- Slide it from the pot and brush away enough mix to see where the rhizome travels and where roots attach.
- Look for a natural section with its own roots and one or more fronds. Tease it apart first; use a clean, sharp knife only when a rhizome connection will not separate by hand.
- Pot the division in a small container of airy mix. Set roots into the medium while leaving the rhizome on the surface.
- Water enough to settle the mix, allow full drainage, and place the new plant in warm, bright filtered light with steady humidity.
- Hold fertilizer until the division shows active new growth. Feeding a freshly cut, stressed root system does not speed rooting and can add salt stress.
Keep the new division evenly but lightly moist while it establishes. A temporary clear cover can reduce water loss, but it must be vented and removed if condensation stays on the foliage or mold appears. New frond growth is a stronger success signal than a fixed number of days; depending on conditions, establishment may take several weeks.
Growing Blue Star Fern From Spores
Spores are possible but much slower and less predictable for a home grower. They are sown on a sterile, moist medium and kept warm, bright, and humid while the fern passes through a tiny sexual stage before becoming recognizable.
The RHS notes spore propagation for ‘Blue Star’ at about 19–24°C when ripe and recommends spring division as the simpler alternative. For a plant you want to keep genetically identical and attractive, division is the better use of time.
Mounting or Hanging: When It Makes Sense
A hanging basket shows off the arching fronds and gives the creeping rhizomes room to travel. Mounting on bark or a similar support can also work because the species is epiphytic, but it changes the care routine. A mounted plant has less reserve moisture than a potted root ball and may need frequent soaking, especially in a heated or air-conditioned home.
Use a clean, stable mount with a thin pad of moisture-retentive material under the roots. Secure the rhizome without wrapping it so tightly that new growth is pinched, and never bury the entire rhizome under wet moss. Water the roots and support thoroughly, then let the mount drain and dry slightly between checks.
Choose mounting only if you can inspect it often. A regular pot is safer for a dry home, a new plant with few roots, or anyone still learning the difference between thirst and rot.
Troubleshoot Symptoms in the Right Order
When a blue star fern looks unhappy, begin with four checks: light, root-zone moisture, rhizome firmness, and pests. Inspecting these in order prevents the common cycle of adding water to a plant that is already losing roots or moving a dry plant into harsher light.
| What you see | First clues to check | First response |
|---|---|---|
| Brown, crisp tips or margins | Dry mix, vent, low humidity, strong sun | Check moisture and location; raise humidity only after ruling out thirst and scorch |
| Curling fronds | Dry root ball, rapid water loss, low humidity | Rehydrate thoroughly, drain, and stabilize the room; do not mist as the only fix |
| Yellow fronds with wet soil | Poor drainage, compact mix, root or rhizome rot | Unpot and inspect roots before watering again |
| Long, sparse growth | Dim light or overcrowding | Move into brighter filtered light gradually and rotate the pot |
| Fine webbing or pale stippling | Spider mites, often worse in hot dry air | Isolate, rinse if practical, and use a labeled treatment after testing the foliage |
| Tiny flies around the pot | Fungus gnats and consistently wet mix | Let the upper mix dry farther, improve drainage, and treat the larvae if needed |
Brown, Crispy, or Curling Fronds
Brown tissue cannot turn green again, so judge the correction by the next fronds. Brown tips with a very light pot and dry mix point first to underwatering. Brown margins beside a heating vent or in a room with persistently dry air point toward humidity stress. Bleached, papery patches on the window side point toward sun scorch.
Curling can be a more immediate water-stress signal. Feel the medium before doing anything: if it is dry, water thoroughly and let it drain; if it is wet, do not add water just because the leaves look limp. Check roots and the rhizome for damage, then address humidity and airflow after the root-zone question is answered.
Remove only fronds that are mostly dead. Keep partially green leaves while you stabilize conditions because they still contribute energy to recovery. If the newest fronds continue to brown after watering and humidity improve, move the plant farther from direct sun and check for mites underneath the leaves.
Yellow Fronds, Soft Rhizomes, or Wet Soil
Yellowing in an older individual frond can be normal, but several fronds yellowing together while the mix stays wet is a warning. A plant with root rot may look thirsty because damaged roots cannot move water, which is why watering is the wrong first response.
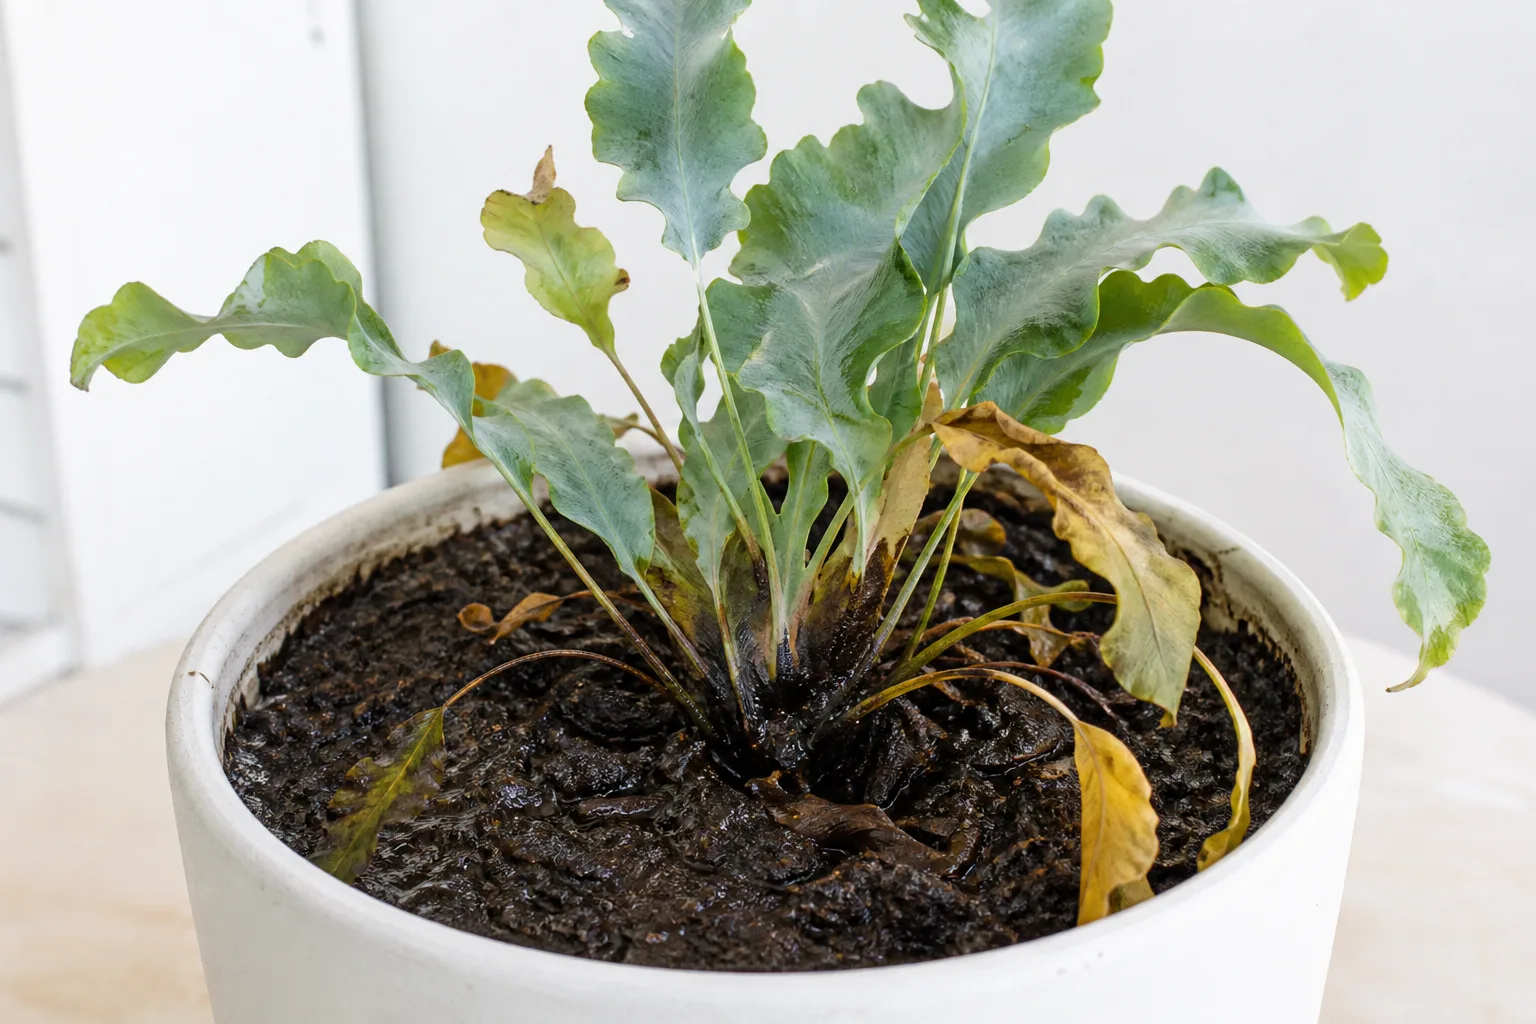
Slide the plant from the pot and smell the root ball. Firm roots and a firm, dry-surfaced rhizome suggest a watering or light issue; mushy dark roots, a soft rhizome, or a sour smell suggest rot. Cut away damaged tissue with sterilized scissors, remove compacted wet mix, and repot into fresh airy medium in a clean pot. Do not place the recovering plant in a huge container or keep it constantly saturated.
If the rhizome itself is soft through most of its length, recovery is uncertain. Save any firm, rooted section with a healthy growth point as a division, but do not propagate from tissue that is already mushy. Keep the surviving section warm and lightly moist, not sealed in a wet environment.
Pests and Leaf Spots
Blue star fern can attract spider mites, thrips, scale insects, fungus gnats, and—in outdoor settings—fern-feeding caterpillars. The best prevention is not a routine pesticide spray; it is a plant that has enough light, balanced moisture, airflow, and space to inspect.
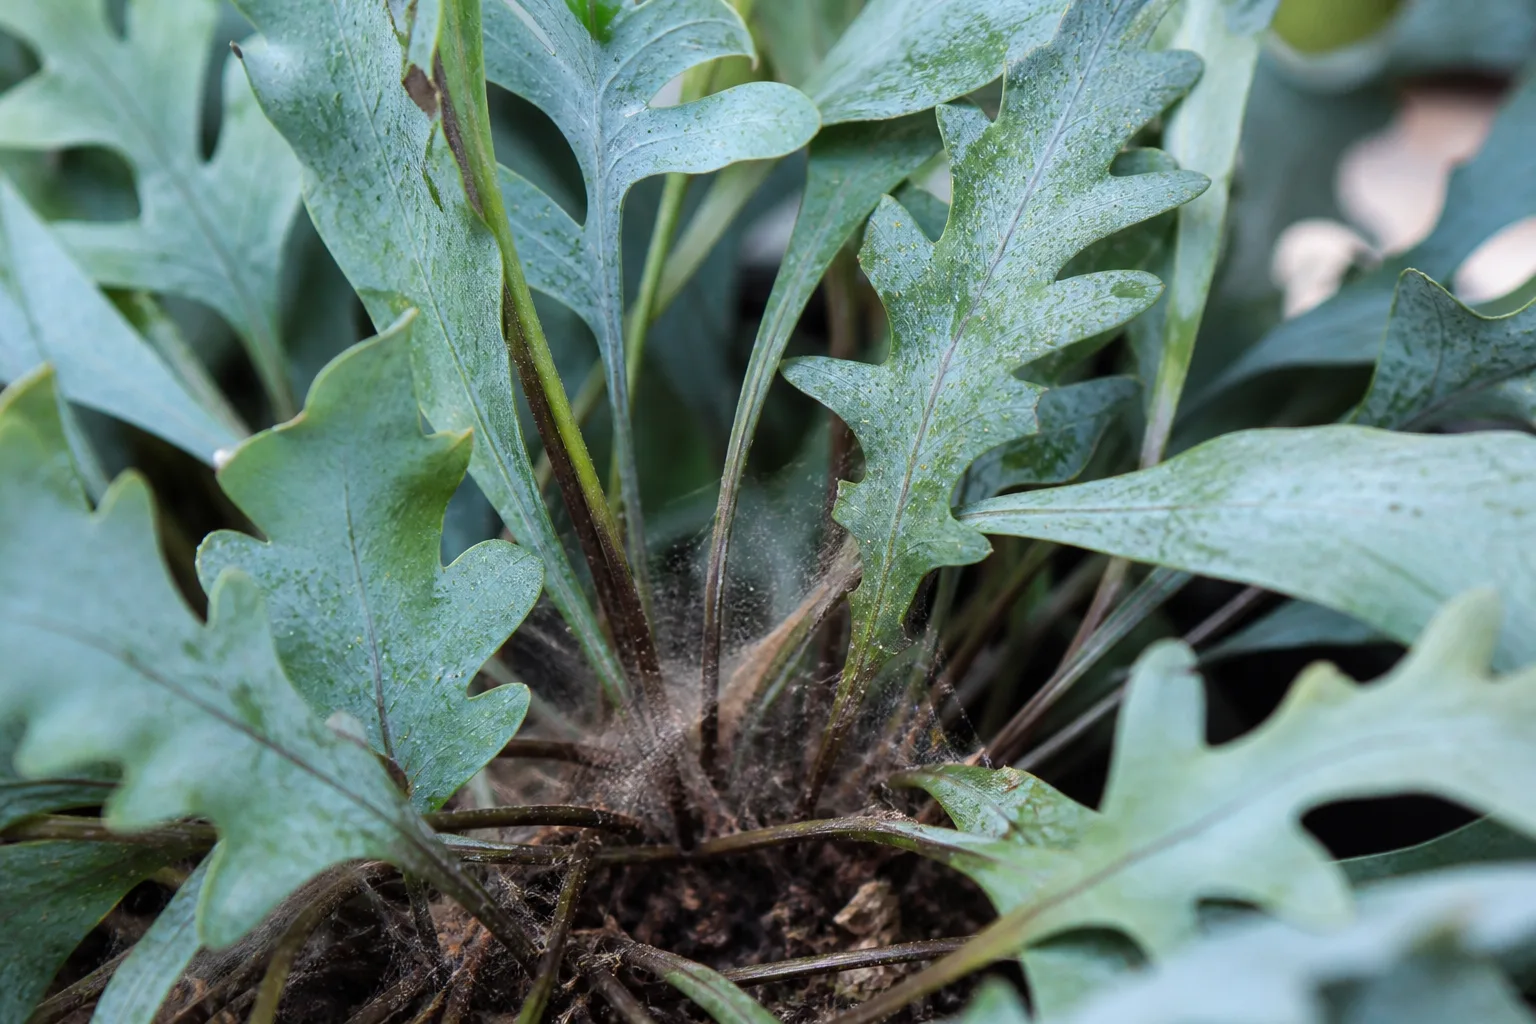
Check the undersides of fronds and the rhizome surface during watering. Fine webbing and many tiny pale specks suggest mites; silvery scarring or distorted new growth can suggest thrips; cottony clusters or fixed bumps suggest other sap-feeders. Isolate the plant, rinse pests away when the plant and room can dry afterward, and use an insecticidal soap or other product only when its label lists the pest and fern use. Test a small area first because delicate foliage can react to sprays.
Fungus gnats are usually a moisture and media problem as much as an insect problem. Let the upper mix dry farther between waterings, improve drainage, remove dead debris, and use a labeled larval control if the infestation persists. Yellow sticky cards can monitor adult activity, but they do not correct wet soil by themselves.
Small regular brown sori on healthy fronds are different from pests. Leaf spots that enlarge, appear irregularly, or come with soft tissue deserve isolation, dry foliage, better airflow, and removal of affected material. Avoid overhead watering while you investigate; if a disease continues to spread, use only a fungicide labeled for the specific situation and follow its directions.
A Simple Weekly Care Routine
Once a week, look at the newest frond, feel the upper inch of the mix, lift the pot, and inspect the underside of a few leaves. This takes less time than recovering a root system after weeks of automatic watering. If the mix is partly dry and the pot feels light, water thoroughly and empty the saucer; if it is still heavy, wait and check again in a few days.
Once a month during active growth, rotate the pot, clear debris from the rhizome surface, inspect for pests, and feed only if the plant is growing and the medium is already moist. In winter, replace the fertilizer check with a light check: shorter days often mean slower drying, so the watering interval should expand naturally.
After repotting, moving, mounting, or dividing, watch the plant for two to three weeks before making another major adjustment. Keep the rhizome visible, the medium airy, and let new growth—not a rigid schedule—tell you whether the routine is working.
Conclusion
Successful blue star fern care is a balance of moisture and air. Give Phlebodium aureum filtered light, a chunky mix, a pot that drains freely, and thorough watering followed by partial drying. Keep its fuzzy rhizomes on the surface, protect it from harsh sun and drafts, and use moderate humidity with real airflow rather than relying on constant misting.
When the plant struggles, inspect before you intervene. A light pot and crisp edges call for a different response from a heavy pot and soft rhizome; regular sori are different from mites; and brown old tissue is less important than the health of the next frond. With that simple diagnostic habit, this unusual fern can become a full, cascading houseplant without the fuss of a rigid care schedule.



