How to Grow Dahlias in Pots for Repeat Blooms
Growing dahlias in pots starts with the right cultivar and container. Get practical advice on planting depth, summer care, repeat blooms, and winter storage.
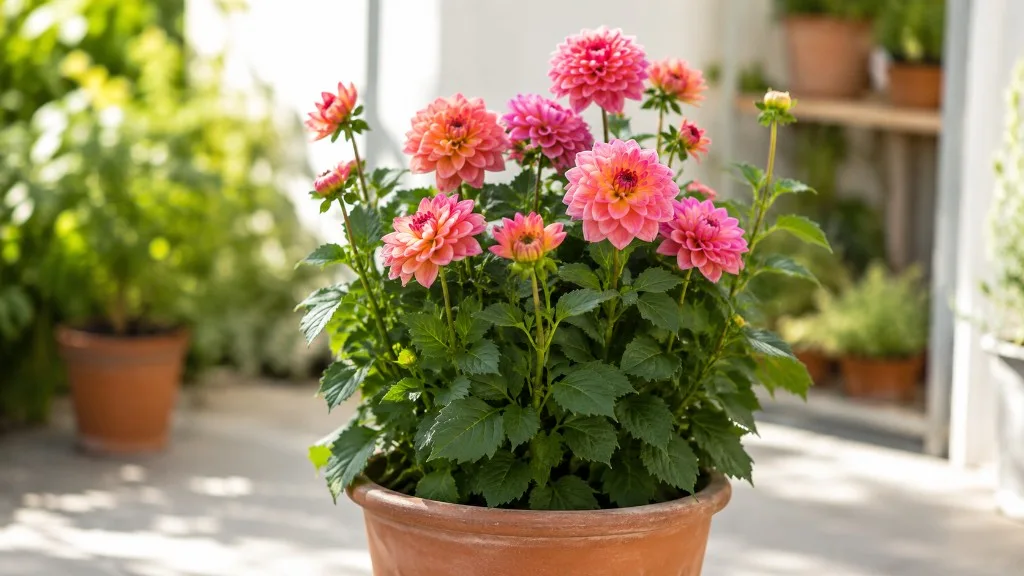
Dahlias can flower for months in a container when the cultivar fits the pot, the tuber starts in warm, barely moist mix, and the growing plant gets sun, water, and regular deadheading. For most gardeners, the reliable setup is one compact or medium dahlia in a sturdy pot about 16 inches wide and deep, with open drainage and a stake installed before the roots fill the container. The exact size varies with the cultivar, so use the mature plant dimensions on the label as the final guide.
The main challenge is that a pot amplifies both drought and excess water: it can dry out quickly in summer, yet a tuber planted in cold, saturated mix can rot before it sprouts. Plan for those two stages separately. Keep the dormant tuber only lightly moist until growth begins; then water deeply whenever the mix starts to dry and keep the plant supported as stems lengthen.
Choose a dahlia that fits a pot
Read the mature height and spread
Start with the plant, not the flower photo. A dramatic dinner-plate bloom may look tempting, but the plant carrying it can be tall, top-heavy, and difficult to keep upright on a balcony or exposed patio. Look for dwarf, patio, mignon, or other compact cultivars, and check the expected height and spread rather than relying on a group label alone. Dahlia varieties differ widely, and a compact label does not guarantee a small root system or a short flower stem.
For a single container, a cultivar that matures around 1 to 3 feet tall is easier to manage than one expected to reach 4 feet or more. You can grow taller dahlias in pots if the container is large and heavy, the site is sheltered, and you can add a sturdy support, but they need more room and more frequent attention. North Carolina State Extension notes that dahlias can range from about 1 to 6 feet tall, which is why cultivar dimensions matter more than a one-size pot rule (NC State Extension).
Match the bloom form to how you want to use the plant. Pompon, ball, and smaller decorative flowers can look balanced on compact plants; a small cultivar with single or collarette flowers can be a better choice if you want a lighter, pollinator-friendly display. If cutting flowers is the goal, pick a variety with stems long enough for a vase and leave space around it for airflow. For a tidy patio accent, choose compact growth and prioritize flower abundance over record-size blooms.
Pick a pot and mix that drain well
Size and material affect stability and drying
For one compact or medium tuber grown through the season, begin with a pot roughly 16 inches across and at least as deep; Savvy Gardening also recommends a container at least 16 inches wide for direct planting (Savvy Gardening). A tall cultivar or a cultivar with large flowers usually needs a wider, heavier container; a small starter pot is useful indoors but is not a summer home for a full-grown plant. The pot should leave a few inches of mix around the tuber, room for roots to expand, and enough weight at the base that foliage and flowers will not tip it over in wind.
Plastic or resin pots are lighter to move and usually lose moisture more slowly, a useful trait on a sunny balcony. Unglazed terracotta breathes and dries faster, so it may need more frequent watering; a heavy glazed pot or ceramic planter is stable but difficult to move once full. In a very hot site, avoid placing a dark container against a heat-reflecting wall, and keep the pot where the roots are not baking on stone all afternoon. Fine Gardening’s container guide also emphasizes matching pot material to local heat and cold, not just appearance (Fine Gardening). The right container is the one you can safely move, water, and support through the season—not just one that looks attractive empty.
Every pot needs unobstructed drainage holes. If you use a saucer to protect a deck, empty standing water after irrigation or rain so the tuber is not sitting in a reservoir. A well-drained potting medium matters as much as the hole: water should move through the mix, not pool around the tuber.
Use a light, soil-free potting mix
Use a fresh, bagged potting mix made for containers, ideally one that feels light and holds moisture without staying soggy. Garden soil is usually too dense for a pot: it compacts, drains unevenly, and can make a large planter heavy to move. If your mix is unusually fine or stays wet, blend in a modest amount of perlite or fine bark to improve air space rather than adding more garden soil. Do not pack the mix hard around the tuber; firm it gently so water can still reach the roots.
Start with a mix that is evenly damp but not dripping. You can add compost if the potting mix is low in organic matter, but avoid filling the container with pure compost, which may settle and hold too much water. If the bag includes a slow-release fertilizer, note how long it feeds before adding anything else. Too much fertilizer in a confined root zone can build up as the pot dries and be harder for roots to escape than it would be in a garden bed.
Plant at the right time and depth
Position the tuber with its eye at the top
Plant outdoors after frost danger has passed and the potting mix has warmed. A container left on a cold patio can stay chilly even after a sunny day, so avoid planting into cold, waterlogged mix just because the calendar says spring. If your spring is unpredictable, wait for stable mild weather or start the tuber indoors in a small pot that you can move outside later.
Before planting, inspect the tuber. It should feel firm, with a swollen body connected to the crown by an intact neck; the growing eye or eyes are on the crown. A tuber without a viable eye or with a broken neck may not produce a shoot. The Washington State University Extension describes the body, neck, and eye as the parts needed for a tuber to grow again (WSU Extension).
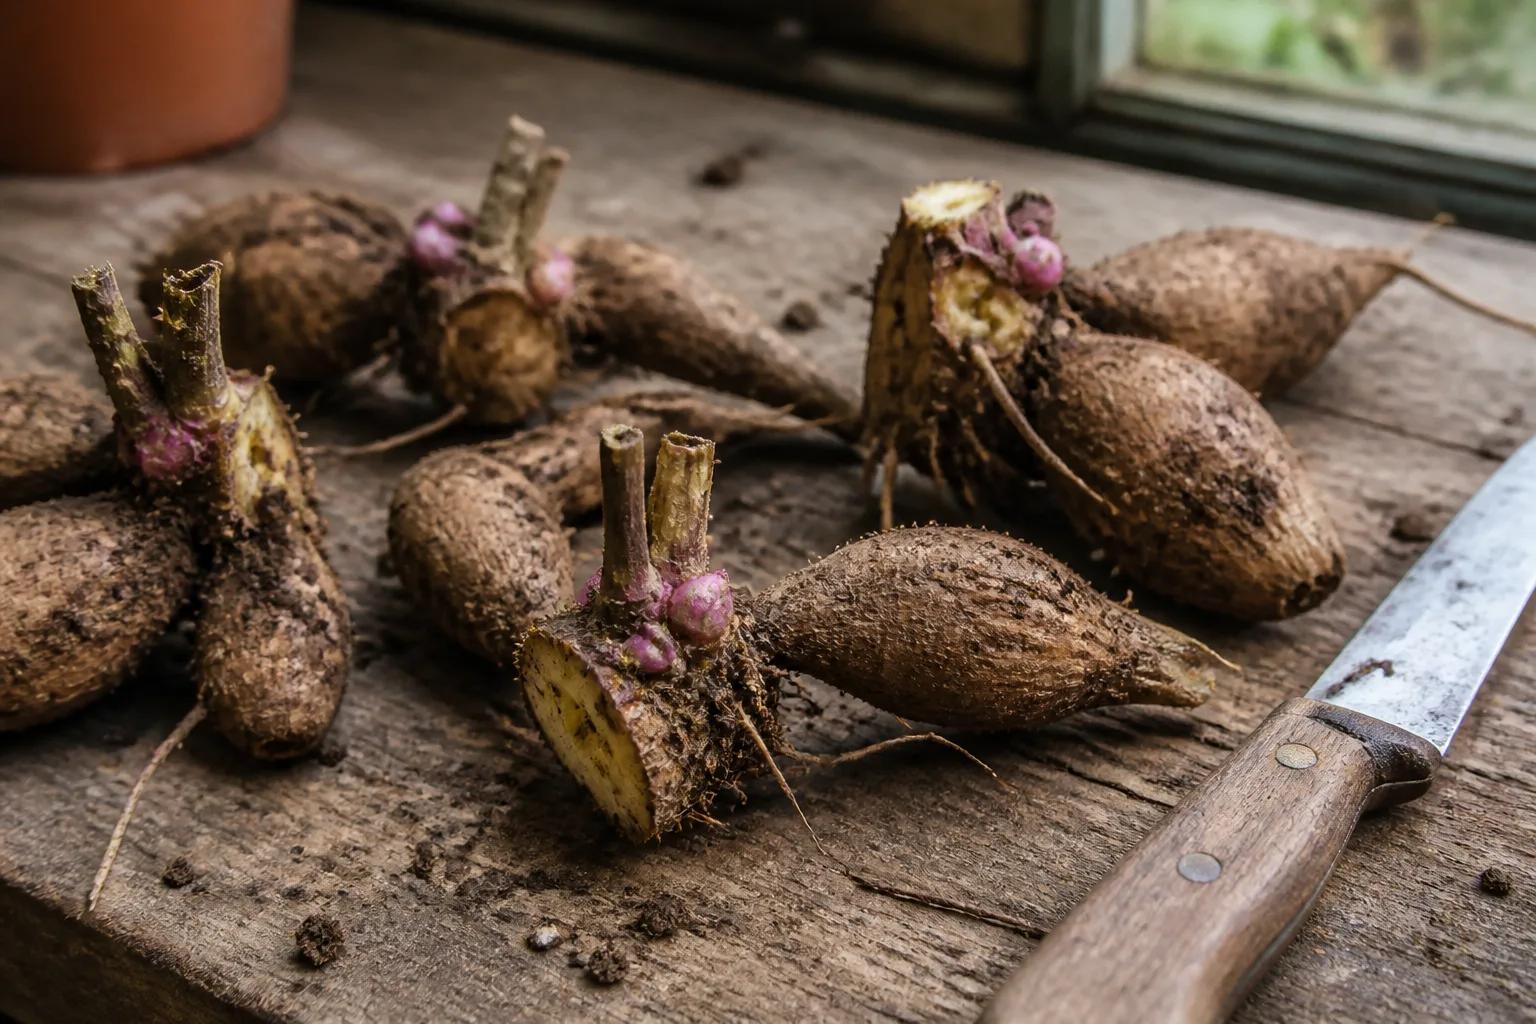
Set one tuber horizontally in the pot, with the crown and eye facing upward and the body extending sideways. Planting depth varies by method: NC State Extension gives about 3 inches as general guidance, while Savvy Gardening starts container tubers with roughly an inch of cover and adds mix as shoots grow. For a roomy, permanent pot, use about 2 to 3 inches; for a small indoor starter, a light inch of cover keeps the emerging shoot close to the surface. In either case, keep the crown near the top, leave several inches below the rim for watering, and do not jam the tuber against the container wall. If a shoot is already present, keep it above the soil and avoid snapping it while you settle the mix. For more detail on recognizing and planting tubers, see our guide to planting dahlia tubers.
Press a sturdy stake into the pot now, a few inches from the tuber, before roots and stems spread. This prevents the stake from spearing the tuber later and gives you a fixed support when the plant grows. Label the cultivar at planting; foliage looks similar across many varieties, and the label is easiest to read before the pot fills in.
Start indoors only if you can harden it off
To get a head start, plant the tuber in a smaller container indoors about three to four weeks before your local last frost date. Keep it in a bright window or under a grow light and water sparingly until shoots appear. The tuber is using stored energy at first; a cold, wet pot is a greater threat than a brief delay in watering.
When outdoor nights are reliably mild, acclimate the plant to sun and wind over about a week. Begin with a few hours outdoors in bright shade, then increase its exposure gradually. A seedling raised indoors can scorch or flop if it moves straight into strong sun and breezes. If roots have filled the starter pot, transfer the whole rootball gently to the final container; avoid breaking the young shoot or disturbing the tuber unnecessarily.
Starting indoors makes sense when the growing season is short or you want a fuller plant earlier. Skip it if you cannot provide strong light or a place to protect the tender shoot from cold. A stretched, weak start often takes longer to recover than waiting to plant a dormant tuber outside.
Give the container sun, airflow, and a sheltered position
Give a dahlia at least 6 hours of direct sun each day; more morning sun usually means sturdier growth and more flowers. NC State Extension lists full sun as 6 or more hours and notes that dahlias also tolerate partial shade, which can be useful when afternoon heat is intense (NC State Extension). In a hot-summer climate, morning sun with light afternoon shade can reduce stress without leaving the plant in deep shade.
A bright, windy corner can be harder than a slightly shadier, sheltered one. Strong wind can snap stems and dry the pot rapidly, while still air and tightly packed neighboring plants slow foliage drying after rain. Place the container where it gets sun and airflow but is not constantly buffeted, and leave enough space around it to inspect leaves and tie stems. If the patio reflects heat, move the planter a short distance from the wall or floor rather than trying to compensate with constant watering.
Rotate the pot every week or two if one side leans toward the light. Once the plant is tall or flowering heavily, avoid turning it abruptly; check the stake and ties instead. If your site gets fewer than 6 hours of sun, a dahlia may survive, but expect fewer flowers and leggier stems. More fertilizer will not make up for insufficient light.
Water by soil condition, not a fixed calendar
Watering needs change sharply as the tuber moves from dormant to actively growing. Before shoots appear, keep the mix only slightly moist. If it is already damp when planted, wait and check the soil rather than watering again on schedule; a tuber sitting in cold, wet mix can rot before it makes roots. When a shoot emerges, begin watering more regularly, but still let excess drain fully.
Once the plant is leafy, water deeply at the base until water runs through the drainage holes. Check the top inch or two of mix each morning during warm weather; water when that layer is dry and the container feels noticeably lighter. A small pot in wind or full afternoon sun may need water daily in a heat wave, while a large plastic pot in mild weather may go several days. This is why a weekly schedule is only a reminder to check, not a reliable irrigation rule.
If water runs straight down the sides without wetting the center, the mix may have dried and pulled away from the pot. Apply water slowly in two passes, a few minutes apart, until the rootball absorbs it. If the plant wilts in midday heat but looks firm again in the evening, it may be temporarily heat-stressed; if it is still limp the next morning, check moisture and drainage. Dry mix points to under-watering; wet, heavy mix with persistent wilt points to oxygen-starved or damaged roots, so stop watering and clear any blocked holes. Keep water off the leaves when practical, especially late in the day.
Feed for flowers, not just foliage
The tuber supplies the first burst of growth, so you do not need to feed at planting if the potting mix already contains fertilizer. Wait until the plant is actively growing, then follow the container fertilizer label at a conservative rate. A balanced or bloom-oriented fertilizer can support flowering, but avoid repeated high-nitrogen feeding: it can push soft foliage at the expense of buds and may leave stems more prone to bending.
A flower or container fertilizer with moderate nitrogen is a sensible starting point; use the product label’s rate for pots rather than guessing from garden-bed directions. There is no single best NPK ratio for every mix, cultivar, and watering pattern, and adding phosphorus or potassium beyond the label is not a shortcut to more flowers. Savvy Gardening recommends waiting until a plant is established and avoiding excessive nitrogen when growing dahlias in pots (Savvy Gardening). If your mix already contains slow-release food, do not stack another slow-release product on top; reassess when the labeled feeding period ends.
Containers lose nutrients as water drains through them, but more fertilizer is not the answer to every pale leaf. First check sun, moisture, and drainage. If foliage is rich green but buds are scarce, stop feeding and look for too much nitrogen, too little sun, or a cultivar that is still establishing. If you do feed, water the soil first when it is very dry so concentrated fertilizer does not sit against dry roots.
Support and pinch stems before they flop
Tie the main stem loosely to the stake as it grows, then add a second tie higher up if the plant becomes top-heavy. Use soft garden ties, strips of cloth, or clips, leaving room for the stem to thicken. A rigid tie pulled tight can cut into the stem in wind. A small tomato cage can work for a compact dahlia, but install it before foliage gets dense so you do not crush branches while fitting it over the plant.
Pinching is optional. When a young plant is about 8 to 12 inches tall and has several sets of leaves, pinch out the growing tip just above a leaf pair to encourage branching and more flower stems. This usually delays the first bloom while the side shoots develop, so skip the pinch if you planted late, have a short growing season, or prefer a single taller stem for cutting. BBC Gardeners’ World describes pinching a dahlia at roughly 20 centimeters to encourage flowering side shoots and tying in new growth as it develops (BBC Gardeners’ World).
Check stakes and ties after heavy rain, gusty weather, or a growth spurt. If a stem has already bent but not broken, support it gently and watch for continued growth; a split or sharply kinked stem is unlikely to recover fully. A stake added at planting is much less disruptive than pushing one through a mature rootball.
Deadhead correctly for repeat flowers
A spent dahlia bloom looks different from a closed bud: the petals fade or fall, and the head becomes dry, papery, or pointed as seeds begin to form. A round, firm green bud is still developing, so do not cut it just because it has not opened yet. If you are uncertain, wait a few days and compare its shape with an open flower.
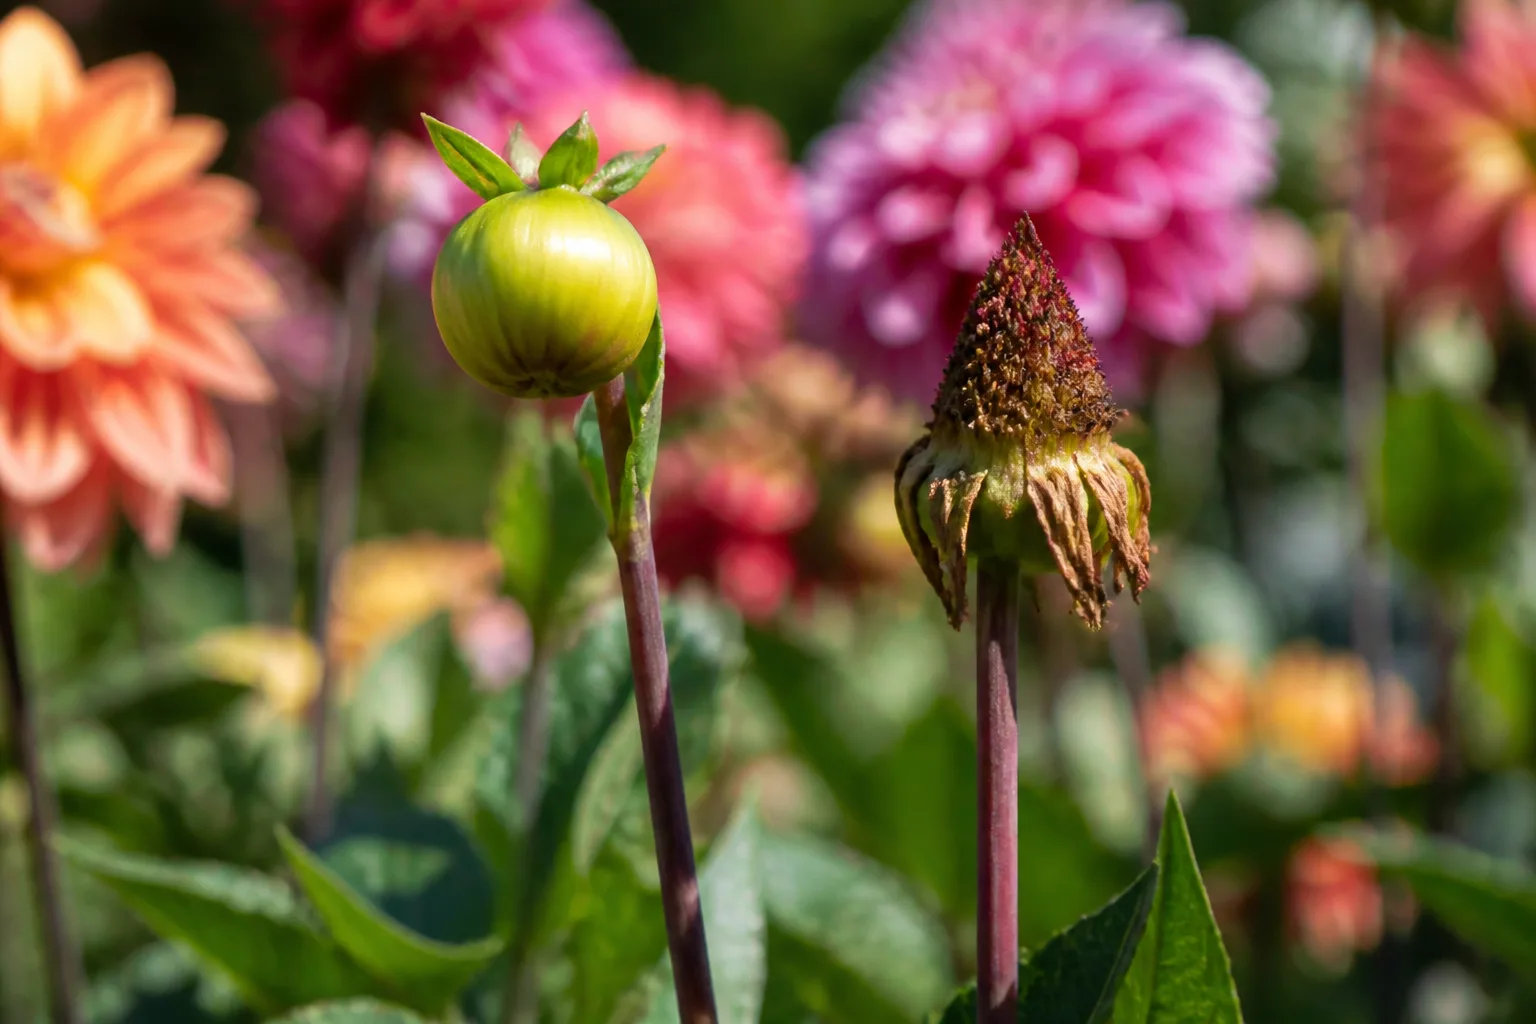
Follow the spent flower stem down to the next pair of leaves or branching shoot and cut just above that point with clean snips. Removing only the petals or the flower head can leave a long bare stalk that will not produce a new bloom. Regular deadheading directs the plant away from seed formation and keeps the container looking tidy; also remove broken or diseased foliage so air can move through the plant.
You can cut open blooms for a vase instead of deadheading them in place. Cut long stems back to a strong leaf node, and the plant will respond with new side shoots when it has enough light, water, and warmth. In late summer, check the plant every few days rather than waiting for every flower to fade at once. For a visual guide to separating buds from spent heads, see how to cut off dead dahlia flowers.
Troubleshoot slow growth, weak stems, and few blooms
A tuber that has not sprouted is not automatically dead. Cold soil, a planting date too early, or a wet pot can delay growth; a shriveled tuber or one with a soft, foul-smelling body is more concerning. Keep the pot warm, confirm the drainage holes are clear, and do not keep adding water while you wait. If the tuber has rotted, remove it and the saturated mix rather than planting another tuber into the same wet pocket.
A dahlia that grows leaves but few buds usually needs a closer look at light and feeding. Move it to a sunnier location if possible, stop high-nitrogen fertilizer, and avoid pinching late in the season. A dahlia can also take time to establish after a late planting or transplant; one quiet week does not call for a stronger dose of fertilizer.
For a drooping plant, check the mix before assuming it is thirsty. If dry, water slowly and thoroughly; if wet, let the pot drain and move it out of extreme heat while roots recover. Yellowing lower leaves can be normal as the season winds down, but widespread yellowing with soft stems can signal waterlogged roots. Small holes or ragged edges may come from slugs, earwigs, or caterpillars; inspect both sides of leaves and remove pests by hand when practical. Avoid spraying a broad pesticide without identifying the pest and checking the product label for use on flowering plants and pollinators.
Overwinter the tuber without exposing it to a freeze
Dahlias are tender perennials whose tubers can be injured by freezing temperatures. NC State Extension notes that the tuberous roots may be damaged below 25°F, but a container can become colder than the surrounding ground, so do not use that number as a safe outdoor target for a pot (NC State Extension). In a mild climate, you may be able to leave a pot outdoors in a protected position, but a hard freeze or prolonged wet winter makes that risky. A container that freezes solid can lose the tuber even where dahlias survive in the ground.
After the plant finishes for the season, stop feeding and let the foliage die back naturally unless a frost is imminent. If you need to protect it from a sudden freeze, move the whole pot to a cool, frost-free garage or shed. Keep the soil on the dry side through dormancy and do not leave water in a saucer. In a cold climate, either store the entire dry pot somewhere cool and frost-free or lift the tuber for separate storage. Washington State University Extension notes that dahlias can remain in the ground in many Zone 8 and warmer locations, while colder areas generally need tubers lifted and protected (WSU Extension).
Choose between storing the whole pot and lifting tubers
Keeping the tuber in its pot saves digging and reduces handling, but it takes more storage space and you cannot easily inspect individual tubers for rot. Let the potting mix dry, cut the stem back after the foliage has died, and move the pot to a dark place that stays cool but does not freeze. Check it occasionally; if the mix is wet, improve airflow and let it dry rather than sealing the pot in plastic.
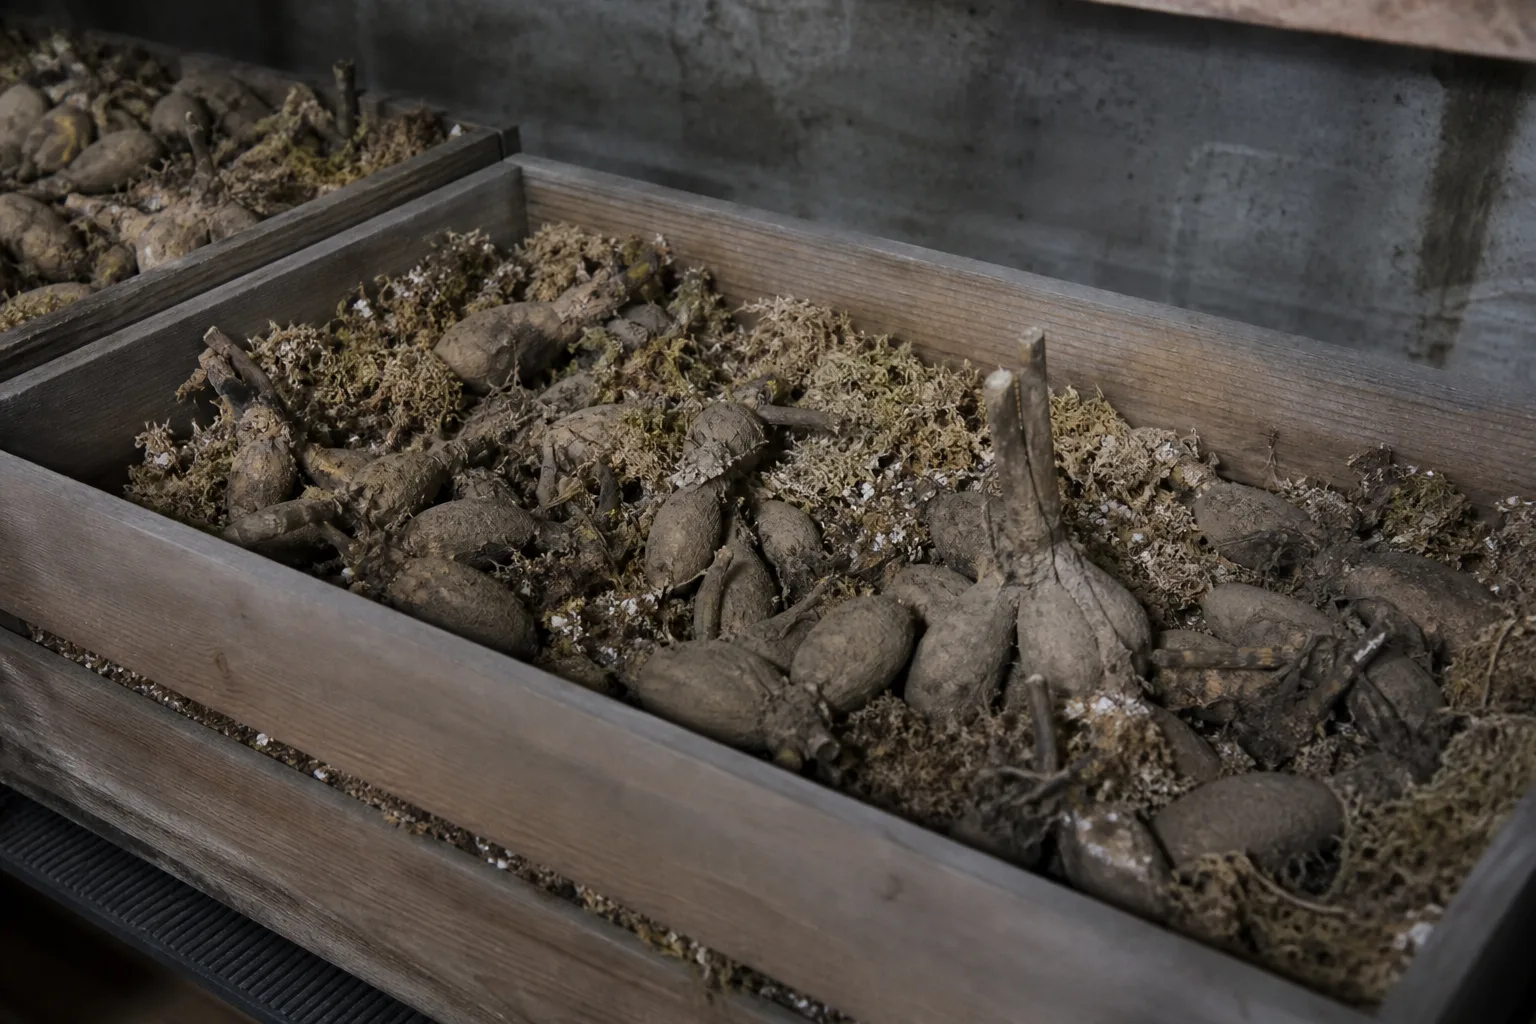
Lifting is more practical when the pot is too large to store or you want to divide and label tubers. After the foliage dies, cut the stem back, tip the pot on its side, and loosen the rootball carefully so the tubers do not snap from the crown. Brush away loose mix, let the clump dry in a sheltered place, and store it in a breathable box with a slightly dry packing material in a cool, dark location. Do not store tubers where they will freeze, sit wet, or shrivel from prolonged heat and dry air. Check them once or twice through winter and discard any that turn mushy; a tuber needs a sound body, neck, and eye to grow again.
As spring returns, inspect the tubers and refresh the container with new potting mix. Plant once frost risk has passed, or start indoors if you can provide light and protect new growth. The same pot can host the plant again, but the next season’s success depends on a sound tuber, a drained mix, and a timely start—not on keeping the old soil untouched.
Conclusion
A potted dahlia is easiest to manage when its mature size matches the container and the pot can drain freely. Start with one healthy tuber in warm mix, place the container in at least six hours of sun, and use the soil’s condition—not a calendar—to decide when to water. Install support early, feed modestly after growth begins, and remove spent flowers down to a strong leaf node so new buds keep developing.
The winter plan depends on your climate and storage space. In a mild region, a sheltered pot may survive outdoors; where the container can freeze, move it to a protected place or lift the tuber for cool, dry storage. With those few decisions made before and during the season, dahlias can turn a patio pot into a long-lasting display rather than a one-month burst of color.