How Often to Water a Poinsettia: A Simple Soil Test
Water a poinsettia when the compost begins to dry, then drain it fully. Use this practical guide to spot thirst, waterlogging, and seasonal changes.
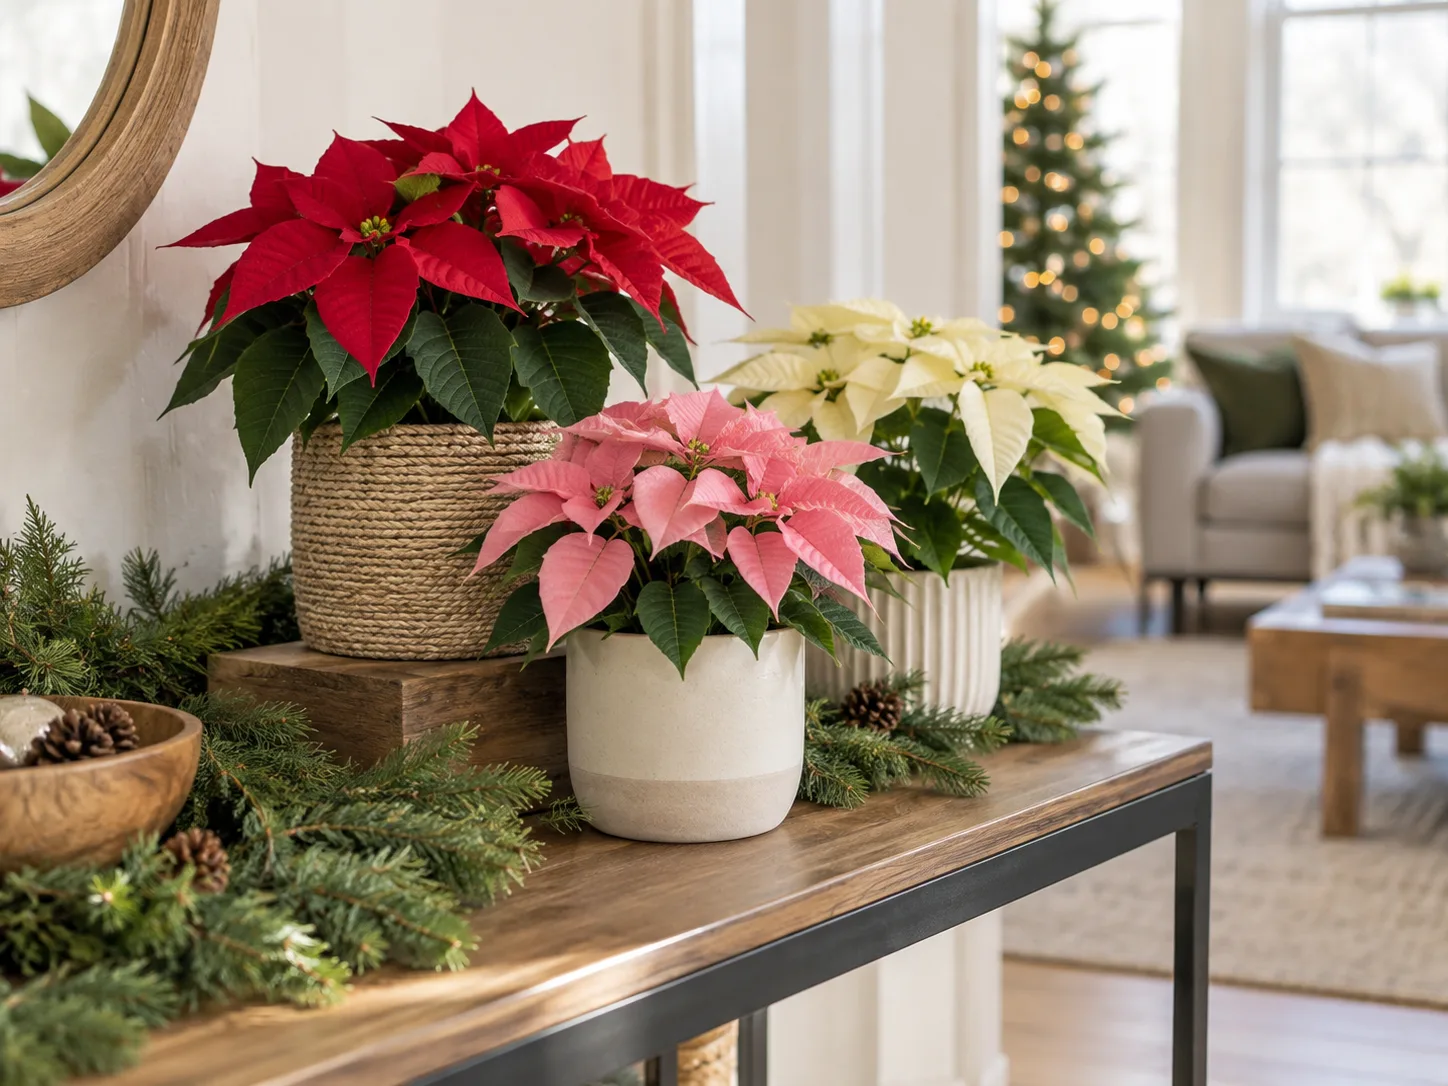
A poinsettia does not need water on a particular weekday. Water when the surface of the potting mix has started to dry, then give the root ball a thorough drink and let every drop of excess water drain away. In many homes that may mean checking every few days and watering roughly weekly, but the plant’s pot, window, room temperature, and the time of year can shift that interval.
The practical target is evenly moist, never waterlogged soil. A dry plant can wilt quickly, but a poinsettia left standing in water can lose roots and leaves even when the top looks fine. Check the mix before you reach for the watering can; leaves alone cannot tell you which problem you have.
The short answer: water by soil condition
For a typical holiday poinsettia in a nursery pot, check the mix every few days. When the top inch begins to feel dry—not dusty and shrunken all the way through—water slowly until a little drains from the holes, then empty the saucer or outer pot. If the surface still feels cool and damp, wait and check again later.
That rule is more useful than a fixed schedule because two plants on the same table can dry at different speeds. A small pot beside a sunny window or warm vent loses moisture faster than a larger plant in a cool, dim room. A decorative sleeve can also hide standing water, making a plant appear dry at the surface while its lower roots remain soaked.
Treat “top inch dry” as the moment to consider watering, not a command to pour regardless of what else you find. In a tiny pot, an inch reaches much of the root zone; in a larger container, the center can still be wet. If the top feels dry but the pot remains heavy, wait. If both the mix near the edge and the pot feel dry and light, a full watering is more appropriate than a small splash.
The Royal Horticultural Society’s poinsettia growing guide recommends watering when the compost surface begins to feel dry and allowing the pot to drain. The Missouri Botanical Garden likewise advises keeping the soil evenly moist without letting the plant sit in water. Those instructions describe a moisture range, not a number of days.
For the first week, check every two or three days so you can see how your particular pot behaves; that is a check-in rhythm, not an instruction to water each time. If the soil dries unusually fast, verify that water is soaking into the mix instead of bypassing it and look for a heater or sunny window nearby. Once you learn the pattern, keep checking often enough to catch the dry-to-damp transition before the entire root ball shrinks away from the pot.
Check moisture below the surface
A dry-looking crust is a clue, not a verdict. The uppermost layer can dry while the middle of the root ball still holds plenty of water, especially in a cool room or a pot with a tight decorative cover. Before watering, check the mix slightly below the surface near the pot’s edge and lift the container to compare its weight with how it feels after watering.
Use a finger and the pot’s weight
Push a clean finger about an inch into the soil near the rim. If that layer feels cool or damp, wait; if it feels dry and the pot is noticeably lighter, water. This simple check is reliable for small pots where you can reach the mix without damaging roots. Homes & Gardens also recommends checking below the surface rather than watering by habit, and advises rechecking in a few days if you are uncertain.
Pot weight is a useful second signal, particularly when the surface is covered with moss or decorative material. Lift the nursery pot after a full watering and drainage, then notice the lighter feel as it dries. You do not need a moisture meter; if you use one, treat it as another clue and confirm with the soil and pot, since probes can read differently in compacted or unevenly moist mix.
A plain wooden skewer can help when your fingers cannot reach the middle. Push it partway into the mix near the edge, leave it briefly, and pull it out: dark, damp particles clinging to it mean there is still moisture below the surface. Do not push through the center of the root ball or treat a single reading as exact; combine it with the pot’s weight and recheck after a day or two if the signals conflict.
If you have trouble reaching the soil, slide the plant out of its outer container rather than guessing. The roots and lower mix need air as well as water, so a quick look at the inner pot’s drainage holes can reveal whether water is still trapped underneath.
How to water evenly
When it is time to water, aim for the soil rather than the foliage. Use room-temperature water and pour gradually across the surface so it can soak into the mix instead of running down a gap between the soil and the pot wall. Stop when a small amount emerges through the drainage holes; a few drops of runoff show that water reached the bottom, but the pot should not remain submerged.
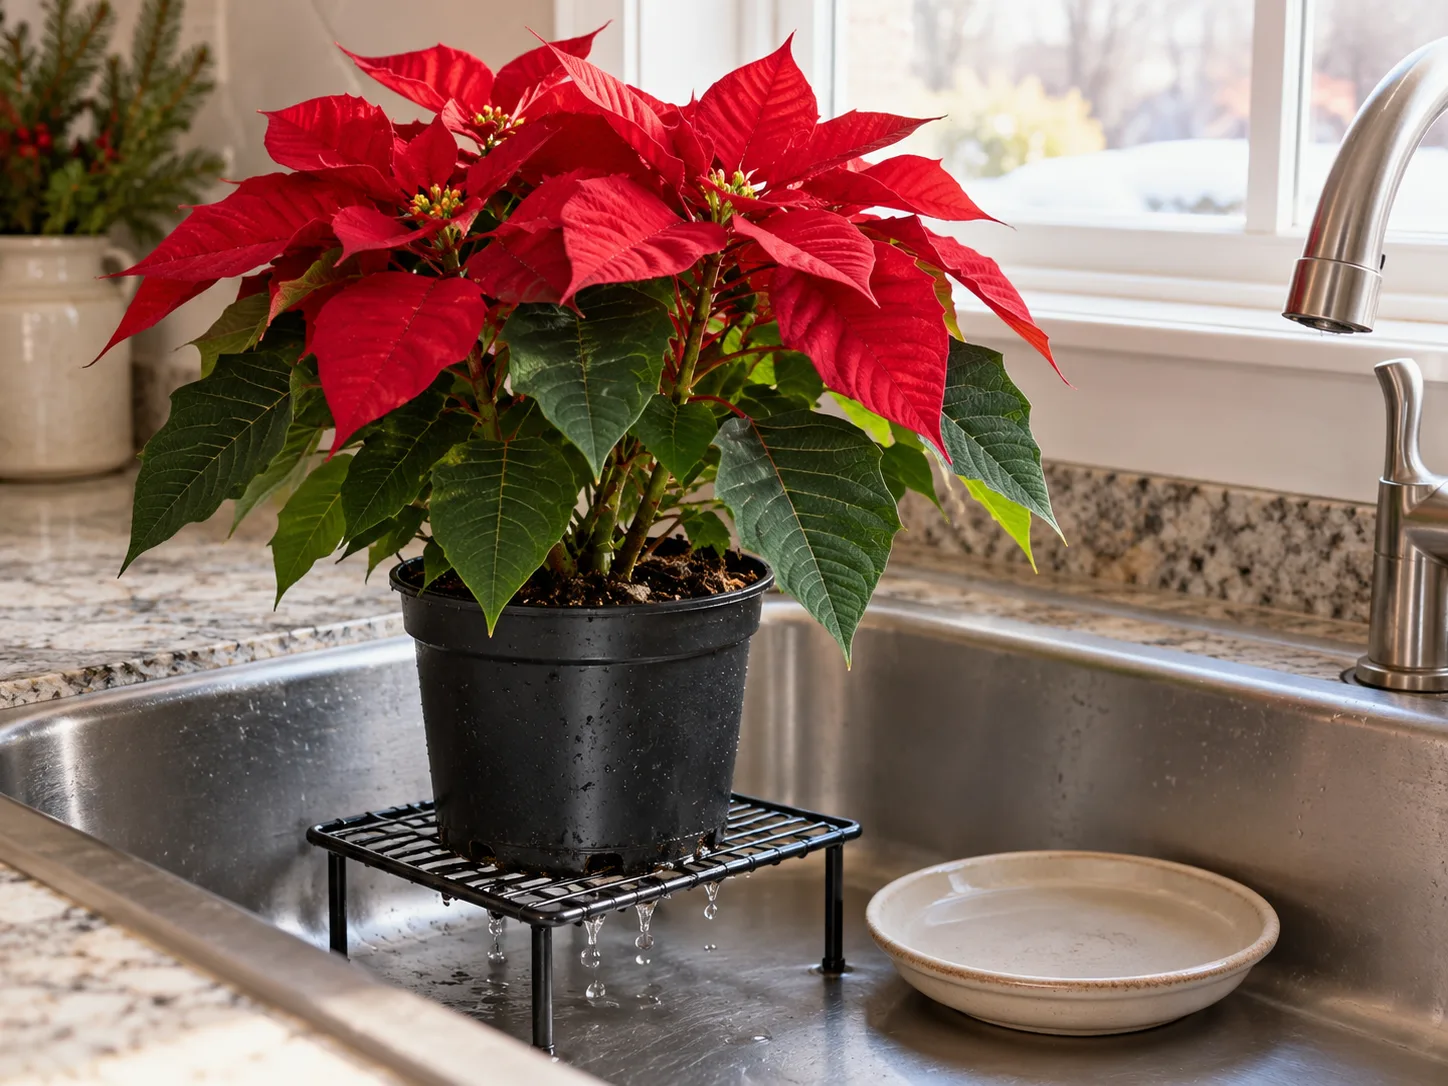
Top-watering a poinsettia
Top-watering is the simplest option when the mix absorbs water normally and the pot has open drainage holes. Remove the foil or lift the nursery pot out of its cachepot, set it over a sink or tray, and pour water around the soil surface in two or three passes. Give the water a moment to soak in between passes; a rushed pour can escape through one channel and leave dry pockets elsewhere. A cup measurement is not a reliable universal dose because one plant may be in a three-inch nursery pot and another in a much larger container, with different mixes and drainage. Runoff is the useful endpoint: it tells you the mix is wet through, while the drain-and-empty step prevents that extra water from turning into a standing bath.
Let the pot drain until dripping stops, then empty the saucer and return the plant to its usual spot. A wet leaf or bract is not the same as watered roots, so direct the stream into the soil. Farmers’ Almanac also advises watering until it drains and not allowing the poinsettia to sit in that runoff.
Bottom-watering a dry root ball
Bottom-watering can help if very dry potting mix has pulled away from the pot or water races down the sides without soaking in. Set the nursery pot in a shallow bowl of tepid water with the water level below the rim, and let the mix draw moisture through the drainage holes. Check after about 10 minutes; once the surface begins to feel damp, lift the pot out and let it drain fully. The RHS gives a 10-to-20-minute soak as a practical option for poinsettias.
Do not leave the plant sitting in the bowl after the mix has rehydrated. Bottom-watering is a way to rewet a stubbornly dry root ball, not a reason to keep the pot continuously wet. If the center remains dry after one soak, repeat briefly and check the mix rather than leaving it submerged for hours.
Fix the foil sleeve and drainage first
Many gift poinsettias arrive in a plastic nursery pot wrapped in decorative foil. The sleeve is fine as an outer cover only when water can escape; if runoff collects inside it, the pot sits in a reservoir that can deprive roots of air. Peel the foil down or remove it for watering, and keep the nursery pot where you can see and access its drainage holes.
After watering, wait until dripping has stopped, pour out any water in the saucer or cachepot, and only then put the plant back. If you want to keep the foil’s appearance, remove the pot each time you water and drain it separately. A few holes in the wrapper may let water out, but they do not make a sealed decorative container a dependable drainage system.
The inner pot needs at least one unobstructed drainage hole. If the poinsettia is planted directly in a container with no hole, either use a nursery pot inside it or move the plant to a container that drains. Adding gravel at the bottom does not create drainage; the excess water still needs an exit. Keep the plant in its nursery pot for the short holiday display if that pot already drains, and use the decorative container only as a cover. This makes each watering easier to inspect and avoids disturbing a plant that is otherwise settled. If you are keeping it long term and discover the inner pot is sealed, move it into a container with drainage rather than relying on a shallow gravel layer or tipping out water you cannot see.
Why your room changes the interval
Water use depends on how quickly the plant loses moisture and how much light is reaching its leaves. More warmth, brighter light, and moving air generally dry the pot faster; cool conditions and low light slow it down. Those are reasons to adjust how often you check, not reasons to water more heavily when the soil is already damp. Pot material and root-ball size matter too. A small plastic pot holds moisture differently from a larger terracotta pot, whose walls allow faster evaporation; a compacted mix can stay wet in the center even after the surface dries. After moving a poinsettia to a new spot, check it a little more often for a week so you learn the new drying pace instead of carrying over the old interval.
The goal is not to keep every particle wet all the time. Roots need both moisture and air, so a cycle of thorough watering followed by partial drying is safer than frequent sips that keep the lower mix constantly wet. If a plant is in a very small pot that dries rapidly, the practical answer is to inspect more often, not to leave it standing in a reservoir.
Warmth, light, and moving air
A poinsettia displayed near a heater, fireplace, or warm sunny pane may need more frequent checks than one set back from the window. Hot air can dry the leaves and top layer quickly, while a cold draft can trigger leaf drop that looks like thirst. Keep the plant in a bright place away from direct blasts of heat and cold; a stable room is easier to manage than a dramatic view beside a drafty door.
The Missouri Botanical Garden notes that poinsettias do not tolerate dry soil for long, while the RHS advises avoiding cold, draughty spots and drying radiator heat. Together, those points explain why a simple calendar fails: a plant in a warm, bright room may dry sooner, but a drooping plant near a cold window may be suffering from temperature stress rather than needing another drink.
What changes after the holiday display
While the plant is full of leaves and colorful bracts, keep checking the pot as usual and water when the mix begins to dry. Once the bracts fade, the plant may shed some leaves and use less water; if you are keeping it through winter in a cooler rest, reduce watering and keep the stems from shriveling rather than treating it like an actively growing summer plant. The Missouri Botanical Garden describes this lower-water rest after the holidays, followed by more regular watering when new growth starts in spring.
Do not sharply cut back water while the plant still has a full canopy in a warm, bright room. The plant’s condition matters more than the calendar date: fewer leaves and cooler conditions slow water use, while new green growth increases it. If you plan to keep the poinsettia year-round, see our poinsettia care guide for the longer seasonal routine.
Diagnose drooping or yellow leaves before watering
Drooping, yellow leaves, and leaf drop can follow too little water, too much water, cold exposure, or normal aging. These symptoms overlap, so start by checking the soil and pot weight. A thirsty plant has a dry root zone and a light pot; a waterlogged one feels heavy, stays damp, and may have yellow lower leaves even though the plant looks limp.
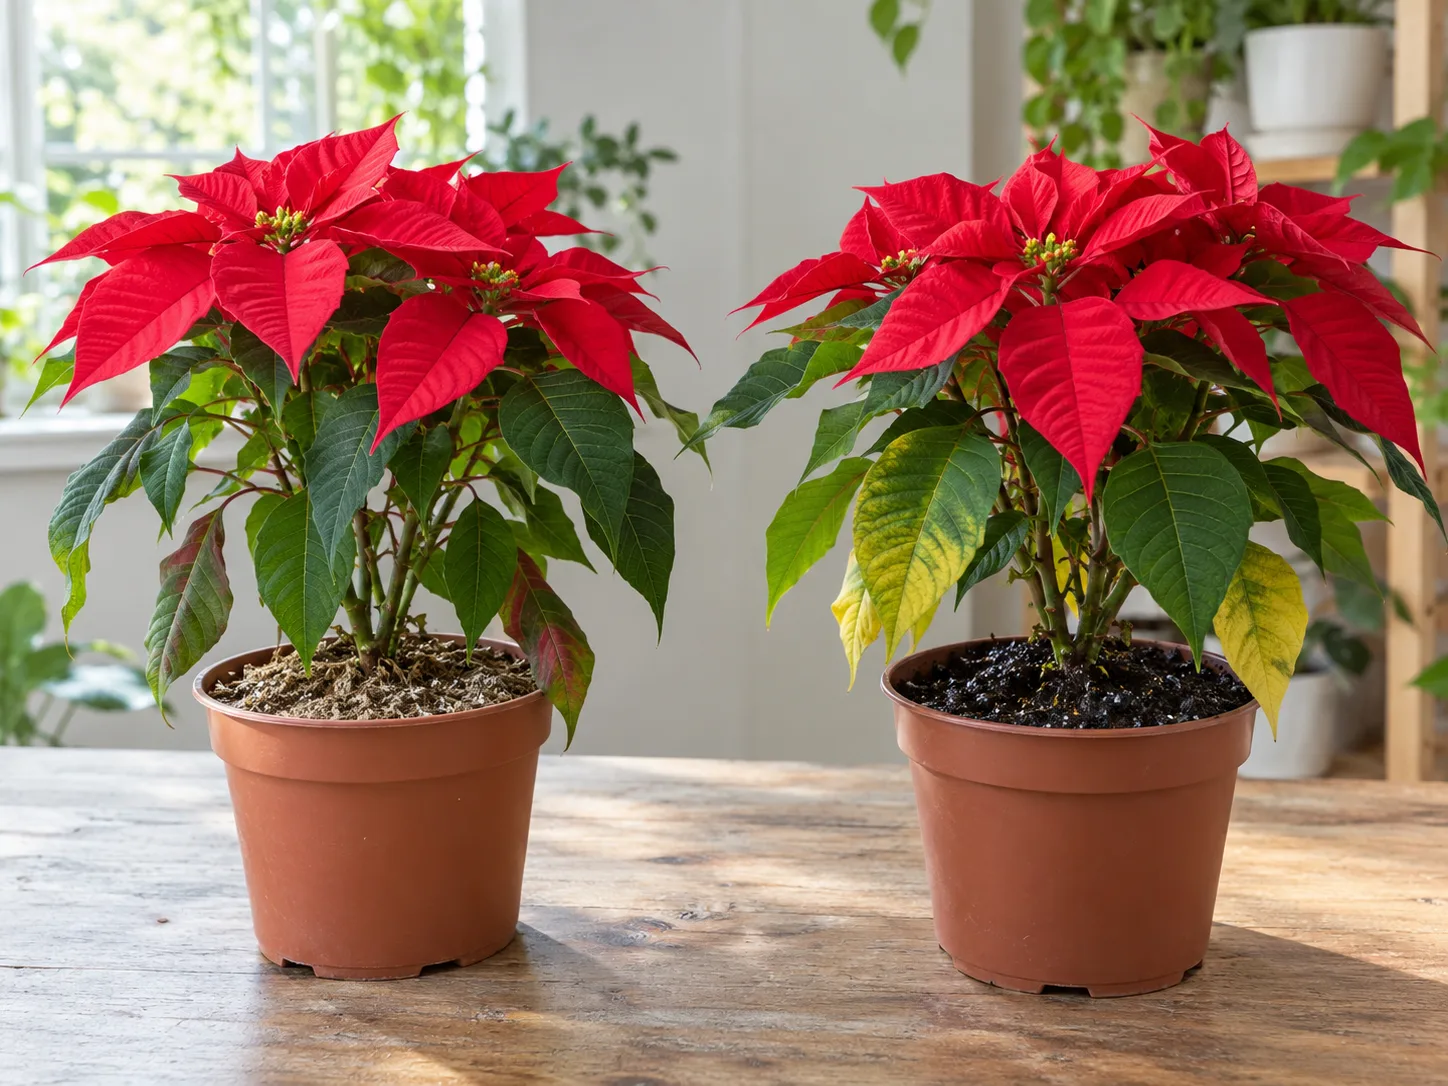
Signs the plant is too dry
Underwatered poinsettias often have a light pot and mix that feels dry below the surface. Leaves and bracts may droop or curl, and prolonged dryness can lead to leaves dropping from the lower part of the plant upward. The Missouri Botanical Garden notes that leaves may begin falling from the bottom when the soil gets too dry; this is a useful clue, but confirm it with the root-zone check before watering.
A dry brown edge does not prove that the plant needs more water. It can reflect dry air, heat, or the natural end of an older leaf, and repeated watering without checking can turn a small issue into soggy roots. Look at the whole pattern: dry mix plus a light pot supports thirst; wet mix means the next step is not more water.
Signs the root zone is too wet
A pot that remains heavy and damp for several days, yellowing lower leaves, or a sour smell from the mix points toward poor drainage or overwatering. If roots stay saturated, they cannot get enough air and may begin to decay; additional water will not revive them. Yellow leaves can have other causes, so use the soil condition and drainage setup as evidence instead of diagnosing by color alone. Leaf drop after moving the plant indoors can also reflect a cold journey or a draft rather than root trouble. The RHS points out that poinsettias exposed to cold during sale or transport may begin dropping leaves and bracts days later. If the soil is only slightly damp and the pot drains freely, stabilize its location before making a drastic watering change.
Take the nursery pot out of the foil or cachepot and check whether water is pooled below it. Let excess drain away, empty the saucer, and wait until the upper layer starts to dry before watering again. The RHS cautions that overwatering can damage poinsettias, and Missouri Botanical Garden specifically warns against leaving them in standing water.
How to revive a dry, wilted poinsettia
If the soil is dry and the pot is light, water it thoroughly once. Pour slowly over the entire surface until water begins to leave the drainage holes, then allow it to drain completely. If water runs straight through because the mix has shrunk from the pot wall, use a short bottom soak, then lift the pot out and drain it.
Move the plant to bright, indirect light in a stable room, away from a heater or chilly window, and check the mix again the next day. A mildly wilted plant may regain firmness as its roots take up water, but leaves or bracts that have already dried or fallen will not grow back. Do not compensate by watering again while the soil remains damp, fertilizing a stressed plant, or putting it in direct hot sun. If the mix has become so dry that it beads water or contracts from the pot wall, one slow pass may not reach the roots. Let the first pass settle for a minute, add a second small pass, and switch to the brief bottom soak only if water still bypasses the root ball. The aim is to restore even moisture once, then return to checking rather than keeping the pot saturated.
If the poinsettia does not improve after the root ball is rehydrated, reassess the conditions instead of repeating the soak. A plant that was chilled during transport, left in a dark corner, or damaged before purchase may keep dropping leaves even after watering is corrected. The RHS notes that cold exposure before sale can cause progressive leaf and bract loss after the plant is brought home.
What to do when soil stays wet
If the mix is still wet when you check again, stop watering and uncover the drainage setup. Remove pooled water, slide the nursery pot out of the decorative container, and leave it somewhere bright with normal room airflow. Do not set it on a radiator or try to force-dry the roots; harsh heat stresses the foliage while the lower mix may remain saturated.
When the top inch begins to dry, resume with a thorough watering and drain the pot as usual. If the mix stays soggy because there is no drainage hole, transfer the plant to a draining nursery pot with fresh, well-draining indoor potting mix. If stems are soft at the soil line or roots are dark and mushy, rot may already be established; remove dead tissue and use fresh mix rather than trying to fix it by alternating floods and droughts.
Prevention is mostly mechanical: confirm the inner pot drains, keep the cachepot empty, and check moisture before adding more. Do not rely on a layer of pebbles, a foil sleeve, or a dry-looking surface to tell you that water has moved through the root ball. A single wet check does not automatically mean you must unpot the plant; first correct any water trapped in the sleeve and give the mix time to dry. Repot only when the container lacks drainage, the medium has collapsed or stays saturated, or there is evidence of root decay. Repeatedly lifting and disturbing healthy roots can add stress without improving drainage.
Conclusion
Water a poinsettia when the potting mix has begun to dry near the surface, not because a set number of days has passed. Check the soil and pot weight together, wet the whole root ball, and let the nursery pot drain before it returns to its sleeve or saucer.
If the plant wilts, look at the soil before you pour: a dry, light pot needs water, while a damp, heavy pot needs drainage and time. That small pause prevents the two common mistakes—letting the root ball dry out completely and leaving it waterlogged—that shorten a poinsettia’s colorful display.