How to Get a Peace Lily to Bloom Again
Learn how to get a peace lily to bloom again by fixing light, watering, fertilizer, age, and root problems—without overfeeding or overwatering.
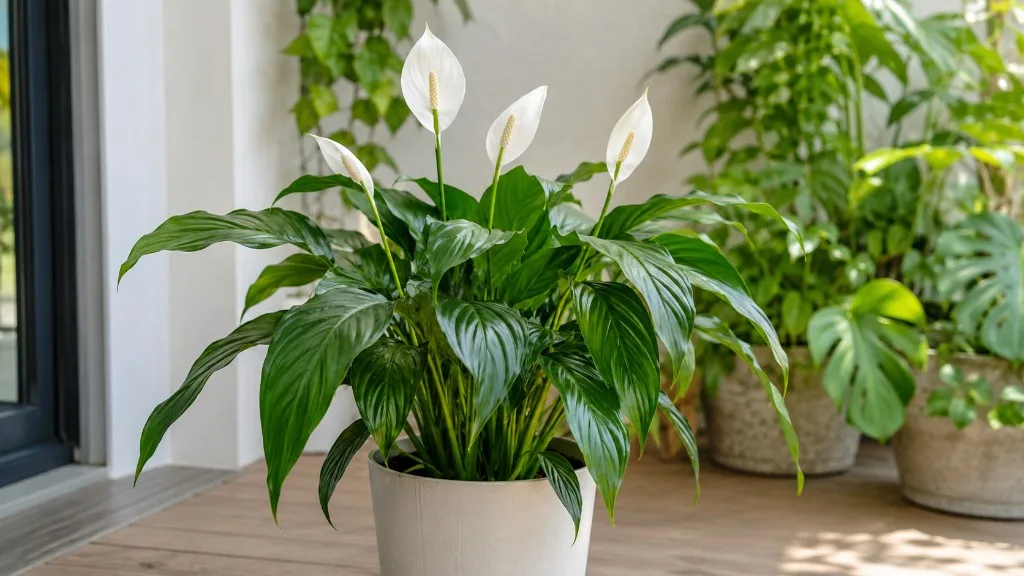
If your peace lily is producing healthy leaves but no white spathes, make light your first suspect—not fertilizer. A mature Spathiphyllum needs enough filtered light to build energy for flowering, while wet roots, cold drafts, a tired potting mix, or simple seasonal dormancy can all keep a leafy plant in maintenance mode.
The most reliable way to get a peace lily to bloom again is to correct the conditions in an order that protects the roots. First confirm the plant is old enough and currently healthy, then improve filtered light, stabilize watering, feed modestly during active growth, and check temperature and root space. A plant may show new leaves before it shows a new spathe, so judge recovery by steady growth rather than expecting a flower within a few days.
Start by checking whether your peace lily is ready to bloom
Flowering is not an annual promise made by the label on a nursery pot. Peace lilies vary by species and cultivar, and published RHS profiles list different time-to-maturity ranges for different selections, including a shorter range for some compact cultivars and a longer range for Spathiphyllum wallisii. That variation is a useful reminder that “three years old” is a clue, not a guarantee; plant size, vigor, light history, and growing conditions matter too. See the RHS peace lily growing guide and its Wallis peace lily profile for the range of forms and habits.
A recently purchased peace lily also deserves extra patience. Commercial growers can time flowering under controlled conditions, and Gardening Know How and Gardener’s Path describe the use of bloom-inducing treatments in production. The plant you bring home may therefore be carrying a nursery-timed display, not a flowering rhythm that your living room can immediately repeat. If the old spathes fade while the plant continues to make firm green leaves, that is not proof of failure; it means the plant is alive and needs time to rebuild under your conditions.
The “flower” is a spathe, and green is not automatically a problem
The showy white part is a modified leaf called a spathe. The small upright structure inside it is the spadix, which carries the tiny true flowers. The RHS explains this arum-family structure and notes that spathes can last for months before gradually turning green as they age.
That color change changes what you should do. A spathe that is turning green but still firm is usually aging naturally, not asking for more fertilizer or a brighter, harsher window. Once it is fading, brown, or collapsing, cut the entire flower stalk at the base with clean snips; this lets the plant redirect attention to roots and leaves without sacrificing a healthy leaf.
Diagnose before you change the routine
Look at the whole plant before choosing a fix. A peace lily that is dense, green, and steadily producing new leaves has a different problem from one with pale stretched growth, persistently wet soil, crispy edges, or a root ball that stays dry in the center. The missing bloom is a symptom of a limited resource, and changing three resources at once makes it hard to know what actually helped.
Start with four observations: where the brightest part of the day falls on the leaves, how heavy the pot feels before watering, how long the mix stays damp, and whether new growth is appearing from the center. Write down the date and make one major change at a time. This turns “my peace lily never flowers” into a small, trackable experiment rather than a cycle of moving, feeding, and repotting in the same weekend.
Pale or stretched leaves point toward a light problem
Leaves that are unusually pale, petioles that lean toward a window, and long gaps between leaves suggest the plant is trying to capture more light. A peace lily can survive in a dim corner, but survival light and flowering light are not the same target. The RHS specifically says plants may tolerate deeper shade yet rarely flower there, while bright indirect light supports stronger growth and flowering.
Do not diagnose light from the room’s appearance. Human eyes adjust quickly, so a spot that feels bright to you may be dim for a plant; a phone light-meter app or inexpensive meter can at least compare locations. If the plant is already dark green and compact but has brown scorch patches on the window side, light may be excessive or changed too abruptly rather than insufficient.
Yellow, soft, or crispy leaves point toward stress
A bloom pause is reasonable when the leaves show active stress. Yellowing across older leaves with mix that stays wet points toward too much moisture or poor drainage; widespread limpness with a very dry mix points toward missed watering. Brown tips can reflect dry air, inconsistent moisture, fertilizer salts, or water quality, so do not treat the color alone as a diagnosis.
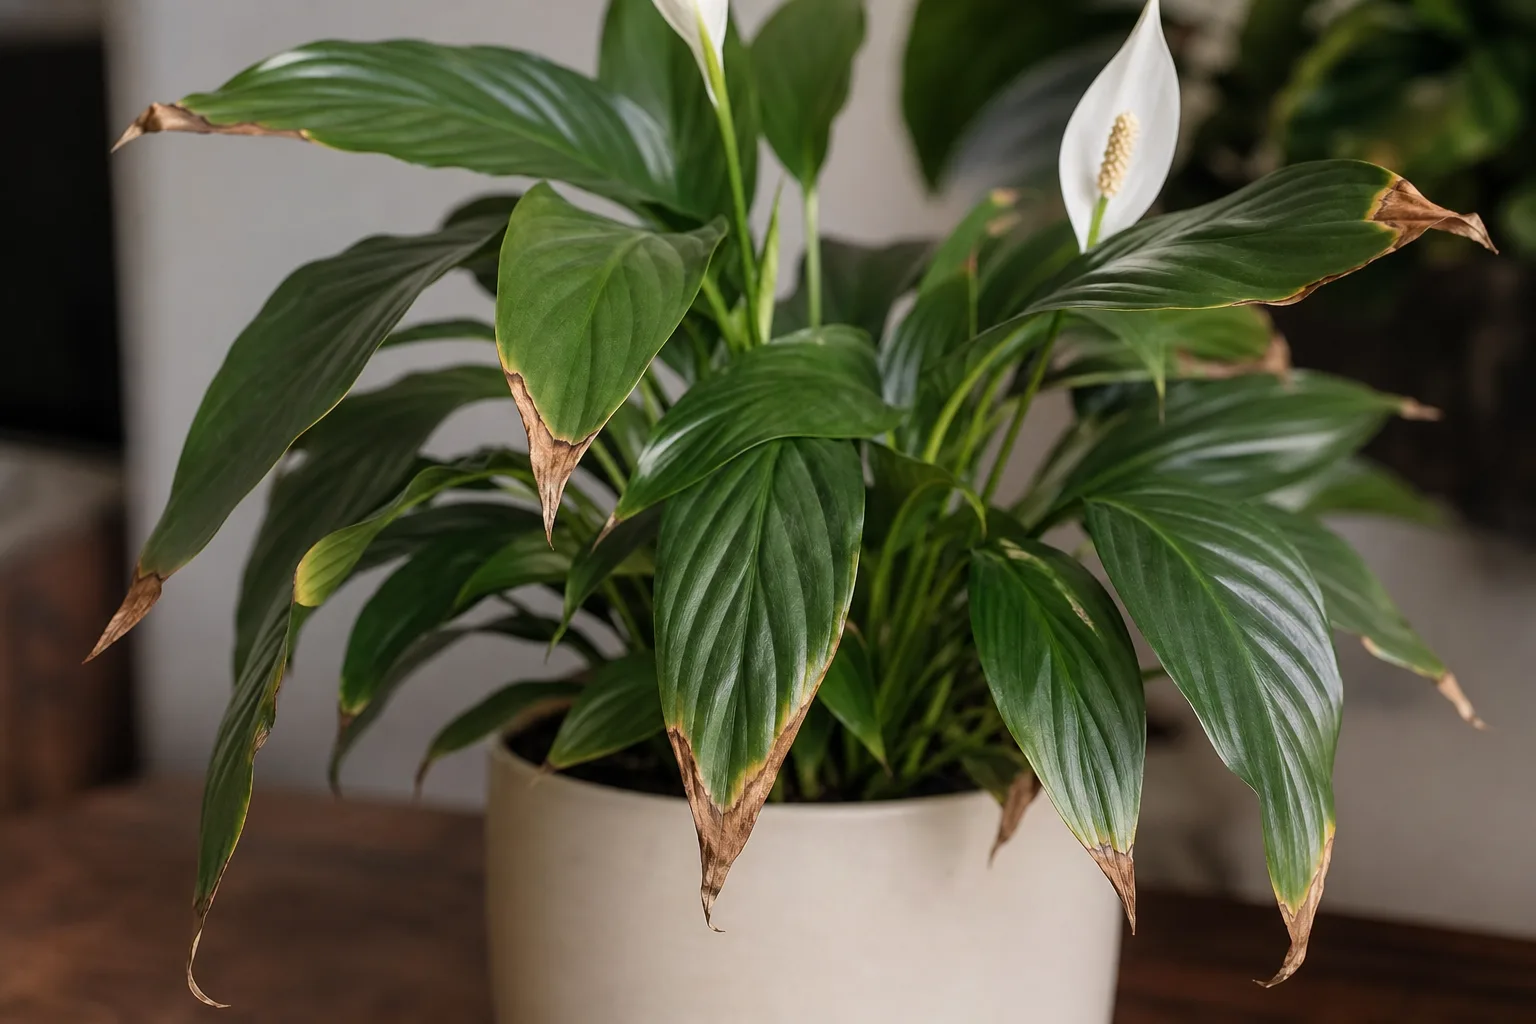
If the center is still producing firm new leaves, correct the underlying routine and remove only leaves that are mostly damaged. If the crown smells sour, the mix remains saturated for many days, or roots are dark and mushy, pause bloom efforts and address root health first. A peace lily cannot spend energy on flowers while its root system is losing access to oxygen.
1. Give it brighter filtered light
Place the plant near a bright window where sunlight is softened by a sheer curtain, blinds, or a position slightly to the side of the glass. An east-facing window is often an easy starting point; a bright north-facing location may work, while a strong south- or west-facing window usually needs distance or a curtain. The goal is visible daylight on the foliage for much of the day, not direct midday rays burning the leaves.
This is the fix most likely to help a mature, otherwise healthy plant that has leaves but no flowers. Light powers photosynthesis and supplies the energy needed for new growth and reproductive structures; fertilizer cannot replace that energy source. The Missouri Botanical Garden’s peace lily profile likewise describes peace lilies as tolerant of lower light but preferring bright filtered light, with direct sun best avoided.
Move gradually and measure the new spot
If the plant has been in a dim room, move it in stages over several days or place a curtain between it and stronger sun. Watch the leaves for bleached patches, crisp tan areas, or heat stress. A little extra distance from the glass can be the difference between useful filtered light and a scorched leaf, especially in summer.
Keep the location steady for at least several weeks before judging it. Turn the pot a quarter turn when you water so growth does not lean permanently toward the window, but do not keep moving it around the home in search of a perfect angle. If natural light is weak in winter, a full-spectrum grow light on a timer can provide consistency; keep it far enough away that leaves stay cool and follow the fixture’s instructions rather than guessing from wattage alone.
2. Water deeply, then let the top layer dry
Peace lilies prefer a repeatable wet-to-slightly-dry cycle, not either permanent saturation or repeated drought. Water when the top few centimeters of potting mix feel dry, then pour slowly over the surface until water exits the drainage holes. Empty the saucer or cachepot after the excess has drained so the pot does not sit in a reservoir of stagnant water.
The Missouri Botanical Garden describes the target as evenly moist but not soggy soil: let the soil dry between waterings, but do not let the plant wilt. The RHS growing guide recommends regular watering through the active season and reducing it slightly in winter. Those instructions leave room for a useful household adjustment: a small pot in a bright, warm room may dry sooner than a large pot in a cool corner.
Use the pot, not the calendar, to decide. Lift it before and after watering, push a finger or wooden stick into the mix, and check the drainage hole if you are unsure. Filtered or rainwater can be helpful where tap water leaves mineral marks or causes recurring brown tips; the RHS specifically flags fluoride sensitivity, while room-temperature water avoids shocking chilled roots.
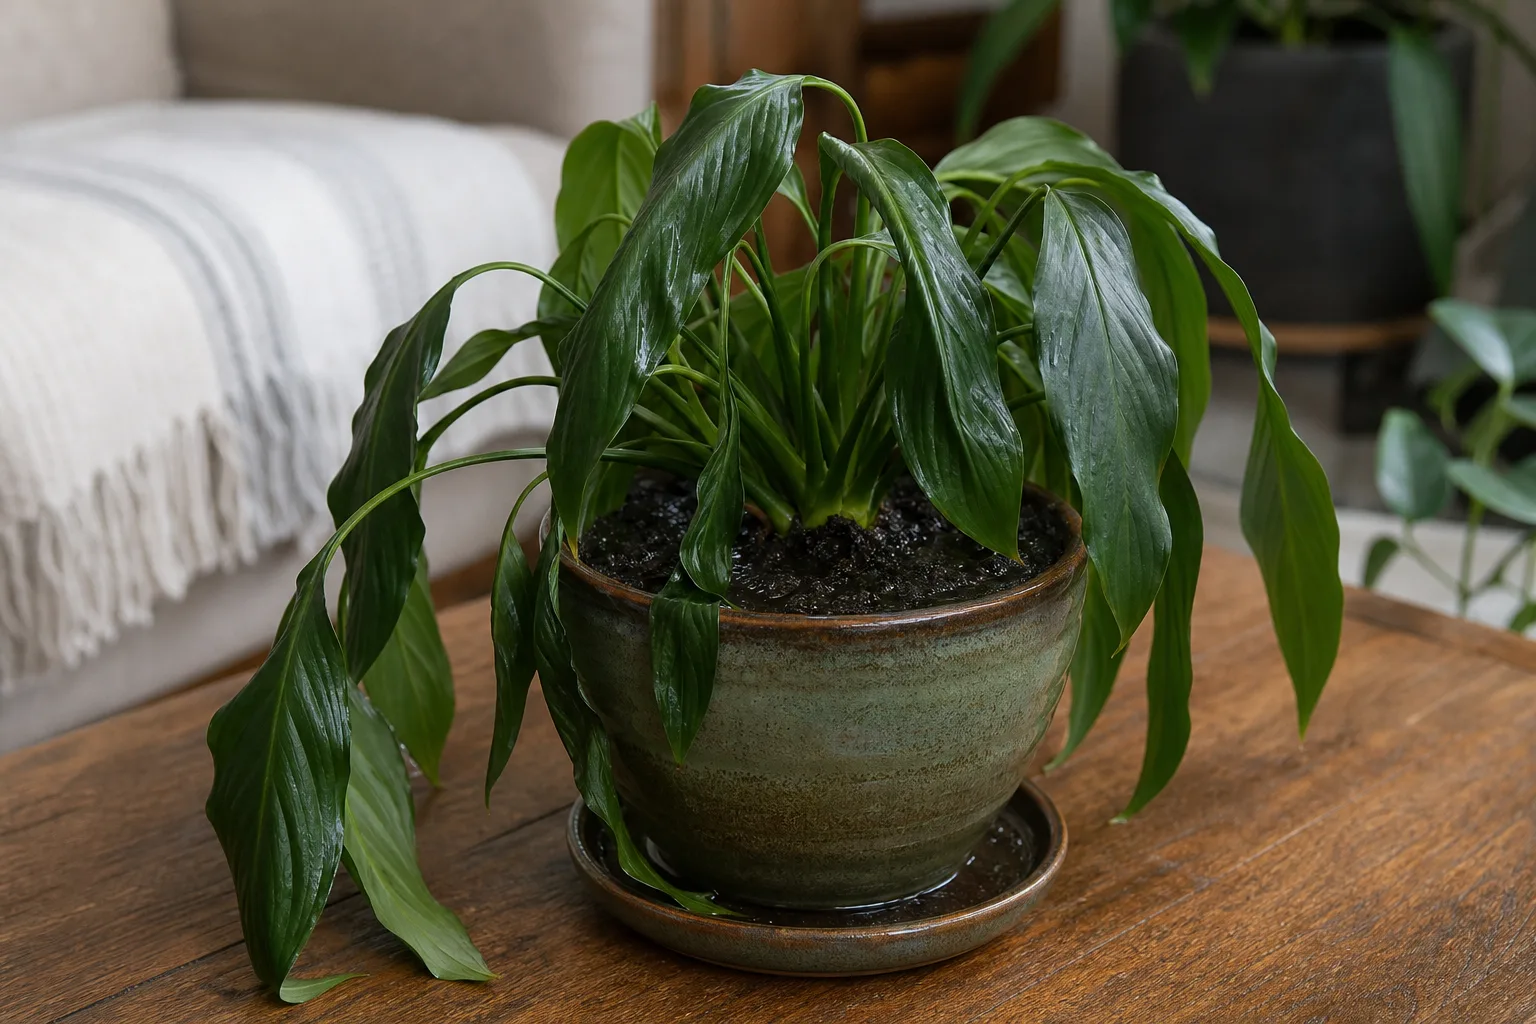
Correct an overwatered or underwatered plant first
If the mix is dry all the way through and the leaves recover after a thorough watering, return to a more consistent schedule. Do not keep adding small sips every day; shallow watering can leave the center of the root ball dry while the surface looks damp. Water fully, let the pot drain, and reassess when the top layer dries again.
If the mix is wet for a week or more, do not respond by withholding water indefinitely while leaving the plant in a waterlogged pot. Check that the container has an open drainage hole, remove the nursery pot from a decorative cover to inspect the bottom, and feel for a sour smell or mushy roots. Yellow leaves plus persistently wet soil is a root-health problem first, and bloom nutrition should wait until the medium drains normally.
3. Feed lightly during active growth
Once light and moisture are stable and the plant is making new growth, provide modest nutrition during spring and summer or your home’s active-growth period. A balanced liquid houseplant fertilizer is a sensible choice; dilute it according to the product label, and use a weaker routine rather than assuming that a stronger solution produces more flowers. The Missouri Botanical Garden recommends very low fertility indoors and specifically warns that overfertilizing can burn leaf tips and roots.
A practical starting point is a quarter-strength balanced fertilizer about once every four weeks while the plant is actively growing. That schedule is deliberately conservative: a recently repotted plant may have enough nutrients in fresh mix, a low-light plant uses less, and a plant with damaged roots should not be pushed. The RHS also recommends a general liquid fertilizer every few weeks from April to October, so the shared principle is regular but moderate feeding during growth—not continuous feeding all year.
Apply fertilizer to already-moist soil, never to a bone-dry root ball. If white crusts collect on the surface or tips brown soon after feeding, stop fertilizing, water thoroughly so excess salts can drain, and allow the plant to recover. Follow the label for the specific product and do not combine a liquid feed, slow-release granules, fertilizer sticks, and a “bloom booster” just because the plant has not flowered yet.
Avoid the fertilizer trap
Too much nitrogen can encourage impressive foliage without solving a light or root problem, and excess salts can damage the very roots needed to support flowering. A bloom-labeled product is not a shortcut if the plant is in shade, chronically wet soil, or a pot without drainage. Nutrients are the third step in the sequence, not the first emergency button.
If you have no record of the last feeding, wait until the plant is visibly growing and the watering cycle is sound. Then choose one product, one dilution, and one interval you can repeat. Consistency gives you better evidence than alternating several formulas and trying to interpret a new leaf after only a few days.
4. Stabilize temperature, humidity, and airflow
Peace lilies are tropical forest-floor plants, so steady warmth supports the recovery routine. Keep the plant away from heating vents, radiators, exterior doors, and cold window glass; rapid swings can stress leaves even when the average room temperature seems comfortable. The Missouri Botanical Garden lists warm daytime conditions around 68–85°F and notes that cold or drafty conditions slow growth considerably; use that as a guardrail rather than trying to recreate a greenhouse in your home.
Moderate humidity helps leaves hold water and can reduce crispy margins, but humidity is supportive care, not a guaranteed flowering trigger. A hygrometer is more useful than guessing from a misting schedule. If the air is dry, group plants with space between them, run a humidifier with good airflow, or use a correctly built pebble tray; keep the pot above the water line rather than standing the container in water.
Skip the drafty window and the radiator
The ideal bloom location is a compromise: bright filtered light, stable warmth, and enough air movement to prevent a constantly damp canopy. Do not place the plant directly under a fan or air conditioner, but do not seal it into a stagnant, steamy corner either. Wipe dust from broad leaves with a damp cloth so the foliage stays functional, and avoid repeated misting if it leaves water sitting on leaves for hours.
If your plant is healthy but refuses to flower in the darkest months, season may be the explanation. RHS describes peace-lily spathes as mainly produced in spring and summer, while Gardener’s Path notes that home plants can flower outside that window but should not be held to a year-round schedule. Keep the plant stable through winter and use the brighter season to build the growth that supports the next bloom.
Repot only when roots—not impatience—say it’s time
Repotting can help when roots are densely packed, the mix has collapsed and drains poorly, or water races through the pot because the root ball has become a hard cylinder. It can also set flowering back if you disturb a healthy plant during a quiet season or move it into a much larger container that stays wet. A peace lily does not need a new pot simply because it has not flowered for a few months.
Slide the plant from its container and inspect the root ball before deciding. Firm, pale roots circling densely around the outside, roots emerging from drainage holes, and a mix that dries unusually fast support repotting. Dark, mushy roots, a sour smell, or a root ball that stays wet point toward a drainage and root-rot problem; that requires removing damaged tissue and replacing the failing medium, not just sizing up the pot.
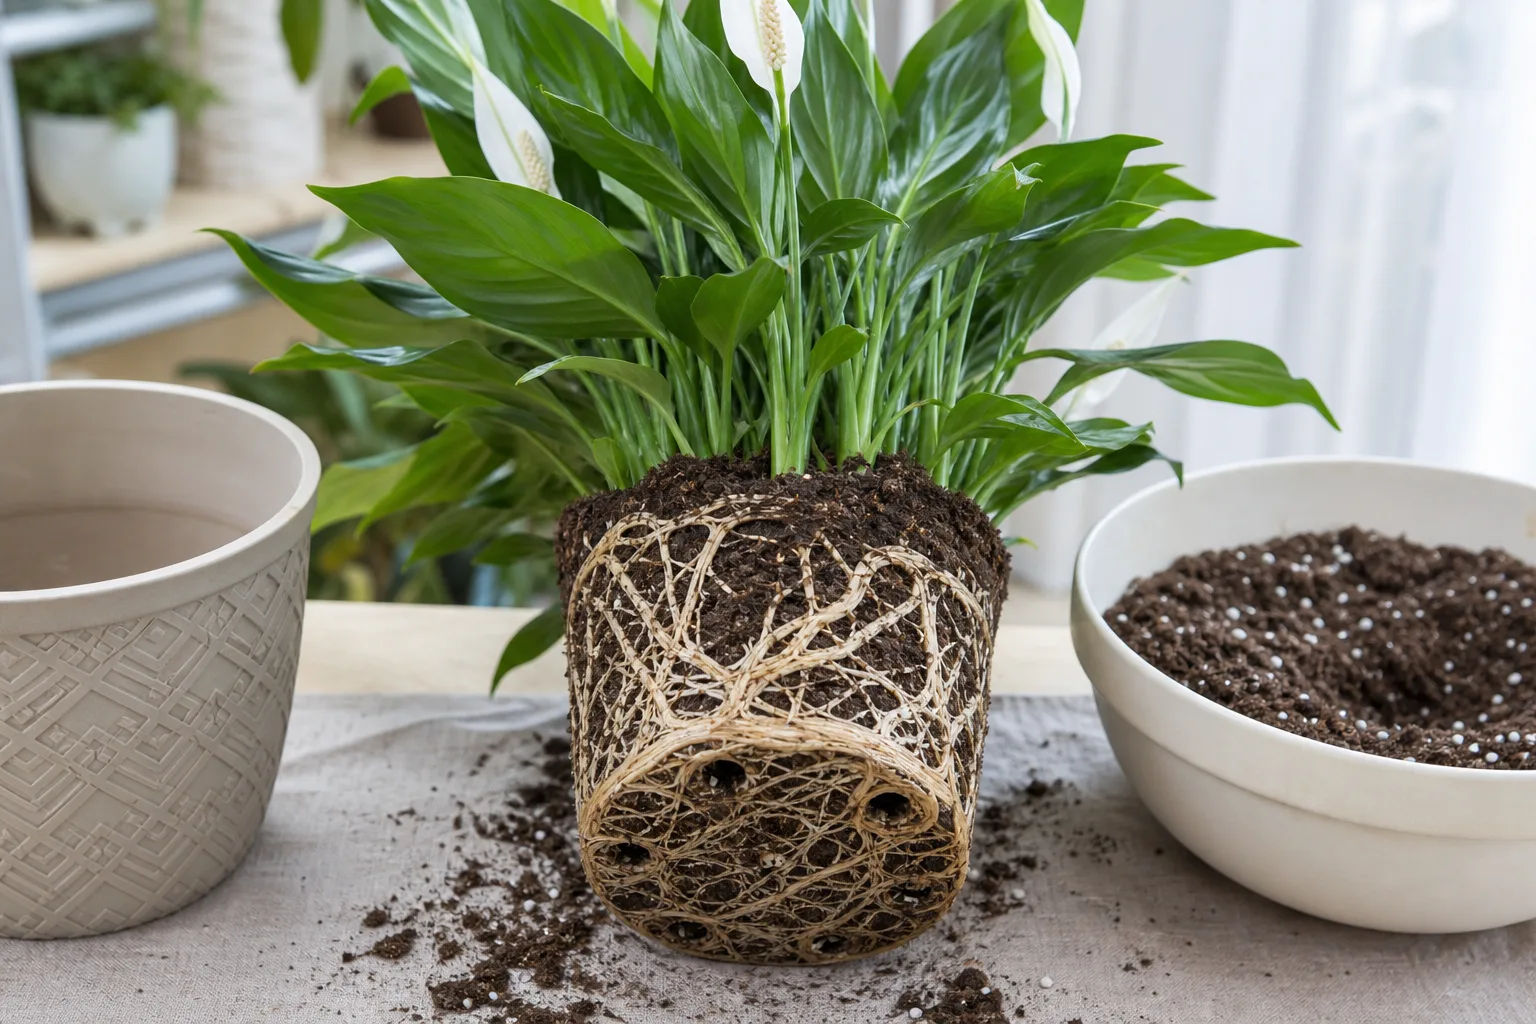
Choose a container only slightly larger than the current root ball and make sure it has drainage holes. Use a well-draining houseplant mix; the RHS suggests peat-free multipurpose compost amended with perlite and warns that overpotting can keep excess mix damp too long. After repotting, return the plant to bright filtered light, keep moisture even but not saturated, and wait for active new growth before resuming regular fertilizer.
Use a bloom-recovery sequence over the next 8 weeks
Treat recovery as a sequence, not a shopping list. In week one, inspect drainage, check the roots only if the watering evidence points there, and move a healthy plant to brighter filtered light. Do not fertilize a stressed, bone-dry, or waterlogged plant on the same day you move it.
During weeks two through four, keep the location steady and record when the top layer dries, how quickly the pot drains, and whether the center produces new leaves. Correct only the watering error you can observe. If the plant is growing actively and has not been recently repotted, begin a conservative balanced feed; if it is not growing, more fertilizer is unlikely to be the missing piece.
During weeks five through eight, reassess the pattern rather than hunting for a new trick. Firmer new leaves, compact growth, and a predictable watering cycle are signs that the plant is rebuilding. If light is clearly adequate and the plant is healthy but still not flowering, check season, maturity, cultivar, and nursery history before making another major change.
That timeline is not a bloom guarantee. A new spathe develops from new growth, and the plant may need a longer active-growth period to reach that point. The useful promise you can make is narrower: a stable routine gives the plant a fair chance, while repeated drastic changes make the answer harder to see.
When to prune spent spathes and damaged leaves
Remove a spent spathe when it is fading, mostly green and no longer attractive, or turning brown. Follow its stalk down into the clump and cut it as close to the base as you can without nicking neighboring stems. This is cleanup and resource management, not a flowering command; a cut stalk will not bloom again.
Remove a leaf only when it is mostly yellow, brown, collapsed, or clearly damaged. A small brown tip cannot be made green again, so trimming the outline is optional, while removing a partly healthy leaf throws away photosynthetic tissue. Always use clean snips and wear gloves if your skin is sensitive; the RHS notes that peace-lily sap can irritate skin and that the plant should be kept away from children and pets.
What not to do if your peace lily still won’t bloom
Do not put it in direct afternoon sun because a dim room has made you impatient. Do not keep the soil wet because the plant “likes humidity,” and do not create a pebble tray with the pot base submerged. Do not apply fertilizer every time a flower fails to appear, and do not repot into a container several sizes larger without examining the roots.
Do not assume that a green spathe is a failed flower or that a plant bought in full bloom owes you another display on the same schedule. Do not make five changes in one afternoon; if the plant improves, you will not know which change mattered, and if it declines, the added stress will be difficult to untangle.
If the peace lily has healthy new leaves, adequate filtered light, a sound root system, and a season in which it normally grows, give it time. If it is declining, stop asking how to make it flower and solve the decline first. Flowers are the result of a plant with enough light, functioning roots, steady moisture, and enough maturity to spend resources on reproduction.
Conclusion
To get a peace lily to bloom again, start with brighter filtered light and a healthy root zone, then make watering predictable. Feed lightly during active growth, protect the plant from temperature swings, and treat humidity as support rather than a magic switch. Repot only when dense roots or failing mix justify it, and remember that cultivar, maturity, season, and nursery-forced flowering can all affect the timetable.
The best sign that your plan is working may arrive before the next white spathe: new leaves emerge firmly, the pot dries at a repeatable pace, and the plant stops cycling between drought and saturation. Once those conditions hold, your peace lily has the resources to flower when its own growth rhythm says it is ready.



