Bearded Iris Care: Planting, Blooming, and Division
Learn bearded iris care, from shallow rhizome planting and drainage to seasonal watering, division, pest checks, and fixes for weak or missing blooms.
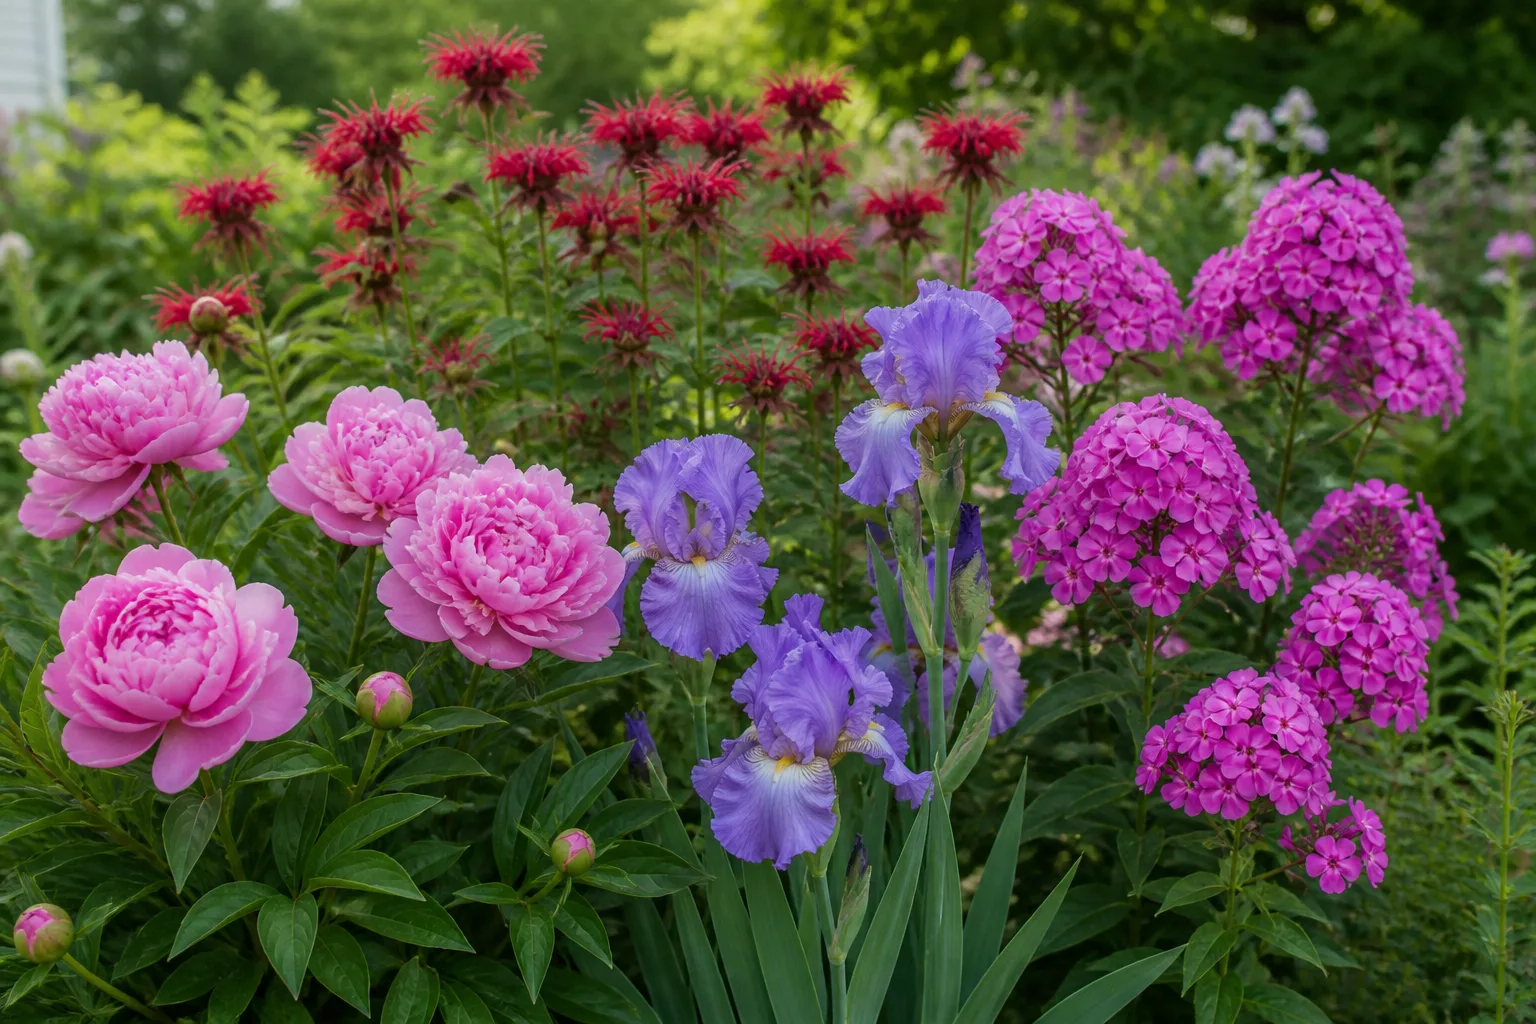
Bearded iris earns a place in the garden with its spring or early-summer flowers, upright sword-shaped leaves, and thick horizontal rhizomes that store energy near the soil surface. The care is straightforward once you get three details right: give the plant enough sun, keep water moving through the soil, and do not bury the rhizome like a bulb.
Most problems trace back to one of those conditions or to a crowded clump. This guide shows how to plant and water bearded iris, when to divide it, what to do after flowering, and how to distinguish common causes of weak blooms and damaged foliage.
Know Which Iris You Have Before Applying Care
“Bearded iris” describes a group of garden irises whose lower petals, called falls, carry a line of soft hairs or a fuzzy beard. The flowers also have three upright petals, or standards. Many familiar garden cultivars are sold as German iris or under Iris germanica, but the genus includes other irises with different growth habits and moisture needs. BBC Gardeners’ World Magazine describes the classic bearded form and its rhizome-based growth in its bearded iris guide.
At the plant’s base, look for a thick, fleshy stem running horizontally at or just above the soil. That is the rhizome; the roots grow from its underside and the leaf fan rises from its growing end. The rhizome is not a bulb, and the shallow placement recommended here is for bearded iris specifically. If your plant has no fuzzy beard or grows from a bulb, identify it before using these directions. Siberian iris, for example, has its own care and division needs.
Choose Sun, Airflow, and a Site That Drains
Choose a site with at least six hours of direct sun, with six to eight hours a useful target for reliable flowering. Bearded iris can survive in less light, but shade often produces plenty of leaves and few flower stalks. In a very hot climate, some afternoon shade can reduce heat stress; preserve as much morning and midday sun as the site allows. The American Iris Society’s growing guidance recommends a half-day or more of direct sun and good air circulation.
Drainage matters as much as sunlight. Bearded iris tolerates periods of dry soil after it is established, but a rhizome that sits in saturated ground can soften and rot. Avoid low spots where rainwater lingers, dense groundcover that shades the rhizomes, and crowded planting that traps damp foliage. If you are unsure about a location, watch it after a heavy rain: standing water that remains for hours signals a site that needs better drainage or a raised planting bed.
Improve Heavy Soil Without Creating a Wet Pocket
Clay is not an automatic deal-breaker, but dense, slow-draining clay is a poor place to bury a rhizome. The safest correction is to improve drainage across the planting area: choose a slope, build a raised bed, or reshape the bed so water can run off. A small amount of compost can improve soil structure, but avoid filling one planting hole with rich amendment surrounded by compact clay; that pocket may hold water around the roots.
If the whole bed stays wet after rain, move the iris or raise the planting area instead of relying on extra fertilizer or frequent soil amendments. The RHS division advice also distinguishes planting depth by soil texture: keep the rhizome at the surface in heavier soil, while a little cover may be useful in light sandy soil. Whatever the texture, water should drain away rather than collect around the crown.
Planting Time Depends on Bloom and Frost
For established clumps and bare-root divisions, the usual window is after the main flowering period, when the plant has time to make roots before winter. The American Iris Society commonly recommends July through September, while the RHS advises dividing bearded rhizomatous irises about six weeks after flowering. Those dates describe different climates; use your local season, not a universal month. In a cold-winter region, finish early enough for roots to establish before the ground freezes.
Newly purchased potted plants can often be planted during the growing season if the soil drains well and you can keep them watered while they establish. Set a potted iris at the depth it was growing in its nursery container, then make sure the rhizome is not buried under additional soil or mulch. For a bare rhizome, follow the shallow-planting steps below. If a plant arrives dry or has been shipped bare-root, follow the supplier’s instructions for rehydration; soaking is not a substitute for correct depth and drainage.
Plant the Rhizome Shallowly and Anchor the Roots
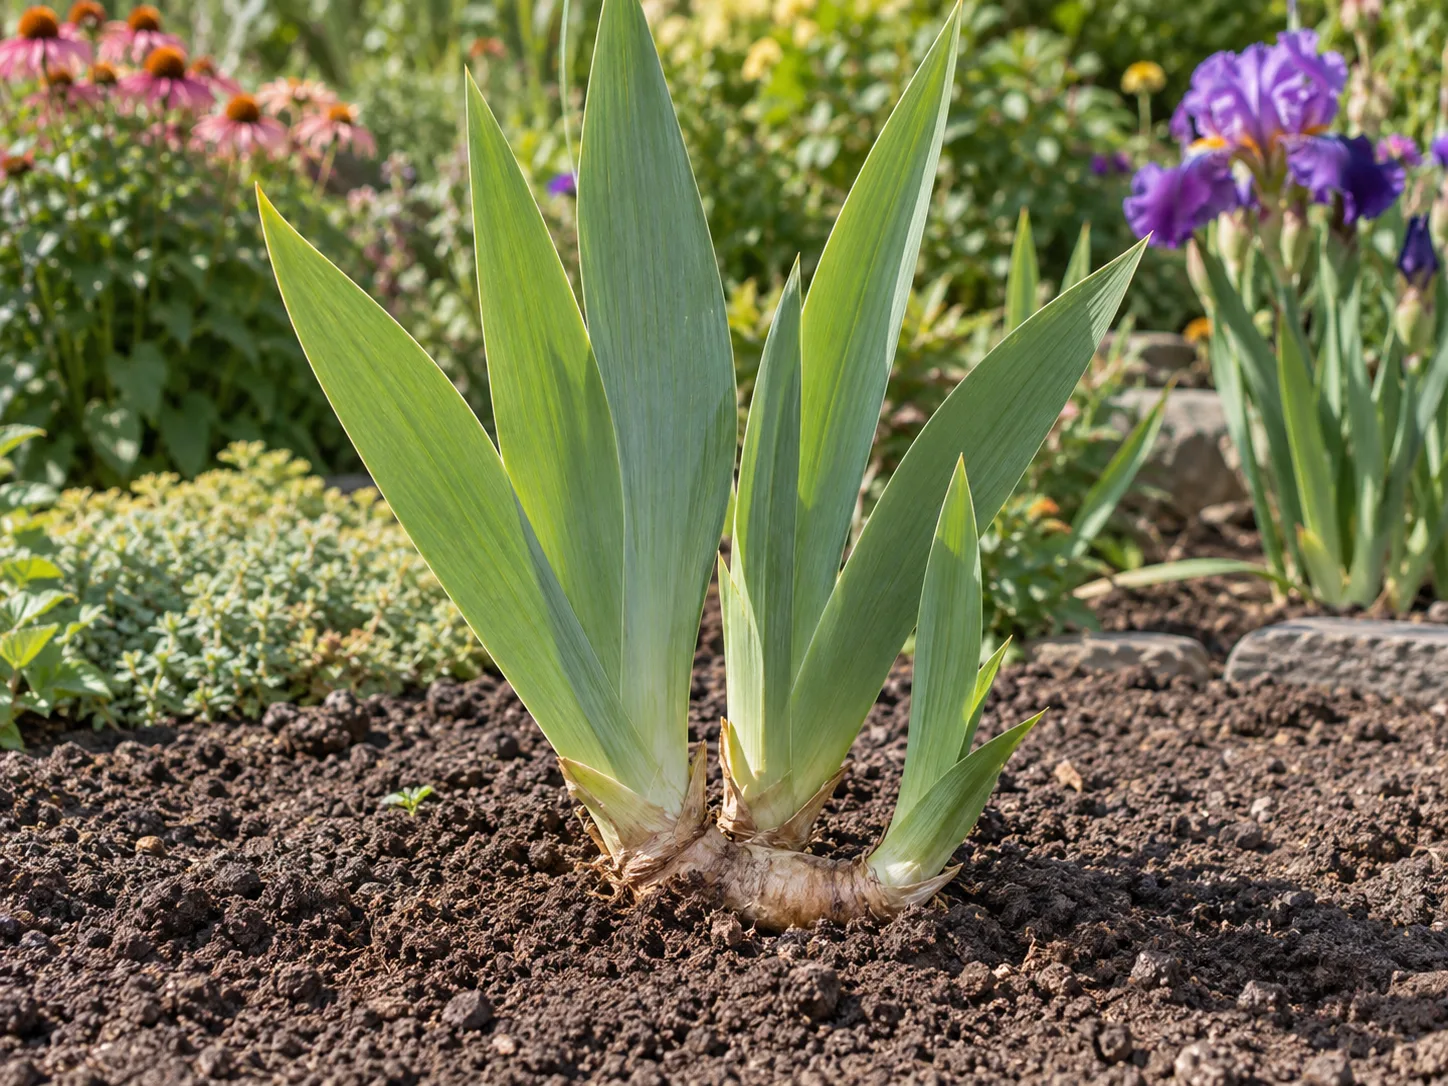
Dig a broad, shallow hole rather than a deep bulb-sized pocket. Make a low mound of soil in the middle, set the rhizome horizontally on top, and spread the roots down both sides of the mound. Cover and firm the roots so the division cannot rock in wind, while leaving the rhizome’s upper surface at soil level or only lightly covered. The American Iris Society advises that the rhizome should usually remain visible; in extremely hot climates or very light soils, it may be covered by up to about an inch.
This placement is the most important planting distinction. A deeply buried rhizome stays shaded and damp, which can weaken flowering and increase rot risk. A rhizome sitting entirely loose on top of dry soil may fail to root, so press the soil around the roots and water the planting well. The American Iris Society’s planting steps and the RHS guidance both emphasize shallow placement with roots below the surface.
Set Spacing and Direction Before Covering
Space rhizomes about 12 to 24 inches apart, adjusting for cultivar size and the look you want. Closer spacing creates a fuller display sooner, but it also means you will need to divide the clump earlier. Leave enough room for air to move between leaf fans and for the new rhizomes to extend outward. If planting a small group, point the growing ends in the direction you want the clump to expand, with the roots fanned down and outward.
Water thoroughly once after planting so soil settles around the roots. If the bed is exposed to strong wind, firm the soil again after watering; do not solve wobbling by burying the rhizome deeper. Check the planting after a few days and press loose soil back around the roots if it has washed away.
Water to Establish, Then Ease Back
Water a new division deeply after planting and keep the root zone from drying out while it establishes. How often that takes depends on rainfall, temperature, soil texture, and whether the plant is newly lifted or already rooted. During a hot, dry spell, check the soil with a finger rather than following a fixed weekly schedule. It should be lightly moist around the roots, not continuously wet around the rhizome.
Once established, water during prolonged dry weather rather than treating iris like a thirsty bedding plant. The American Iris Society suggests watering when the top three inches of soil are dry and favors a deep soak over frequent shallow watering. Stop and reassess if water puddles around the plant or leaves yellow while the soil remains wet. In heavy soil and humid weather, extra water can do more harm than a brief dry period.
Feed Lightly and Avoid Nitrogen Excess
Start with the soil, not a fertilizer label. If the bed is reasonably fertile and the plant is growing and flowering well, it may need little or no supplemental feeding. A soil test is useful before correcting pH or adding nutrients; bearded iris tolerates a range of garden soils, and guessing can create a new imbalance.
If growth is poor and a soil test or local guidance supports feeding, use a modest application of a balanced, relatively low-nitrogen fertilizer in early spring. Keep it away from direct contact with the rhizome and follow the product label. Too much nitrogen can push lush, soft leaves without improving bloom, and repeated feeding will not correct shade, a buried rhizome, waterlogged soil, or an overgrown clump. Avoid weed-and-feed products around iris beds.
Manage Flowers and Foliage Through the Year
Most bearded iris bloom in spring or early summer, though the exact weeks depend on cultivar and local weather. Individual flowers last briefly, but a stalk may carry several buds that open in sequence. Some cultivars rebloom later; a second flush is a cultivar trait, not a result you can guarantee by adding more water or fertilizer. When shopping, check the cultivar label for mature height, bloom season, and whether it is described as a rebloomer.
Keep the bed weeded so nearby plants do not shade the fans or crowd the rhizomes. After bloom, retain healthy green leaves: they continue making and storing energy that supports the next flowering cycle. Remove only dead or badly damaged foliage during the growing season, and clear dry leaves and plant debris from around the clump as part of fall cleanup. Open, clean beds also make it easier to spot pests before they reach the rhizomes.
Deadhead the Stalk, Keep the Green Leaves
When the last flower on a stalk fades, cut the flower stalk down near its base without cutting into the leaf fan. Removing spent stalks tidies the plant and prevents seed pods from developing; it does not mean cutting the foliage to the ground. The Parker County Master Gardener Association notes that the leaves continue to store energy in the rhizome after flowers fade. If the leaf tips brown later in the season, trim the dead portion, but keep the healthy green blade until it naturally declines.
Divide a Crowded Clump in Late Summer
Division restores room for vigorous new growth and gives you additional plants. Reassess the clump every three to five years, but let its condition make the decision: divide if the center has become bare, the rhizomes are crowded or pushing upward, or flowering has declined after you have ruled out shade and poor drainage. The RHS recommends dividing bearded rhizomatous irises every three to five years; Savvy Gardening also describes crowding and reduced flowering as useful signs.
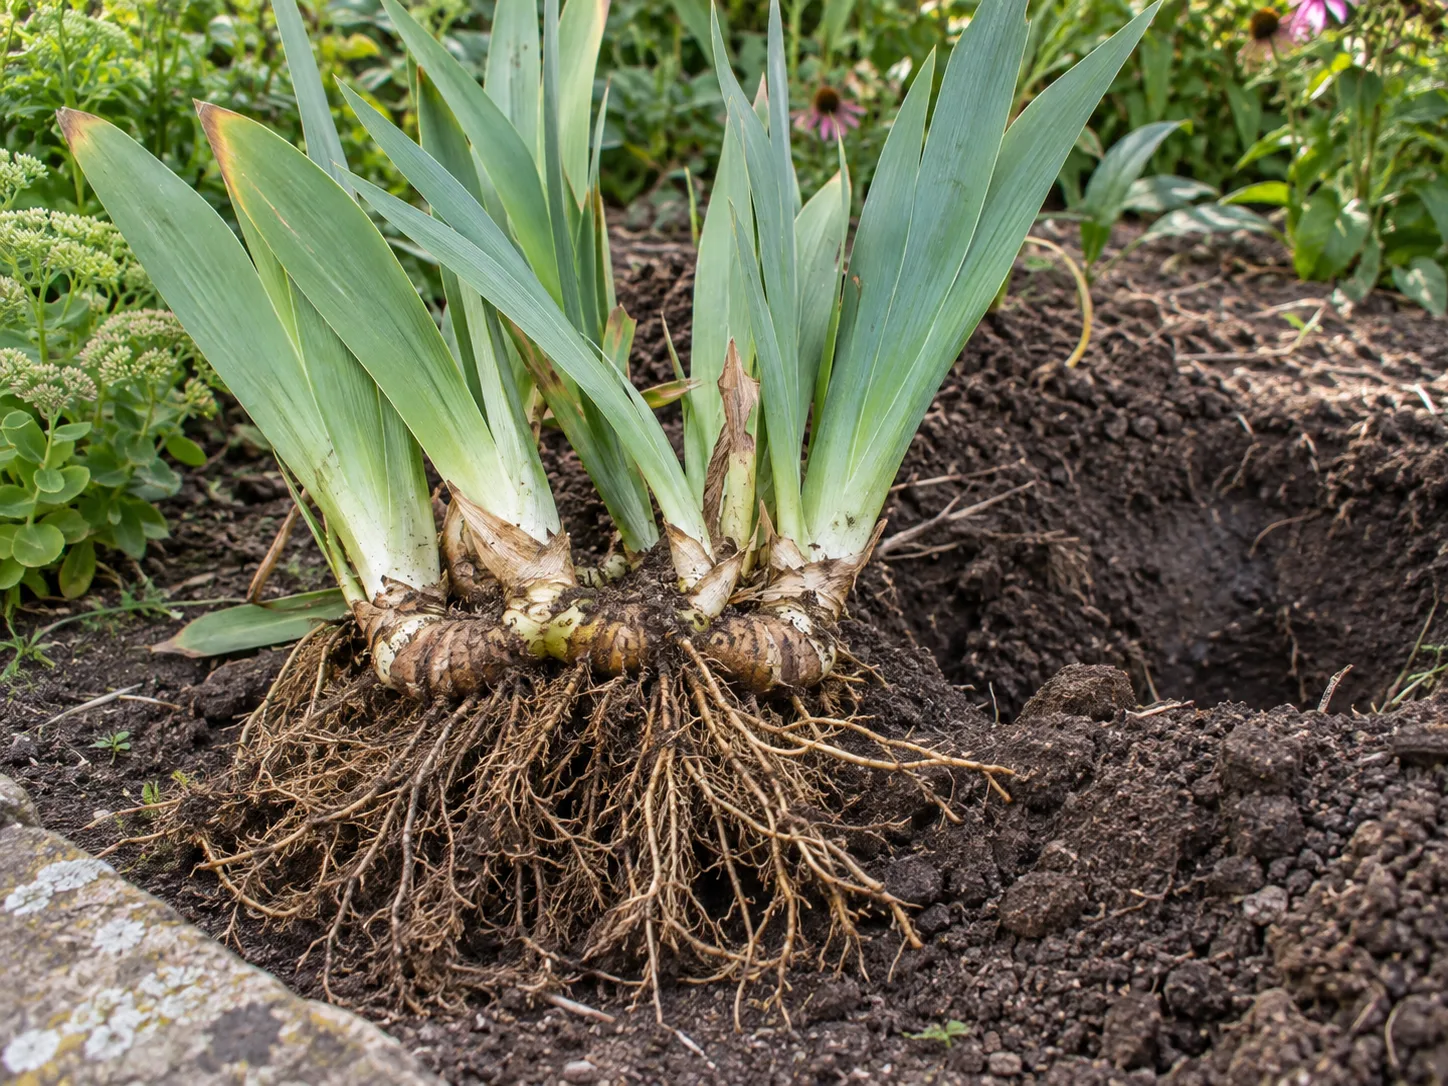
Choose a dry, workable day after flowering, during a period when the plant is not wilted from heat or drought. Prepare the new bed first so lifted divisions are not left drying in sun and wind. Use a garden fork to loosen soil around the clump, then lift from underneath rather than pulling on the leaves. Brush or rinse away enough soil to inspect the rhizomes and roots.
Keep Firm, Healthy Fans and Discard Damaged Rhizomes
Keep the younger outer sections that are firm and attached to a healthy fan and several roots. The old center may be woody, leafless, or exhausted; discard it if it has no viable growing point. Use a clean, sharp knife to separate connected pieces at a natural joint. Trim the leaves to roughly four to six inches so wind is less likely to rock the new planting, and shorten broken or very long roots if needed.
Inspect each piece before it goes back in the ground. A healthy rhizome should feel solid; reject tissue that is soft, collapsing, foul-smelling, hollowed by tunnels, or badly damaged. Clean soil from the knife and disinfect it between cuts through diseased material. Do not compost suspect rhizomes or foliage when pest or disease is involved; discard them according to local guidance. Epic Gardening’s iris-division guide also stresses choosing healthy pieces and working with clean tools.
Replant divisions promptly using the shallow method above, then water well. Keep the roots from drying while new growth starts, but do not keep the bed soggy. A divided iris may flower lightly or not at all the next spring while it re-establishes; that pause does not necessarily mean the division failed. If the site and planting depth are right, stronger flowering often returns after the plant has had a full growing season to settle.
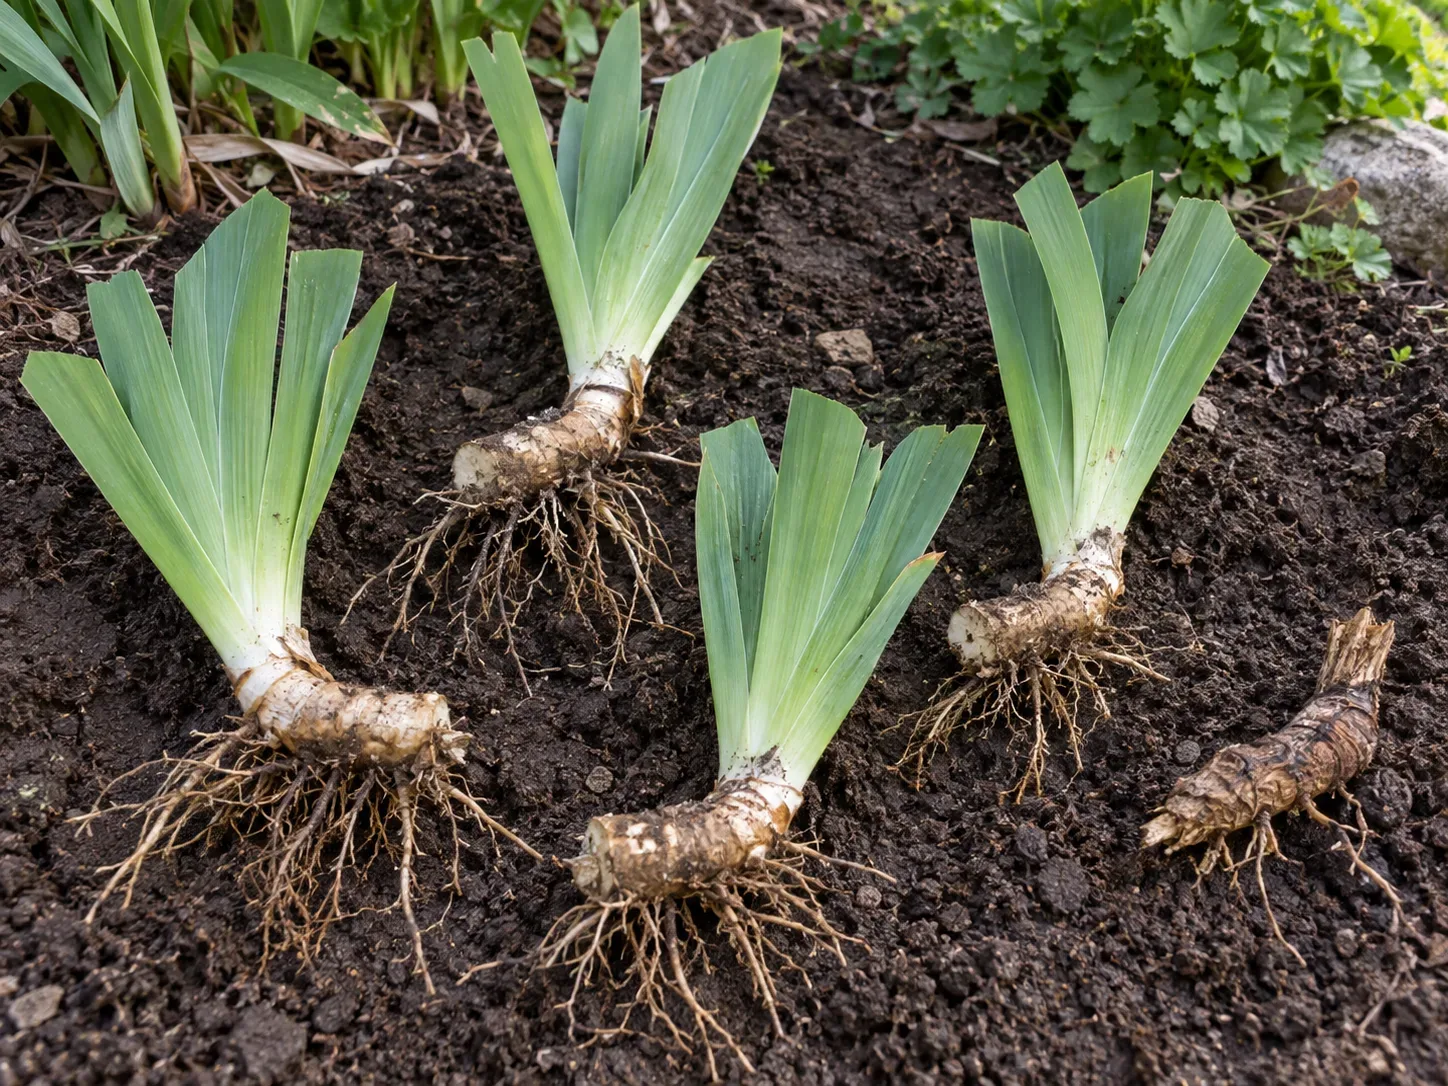
For a longer step-by-step walkthrough, see the related guide to dividing and transplanting iris. The timing and depth principles here remain specific to bearded iris.
Diagnose a Missing Bloom Before Adding Fertilizer
If an iris makes leaves but no flowers, check the site and the rhizome before feeding it. Work through the likely causes in this order:
- Too little direct sun: move or thin competing plants if the bed receives less than about six hours of sun.
- Rhizome buried too deeply: pull back excess soil or mulch so the top is at the surface, then make sure the roots remain covered.
- Wet soil or poor drainage: correct the bed or move the clump; more fertilizer cannot rescue a rhizome that stays soggy.
- Crowding: divide when the clump is packed, the center is bare, or rhizomes are pushing over one another.
- Excess nitrogen: stop high-nitrogen feeding and allow the plant to grow without forcing leaf production.
- Recent planting or division: give the rhizome time to root. A young or freshly divided piece can take a season to return to full bloom.
Also confirm the cultivar’s normal bloom season and whether it is actually a rebloomer. A plant that flowers once in spring is not underperforming because it does not flower again in fall. Make one correction at a time where possible; changing site, water, fertilizer, and division schedule together makes it harder to see which issue mattered.
Identify Iris Borer, Soft Rot, and Leaf Spot
Yellow leaves alone do not identify a disease. First feel the soil and inspect the base of the fan and the rhizome. Wet soil plus soft, collapsing tissue points toward rot; a firm rhizome and a few aging outer leaves may simply reflect normal seasonal decline. Correct drainage before watering again, and remove any soft tissue rather than covering it with soil.
Iris borer damage often begins as notches or ragged feeding in young central leaves, sometimes with dark streaks or frass. The caterpillar can tunnel down toward the rhizome, leaving it hollowed or damaged. The American Iris Society describes the borer’s seasonal movement from spring foliage into the rhizome; the problem is more common in some regions than others. Remove visible larvae and badly tunneled rhizomes, and clear old iris leaves and debris where eggs may overwinter. Ask a local extension service to confirm a serious or recurring infestation before considering any pesticide.
Soft rot is different: the rhizome becomes mushy and may smell unpleasant, while the fan yellows at its base or collapses. Lift affected material, cut away all soft tissue with a clean tool, and keep the remaining firm rhizome in a sunny, well-drained position. If rot has spread through the piece, discard it rather than trying to save it. Avoid splashing soil onto the leaves and keep fallen debris from accumulating around the crown.
Leaf spot usually appears as distinct tan, brown, or dark marks on the foliage, often after prolonged wet weather. It can resemble other damage, so do not diagnose a specific pathogen from color alone. Remove badly affected or old leaves, improve spacing and airflow, avoid unnecessary leaf wounds, and water the soil rather than spraying the foliage. If spots keep spreading despite cleanup, take a clear photo or sample to a local horticulture or extension service for diagnosis before applying a fungicide.
Grow Bearded Iris in a Container
Bearded iris can grow in a pot, but a sunny garden bed with excellent drainage is usually easier. Choose a wide, stable container with generous drainage holes and a compact or dwarf cultivar; tall flower stalks can make a small pot top-heavy. Use a free-draining potting mix, spread the roots below the surface, and keep the rhizome at or just above the mix line. Do not let the pot sit in a saucer of water.
Containers dry faster than garden beds, so check moisture more often while a new planting roots. Water deeply when needed, then let excess drain completely. A pot may also need dividing sooner because the rhizomes have limited room. In winter, follow the cultivar’s hardiness guidance for your region and protect the container from prolonged waterlogging; do not bring a dormant iris into a warm, dim room as though it were a tropical houseplant.
Common Mistakes That Keep Iris From Thriving
The most consequential mistakes are usually easy to fix once you know what to look for. Do not plant the rhizome several inches underground, smother it under wet mulch, or choose a place where runoff collects. Do not water established clumps on a rigid schedule regardless of rainfall, and do not add nitrogen because a plant failed to bloom before checking its light and drainage.
Avoid cutting all the foliage off after flowering; green leaves are still feeding the rhizome. Do not divide every clump simply because a calendar says it is time—healthy, open clumps that bloom well can stay put. And do not apply one iris rule to every species: Siberian, Japanese, bulbous, and other irises differ in their preferred moisture, depth, and division method.
Keep pets away from iris rhizomes and plant debris. The ASPCA lists iris as toxic to dogs, cats, and horses, with the highest concentration of toxic compounds in the rhizomes; reported signs include salivation, vomiting, lethargy, and diarrhea. If a pet chews or swallows any part, contact a veterinarian or animal poison-control service promptly rather than waiting for symptoms. See the ASPCA iris toxicity entry for its current guidance.
Conclusion
For dependable bearded iris, start with a sunny, freely draining site and plant the rhizome at soil level with its roots spread below. Water a new division until it establishes, then respond to dry soil rather than following a calendar; feed lightly only when the bed needs it. Keep green leaves after bloom, divide crowded clumps in the locally appropriate post-bloom window, and inspect soft or tunneled rhizomes before replanting.
When flowering drops, check light, depth, drainage, crowding, and recent disturbance before reaching for fertilizer. Those few checks solve many common failures and help a healthy clump keep flowering for years.