How to Grow and Care for Peanut Plants
Grow peanuts at home with practical timing, variety, container, watering, pegging, harvest, curing, and troubleshooting advice for your climate.
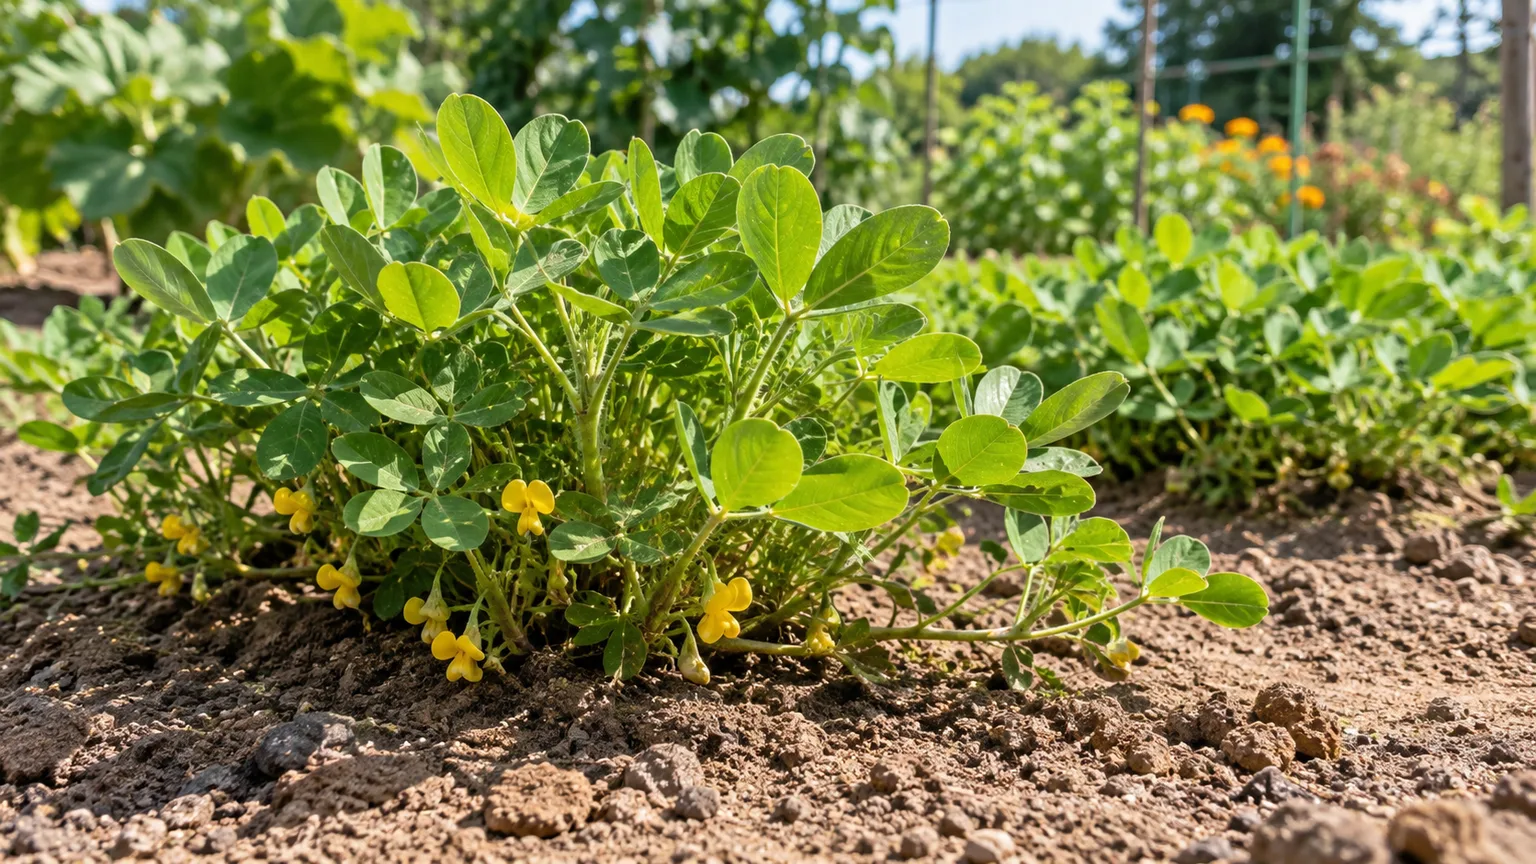
Peanuts are a warm-season crop with an unusual harvest: the flowers appear above ground, but the pods mature below it. If you give the plants enough heat, loose soil, steady moisture, and time, a few backyard plants can produce a genuinely satisfying crop. The main challenge is not keeping the foliage alive; it is helping the fertilized flowers enter the soil, then knowing when the hidden pods are mature enough to lift.
This guide follows that sequence from planning through storage. Start by counting the warm, frost-free days you have, then choose a variety that can finish before cold weather. After planting, protect the pegging zone from compaction and disturbance, keep weeds from competing with the low-growing plants, and harvest from evidence rather than from the calendar alone.
Is your growing season long enough?
Most peanuts need roughly four to five months from planting to harvest, although early Valencia and Spanish types can finish sooner. NC State Extension describes common maturity windows of about 120 to 150 days, while the National Peanut Board gives 140 to 150 frost-free days for many U.S. production situations. Those are useful planning ranges, not a promise: variety, temperature, planting date, drought, and soil conditions all change the finish line. NC State Extension’s plant profile and the National Peanut Board’s growth-cycle explanation both emphasize that peanuts are frost-tender and depend on a long warm season.
Count backward from your usual first fall frost, leaving a margin for a cool spring or a slow final ripening period. If the result leaves you with fewer than about 100 reliably warm days, growing a full crop outdoors will be a gamble; choose a shorter-season type, use a raised bed that warms early, or treat the plant as a curiosity rather than expecting a full harvest.
What peanuts need before you plant
Peanuts need full sun, ideally eight or more hours of direct light, and soil that warms quickly in spring. A south-facing bed, dark raised bed, or sunny container can help in a marginal climate, but no site can compensate for a season that ends before the pods mature. A frost or prolonged cold snap can stop the crop at the point when it still looks healthy above ground.
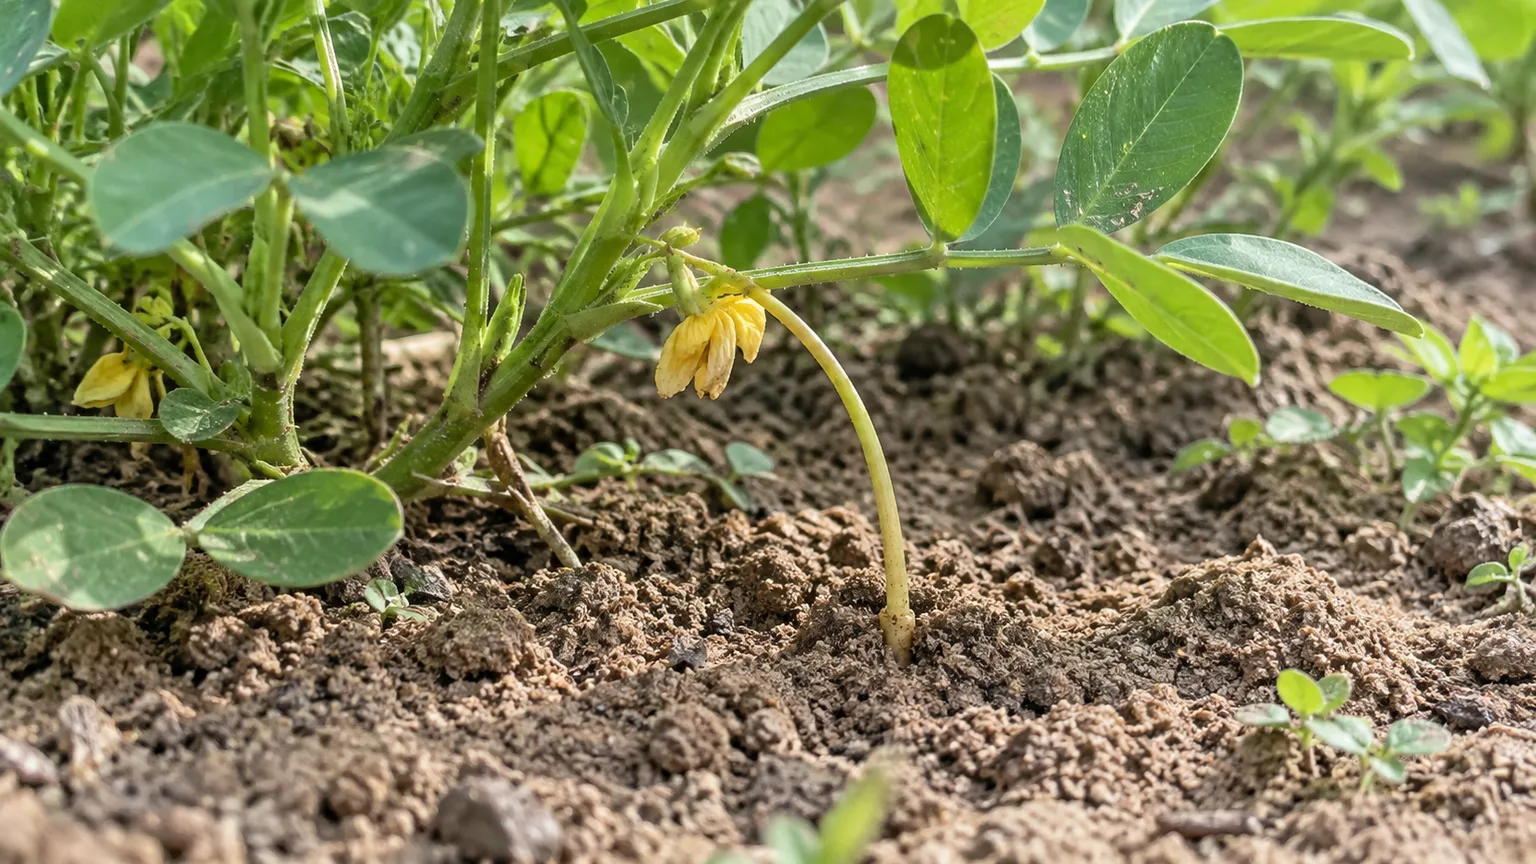
The plant is a legume, not a tree nut, and it is grown as an annual even though the species can behave as a perennial in frost-free conditions. Its yellow flowers self-pollinate; after a flower is fertilized, the developing ovary grows on a stem-like structure called a peg. The peg bends toward the ground and must enter loose soil before the pod can form underground. This process, called geocarpy, is the reason soil texture and careful cultivation matter so much. NC State Extension explains that the species name refers to developing under the earth, while the National Peanut Board illustrates the stages from flower to peg to pod.
Choose the right peanut type
Choose the variety before you choose the planting date. Peanut types differ in maturity speed, pod size, kernel count, plant habit, and the amount of room they need to spread. A seed packet or reputable seed supplier should state the type and approximate days to maturity; that information is more useful than a generic “peanut” label when your season is tight.
| Type | Typical home-garden advantage | Timing and space considerations |
|---|---|---|
| Valencia | Sweet kernels, often several per pod; good for fresh eating or boiling | Usually among the quickest types; useful where the season is shorter |
| Spanish | Small kernels with reddish skins and a relatively quick finish | A practical choice for shorter seasons; plants still need sustained warmth |
| Runner | Uniform pods and good yields; common in peanut butter production | Often needs a longer season and more room to spread |
| Virginia | Large kernels and attractive in-shell pods | Usually one of the slowest finishes; avoid if frost is likely to arrive early |
These categories overlap in actual garden performance, so treat the days-to-maturity number as a comparison tool, not a guarantee. Savvy Gardening recommends early Spanish or Valencia types for short-season gardens, while NC State Extension describes Runner, Virginia, Spanish, and Valencia as the four main U.S. types. If you are growing in a cool climate, the sweetest strategy is often to choose an early type and start it just early enough to gain time without creating a root-bound transplant.
Valencia and Spanish: best for short seasons
Valencia and Spanish peanuts are often the sensible starting point for a home gardener who does not have a long, hot summer. They can still fail if planted into cold soil or exposed to an early frost, but their shorter maturity window gives the pods a better chance to fill before the season closes. They are also rewarding for small plantings because the kernels are flavorful and easy to use fresh or roasted.
For a first attempt, prioritize reliable maturity over the largest possible pod. A smaller crop that finishes cleanly is more useful than a vigorous Virginia plant that is still filling pods when wet autumn weather arrives.
Virginia and Runner: larger pods, longer finish
Virginia types are known for large kernels and in-shell eating, while Runner types are widely associated with uniform pods and peanut butter. Their appeal comes with a planning cost: they generally need a longer warm period, and Runner plants may spread more than a compact bunch type.
Give these types the warmest, widest bed you have. Do not squeeze them into a narrow strip beside a wall and then blame the seed when flowers and pegs have no loose soil to reach.
Plant peanuts in warm, loose soil
Peanuts prefer a light, friable, well-drained soil, often described as sandy loam. The exact texture is less important than the result: a peg should be able to push into the upper few inches without meeting a hard crust, standing water, or a mat of woody mulch. Work the bed before planting, remove large clods, and improve heavy soil with finished organic matter and a raised or mounded shape rather than planting into a cold, saturated hollow.
Avoid turning the seedbed into rich, high-nitrogen compost. Peanuts can form root nodules with nitrogen-fixing bacteria, and excess nitrogen can produce lush leaves without improving pod set. A soil test is more useful than guessing with fertilizer, especially if the bed has been heavily amended for other vegetables.
Direct-sow timing and spacing
Wait until the danger of frost has passed and the soil is consistently around 65 to 70°F at planting depth. The National Peanut Board uses that temperature range for spring planting, and Gardening Know How likewise recommends warm soil rather than planting by calendar date alone.
Use raw, unroasted, unsalted seed intended for planting when possible. If you shell a peanut, remove the hard outer shell but leave the thin papery seed coat intact; damage to that coat can reduce germination. Grocery-store peanuts may sprout, but they are an experiment because they may be old, treated, or selected for eating rather than dependable garden performance.
Plant kernels about 1½ to 2 inches deep. Space bunch types roughly 6 to 10 inches apart and leave about 24 to 36 inches between rows, adjusting for the variety’s growth habit and the seed supplier’s instructions. Cover the seed with loose soil, water gently, and keep the bed evenly moist until seedlings emerge, usually in about one to two weeks.
Do not keep the seedbed soaked while waiting. Constantly saturated soil can rot the seed before it gets a chance to emerge; the goal is moisture throughout the seed zone with drainage below it.
Starting seeds indoors without transplant shock
Indoor starting can help in a short season, but peanuts dislike root disturbance. Sow one seed per cell, soil block, or biodegradable pot about four to six weeks before the expected outdoor planting date, then move the seedling outside only after the soil has warmed and the plant has been hardened off.
Use a container deep enough for an intact root plug rather than a shallow tray that forces roots to circle. Transplant while the seedling is still young, keep the root ball together, and handle the stem and leaves gently. Savvy Gardening reports success starting peanuts indoors in a short-season garden, while Gardening Know How cautions that the crop needs careful timing around the last frost. If the plant is already tall and root-bound, direct sowing a fresh seed after the soil warms may be the lower-risk choice.
Care from seedlings through pegging
The first month is mostly about establishment: protect young plants from frost, keep the surface from crusting, and remove weeds before their roots tangle with the peanut plants. Once the canopy begins to spread, the plants shade some of their own soil, but they still need an open, workable pegging zone.
Watch the flowers rather than pruning the plant. Yellow flowers often begin appearing around six weeks after planting, depending on weather and variety. After they fade, look for small pegs bending down from the lower stems; that is the crop’s transition from above-ground growth to underground pod formation.
Water and weed control
Aim for roughly 1 to 1½ inches of water per week from rainfall and irrigation, with the most consistent supply during flowering, pegging, and pod fill. The precise amount depends on soil, heat, wind, and rainfall, so check the soil instead of watering by a rigid schedule. It should be moist several inches down but never remain muddy or waterlogged.
Water at the soil line when possible. Wet foliage that stays damp overnight can increase disease pressure, and a hard overhead stream can expose pegs or wash soil away from the base. Drip irrigation, a soaker hose, or a gentle morning watering is easier on the crop.
Weed shallowly while plants are small. Once pegs begin entering the soil, stop digging close to the stems; a hoe or cultivator that slices through a peg can remove the very flower that would have made a pod. GrowVeg recommends regular shallow hoeing to keep the soil loose and weed-free, a useful practice that needs one important limit: do it before pegs are buried, not after.
When plants are about 10 to 12 inches tall, gently pull a little loose soil toward the base if the pegs are struggling to contact soil. A thin layer of straw or leaf mulch can hold moisture and suppress weeds, but avoid heavy wood chips or a thick, compacted blanket that blocks new pegs from reaching the ground.
Calcium, nitrogen, and inoculant decisions
Calcium matters in the upper soil layer where peanut pods develop. If a soil test shows low calcium or your local extension recommendations support it, use a labeled calcium amendment such as gypsum at the appropriate rate and timing. Do not assume that adding lime or gypsum is automatically helpful: lime changes pH, gypsum does not, and the right amendment depends on the soil test and the crop’s needs.
Peanuts do not usually need a high-nitrogen fertilizer. Too much nitrogen can favor foliage over pods and may increase the risk of fertilizer injury. If the soil is poor, start with a soil test and modest, well-incorporated amendments before planting rather than scattering strong fertilizer beside emerging seedlings.
Inoculant is a more specific decision than “feed the plant.” Peanuts need compatible nitrogen-fixing bacteria to form effective root nodules, and a new peanut-growing bed may not contain the right population. NC State Extension’s peanut specialist stresses that inoculation is critical in new commercial peanut ground, especially when the product must reach the seed furrow. For a handful of backyard plants, use a peanut-specific inoculant exactly as its label directs if it is available; do not substitute a generic bean inoculant or pour an agricultural product into a home bed without reading the label.
Growing peanuts in containers
Peanuts can grow in containers, but the container should be treated as a small, deep crop bed rather than a decorative pot. Use one plant in a pot at least about 18 inches wide and 18 inches deep, with drainage holes and enough surface area for flowers and pegs to reach soil. A wider half-barrel or grow bag can work if it drains freely and the mix stays warm.
Fill the pot with a loose, well-drained vegetable mix that will not compact around the pegs. Avoid a shallow bowl, a water-retaining cachepot, or a crowded container with several plants competing for the same pegging zone. Place it where it receives full sun, and remember that a container can heat and dry faster than a bed; check moisture more often without keeping the mix constantly wet.
Container growing is useful when you need to warm the crop, move it under cover, or garden without suitable native soil. It is not a shortcut around the season: a pot still needs months of warmth, and a single plant will produce less than a well-spaced bed. If you start in a pot indoors, move the plant outside before it becomes root-bound and avoid disturbing the root ball when you do.
Protect flowers, pegs, and developing pods
Peanut plants self-pollinate, so you do not need to hand-pollinate flowers or attract a special pollinator to get pods. The practical job is protecting the lower stems and the soil around them while the plant keeps flowering over several weeks. The National Peanut Board notes that a mature plant can produce around 40 or more pods, but not every flower successfully makes a buried pod.
Squirrels, mice, chipmunks, and other animals can be a larger threat than leaf-feeding insects because they may dig up the entire plant or steal pods from the soil. Use a secure mesh barrier early, and bury or weight the lower edge so animals cannot lift it and dig underneath. A row cover can protect young plants from cold, but it must be removed or ventilated as temperatures rise and flowers appear.
Inspect leaves weekly for chewing, spots, or unusual yellowing. Remove badly damaged leaves only when necessary, improve airflow, and ask a local extension office to identify a disease before applying a pesticide. Peanut diseases include leaf spots and other soil- or foliage-borne problems, and a blanket spray can damage beneficial organisms without solving a misdiagnosed issue. NC State Extension lists common peanut disease concerns and directs growers toward local diagnosis.
Know when peanuts are ready to harvest
Harvest timing is a balance between maturity and weather. If you lift too early, many pods will be small or poorly filled; if you wait through cold, wet weather, the crop may sprout in the pod or become difficult to dry cleanly. Yellowing or dying foliage is a useful signal, but it is not sufficient by itself because drought, disease, and root damage can yellow a plant prematurely.
Stop routine irrigation as the crop approaches maturity so the soil can dry enough for lifting, but do not withhold water early just to force yellow leaves. Research reviewed in a peer-reviewed article on peanut heat and drought stress shows that drought during the reproductive stage can reduce yield and increase quality risks, so steady moisture while pods are filling is more important than creating artificial stress.
Test pods before you lift the crop
Dig a test plant from more than one part of the bed when the foliage begins to decline and the expected maturity window is near. Shake off soil gently, then inspect several pods rather than judging the whole plant by one attractive shell.
Look for well-formed, veined shells and kernels that have developed their mature color for the variety. Immature pods tend to have smooth, pale shells and small, soft kernels; a few are normal, but if most pods look immature, cover the crop from animals and give it more time. If an early frost is approaching, lift the crop before the frost and cure it under cover rather than leaving the plants exposed while hoping for a perfect finish.
Use a garden fork to loosen soil beneath the plant and lift from below, keeping the fork away from the crown and pod zone. Pulling hard on a dry, compacted plant can leave pods in the ground; work around the root mass, lift the whole plant, and search the loosened soil for detached pods.
Cure and store peanuts safely
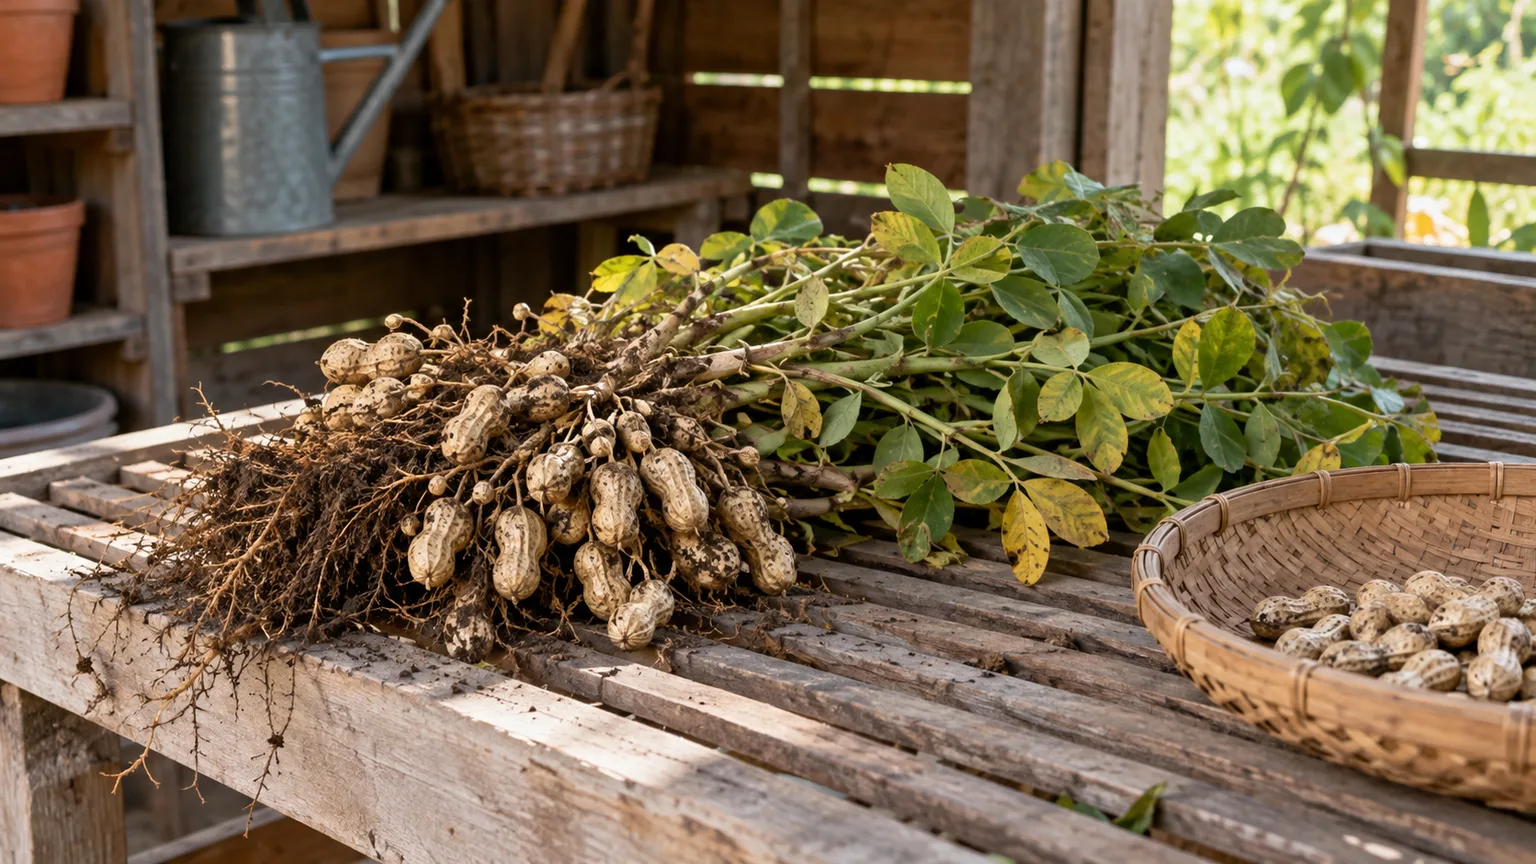
Freshly dug peanuts contain too much moisture for safe long-term storage. Shake off loose soil without scrubbing the shells aggressively, then hang or lay the whole plants in a warm, dry, well-ventilated place protected from rain, dew, rodents, and direct wetting. Allow about one to two weeks for the first cure, then remove the pods and continue drying them in a single layer until the shells feel dry and crisp.
The exact time can be longer in humid weather. GrowVeg recommends curing the plants for one to two weeks and then drying the separated peanuts until the shells are crisp, while Savvy Gardening describes a longer staged drying process. The useful checkpoint is dryness, not a fixed number of days: if pods still feel damp, flexible, or cool and clammy inside, keep drying them.
Discard pods or kernels that are moldy, discolored, shriveled, or smell abnormal. Do not taste-test questionable nuts or assume roasting will make spoiled peanuts safe; peanut mold can involve aflatoxin and other food-safety concerns. The peer-reviewed research on peanut drought and heat stress discusses the connection between crop stress and aflatoxin risk, and GrowVeg likewise advises disposing of moldy nuts immediately.
Store fully cured peanuts in their shells in a cool, dry, ventilated place for short-term use, checking them regularly. For longer storage, shelled kernels keep better in an airtight container in the refrigerator or freezer. Label the harvest date, and keep peanuts away from anyone with a known peanut allergy; the seeds contain allergenic proteins, and NC State Extension notes that exposure can cause serious reactions.
Troubleshoot common peanut-growing failures
Seeds rot before they emerge. The usual combination is cold soil, overwatering, or damaged seed coats. Replant when the soil is warmer, use fresh raw seed, and keep the seed zone moist but drained rather than watering repeatedly into a saturated bed.
Plants are leafy but produce few pods. Check the season length first, then look at the pegging zone. Excess nitrogen, compacted soil, drought during flowering and pod fill, or cultivating after pegs enter the soil can all reduce the harvest; loosen the bed before planting, stop digging close to the plants once pegging starts, and maintain steady moisture.
Flowers appear but no pegs enter the soil. The soil may be crusted, hard, too dry, or covered with a heavy mulch. Keep the surface loose early, pull only a light layer of soil toward the base when needed, and avoid trying to bury the flowers yourself; the plant needs to make and direct the peg naturally.
Leaves turn yellow early. Yellowing near the expected harvest window can be normal, but early yellowing may signal drought, saturated roots, disease, nutrient imbalance, or pest injury. Feel the soil several inches down, inspect roots and leaves, and compare the timing with recent heat or rain before watering more or adding fertilizer.
Pods are small or empty. The plant may have been harvested too soon, or the crop may have experienced drought, poor calcium availability, or cool weather during pod development. Test more than one plant, keep the soil evenly moist while pods fill, and use a soil test before adding calcium blindly in the next crop.
Animals keep digging up plants. Protect the crop before pods mature, not after the first theft. Use a rigid or well-anchored mesh barrier that reaches close to the soil surface and check for gaps at the edges; a loose net resting on foliage will not stop a determined squirrel or mouse.
Conclusion
Growing peanut plants successfully is mostly a matter of timing and restraint. Choose a type that can finish in your actual warm season, plant intact raw seed into warm loose soil, keep moisture steady while flowers become pegs and pods, and protect the soil surface without disturbing the buried crop.
Harvest when test pods show maturity rather than relying on yellow leaves alone. Then cure the whole plants in dry moving air, continue drying the detached pods until they are truly crisp, and discard anything moldy or questionable. With a sunny site and enough patience, even a small container or garden bed can turn the plant’s strange underground growth habit into a rewarding harvest.



