How to Grow and Care for Stella d'Oro Daylily
Learn how to grow Stella d'Oro daylily with the right sun, planting depth, water, deadheading, division, winter care, and bloom troubleshooting.
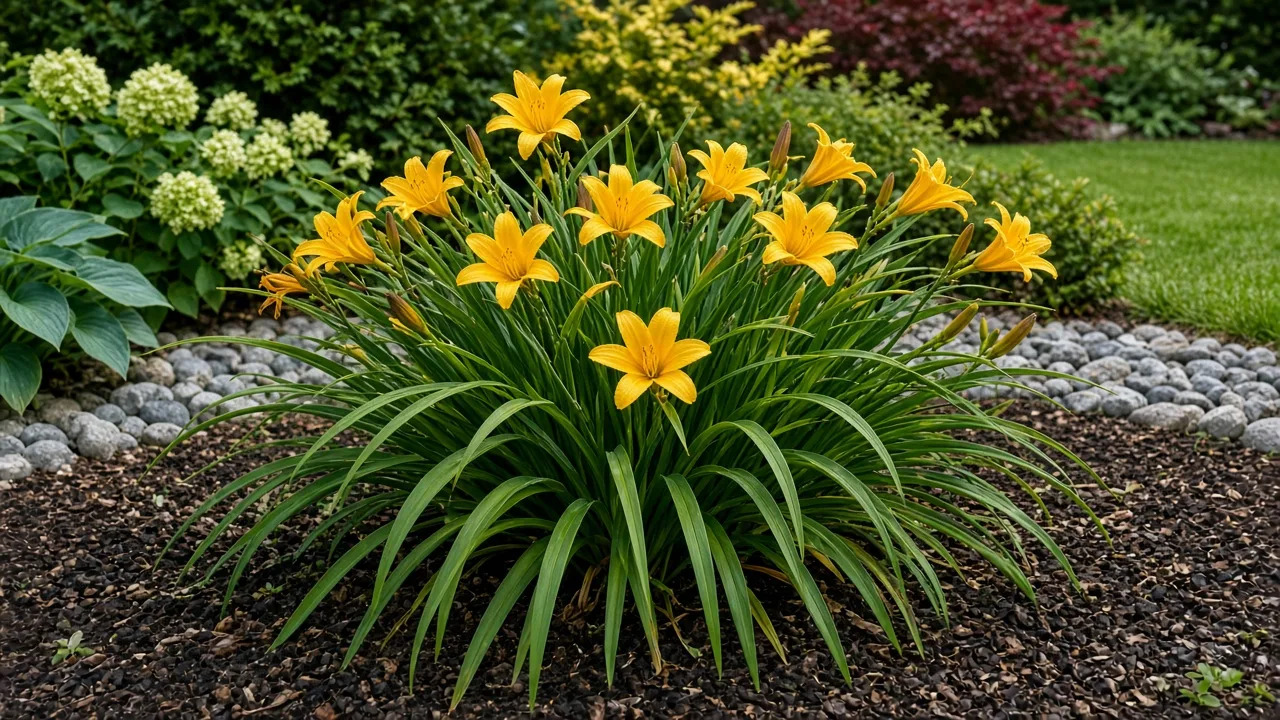
Stella d’Oro daylily (Hemerocallis ‘Stella d’Oro’) earns its reputation by combining a compact clump with fragrant, rounded, canary-yellow flowers and a long season of intermittent bloom. It is a reblooming daylily, not a plant that keeps one flower open for weeks: each trumpet-shaped flower lasts about a day, while a scape carries multiple buds that open in succession.
The best results come from treating it as a flowering perennial with a clear priority order: give the crown sun and drainage, plant it at the right depth, supply steady moisture while it establishes, and remove finished flower stems before they become a seed-making project. The cultivar is forgiving, but “drought tolerant” and “low maintenance” do not mean that a buried crown, dark corner, or waterlogged bed will produce flowers.
What makes Stella d’Oro worth growing
This cultivar forms a relatively short, tidy mound of arching, strap-like leaves and usually fits at the front of a border, along a path, in a mass planting, or in a large container. The Royal Horticultural Society plant profile describes it as a compact deciduous perennial reaching roughly 30 centimeters tall, with fragrant yellow flowers and a clumping habit. In a North American garden, mature size varies with climate and soil, so leave enough room for the foliage to make a full mound instead of packing crowns edge to edge.
It is also not a true lily. Daylilies belong to Hemerocallis and grow from fleshy crowns and roots rather than the scaly bulbs associated with Lilium. NC State Extension notes that the name refers to the short life of each flower, while many buds extend the display across weeks. Removing a whole scape too early can therefore remove unopened flowers.
Choose the site: light, soil, and drainage
The planting site controls Stella d’Oro’s bloom performance more than stronger fertilizer. Choose a bed where water drains after rain, air moves around the foliage, and the plant receives direct light. Avoid a roof drip line, downspout outlet, or low pocket that stays saturated.
Read the sun by climate
Use six or more hours of direct sun as the reliable target for abundant flowering. A little less light may keep the plant alive, and the cultivar can flower in partial shade, but flower count and scape strength generally fall as the light declines. Morning sun with light afternoon shade can be a sensible compromise in hot, bright regions where dark, heat-reflective walls or pavement turn a full-sun bed into a stress test.
In cooler or cloudy climates, prioritize the brightest available position. In hot inland or southern gardens, use afternoon shade only if the soil also remains evenly moist; shade alone does not solve drought stress.
Build a root-friendly bed
Stella d’Oro tolerates clay, sand, rocky soil, and a broad pH range, but “tolerates” is different from “performs best.” The RHS growing guidance recommends fertile, moist but well-drained soil and notes that flowering can be poor in shadier situations. Before planting, loosen compacted soil across the whole bed rather than creating a small, rich pocket that holds water around the crown.
Mix in finished compost when the native soil is thin or compacted, then stop. Excess organic amendment in a heavy clay hole can act like a bowl. If the site stays wet for days, improve the bed’s grade or drainage before planting, or choose a raised position. Keep the crown slightly proud of the surrounding grade if the soil settles easily, while still following the planting-depth rule below.
Planting depth and spacing
Plant bare-root or divided daylilies in spring after the soil is workable, or in early fall with enough time for roots to settle before the ground freezes. In regions with very hot, dry summers, early spring is easier on a new division; in mild climates, fall planting can work well if you can water consistently.
Make a broad cone of soil in the planting hole and spread the roots over it. Set the crown—where the leaves meet the roots—about 1 inch below the finished soil line, then backfill and firm gently. Do not bury the green fan deep to “anchor” it. A crown planted too low may grow leaves but flower weakly, and wet soil around the crown raises the risk of rot. Water slowly after planting so soil settles around the roots, then add a thin mulch layer while keeping mulch off the crown itself.
Space Stella d’Oro about 18 inches apart when you want individual clumps to develop without constant crowding. A tighter mass can look filled in sooner, but it will need division earlier and can dry unevenly at the edges. For a repeating border, measure from crown center to crown center rather than from leaf tips; the foliage arches beyond the root zone as it matures.
Watering for steady rebloom
For the first growing season, water deeply whenever the upper soil begins to dry, adjusting for rainfall, soil texture, and temperature. A new division has a small root system; established plants tolerate dry spells better, but consistent moisture supports flowering during heat.
Water at the soil line with a soaker hose, drip line, or slow hand watering. Frequent overhead sprinkling wets leaves and prolongs the warm, damp conditions that favor leaf disease. During a hot, rainless week, check several inches down before watering.
There is no useful universal calendar for “one inch every week.” Sandy soil, containers, and reflected heat need attention sooner; clay, shade, cool weather, and oversized pots need less. Aim for a moist-but-not-soggy root zone followed by a partial dry-down.
Feeding and mulching
Stella d’Oro is a light feeder when planted in decent soil. A spring top-dressing of compost or a modest, slow-release perennial fertilizer can support growth, but repeated high-nitrogen feeding often produces leaves at the expense of flowers. Follow the label for rate and timing; do not increase the dose because a plant has not rebloomed.
Mulch is more valuable for moderating the root zone than for “feeding” the plant. Apply about 1 to 2 inches of shredded leaves or another stable organic mulch over the surrounding soil, leaving a clear ring around the crown. Mulch reduces evaporation and weeds, but a thick wet collar touching the crown creates a rot-friendly pocket and can hide slugs.
Deadheading and seasonal pruning
Pruning daylilies has three separate jobs: removing individual spent flowers, removing a finished scape, and cleaning up old foliage. Confusing these jobs is why gardeners sometimes cut a reblooming plant too hard while it still has buds, or leave diseased leaves in place until spring.
Deadhead the right way
If you walk past the plant often, pinch or snip off each spent flower at its base. This keeps the clump tidy and prevents energy from going into a seed pod. You do not have to remove every flower the same day for the plant to rebloom, however; missing a few is not a disaster.
The more important timing decision is the scape. Follow a flowering stem upward and leave it in place while it still has unopened buds. When no buds remain, cut the entire scape near the foliage mound with clean pruners. Savvy Gardening’s daylily pruning guidance similarly distinguishes individual flowers from a finished scape. Remove any developing seed pod if you are growing a named cultivar and want to direct resources toward vegetative growth; seedlings will not reliably reproduce ‘Stella d’Oro’ because it is a hybrid.
Deadheading helps the plant look better and can support continued flowering, but it cannot replace light, water, or a healthy crown. If a plant is in deep shade, recently divided, drought-stressed, or planted too deeply, more diligent snipping will not create a full rebloom cycle.
Fall cleanup versus spring cleanup
After several hard frosts, the foliage may turn yellow, brown, and papery. If the foliage was healthy, you can cut it back in late fall or leave it until early spring, depending on how tidy you want the bed and whether winter structure matters in your garden. Penn State Extension lists daylilies among perennials commonly cut back after browning, but also advises waiting until hard frosts have killed the tops so roots can reclaim energy.
If leaves showed clear disease symptoms, clean them up more deliberately and remove the debris from the bed rather than leaving it as mulch. Cut foliage to a few inches above the soil so you can still see where the crown is. In spring, remove the remaining old leaves before new fans are crowded, taking care not to slice emerging growth.
Division and propagation
Division is the dependable way to make more plants that match the parent. Seedlings from a hybrid can differ in color, height, bloom timing, and rebloom habit. Divide when the clump is crowded, the center loses vigor, flowers become smaller, or you need to move part of it—not simply because a set number of years has passed.
Early spring and early fall are the safest general windows. Epic Gardening’s daylily guide also recommends dividing in these shoulder seasons. Pick the window that gives a new division moderate temperatures and several weeks to make roots before severe heat or frozen soil. Avoid dividing during a heat wave, drought, or while the plant is in full flower unless you have no choice.
Step-by-step division
- Water the clump the day before if the soil is dry, and prepare new planting holes first.
- Cut back only what you need to handle. Fall foliage can be shortened; in spring, preserve new green growth and avoid cutting emerging fans.
- Drive a spade around the outside of the clump, then lift from underneath. Do not yank the leaves, because the crown and roots can tear apart unevenly.
- Brush or rinse away enough soil to see the crown. A clean, sharp knife or spade can split the mass into sections, each with healthy roots and at least one strong fan.
- Trim mushy or blackened roots, but do not shave away every fine root. Replant divisions promptly at the same crown depth as the original plant.
- Water thoroughly, settle the soil, and keep the new plants evenly moist while they re-root. Mulch around, not over, the crown.
Small divisions may take a season to flower well while they rebuild roots and fans. A healthy, vigorous clump does not need yearly division.
Container growing
Stella d’Oro can grow in a container, but the pot must be wide and deep enough for a substantial root mass, not a decorative cup. Choose several drainage holes and enough volume to avoid rapid temperature swings; 3 to 4 gallons can support one compact plant if the mix drains freely.
Use a quality container mix amended for drainage rather than garden soil. Position the pot where it receives strong light, and check moisture more often than you would in the ground because containers heat and dry from the sides. Water thoroughly until it drains, then empty any saucer; do not keep the pot sitting in runoff.
Container roots are more exposed to winter cold than roots in a bed. In colder climates, move the pot to an unheated but sheltered space or insulate the container after the foliage dies back. The goal is to protect the roots from repeated freeze-thaw swings, not to keep the plant warm and actively growing all winter. Repot or divide when roots circle densely, the plant dries within a day despite watering, or flowering declines from crowding.
Fix weak or missing blooms
Start with the simplest inspection: how many hours of direct sun reaches the leaves, and is the crown planted too deeply? Inadequate light and a buried crown are more common explanations for sparse flowers than a lack of specialty fertilizer. If a tree has increased shade, move the plant in the dormant season or thin competing growth.
Next, review water and roots. Drought during scape formation can shorten the display, while persistently wet soil damages roots. Check drainage, recent division, and yellowing from the base; transplant shock can reduce a new plant’s first-season flowers.
Finally, look at pruning. Removing a finished scape helps tidy the plant, but cutting a scape while it still holds buds reduces that bloom cycle. Excess nitrogen can make a lush leaf mound with fewer flowers. Correct the growing conditions first, then use a light spring feed only if the soil is genuinely poor.
Diagnose yellow leaves and leaf streak
Yellow foliage is a symptom, not a diagnosis. A few older leaves yellowing as the season advances can be normal; widespread yellowing after heavy rain points you toward root stress; crisp, bleached patches on the sun-facing side suggest heat or drought; and yellow-to-brown streaks that begin near leaf tips deserve a closer look.
The University of Wisconsin–Madison Plant Disease Diagnostics Clinic describes daylily leaf streak as a fungal disease that often starts with yellowing from the tips along the midveins, followed by brown dead tissue or red-brown flecks with yellow halos. It is favored by warm, wet conditions and survives in infected leaf debris. Remove affected leaves as they appear, keep irrigation at the soil line, and avoid handling wet plants.
Space crowded clumps so leaves dry faster, and remove diseased foliage during fall cleanup. Do not put visibly infected debris in a casual backyard compost pile. If leaf streak is severe every year, photograph the pattern and contact a local plant diagnostic service before choosing a fungicide. Products, active ingredients, application timing, and legal use vary, so follow the current product label exactly rather than copying a generic spray schedule.
Pests, rust, and crown problems
The RHS profile lists aphids, slugs, snails, thrips, and glasshouse red spider mite among possible pests, while also describing the cultivar as generally disease-free but susceptible to fungal leaf spot, rust diseases, and bacterial leaf or stem rot. Most infestations are manageable when caught early. Look under leaves and around the crown, especially where mulch stays damp, and first remove hiding places, improve airflow, or use a firm water spray for visible soft-bodied aphids.
Rust is more likely to show orange or rust-colored powdery pustules than the long yellow-brown streaks associated with leaf streak. Remove badly affected leaves, avoid overhead irrigation, and clean tools between plants. A soft crown, sour smell, sudden collapse, or blackened base is more concerning for rot: stop routine watering, inspect the drainage, and lift the plant if necessary to assess roots and crown tissue.
Do not diagnose every brown leaf as disease. One old leaf, a spent scape, frost damage, drought scorch, and salt stress can all look untidy without requiring a pesticide. Treat the pattern, location, and pace of change as evidence, not just the color.
Winter care and cat safety
In the ground, established Stella d’Oro is winter hardy across a broad range of climates, but local exposure and drainage still matter. After frost has finished the foliage, clean up diseased leaves, mark the crown with a short stubble if it disappears under mulch, and keep winter mulch loose rather than piled against the plant. Do not fertilize late in the season to force tender growth.
The plant is toxic to cats. NC State Extension lists potential signs after ingestion including vomiting, loss of appetite, lethargy, kidney failure, and death. Keep cut foliage, divisions, and potted plants away from cats, and contact a veterinarian promptly if a cat chews any part of a daylily. Do not assume that a daylily is safe because it is not a true lily botanically; pet risk is a separate question from plant classification.
Conclusion
Stella d’Oro daylily is easiest to keep blooming when you make a few precise choices at the beginning: give it strong light, fertile but draining soil, and a crown planted only about an inch below the surface. Water new plants deeply and established plants during real dry spells, deadhead finished flowers without removing live buds, and divide only when a crowded clump needs rejuvenation.
If the plant disappoints, inspect light, crown depth, moisture, roots, and disease pattern in that order. Those checks usually reveal more than another handful of fertilizer, and they turn this adaptable yellow daylily into the compact, repeat-flowering perennial it can be.



