Why Your Philodendron Is Turning Yellow: 7 Causes
Find why your philodendron is turning yellow with a quick soil, root, light, and pest check—plus safe steps for wet soil, dry roots, and damaged leaves.
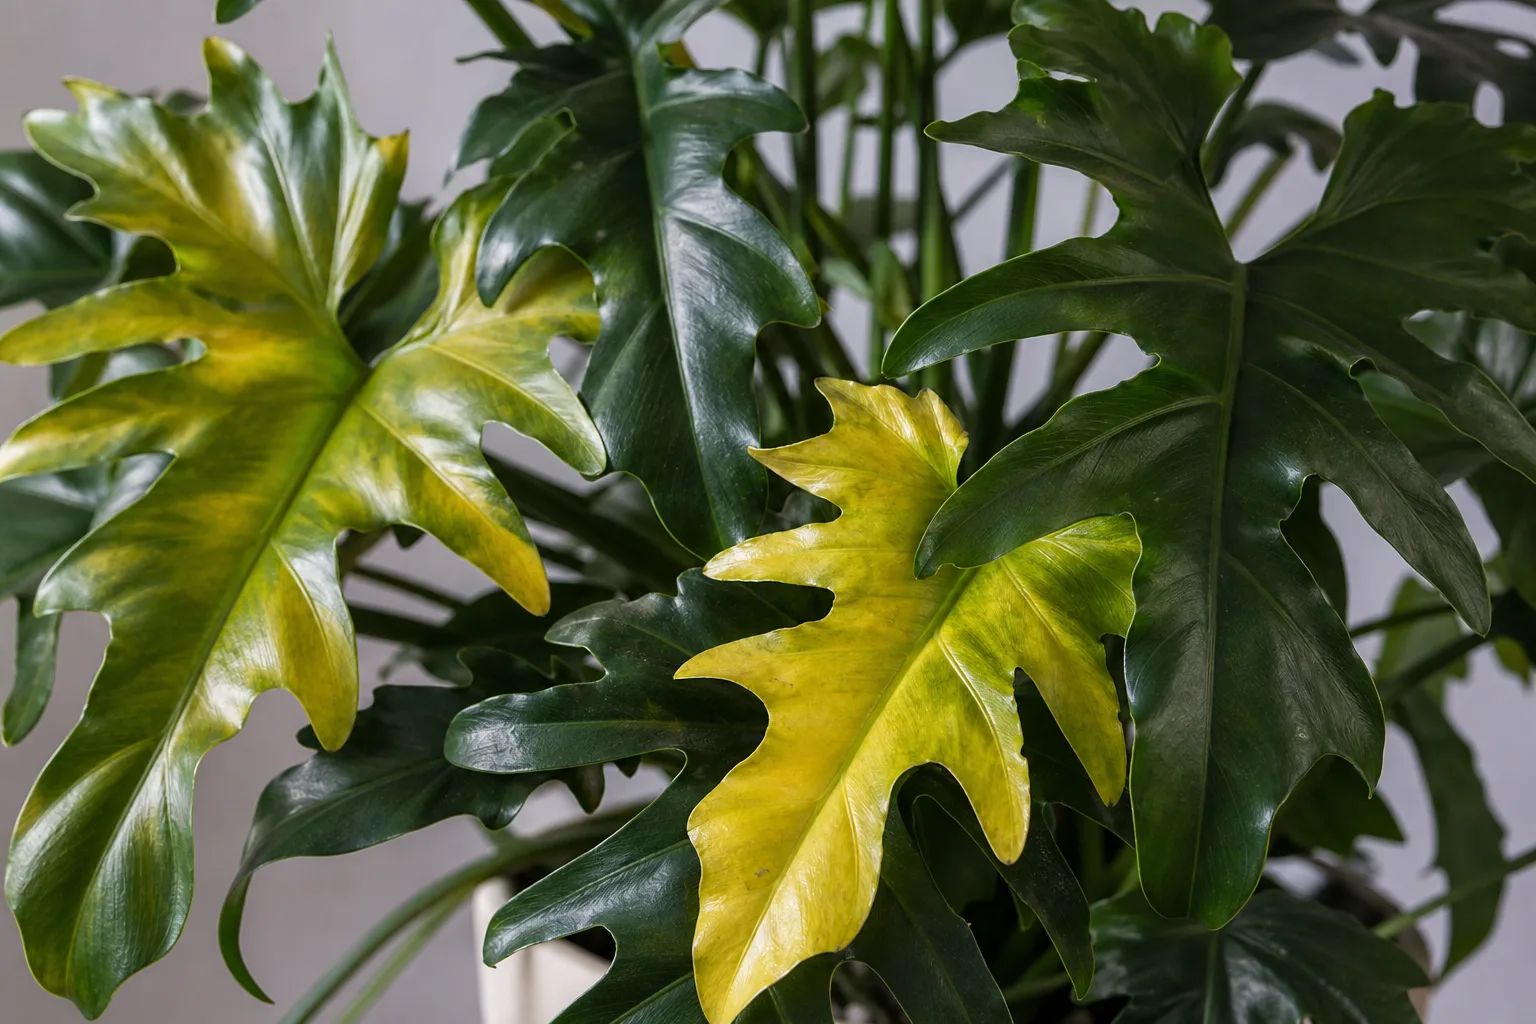
A yellow philodendron leaf is a clue, not a diagnosis. If one of the oldest leaves near the base is fading while the rest of the plant is firm and putting out new growth, it may simply be aging; if several leaves yellow over a short period, check the soil and roots before changing fertilizer or moving the plant.
Philodendron species and cultivars vary in leaf shape, color, and growth habit. A Philodendron Brasil or Lemon Lime can have stable yellow-green patterning, while distress yellowing usually looks like a change from that plant’s normal color. Compare the affected leaf with healthy leaves on the same plant, then note whether the yellowing is on old or new growth, one side or the whole plant, and whether the tissue feels firm, soft, or dry.
Start With the Pattern, Then Check the Root Zone
Start with the pot, not the watering can. Press a finger into the mix away from the stem, feel the pot’s weight, and check whether the inner nursery pot has open drainage holes; a dry surface does not prove that the center of a large root ball is dry, and a drooping plant is not automatically thirsty.
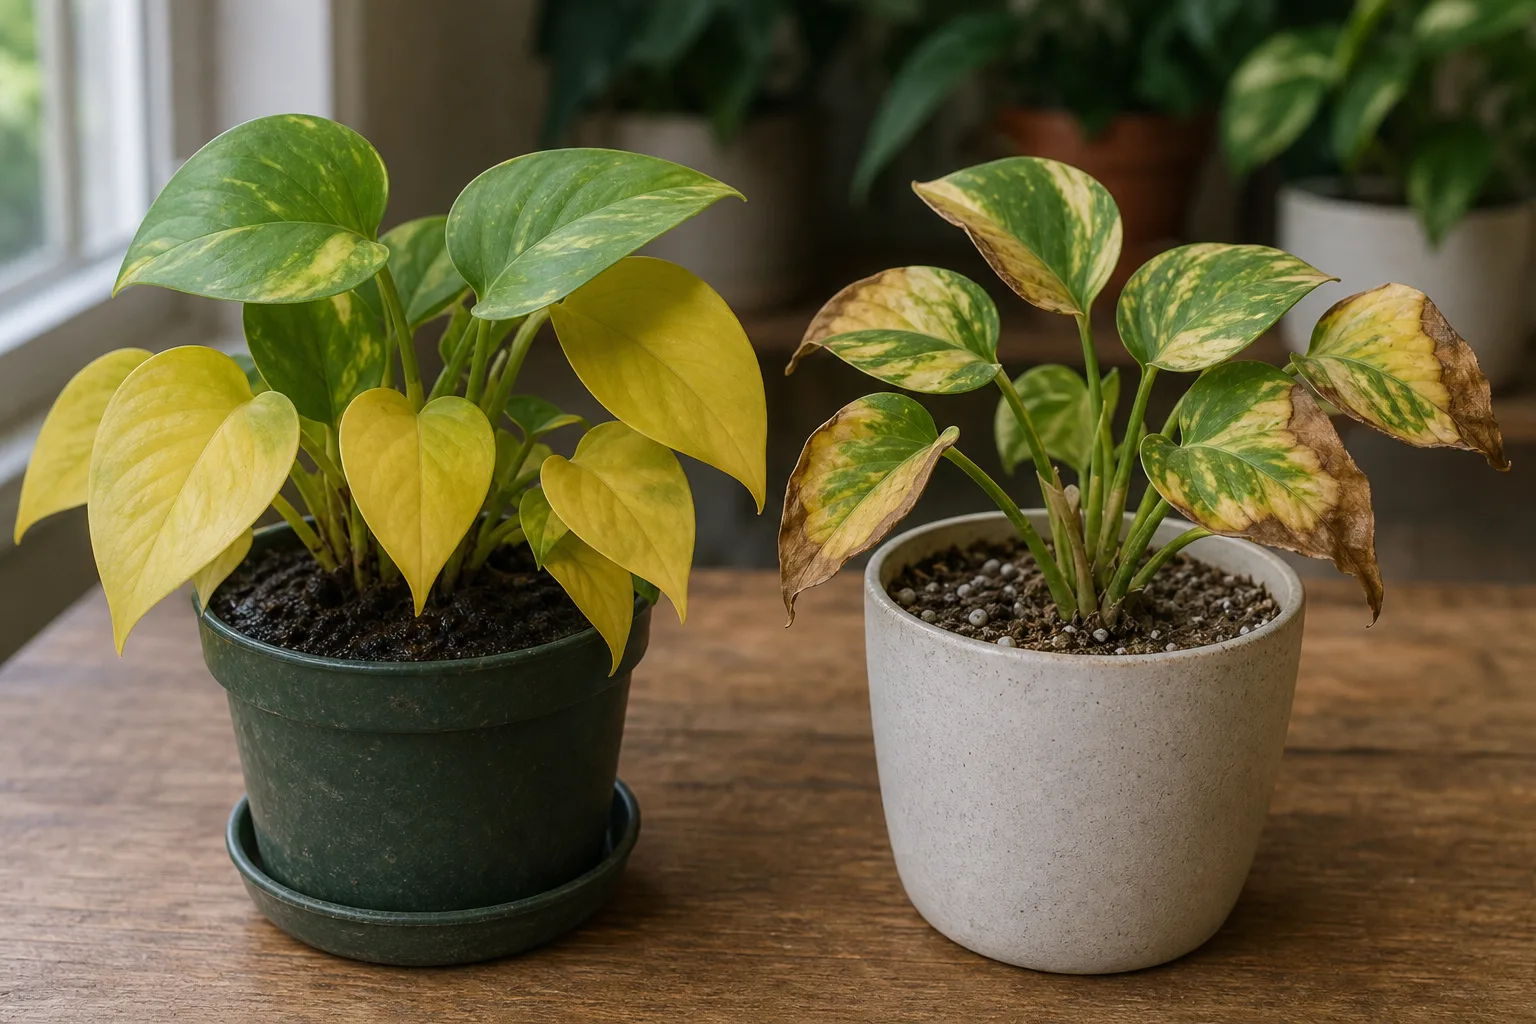
Leaf distribution and edge damage offer clues, but the root-zone check helps distinguish causes that look alike.
| What you notice | First check | More likely direction |
|---|---|---|
| One oldest lower leaf fades; the rest looks normal | Is there healthy new growth? | Natural leaf aging |
| Several lower leaves yellow and the mix stays wet | Drainage, pot weight, root condition | Waterlogged roots or root damage |
| Leaves wilt and the pot feels unusually light | Moisture through the root ball | Underwatering |
| Pale, bleached patches face a sunny window | Recent move or stronger sun | Light stress or scorch |
| Fine stippling, sticky residue, cottony clusters, or bumps | Undersides, petioles, and leaf joints | Sap-feeding pests |
| Yellowing follows repeated feeding or a crust on the mix | Fertilizer history and drainage | Salt buildup or root stress |
Where yellowing begins matters
Older leaves are the plant’s first place to shed foliage when resources or conditions change, so a single lower leaf is less concerning than multiple leaves yellowing at once. New leaves that emerge pale, stalled, or distorted deserve a different check: look for pests, weak light, cold exposure, and roots that are too wet to function before assuming the plant needs more fertilizer.
A gradual change after a move or repot can reflect adjustment to different light, airflow, or moisture, but “acclimation” should not become a reason to ignore a worsening pattern. Take a dated photo, mark which leaves are affected, and see whether the change stops after one targeted correction.
Check the pot before changing care
A pot without drainage, a decorative cachepot holding runoff, a dense mix, or a container much larger than the root ball can keep roots wet long after the surface appears dry. Remove the nursery pot from its cover pot and empty any standing water; never let the plant sit in water while you try to diagnose it.
If you are unsure how much moisture is in the center, insert a clean wooden skewer several inches into the mix and pull it out. A dark, cool skewer with damp particles suggests the interior is still wet; a clean, dry skewer and a light pot support the opposite conclusion. Use these checks together rather than treating a moisture meter or a calendar as a diagnosis. Also look at how the newest leaf is unfolding: a naturally soft, lighter-colored leaf can darken as it matures, but a leaf that stays pale, curls, or stops expanding deserves another look. Take a quick photo of the same side of the plant each week so you can tell whether the yellow area is actually spreading.
A plant with a self-heading growth habit has a compact central stem and a different canopy from a trailing heartleaf type, so “lower leaf” can mean different places on different philodendrons. Judge position relative to that individual plant, not a generic picture of a vine. Variegation is usually patterned and stable; a formerly green section that fades, softens, or browns is a change worth investigating.
1. One old leaf is reaching the end of its life
Philodendrons do not keep every leaf forever. An occasional oldest leaf can turn evenly yellow, then dry and detach as the plant directs resources toward younger foliage; this is most plausible when the change is slow, limited to the bottom or interior of the plant, and accompanied by healthy stems and new growth. Both Hunker’s Philodendron-specific overview and Bloomscape’s care notes describe this kind of occasional lower-leaf yellowing as normal aging.Hunker Bloomscape
The useful distinction is pace. One leaf fading over time is different from several leaves turning yellow over a few days, a soft stem near the soil, or yellowing spreading from one side to new growth. Check the soil once, inspect the plant for pests, and then leave care steady if the evidence points only to an old leaf.
A recent move from a bright greenhouse to a dim home can also prompt a small amount of leaf loss as the plant adjusts. Keep the plant in stable bright, indirect light and avoid stacking stressors by repotting, pruning heavily, and fertilizing on the same day. If the plant keeps losing leaves, treat the continued pattern as a new signal and work through the other checks below.
2. Soil stays wet and roots cannot breathe
Overwatering is not simply “using too much water once”; it is a root zone that stays wet too long. Water displaces air in the mix, and roots under prolonged stress cannot move water normally, so a plant may look wilted even while the pot is damp. The University of Maryland Extension notes that excess moisture can produce yellowing and wilting that overlap with drought symptoms, which is why the soil and drainage must be checked together.University of Maryland Extension
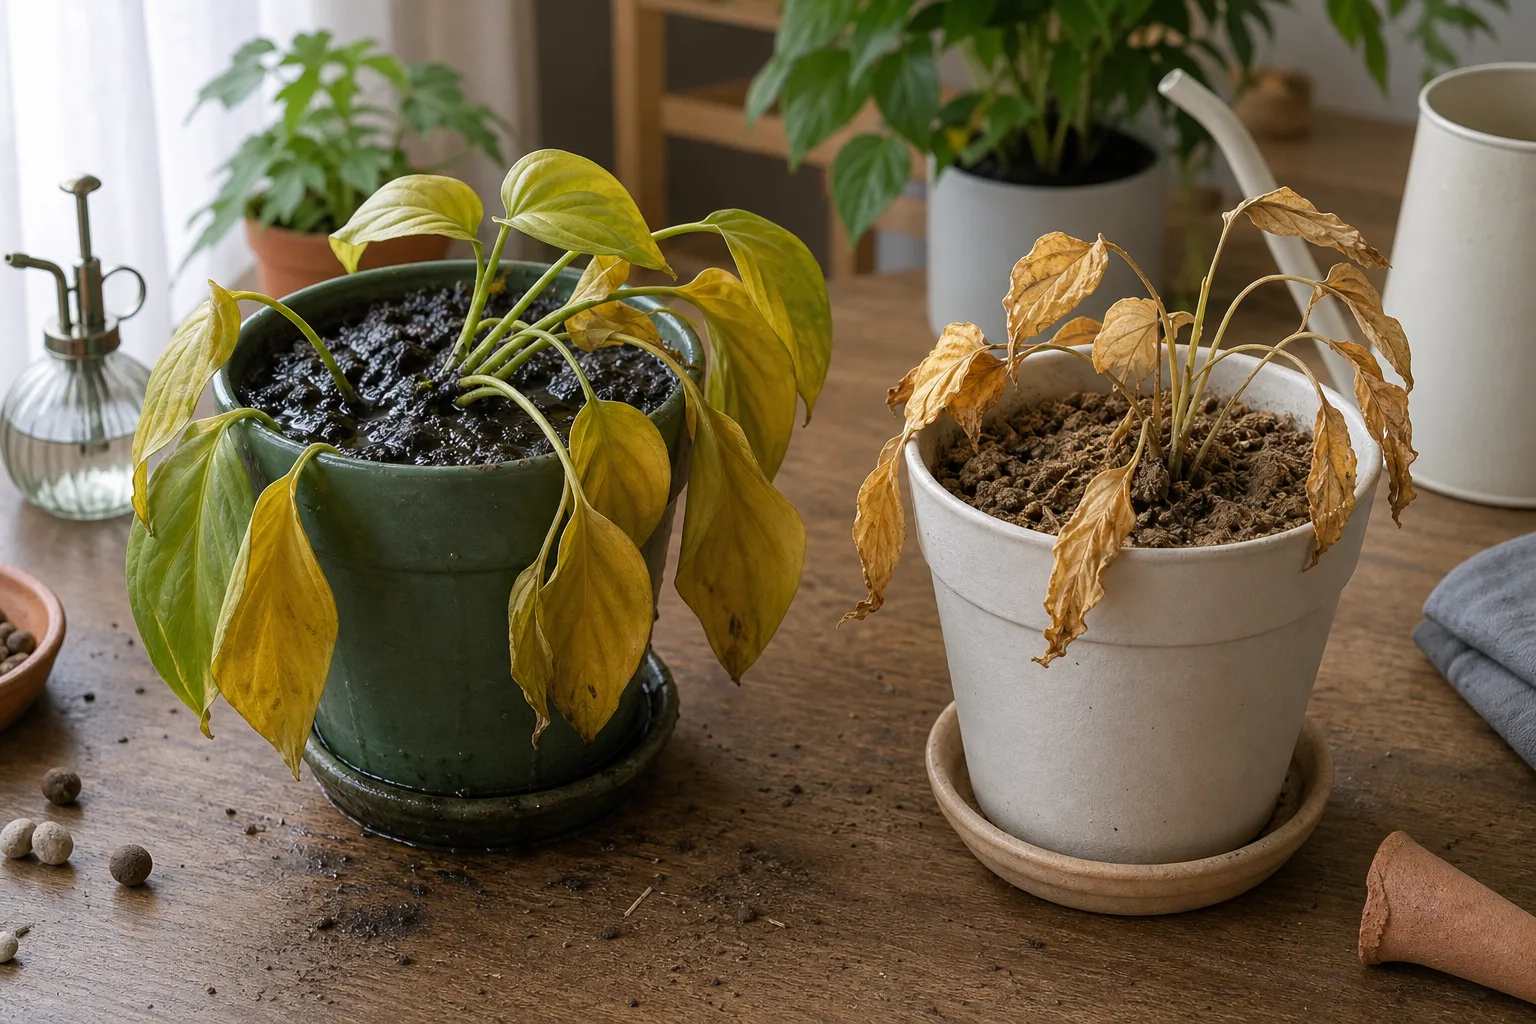
Compare the moisture through the pot rather than guessing from the leaf or the top layer alone.
The combination that raises concern is repeated yellowing plus mix that remains wet for days, a pot with no drainage, a sour smell, or stems that feel soft at the soil line. Brown or black mushy roots are stronger evidence of rot than yellow leaves alone; healthy roots are generally firm. Do not unpot a stable plant just because one leaf is yellow, since unnecessary root disturbance can create another problem.
A pot can stay wet because it is too large, the mix is compacted, the drainage hole is blocked, or the plant is using less water in a dim or cool room. The same watering amount that worked in summer may be excessive during winter slowdown. If the pot is still heavy and the mix is damp several inches down, wait and improve drainage or light before offering more water; repeated small sips can keep the center wet without evenly moistening the root ball.
When to unpot and inspect
Unpot only when the mix is staying saturated or the plant continues to decline despite removing standing water. Slide the root ball out gently and inspect the outside and bottom first; if roots are firm and pale or tan, return it to the pot and correct watering conditions rather than cutting them. If a portion is clearly mushy, dark, and deteriorating, use clean shears to remove only those damaged sections, then repot in fresh, airy houseplant mix in a pot with drainage that is only modestly larger than the remaining roots.
After repotting, water once to settle the mix and let excess drain completely. Do not immediately fertilize or keep the soil wet “to help it recover”; damaged roots need air as well as moisture. If most roots and the stem base have collapsed, recovery is uncertain, and taking a healthy cutting from unaffected growth may be a better backup than repeatedly disturbing the remaining root ball.
For prevention, water thoroughly when the mix has dried enough for that pot and plant, then empty the saucer or cachepot. Bloomscape suggests allowing the upper portion of the mix to dry and emphasizes removing runoff; that is a useful cue, but the interval changes with pot size, season, light, and mix texture.Bloomscape See our philodendron watering guide for a more detailed routine.
Avoid trying to solve persistent wetness by watering just a little less every day. A porous mix, a pot with a drainage hole, and a repeatable “check, water, drain, recheck” routine are more useful than a precise number of days. The University of Maryland Extension notes that excess moisture can mimic drought stress; that overlap explains why leaves alone are a poor reason to water or repot.University of Maryland Extension
3. The root ball is drying too far between drinks
An underwatered philodendron often has limp or curled leaves, dry tips, and a pot that feels light. The mix may pull away from the pot wall or stay dry several inches down, and the oldest leaves may yellow as the plant sheds foliage it cannot support. Dry soil and waterlogged soil can both lead to drooping, so look at the root zone before deciding that more water is the answer.
If the mix is dry through most of the pot, water slowly over the entire surface until water exits the drainage holes. Very dry peat-based mix can channel water down the sides without soaking the root ball; in that case, let the pot sit briefly in a shallow basin, then lift it out and drain it fully. Do not leave it standing in water after the mix has rehydrated.
Resume checking moisture rather than following a weekly schedule. A smaller pot in bright, warm conditions can dry faster than a large pot in a cool, dim room. The goal is to moisten the whole root ball and allow excess to drain, then wait until the plant’s mix has dried to the right degree before watering again; there is no single interval that works for every philodendron.
If the outside of the root ball is wet but the center is powder-dry, water is channeling through instead of soaking the mix. Break the dry cycle with a slow pour around the pot in two passes, allowing a few minutes between them; if the plant is severely dry, a short soak can help the mix rehydrate, but remove it from the basin once the soil is evenly damp. Afterward, let it drain and do not leave water in a cover pot. A badly damaged yellow leaf may still die even after the moisture problem is corrected, so base the next watering on the soil rather than trying to “top up” the old leaf.
4. Light changed in either direction
Too much direct sun can bleach or scorch leaves, often creating pale patches on the window-facing side. That pattern is different from a general fade through the lower canopy, and it may appear after a seasonal change or moving a plant outdoors. Hunker notes that philodendrons generally tolerate indirect light better than direct sun, while very dim conditions can also contribute to yellowing.Hunker
Too little light usually shows up more gradually: growth slows, stems stretch toward the window, and the mix dries more slowly because the plant is using less water. That slower drying can turn an unchanged watering routine into overwatering, so the apparent “light problem” and “water problem” can reinforce each other. Variegated cultivars may need brighter indirect light to maintain their pattern, but more light does not mean harsh midday sun. Window exposure also shifts by season: the same sill can receive much stronger direct sun in summer or during a clear afternoon than it did in winter. If yellow patches appeared after you changed the plant’s position, return it to the previous filtered exposure before you make unrelated changes to the watering routine.
Distinguish scorch from low-light decline
For scorch, move the plant out of the direct beam or filter the window with a sheer curtain, then keep it in a bright spot where leaves receive ample ambient light. For a dim corner, shift it closer to a window in stages and watch how quickly the mix dries before increasing watering. Avoid a sudden move from a low-light room to full sun; acclimate it gradually over several days.
If the leaves are yellowing and the plant is close to a heater, air conditioner, or cold window, correct that exposure before adding fertilizer. A sudden environment change can stress foliage, and a leaf already damaged by scorch will not regain its original green. Judge the adjustment by whether new damage stops and fresh growth looks healthy.
5. Sap-feeding pests are draining leaves
Small infestations can be easy to miss because pests hide under leaves, along veins, and where the leaf stalk joins the stem. Scale often looks like immobile brown or tan bumps; mealybugs form white cottony patches; aphids cluster around soft new growth; spider mites leave fine stippling and, in heavier infestations, delicate webbing. Sticky honeydew can point to aphids, mealybugs, or soft scale, while a fine speckled fade suggests checking for mites. Sap-feeding damage can weaken foliage and make it yellow, but the presence of one yellow leaf does not prove pests are present.Better Homes & Gardens
A useful inspection takes more than a quick glance at the upper surface. Turn each suspect leaf over and check its veins, the petiole, and the narrow folds where new leaves emerge; use a flashlight to look for fine webbing or tiny crawling forms. Sticky residue that returns after wiping can indicate an ongoing sap-feeder, while dust that wipes away without insects may simply be household dust. If you find no pest evidence after a careful repeat inspection, do not spray “just in case.”
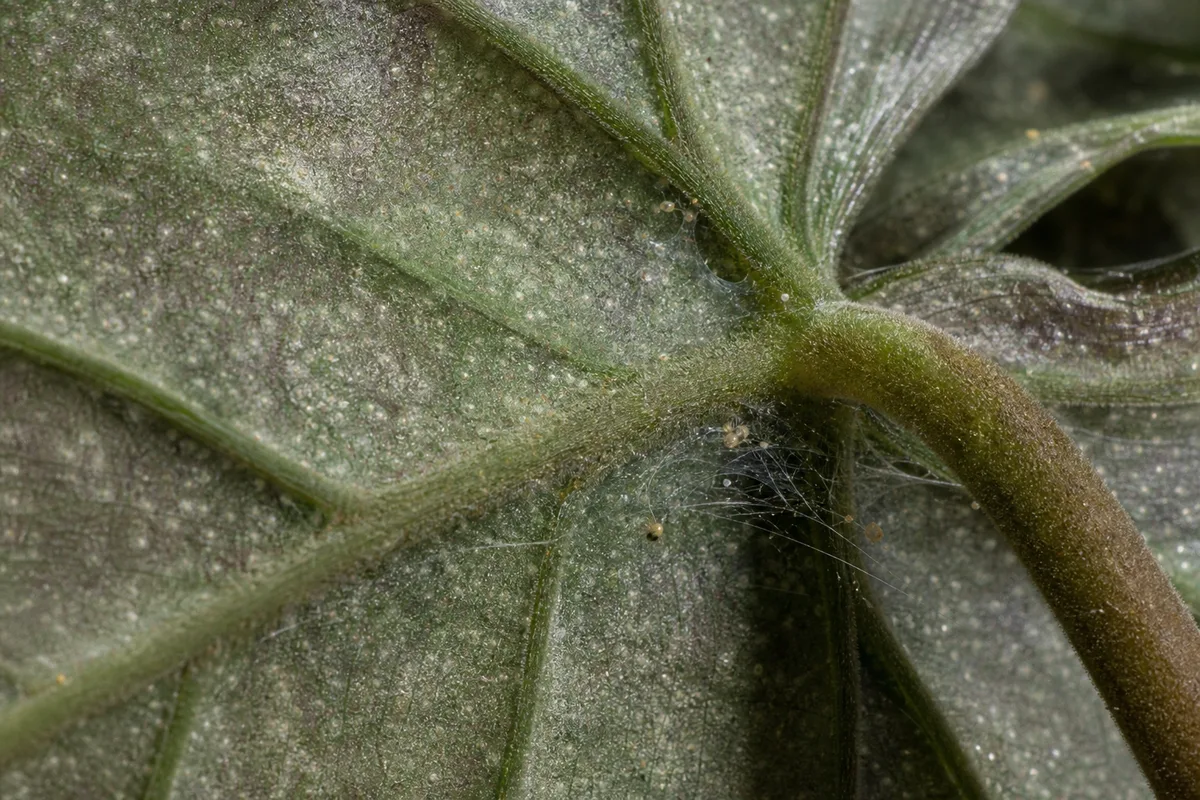
Spider-mite webbing can be hard to see until you inspect the underside of the leaf.
Inspect and treat without spreading pests
Move a suspect plant away from nearby houseplants while you inspect it. Check both sides of leaves, new growth, stems, and the tight joints around petioles; a flashlight and a white sheet of paper under a gently tapped leaf can help reveal small moving pests. Recheck the plant after cleaning because eggs or hidden insects may survive the first pass.
For a light infestation, rinse sturdy leaves with a gentle but thorough stream of lukewarm water, wipe visible pests away, and prune only heavily affected leaves. Colorado State University Extension recommends inspecting new plants and keeping them separate from the collection for several weeks, and it notes that water can dislodge some exposed pests; it also warns that alcohol and household soaps can injure foliage.Colorado State University Extension
If pests remain, use a product specifically labeled for the pest and indoor plants, follow its label exactly, and test a small area first because philodendron leaves can be sensitive. Cover the leaf undersides and joints only as the label directs, keep treated plants away from children and pets until safe according to the label, and repeat only at the specified interval. Sticky traps can help monitor flying adults, but they do not remove pests hidden on the plant.
6. Dry air or temperature swings add stress
Low humidity more often causes crisp tips, brown edges, or curling than a whole plant turning yellow. Dry air can worsen stress when the mix is also allowed to become bone-dry, but a humidifier will not fix soggy roots or pests. If the air is consistently dry and leaves have crispy margins, a room humidifier near the plant is a more dependable adjustment than repeated misting, which changes humidity only briefly.
Temperature shifts can be the overlooked part of the same environmental problem. A plant beside a drafty door, cold window, heating vent, or air conditioner may lose leaves even when watering has not changed. Move it to a stable indoor location with bright indirect light, and avoid placing it outdoors during a cool spell just to “freshen it up.” A temperature change can be gradual and easy to miss: a pot beside glass may become much colder overnight than the room thermostat suggests, and airflow from a vent can dry one side of the canopy. Look at where the plant sits at different times of day, not only at the temperature setting on the thermostat.
Make one environmental change at a time. If a philodendron was moved recently, return it to a stable position and monitor it rather than rotating it among several windows. If the yellowing continues after light, temperature, and moisture are steady, inspect roots and leaves again instead of assuming humidity is the missing fix.
7. Low nutrition, salt buildup, or a crowded pot
A nutrient shortage is possible when the plant has been in the same old potting mix for years, growth is weak during the active season, and leaves are generally pale. But yellowing can also happen when wet, damaged roots cannot take up nutrients, so adding fertilizer to a plant with soggy soil can compound the stress. Some yellow or cream coloring is normal in variegated cultivars, and a single old leaf is not evidence that the plant needs feeding.
Excess fertilizer can cause its own root-zone problem. A white crust on the soil or pot rim, repeated heavy feeding, and brown leaf tips suggest accumulated soluble salts. Gardening Know How describes overfertilization as one possible source of leaf discoloration on pothos, a related aroid; use that as a general warning about excess feeding, not proof that a philodendron has a particular deficiency.Gardening Know How
Look for a pattern before adding nutrients. A deficiency can affect leaves differently depending on the nutrient and growing conditions, while root damage can prevent several nutrients from being absorbed at once. Yellowing between veins, uniformly pale new growth, and stalled growth are clues to investigate, not a home test result. A specific diagnosis may require a close look at the medium, water quality, and recent fertilizer use; do not assume hard tap water is the culprit simply because it contains minerals.
A crowded pot can dry very quickly and leave roots circling the container, while a pot that is too large for the root ball can stay wet too long. Repot when you see roots densely circling, pushing through drainage holes, or when the mix has broken down and no longer drains—not just because a leaf changed color. Choose a container with drainage only a little wider than the root mass and use an airy mix that retains some moisture without staying saturated.
Correct nutrients only after roots are healthy
First rule out waterlogged soil, pests, and sudden light or temperature changes. If the plant is actively growing and has not been fed or repotted in a long time, apply a complete houseplant fertilizer according to its label, starting conservatively rather than doubling a dose to correct yellow leaves quickly. Do not fertilize a dry root ball or freshly damaged roots.
If fertilizer has been used heavily and the mix drains freely, run water through the pot to carry salts out and let it drain fully. Do not flush an already waterlogged plant; fix the drainage and root issue instead. Avoid adding Epsom salt, eggshells, or a general “yellow-leaf” remedy without evidence of a specific deficiency, since the wrong supplement will not correct the cause and may add more salts. If the pot is badly rootbound, move up only one container size rather than surrounding a small root system with a large volume of wet soil. If the mix has broken down into a dense, airless mass, fresh potting mix may help more than another fertilizer application.
Remove yellow leaves and judge recovery correctly
A fully yellow leaf will not turn green again, so remove it if it is mostly yellow, dry, or easy to detach. Use clean scissors to cut the petiole near the stem without nicking the main stem; if only a small edge is affected and the rest of the leaf is green, leave it in place while you fix the cause. Removing healthy leaves does not speed recovery, and pruning many leaves at once reduces the plant’s remaining energy source.
After the first correction, resist changing several other things in response to the same old leaf. Keep a simple note of the date, affected leaves, pot moisture, and any treatment; then inspect weekly for new yellowing, fresh pests, or improving growth. A damaged leaf may remain yellow while the plant recovers, so the most useful signs are that yellowing stops spreading, stems stay firm, and new leaves emerge normally.
Track new growth, not old color
Give the plant time to respond, especially after root damage or a major light change. There is no reliable number of days in which every philodendron will recover: season, cultivar, root loss, temperature, and light all affect the pace. If new leaves continue to yellow, the plant becomes increasingly limp, or the stem base softens, return to the root-zone and pest checks and consider asking a local extension office or qualified plant clinic to examine photos and roots.
Conclusion
When a philodendron turns yellow, start with the pattern and the root zone: one fading lower leaf may be normal, while widespread yellowing calls for a closer look at moisture, drainage, light, pests, and temperature. Make the smallest evidence-based correction first, and do not try to reverse yellow leaves with extra water or fertilizer.
The plant’s next growth is the clearest measure of success. Once you know whether the mix is wet or dry and have ruled out pests, you can correct the actual cause, keep the plant in stable conditions, and avoid turning a manageable leaf problem into a damaged root system.