Yellow Leaves on Alocasia Stingray: Causes, Checks & Fixes
Quick answer
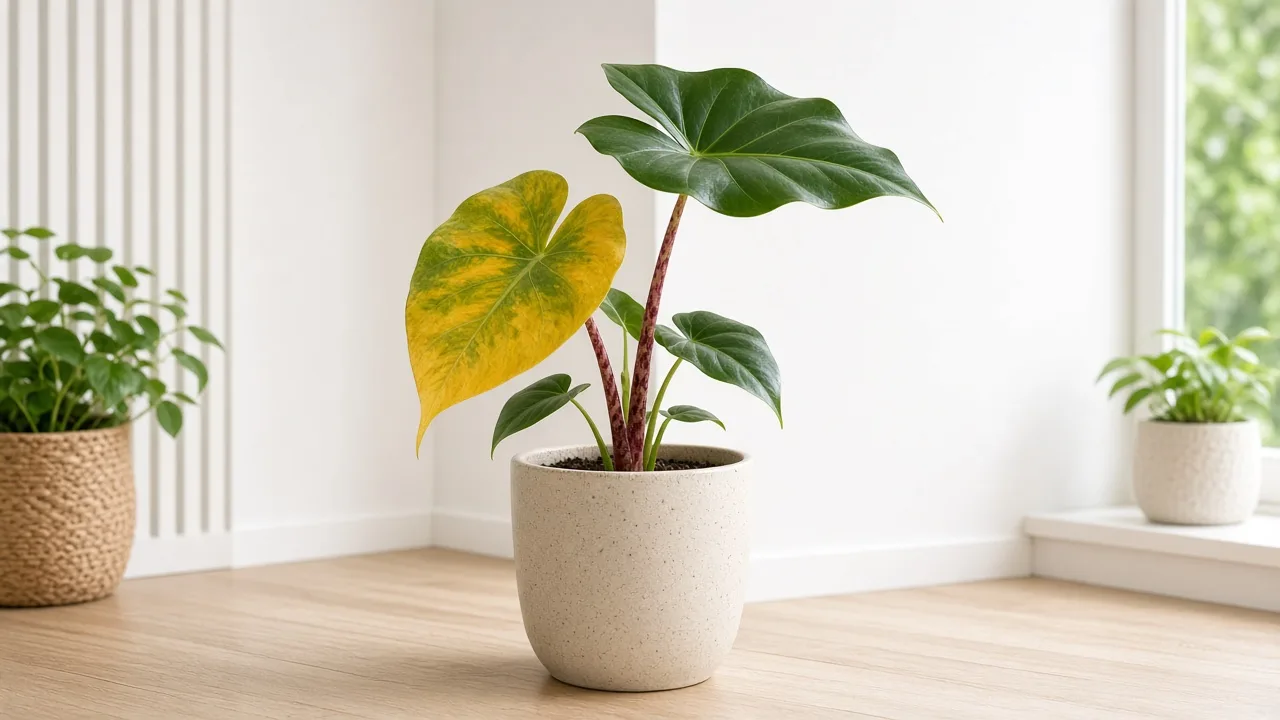
Yellow leaves on Alocasia Stingray usually trace to one oldest ray-tail leaf aging out, chronic wet mix, winter dormancy, or — less often — iron or nitrogen deficiency on new growth. First step: pinch the red-mottled petiole at the soil line and probe mix moisture 2–3 cm deep; firm stalk plus one fading bottom leaf on normal dry-down is often normal turnover, not an emergency.
Yellow Leaves on Alocasia Stingray: Causes, Checks & Fixes
This guide covers yellow leaves on Alocasia Stingray. See also the general Yellow Leaves guide, watering, and light pages for this plant.
Yellow Leaves on Alocasia Stingray: Causes, Checks & Fixes
Quick answer
Yellow leaves on Alocasia Stingray (Alocasia macrorrhizos ‘Stingray’) are not one diagnosis — they are a pattern on a corm-backed floor plant that often carries only two or three huge round ray-tail blades at a time. One fading bottom leaf while a dark green spear unfurls above is frequently normal aging. Several ray-tail leaves yellowing within a week on a heavy wet pot is a rot emergency.
First step: pinch the red-mottled petiole where it meets the soil and probe mix moisture 2–3 cm deep. Firm stalk plus one yellowing lowest leaf on a pot that dries normally between soaks usually needs watching, not repotting. Soft petiole base on saturated mix needs the overwatering dry-down path immediately.
For how chlorophyll loss works across houseplants in general, see our yellow leaves guide. On Stingray, the tell is almost always which ray-tail blade yellows first, whether the underground corm stays firm, and whether the pot weight matches your last watering.
When to use this page vs other Stingray guides
- Overwatering — yellow spreads on a heavy wet pot; red petioles go soft at the soil line
- Root rot — corm or roots are mushy, black, or sour-smelling after chronic wet soil
- Underwatering — very light pot, bone-dry mix, crispy ray-tail tips before yellowing
- Wilting — limp blades on either wet or dry soil without full chlorosis
- Iron deficiency — yellow new ray-tails with green veins, not oldest leaves first
- Nitrogen deficiency — pale wash across multiple lower blades during active summer growth
- Not enough light — olive pale new growth, pot stays heavy for weeks, slow unfurling
What yellow leaves look like on Alocasia Stingray
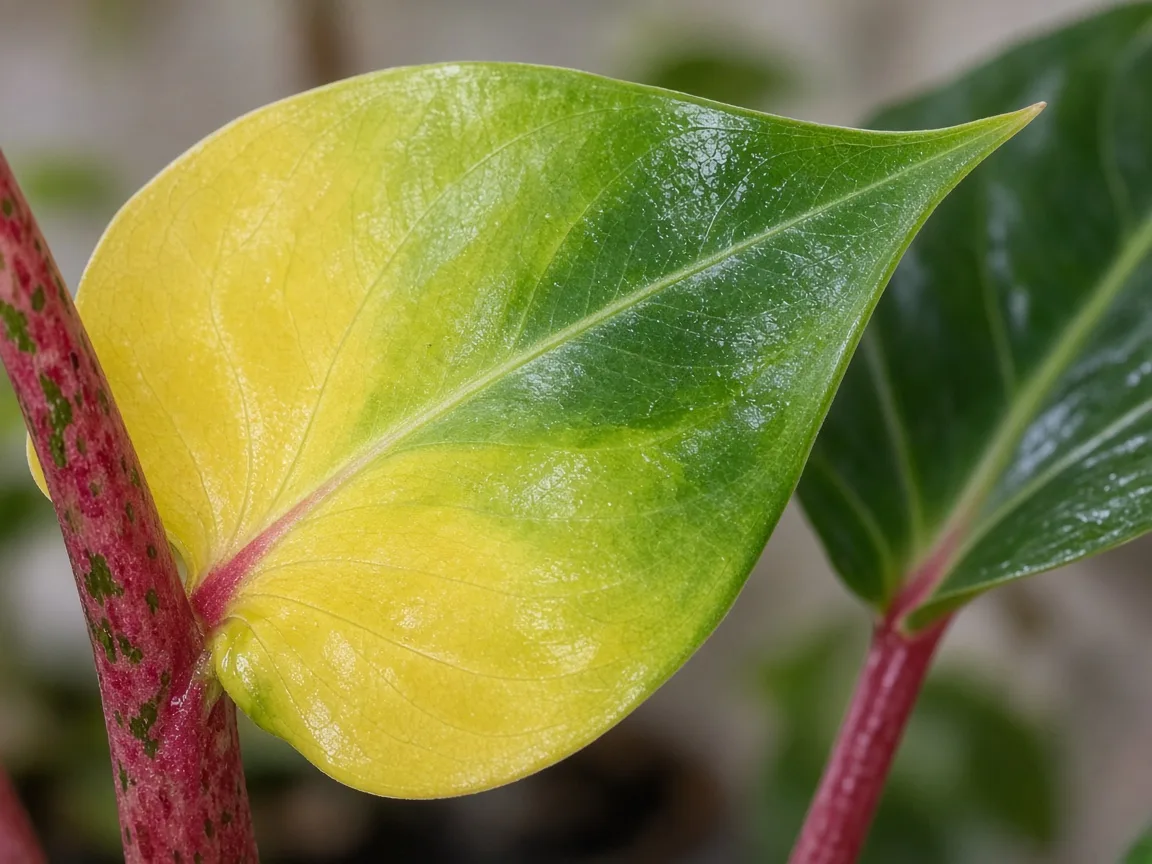
Oldest lower ray-tail fading yellow from the petiole upward while the round blade tip stays greener — compare with a firm red stalk on the same plant.
Normal bottom-leaf senescence:
- Only the oldest, outermost ray-tail leaf yellows from the petiole upward
- Red-mottled stalk stays firm when pinched at the soil line
- A glossy dark green new blade is unfurling or already open above
- Mix dries on your normal watering rhythm between soaks
- Yellowing takes two to four weeks on that single leaf, then it dries and can be removed
Overwatering yellow pattern:
- Multiple ray-tail leaves yellow within one to two weeks
- Pot feels heavy; mix wet past 2–3 cm for five or more days
- Red petiole base goes soft before the whole round blade browns
- Fungus gnats or mold on soil at the surface
- Newest leaf may yellow or fail before unfurling
Dormancy yellow-and-drop:
- Late autumn through winter: all ray-tail leaves yellow then detach cleanly
- Underground corm stays firm when you probe gently at the soil line
- No sour smell; mix is not chronically soggy
- Pot may look empty while the corm rests — the RHS alocasia guide notes foliage loss during winter dormancy is normal above 10°C (50°F)
Nutrient or light yellowing:
- Newest ray-tail with green veins and pale tissue between — iron deficiency
- Several lower blades evenly pale olive during warm growth — nitrogen deficiency or not enough light
- Yellow speckling with fine webbing on leaf undersides — spider mites
Why Stingray yellows differently from compact jewel alocasias
This macrorrhizos cultivar stores energy in a large underground corm and pushes only a few enormous ray-tail leaves on upright red-mottled stalks. NC State Extension lists yellowing among symptoms of overwatering, too little water, and inadequate light on alocasias — on Stingray, the visual drama is amplified because each leaf is up to 60 cm long per the RHS Stingray profile, so losing one blade feels like losing half the plant.
That size also means senescence concentrates on the oldest outer ray-tail while the corm funds a new spear. Jewel alocasias with many small leaves hide turnover; Stingray owners often panic at a single yellow floor leaf even when the corm and new growth are healthy.
Pair chunky aroid soil with bright indirect light so the mix cycles between wet and aerated. A dark corner plus generous watering yellows every remaining blade before the corm signals distress.
The bottom-ray-tail vs. new-spear test
Run this before you repot, fertilize, or soak a bare winter pot:
- Count which leaves are yellow — bottom oldest only, or newest crown too?
- Pinch the red petiole at the soil line — firm or mushy?
- Lift the pot — heavy and wet, or light and dusty?
- Check the corm — probe gently at the soil surface; firm like a potato, or soft?
- Look for a new spear — any tight rolled ray-tail pushing from the center?
| Result | Likely cause | First move |
|---|---|---|
| One bottom leaf yellow, firm petiole, new spear open | Normal senescence | Watch; remove leaf when fully dry |
| Several leaves yellow, heavy wet pot, soft petiole | Overwatering / early rot | Stop watering — see overwatering |
| All leaves yellow and drop, firm corm, cool season | Dormancy | Cut water 60–70%; do not discard pot |
| New ray-tail pale with green veins | Iron issue | Check pH and feed — iron deficiency |
| Lower blades pale olive, active summer | Nitrogen or light | Fertilizer after ruling out wet soil |
One bottom ray-tail yellow while a green blade unfurls above is the pattern sibling nutrient pages reference — it is often not magnesium, potassium, or nitrogen deficiency.
Dormancy drop vs. rot death on a bare floor pot
Stingray may shed all ray-tail leaves in winter while the corm survives underground — normal for alocasias given cooler, drier winter conditions per the RHS growing guide. The Stingray profile advises reducing watering to a minimum in winter and keeping above 15°C. Proven Winners warns that overwatering during dormancy is the most common alocasia killer.
Because this cultivar often held only two or three huge leaves before dormancy, an empty-looking floor pot triggers rescue soaking every few days. A firm corm below bare soil does not need summer soak frequency — every 2–4 weeks is often enough to prevent shrivel without saturating dormant roots. Yellow-then-drop on a firm corm in cool months is dormancy. The same pattern in July on wet soil is urgent root rot.
How to confirm the cause
| Signal | Normal aging | Overwatering | Drought | Dormancy |
|---|---|---|---|---|
| Which leaf | Oldest bottom only | Multiple, any age | Lower first, then tips crisp | All leaves |
| Petiole at soil | Firm | Soft, mushy | Firm, may wilt | Firm as leaves drop |
| Pot weight | Normal cycle | Heavy, wet days | Very light | Light to normal |
| Mix at 2–3 cm | Dries between soaks | Wet 5+ days | Bone dry deep | Slow dry, cool |
| New growth | Green spear unfurling | Fails or yellows | Stunted, curled | None until spring |
| Smell | None | Sour, gnats | Dry dust | None |
Run checks in this order: which ray-tail blade, petiole firmness, pot weight, then corm probe. Match the row before you change light, feed, or repot.
First fix for Alocasia Stingray
Identify the pattern, then make one correction.
- One firm bottom leaf yellowing with healthy new growth: do nothing except remove the fully dry blade later. No fertilizer, no repot, no extra soak.
- Heavy wet pot with spreading yellow: stop watering immediately. Let the top half of mix dry before the next soak — full protocol on overwatering.
- Very light pot with crispy ray-tail edges: one thorough soak, then return to the 2–3 cm dry-down check per underwatering.
- All leaves dropping in winter with firm corm: cut watering to every 2–4 weeks, stop fertilizer, keep above 15°C — wait for spring shoots.
- New growth pale with green veins during warm months: address iron and pH per iron deficiency after confirming mix is neither bone dry nor soggy.
Do not fertilize yellow foliage to “green it up” — salts stress roots already struggling with moisture imbalance. Do not repot on day one unless petioles are mushy or mix smells sour.
Lookalikes to rule out
| What you see | Likely cause | Next page |
|---|---|---|
| Yellow lower leaves in quick succession on wet soil | Overwatering → rot | Overwatering, root rot |
| Yellow then brown soft patches with halos | Chronic saturation | Brown leaves |
| Yellow newest leaf, green veins | Iron chlorosis | Iron deficiency |
| Pale olive lower blades, slow summer growth | Nitrogen or light | Nitrogen deficiency, not enough light |
| Yellow speckles, fine webbing underneath | Spider mites | Spider mites |
| Limp yellow leaves, no color loss pattern | Wilting stress | Wilting, drooping leaves |
Yellow vs. pale: Pale leaves wash out olive-green without the clear chlorosis band from petiole to tip. True yellow leaves lose green pigment — often starting at the oldest ray-tail base.
Step-by-step recovery
- Photograph today — note which ray-tail blades are affected and pot weight.
- Pinch petioles at the soil line; probe mix 2–3 cm deep.
- Apply the single matching fix from the first-fix section — not all fixes at once.
- Remove fully yellow or mushy leaves at the petiole base with clean shears once you know the cause — do not cut through partially green tissue on a stressed plant.
- Wait for the next unfurling ray-tail — firm red stalk and glossy round blade mean recovery.
- Escalate to unpotting only if petioles stay mushy, smell is sour, or yellow spreads on corrected watering for two weeks.
- Resume light feeding per fertilizer only after new growth looks healthy for two weeks in spring or summer.
What not to do
- Do not rescue-soak a bare winter pot because it looks empty — dormancy with a firm corm needs minimum moisture, not summer frequency.
- Do not treat every yellow ray-tail as iron or nitrogen — one bottom leaf on a firm stalk is usually age, not feed gap.
- Do not move to direct sun to “fix” yellowing — scorch on glossy round blades adds a second stress; bright indirect light is enough.
- Do not discard the plant when all leaves drop in cool months without checking corm firmness first.
- Do not stack repot, prune, and pesticide on the same day — change one variable and read the response.
When to worry
Treat as urgent when several ray-tail leaves yellow within one week on wet soil, red petioles go mushy, mix smells sour, newest leaves fail before unfurling, or the corm feels soft — salvage window is narrow on a plant with so few leaves.
Lower urgency: one oldest ray-tail yellowing slowly over two to four weeks while a green spear unfurls on a firm petiole and mix dries normally — usually normal turnover.
Recovery timeline
Normal bottom-leaf senescence completes in two to four weeks on that single blade. The plant is recovered when yellowing does not spread to younger ray-tails and the next leaf opens clean.
Overwatering recovery after dry-down often takes one to three weeks to stop spread; existing yellow tissue will not re-green. Judge success on the next new ray-tail leaf.
Dormancy may leave the pot bare until mid-spring — normal if the corm stays firm and you are not soaking on a summer schedule.
Nutrient correction shows in new growth within three to six weeks during warm active growth — old yellow blades are already spent tissue.
How to prevent yellow leaves
Match the overview baseline: bright indirect light, 60–75% humidity, chunky fast-draining mix, and watering when the top 2–3 cm is dry. Cut watering 60–70% in winter when growth slows. Lift the pot before every soak — if it still feels heavy from last week, skip the drink even if a ray-tail blade looks dramatic.
Give the plant floor space so huge leaves do not crowd against walls — bent petioles stress blades and block clean unfurling. Inspect weekly for spider mites on leaf undersides during dry heated winters.
Feed lightly during active growth per the fertilizer guide only when new ray-tail leaves look healthy — not as a response to one fading bottom leaf.
Related Alocasia Stingray guides
- Overview — species baseline, dormancy, and ray-tail leaf rules
- Problems hub — all sibling symptom pages
- Watering — dry-down depth and seasonal cuts
- Overwatering — wet-pot yellow spread and corm rot
- Iron deficiency — green-vein chlorosis on new ray-tails
Related tool
Use the Yellow Leaves Diagnosis Tool to narrow causes for yellow leaves on this plant before changing multiple variables at once.