How to Deal With Orchid Root Rot
Learn how to spot orchid root rot, tell rotten roots from thirsty ones, trim safely, repot in fresh bark, and adjust watering so new roots can return.
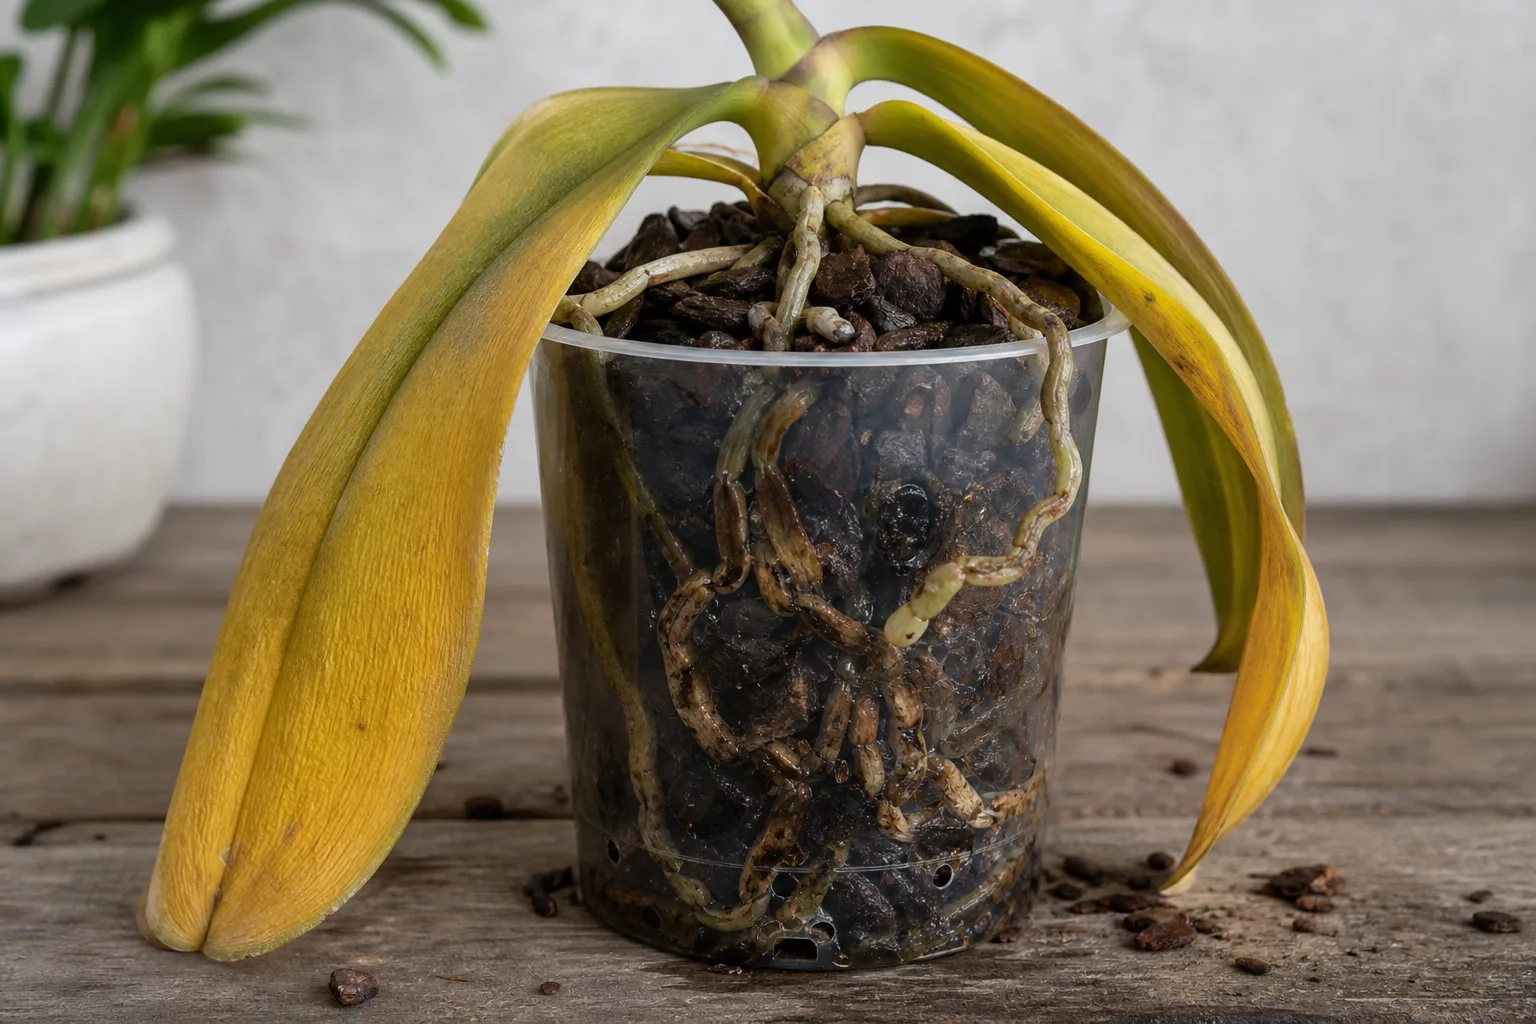
Orchid root rot is not diagnosed by a yellow leaf or an empty-looking pot. Those clues tell you the plant is under stress, but they do not tell you why. The useful diagnosis happens at the roots: living roots are usually firm and springy, while rotten roots lose their structure and collapse under light pressure.
For a typical Phalaenopsis, the rescue is straightforward but not casual. You need to remove the orchid from its medium, separate roots that are merely dry from roots that are dead, trim with a clean tool, and repot into a container and mix that can dry on a predictable schedule. The plant may lose flowers or pause growth while it rebuilds; that is a normal cost of recovery, not proof that the rescue failed.
This guide focuses on orchids grown indoors, especially moth orchids. Other orchids may have different root colors, pseudobulbs, seasonal rhythms, or moisture needs, so treat the root texture and the plant’s structure as more reliable than a universal watering calendar.
Root Rot or Dehydration? Start With the Roots
Limp, wrinkled leaves are a sign that too little water is reaching the foliage. That can happen because the plant is dry, but it can also happen because most of the roots have rotted and can no longer absorb water. The leaves alone cannot separate those two problems, which is why watering an already rotting orchid often makes the decline faster.
The best first move is to inspect the root system if the leaves remain limp after a normal watering, several leaves yellow in a short period, the plant wobbles in its pot, or the medium smells sour or stays wet far longer than it used to. A healthy orchid can tolerate an occasional missed watering; it does not tolerate a root zone that stays airless.
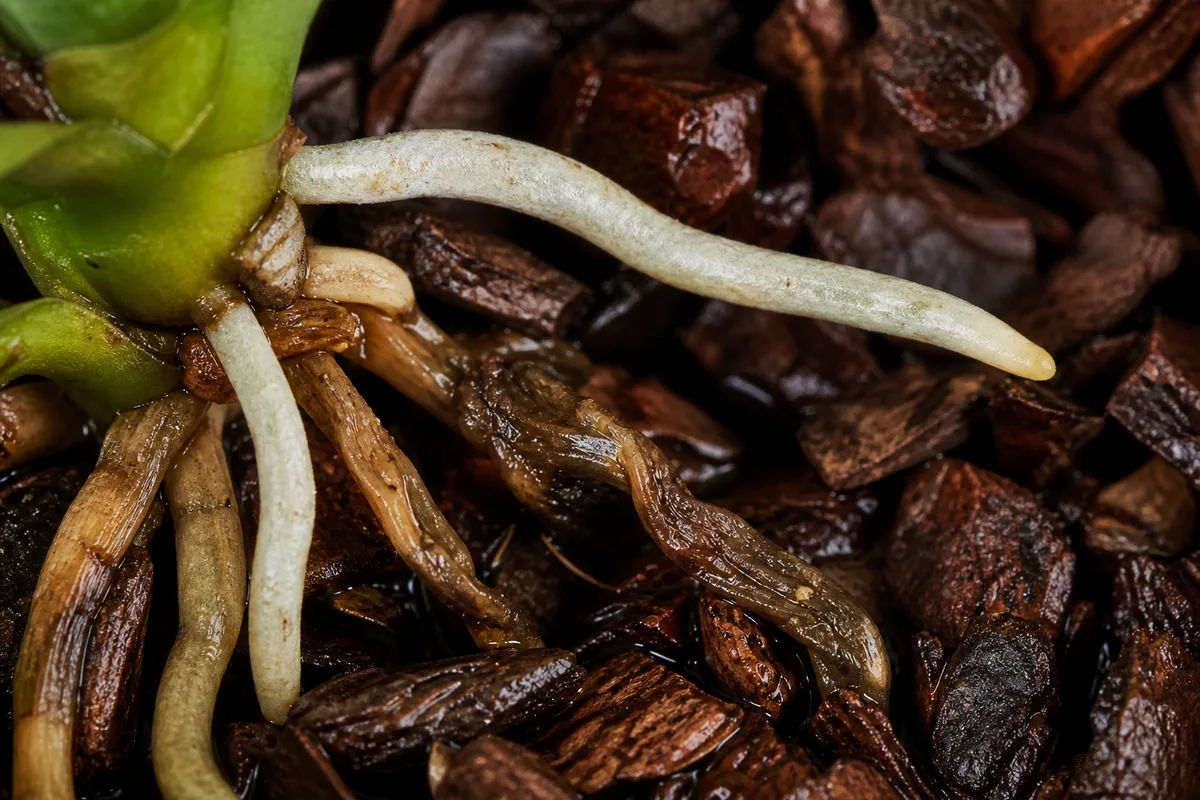
A close look at firm pale roots beside brown, collapsing roots helps separate dehydration from true root rot.
Healthy, thirsty, and rotten roots
Most grocery-store orchids are Phalaenopsis hybrids with thick roots surrounded by a spongy covering called velamen. That covering absorbs and holds water, then helps protect the living inner root. The American Orchid Society explains that the root tip is the growing part and that velamen color can change as the root wets and dries; a green or silvery appearance is not, by itself, a disease diagnosis. The American Orchid Society’s orchid-root guide is a useful reference for that anatomy.
Use this quick sort after removing loose bark:
| What you find | What it usually means | What to do |
|---|---|---|
| Silvery white or gray, firm, slightly flexible | A living root that is dry | Keep it; water when the plant’s normal cues say it is time |
| Green, plump, firm root | A living root that is currently wet | Keep it; do not add more water just because leaves are limp |
| White or yellow but firm root hidden inside the pot | A living root that has not seen light | Keep it; color alone is not a reason to cut |
| Brown or black, hollow, slimy, or collapsing root | Dead or rotting tissue | Cut it away with a clean tool |
| Brown but solid and firm root | Stress, age, staining, or a mild problem is possible | Rinse and squeeze; remove only if the tissue is hollow or soft |
Practical orchid growers make the same distinction between a symptom and a diagnosis: limp leaves or early flower drop can point to a root problem, but the roots confirm it. Everyday Orchids’ root-rot diagnostic guide is useful for comparing firm roots with mushy, hollow, or collapsing ones.
Rotten roots feel different from dry roots. A dry root may be thin and wrinkled but still has a firm outer wall. A rotten root often bends without resistance, feels mushy or slimy, sheds its outer coating, or leaves a wiry strand when the velamen has disintegrated. When in doubt, do not cut a root simply because it is tan or brown; check the texture along its length.
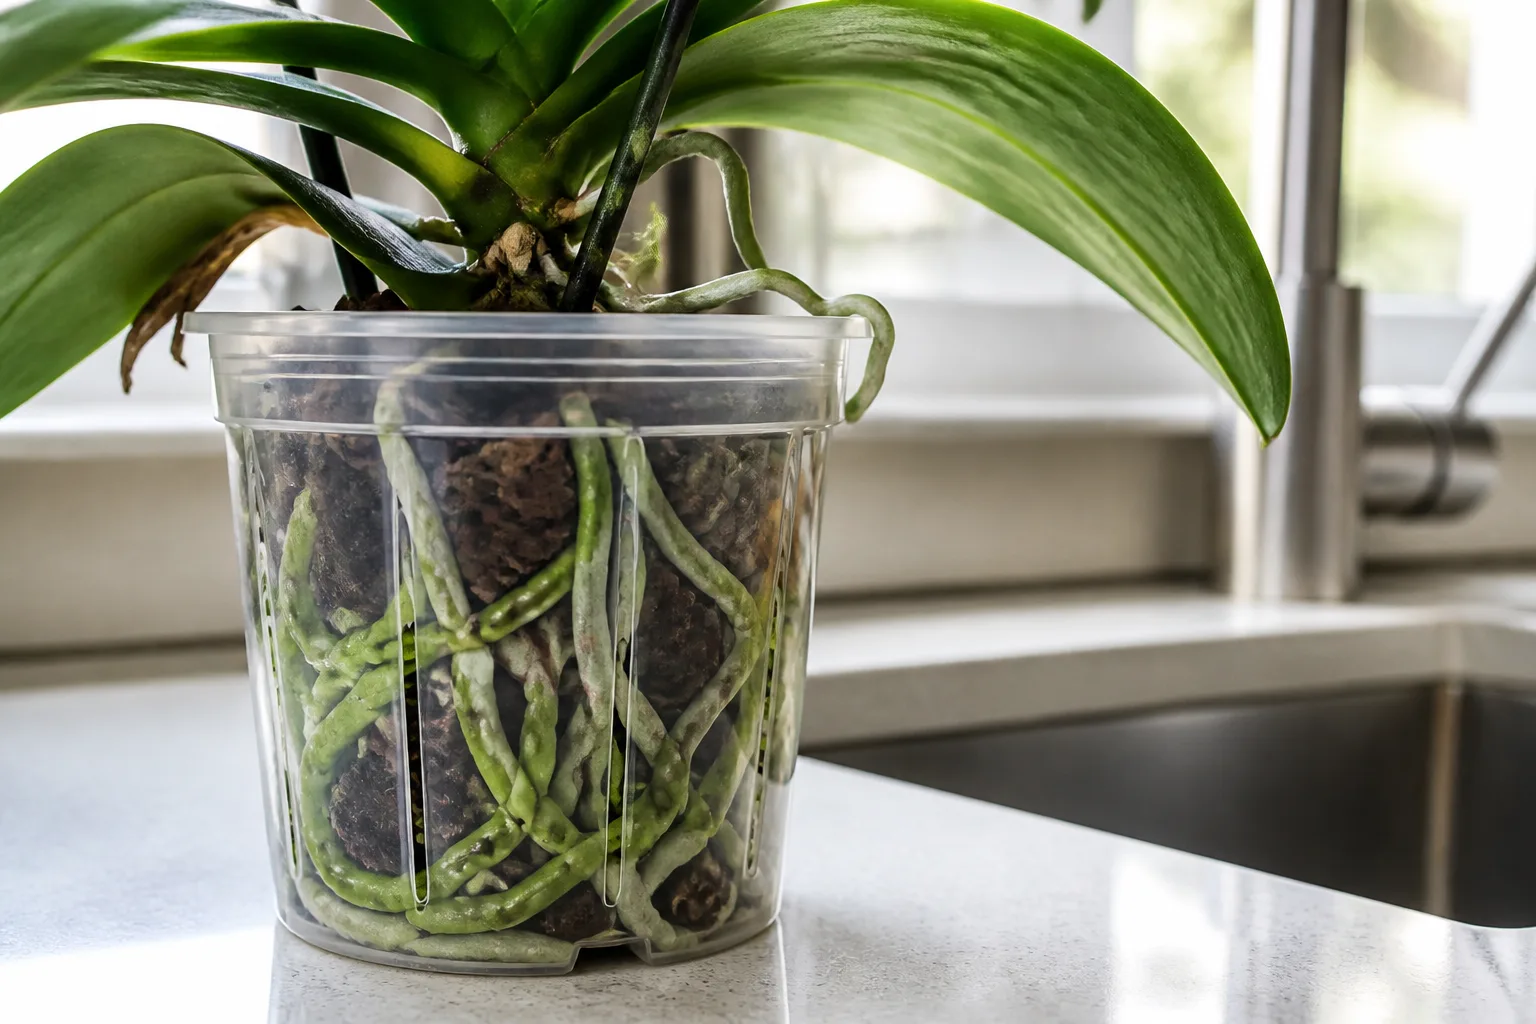
A clear inner pot lets you see root color and moisture without disturbing the plant every time you check it.
When a brown root can stay
Not every dark mark is active rot. Roots can age, dry against the pot wall, pick up mineral stains, or show natural color differences. The American Orchid Society’s root troubleshooting guide distinguishes mushy or hollow roots from roots that are simply brown but still solid. That distinction matters because an orchid with only a few roots left cannot afford unnecessary pruning.
Give a questionable root a short rinse with room-temperature water, then press it gently between two fingers. If it becomes plump and remains firm, it is still contributing to the plant. If the outer layer slides off, the root caves in, or the center is empty, take it back to firm tissue. The cut should reveal a clean, solid interior rather than a wet, brown smear.
A single older bottom leaf turning yellow slowly can also be normal, particularly when the remaining leaves are firm and green. By contrast, uniform yellowing or shriveling across newer leaves, especially while the plant is being watered regularly, deserves a root inspection. University of Maryland Extension’s orchid troubleshooting response makes the same practical distinction between normal leaf aging and a root system that is failing to deliver water.
Why Orchids Develop Root Rot Indoors
Root rot is best understood as a wetness-and-oxygen problem, not simply a punishment for watering one day too often. Orchid roots need water, but they also need air in the spaces around them. When a mix stays saturated, decomposes into fine particles, or drains into a sealed outer pot, the root zone loses the quick wet-dry cycle that epiphytic orchids are adapted to.
Several fungi and water molds can be involved, and the exact pathogen cannot be identified from a casual look at one root. For home care, the first response is usually cultural: remove decayed tissue, discard contaminated medium, restore drainage, and shorten the time the roots stay wet. If the rot is moving into the stem or rhizome, or multiple plants are affected, the diagnosis is more serious than ordinary overwatering.
Waterlogged medium and poor drainage
The most common setup problem is a pot that holds water longer than the plant can use it. This happens when the orchid is planted in regular potting soil, packed sphagnum, a very large container, or bark that has broken down into a dense, wet layer. It also happens when a draining inner pot sits in a decorative pot with water pooled below it.
Orchid pots need real openings that let excess water leave from the bottom; side slots can help the medium exchange air, but they do not replace bottom drainage. A pot should be only slightly larger than the remaining root mass. Oversizing creates a big reservoir of damp mix around a small plant, and the center may remain wet long after the visible surface looks dry.
The Gardening Know How guide to treating orchid root rot notes that poor drainage, inappropriate medium, and standing water can all keep roots wet enough for opportunistic pathogens to take hold. The remedy is not to add a layer of rocks beneath the bark; that can move the saturated zone upward. Use a properly draining pot and a coarse medium instead.
Decomposed bark, salt buildup, and weak airflow
Bark-based orchid mix does not stay open forever. As bark softens and breaks apart, the air gaps shrink and fine material collects around the roots. A plant that was easy to water when newly potted can become a rot risk months later without any change in your routine. If the medium smells stale, collapses when squeezed, or stays damp for many extra days, it is part of the diagnosis.
Fertilizer salts and mineral-heavy water can injure roots as well. Damaged roots are less able to resist wet conditions, and salt crust on the pot or bark is a reason to review feeding and flushing practices. Do not respond by increasing fertilizer to revive limp leaves; a root system that cannot absorb water cannot make good use of extra fertilizer.
Still air adds another layer of risk. It slows evaporation and lets foliage, leaf axils, or the crown remain wet after watering. A small fan moving air gently around—not blasting directly at—the plant can help the root zone and leaves dry at a reasonable rate. The American Orchid Society emphasizes sanitation, spacing, dry foliage, and air movement as part of preventing fungal spread, not as optional decoration. Its fungal-infection guidance is especially useful if you keep several orchids together.
The Orchid Root Rot Rescue: Step by Step
If the roots are genuinely soft or hollow, change the environment in one session. Repeatedly lifting the orchid, rinsing it, and putting it back into the same old wet mix only prolongs the problem. Set up the replacement pot and fresh medium before you start so the plant spends as little time exposed as possible.
1. Isolate the plant and prepare tools
Move the orchid away from other plants, especially if the pot smells foul, the rot is spreading quickly, or you see watery dark lesions on leaves or the crown. Isolation helps prevent shared water, splashed medium, and dirty tools from carrying pathogens to healthy orchids.
Gather sharp scissors or snips, rubbing alcohol for cleaning the blade, a clean work surface, a waste bag, a fresh pot, and new orchid medium. Gloves are sensible if you have irritated skin, but the critical protection is sanitation. Wipe or spray the cutting tool with alcohol before the first cut and again between cuts when moving from suspect tissue to healthy tissue. Let the blade dry before it touches the plant.
Do not compost rotten roots or reuse the old bark. Bag both and clean the work area afterward. If a valuable collection plant has rot in the crown, rhizome, or pseudobulb, take photos and contact a local orchid society or extension professional rather than guessing at a fungicide program.
2. Unpot, rinse, and sort the roots
Support the orchid at the base of the leaves or the cane/pseudobulb structure while easing it from the pot. Do not yank on aerial roots; if bark is stuck, soften it with a brief rinse rather than tearing the root away. Remove every piece of old medium you can do so without scraping the roots.
Rinse with lukewarm water until you can see the roots clearly. This is the point at which color becomes more informative, because a dry velamen can look pale or silver while a wet one can turn green. More important than color is what happens when the root is touched: healthy tissue stays cohesive, while rot loses its shape.
Lay the plant on a clean towel in bright shade and separate the roots into three groups: keep, cut, and uncertain. Conservatism is useful here. The goal is not a bare, cosmetically perfect root system; it is a smaller system made of living tissue that can function in a breathable medium.
3. Cut back only dead or collapsing tissue
Remove roots that are fully soft, hollow, blackened, slimy, or stripped of their velamen. Cut at the base when the entire root is dead. If only the lower portion is rotted, cut upward until the tissue is firm and clean. Sterilize the snips before each new cut, especially if you are working around the crown or rhizome.
Do not keep trimming simply because the cut surface is not bright green. Orchid roots can be white, tan, yellow, gray, or species-specific shades and still be alive. Stop when you reach firm tissue. If a root is merely wrinkled from drought, leave it; it may still support the plant once the root zone is corrected.
Root rot limited to roots can often be managed with sanitation and a fresh medium. A fungicide is not a substitute for removing rot or fixing the water-holding conditions. If you see a rapidly expanding watery lesion, darkening that moves into the crown, a hard brown line traveling through a pseudobulb, or the same disease on several orchids, ask for an accurate diagnosis. The American Orchid Society’s disease guide separates several fungal rots that need different labeled treatments.
Household remedies deserve restraint. A peroxide bath, cinnamon dust, or a concentrated product can damage living tissue and can create false confidence while the medium remains too wet. If a fungicide is warranted, choose one whose label includes the plant and disease situation, follow the label exactly, and check whether the orchid type is sensitive to the active ingredient. Never pour an improvised concentration into the pot.
4. Repot without burying the crown
Choose a clean clear plastic orchid pot or another container with generous drainage, sized for the remaining roots rather than the old root ball. A clear pot is useful because it lets you monitor drying and new root growth, but it is not magic; a clear pot without drainage is still a water trap.
Use fresh, airy orchid medium matched to your conditions. Coarse bark works well for many Phalaenopsis plants in warm homes. Smaller bark, perlite, or a modest amount of sphagnum can hold more moisture, which may be useful in a dry room but risky in a cool or poorly ventilated one. The right mix is the one that becomes evenly moist when watered and then dries at a pace you can observe—not the mix with the most ingredients.
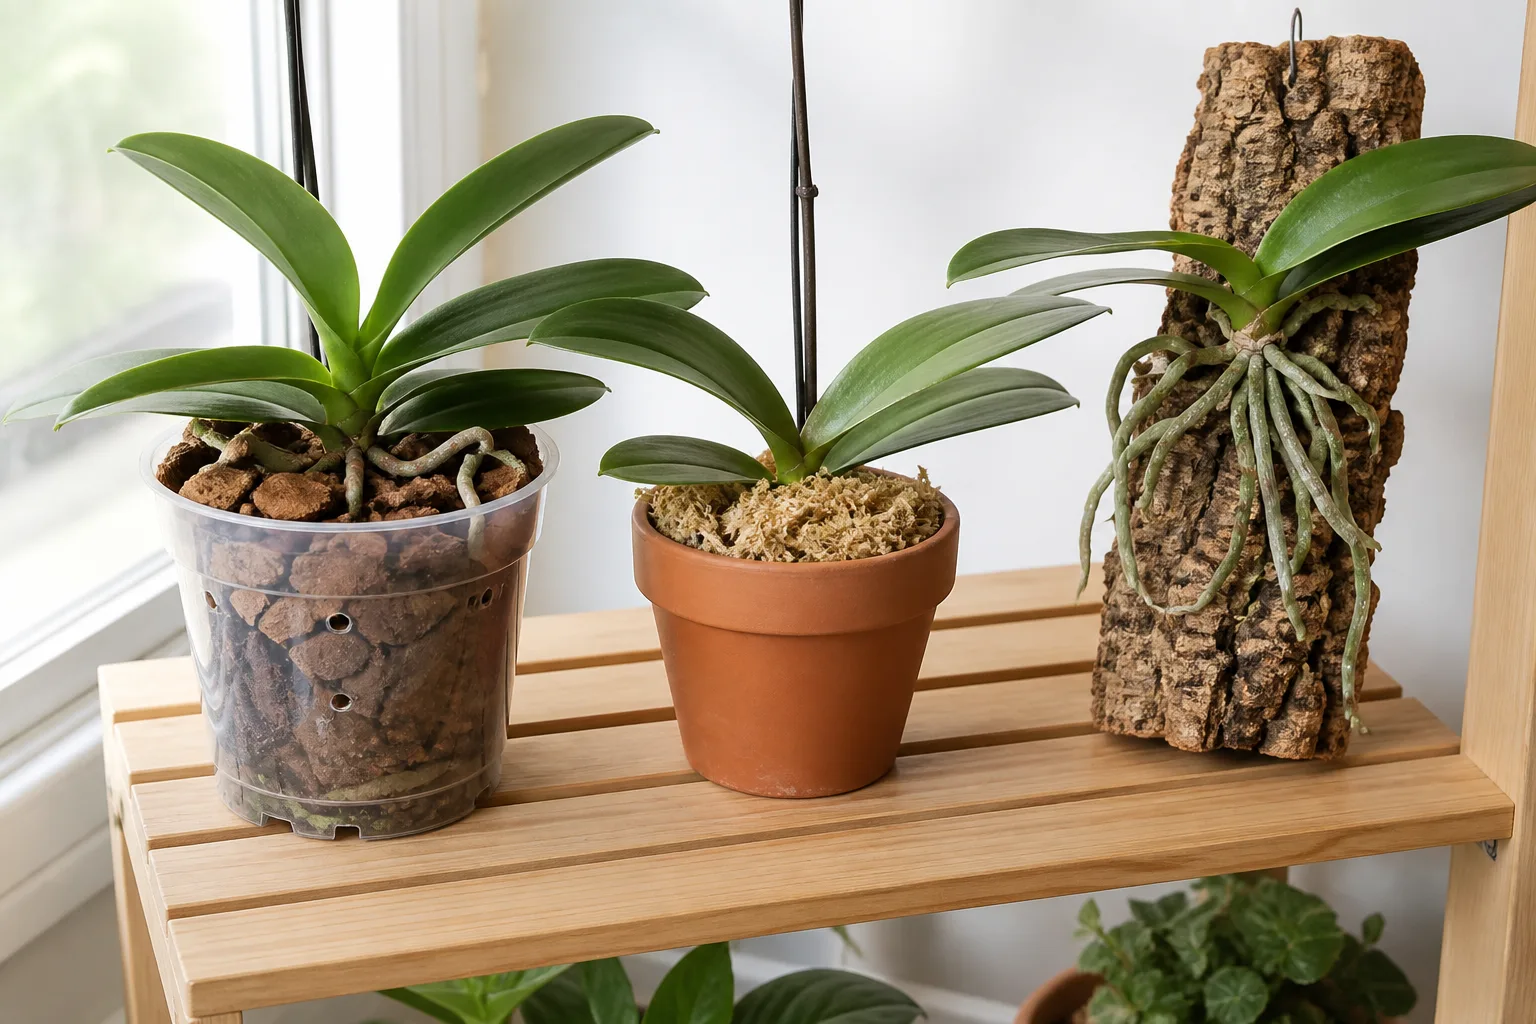
The same orchid can dry at very different speeds in bark, moss, or a mount, so the watering routine must follow the medium.
Place enough medium in the bottom to support the plant, then arrange the surviving roots without forcing them into sharp angles. Keep the crown—the point where the leaves meet—above the medium. Do not pack bark tightly to anchor the plant; tap the pot gently and use a stake or clip if the orchid needs stability. Burying the crown or trapping wet moss against it creates crown-rot risk.
Leave aerial roots outside if they are growing upward or outward. They are not a sign that you must stuff more medium into the pot. Put the inner pot inside a decorative cover only after you have confirmed that no water remains pooled at the bottom.
Recovery Care After Repotting
Pruning removes the plant’s water-uptake capacity, so the orchid may look worse before it looks better. That does not mean you should compensate with daily misting, fertilizer, or a darker, more humid corner. The recovery environment should be stable, bright enough for the plant to use water, and airy enough for the new medium to dry.
Watering and light while roots regrow
After repotting, do not water by a fixed 24-hour rule. Let the cut surfaces dry and let the fresh medium reach the moisture level appropriate for the first watering. If you prepared the bark dry, you may water sooner; if you soaked it, the pot may stay moist for several days. The plant’s condition, the pot’s weight, and the medium’s dryness are better evidence than the calendar.
For the first full watering, wet the medium thoroughly with room-temperature water, then let every excess drop drain away. Empty the saucer and cachepot. After that, wait until the roots are silvery, the pot feels light, and the bark is close to dry before watering again. A plant with fewer roots will use water more slowly, so the interval after rescue can be longer than the interval before the rescue.
Keep the orchid in bright, indirect light while it stabilizes. Very low light slows growth and keeps the mix damp; harsh direct sun can overheat a clear pot and add leaf stress. Maintain gentle air movement, but avoid a hot or cold vent. If leaves remain limp, check the roots and the medium again instead of automatically watering more often.
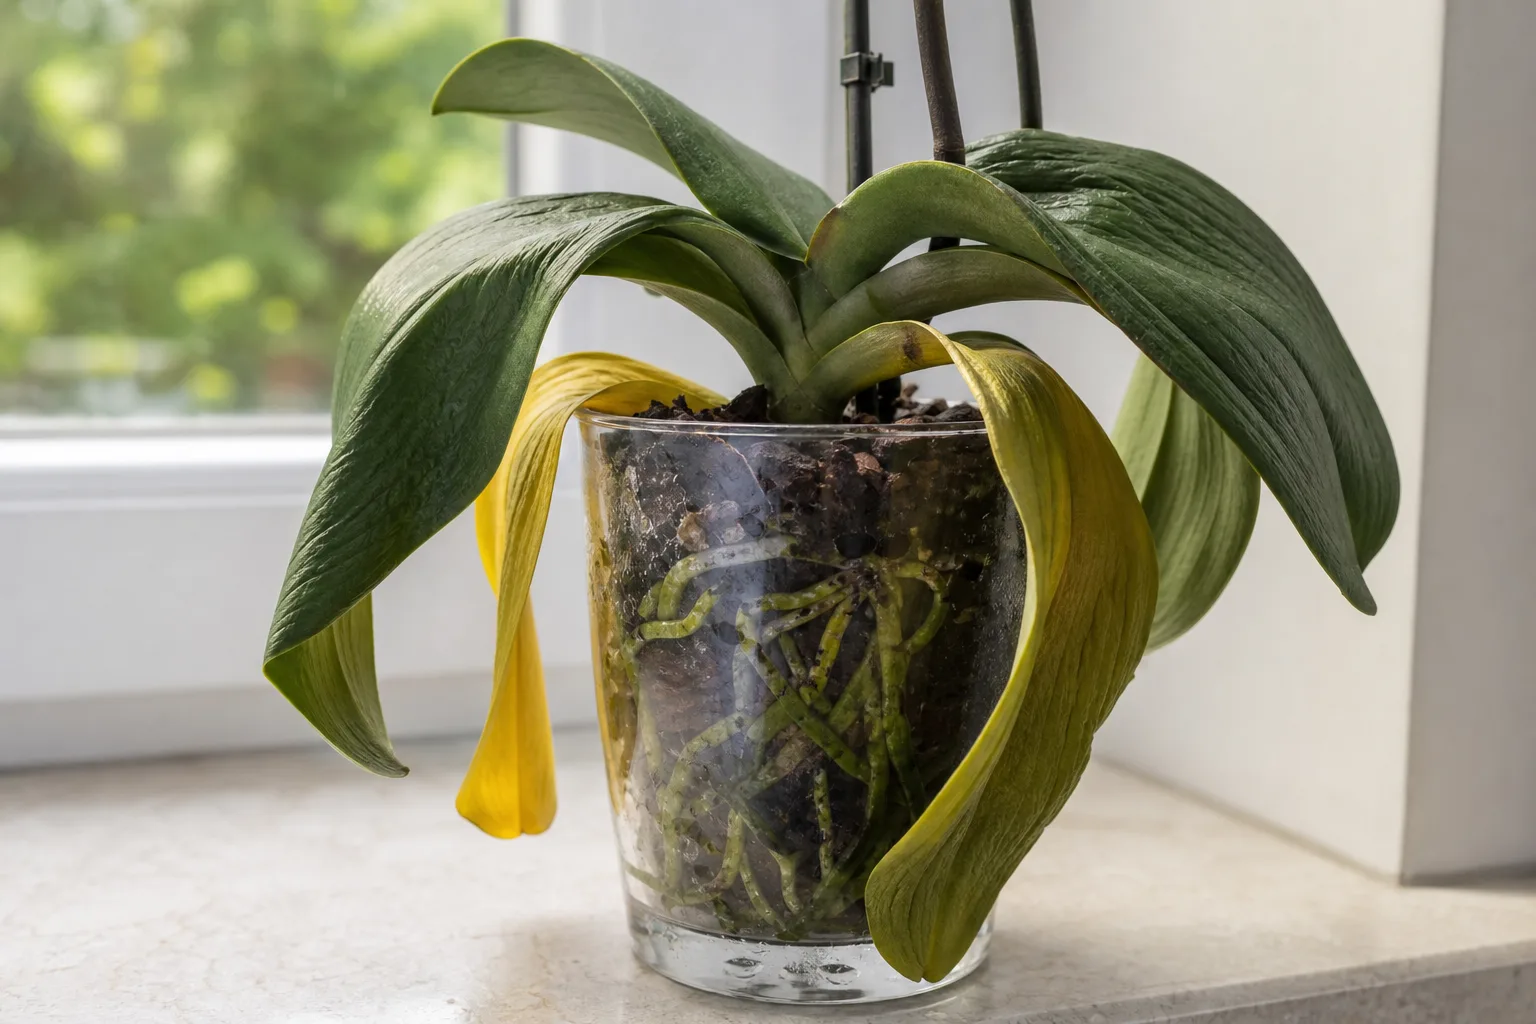
Limp leaves can coexist with wet roots; that combination is a reason to inspect the root system, not to keep adding water.
Fertilizer, humidity, and the first new growth
Hold fertilizer while the plant is freshly pruned and repotted. Wait for evidence that it is growing—such as a new root tip or leaf—and then resume with an orchid fertilizer according to its label, applied to a hydrated root zone. Feeding a dry, damaged root system can add salt stress without supplying usable nutrition.
Humidity can reduce water loss from leaves, but humidity is not a replacement for root oxygen. A humid room with stagnant air and a continuously wet pot is still a rot-friendly environment. If you use a humidity tray, keep the pot above the waterline; never let the orchid’s drainage holes sit in standing water.
The first new root tip is the clearest recovery signal. A green or pale growing tip means the plant is investing in new root tissue. Older wrinkled leaves may not become perfect again, and a flower spike may yellow or stop; let the plant spend its stored energy on roots and leaves. Do not cut healthy leaves just because they look tired unless they are fully dead or diseased.
When It Is Not Root Rot
Some orchid problems look similar from across the room but need different first actions.
| Pattern | More likely explanation | First response |
|---|---|---|
| One old lower leaf slowly yellows while other leaves stay firm and green | Normal aging | Monitor; do not unpot solely for that leaf |
| Limp leaves, silvery shriveled roots, dry bark, and a light pot | Underwatering or too-fast drying | Water thoroughly and adjust the routine or medium |
| Limp leaves, wet medium, hollow roots, and a sour smell | Root rot | Unpot, trim dead roots, and repot |
| Soft dark tissue in the leaf crown or between leaf bases | Crown rot | Keep water out of the crown, isolate, and seek targeted advice |
| Watery dark spots that expand rapidly on leaves or pseudobulbs | Black rot or another active disease | Isolate immediately and get a diagnosis; do not treat as ordinary overwatering |
Root rot generally begins in the root zone, while crown rot starts where water collects around the central growing point. Black rot can move rapidly through wet plant tissue. The American Orchid Society notes that black rot lesions may enlarge quickly and that infected tissue must be removed with sterile tools; this is a different situation from a few old roots that have dried or stained. See the society’s black-rot guidance before cutting into a crown or pseudobulb.
If the plant is a Dendrobium, Cattleya, or another orchid with pseudobulbs, inspect those storage organs as well as the roots. A gradual decline with shriveled, yellowing growths can indicate a pathogen moving through the rhizome, and the plant may need more extensive pruning than a Phalaenopsis in a clear pot.
How to Prevent It From Coming Back
Once the orchid produces new roots, prevention becomes a matter of making the next wet-dry cycle predictable.
Water when the plant needs water, not because a certain weekday arrived. Use the roots, pot weight, bark texture, season, light, temperature, and airflow together. A warm orchid in coarse bark near a bright window may dry quickly; the same plant in dense moss during a cloudy winter may remain wet for much longer. There is no honest universal schedule that overrides those conditions.
Water in the morning when practical so the foliage and crown have time to dry. Direct water toward the medium, not into the leaf axils. Drain completely, wipe away water caught in the crown, and do not let the orchid sit in a decorative pot containing runoff.
Repot before the medium collapses into fine, water-retentive pieces. Replace the mix rather than topping it off, and inspect the roots whenever you repot. Clean reused pots and tools, but do not reuse old orchid medium from a diseased plant. Keep new or suspicious orchids separate until you know they are healthy.
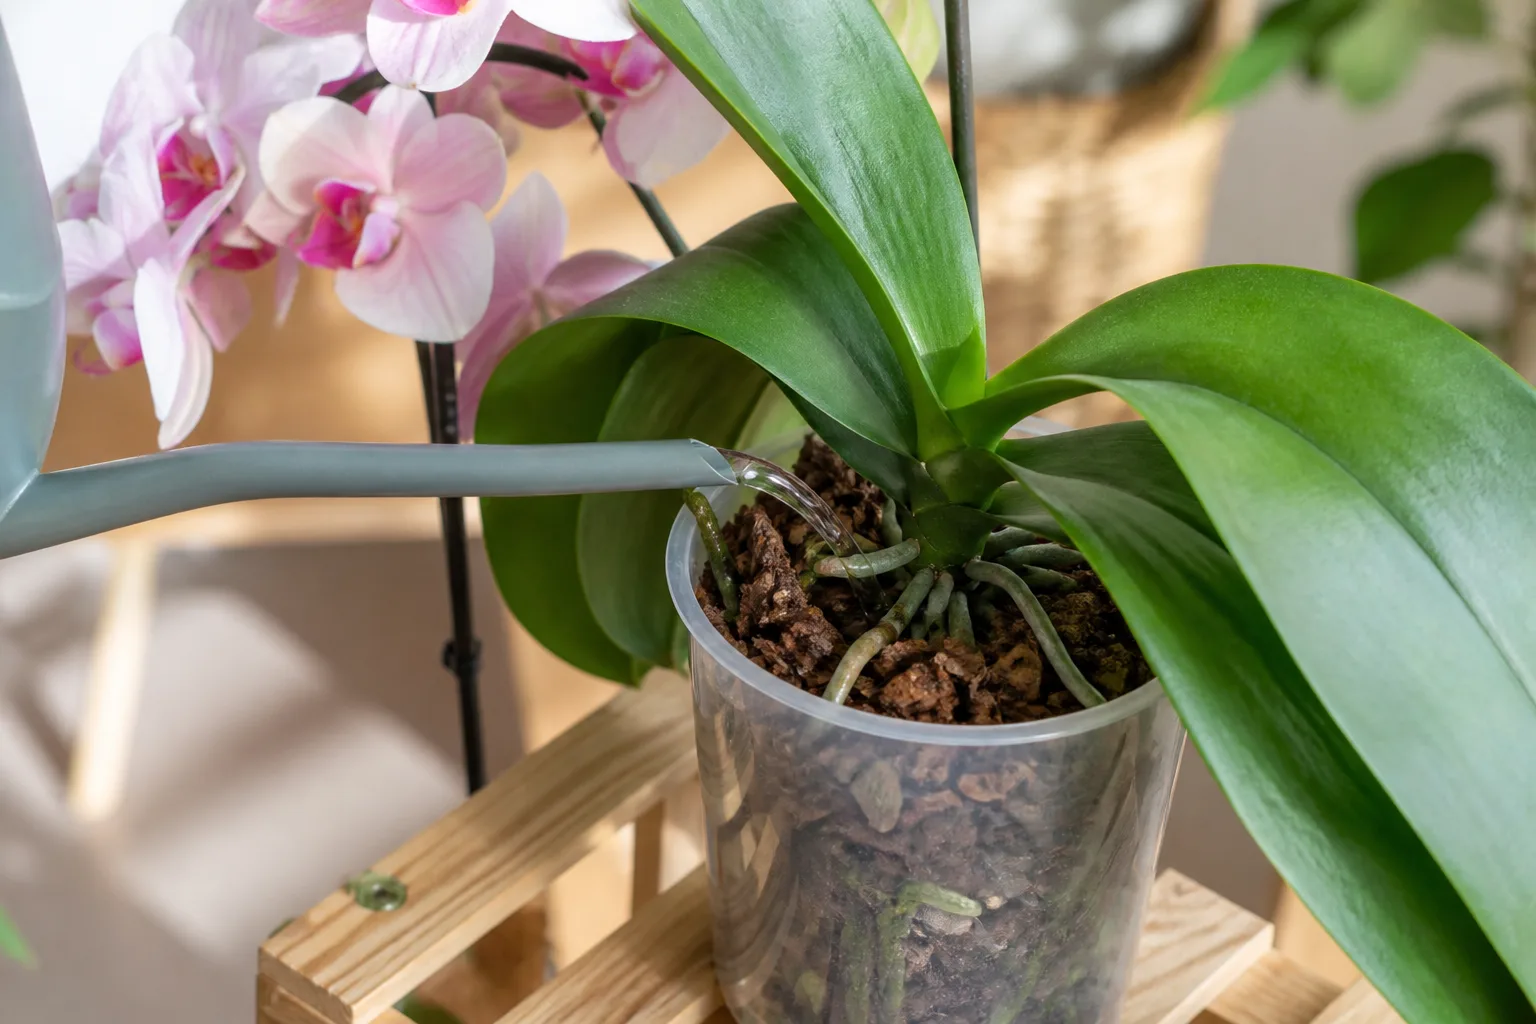
Water the bark thoroughly while keeping the crown and leaf bases dry; gentle airflow helps the plant dry between waterings.
Keep leaves from touching constantly if you grow several orchids together, and leave enough space for air to move between pots. Review fertilizer and water quality if you see salt crust, repeated root-tip damage, or rot despite good drainage. When the same issue returns after a fresh repot, the missing variable is often drying speed: too little light, a pot that is too large, dense moss, a cool room, or water trapped in the outer container.
Can a Nearly Rootless Orchid Recover?
Yes, sometimes. An orchid with a firm crown or rhizome, several healthy leaves, and no active rot can have enough stored energy to produce new roots. The odds are much worse when the crown is soft, the stem is dark and spreading, or every growing point has collapsed, so do not promise yourself a recovery based on leaves alone.
If no usable roots remain, keep the plant isolated and the crown dry. A carefully monitored high-humidity recovery setup can reduce water loss while new roots initiate, but it must be ventilated and inspected for mold. The plant should not sit in water, and wet sphagnum should not touch the crown. Once new roots are long enough to anchor and absorb, transition to a small, airy orchid pot rather than leaving the plant indefinitely in a sealed humidity chamber.
A nearly rootless orchid may pause flowering for a season. That is a sensible trade: a flower spike spends resources while a new root system is the part that determines whether the plant can keep living. Give the plant stable warmth, bright filtered light, clean conditions, and time. If rot keeps advancing even after sanitation and a fresh medium, ask an experienced orchid grower or extension professional to examine the plant.
Conclusion
To deal with orchid root rot, start with a root inspection instead of guessing from limp leaves. Keep roots that are firm, cut roots that are hollow or collapsing, discard the old medium, sanitize your tools and pot, and repot the survivors in an airy container that can drain completely.
The long-term fix is a better wet-dry cycle: water deeply when the plant and medium are ready, let the pot drain, keep the crown dry, and provide enough light and airflow for the mix to dry. A rescued orchid may lose flowers or grow slowly while it rebuilds, but a firm crown and even one or two healthy roots can give it a realistic path back.