11 Reasons Orchid Leaves Turn Yellow and What to Do
Why are orchid leaves turning yellow? Match the pattern to 11 causes, from natural aging and root rot to light, pests, disease, and fertilizer salts.
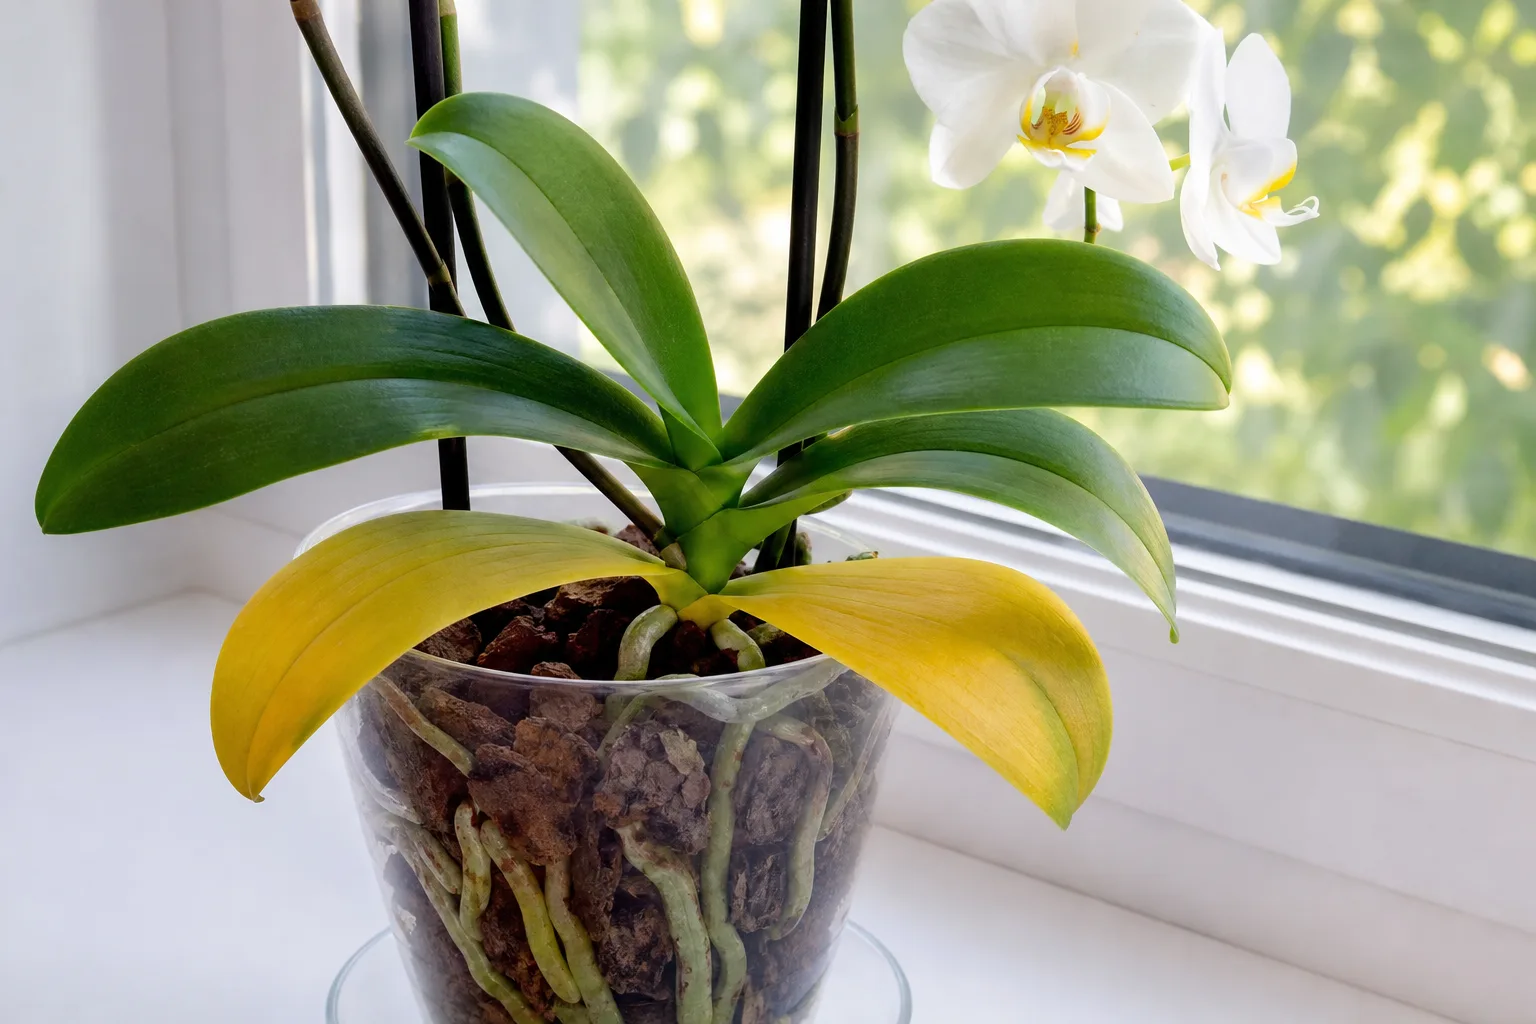
Yellowing is a message from the orchid, not a diagnosis. A single bottom leaf that fades slowly on an otherwise firm, growing Phalaenopsis may be finishing its useful life; several leaves becoming soft, spotted, wrinkled, or yellow in quick succession demands a closer look at the roots and growing conditions.
The fastest way to help is to record where the yellowing starts, how quickly it spreads, and what the roots feel like before you water, fertilize, prune, or repot. Phalaenopsis orchids are epiphytes, so their roots need both moisture and air; a plant can look thirsty above the pot when its roots are actually damaged below it.
Start with the pattern before changing care
First, count the affected leaves and note their position. Yellowing that begins with the oldest leaf at the bottom and progresses slowly is a different problem from pale new leaves, yellow patches with black centers, or a whole plant that turns yellow after a cold night. The Royal Horticultural Society describes chlorosis simply as yellowing with many possible causes, and the accompanying pattern—wilting, leaf fall, spots, stunting, or dieback—is what supplies the useful clue (RHS chlorosis guidance).
Next, feel the leaf. A firm, smooth, yellowing leaf often points toward aging, light stress, or a root problem that is still developing; a limp, wrinkled leaf suggests inadequate water reaching the foliage; a soft, translucent, or foul-smelling area raises concern about rot. Look under the leaves and into the pot before deciding that “yellow” means “more water.”
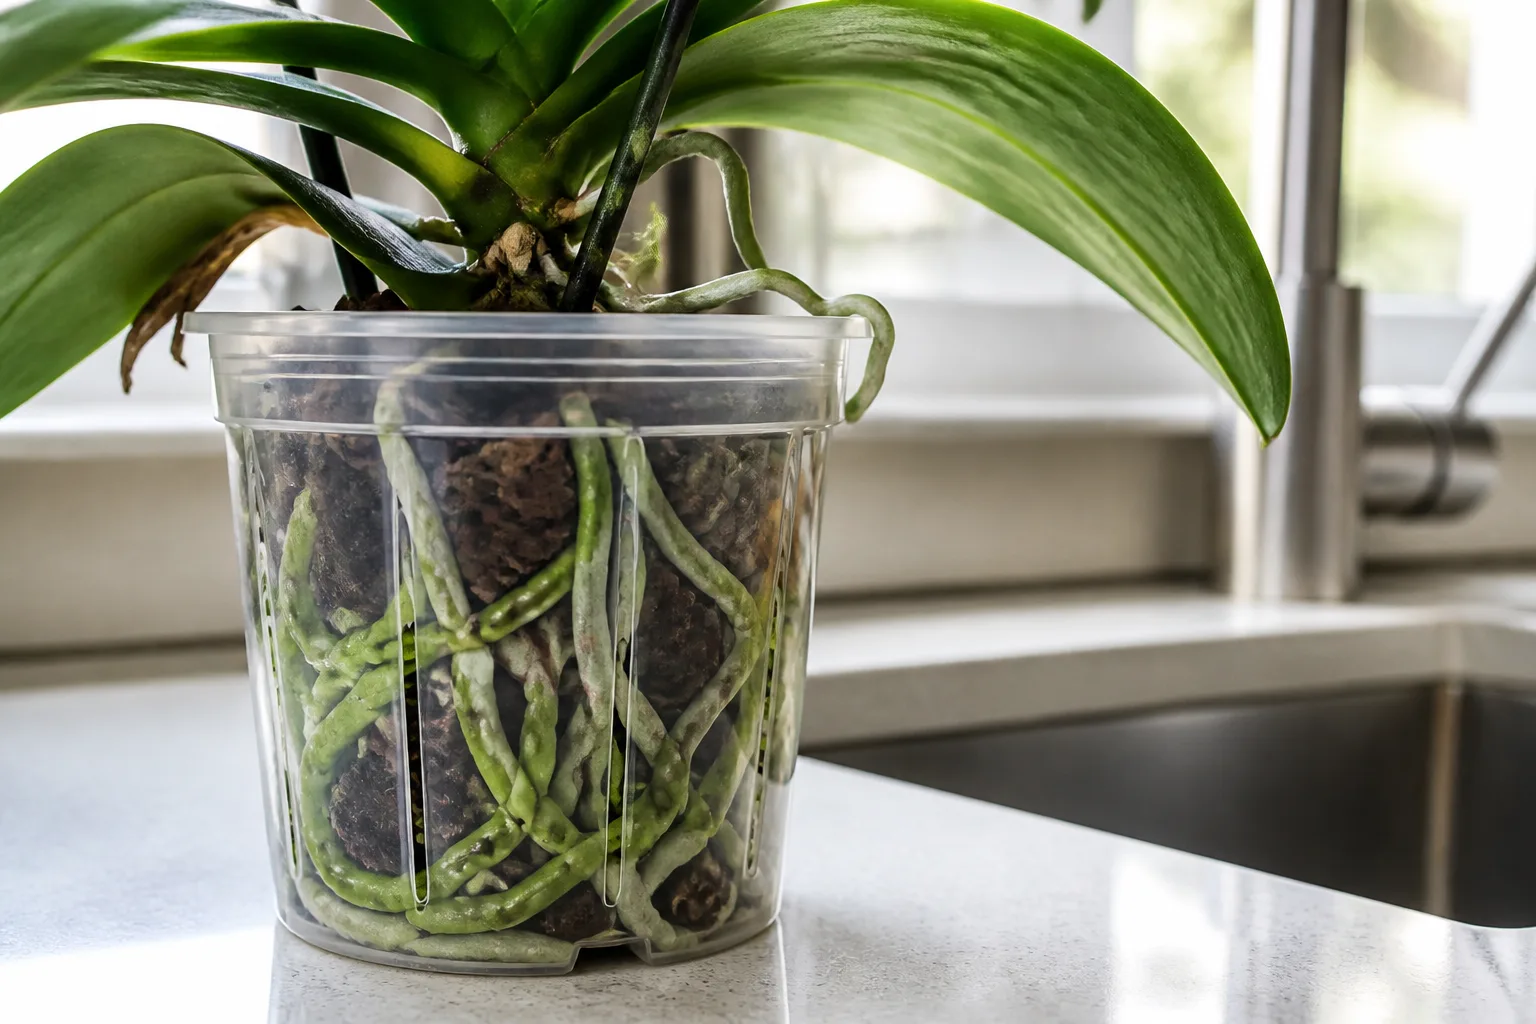
If you can see the roots through a clear pot, use them as a second instrument. Healthy Phalaenopsis roots are firm and may look green when wet or silvery when dry; brown, hollow, collapsed, or mushy roots cannot reliably supply water even when the medium is damp.
1. Natural aging of an older lower leaf
Phalaenopsis does not keep every leaf forever. When one of the oldest lower leaves turns a clear, even yellow over days or weeks while the newer leaves remain firm and green, the plant may be reclaiming mobile nutrients before forming an abscission layer. The American Orchid Society notes that a lower Phalaenopsis leaf can yellow as a normal springtime senescence process and should not be rushed off while the plant is still reabsorbing useful material (American Orchid Society: Leaf Yellowing in Orchids).
Leave that leaf attached if it is dry, clean, and not touching a wet crown. Do not increase watering or fertilizer to rescue tissue that is already being retired, because those changes can create a new root problem. Wait until the leaf is completely dry or separates with almost no resistance; if it resists, the orchid is still using it.
Natural aging becomes less convincing when two or more leaves yellow together, when yellowing moves upward, when new leaves are affected, or when the plant also wilts, smells sour, develops spots, or stops producing healthy roots. In those cases, treat senescence as a possibility—not a verdict—and continue down the checklist.
2. Too much direct light or heat
Moth orchids prefer bright light that is filtered through a sheer curtain or diffused by a bright room. Hot direct sun through glass can raise leaf temperature far above the room temperature, bleaching the leaf toward yellow, leaving tan patches, or producing a reddish-purple stress color before tissue dies. A leaf that faces the window and develops a distinct pale or scorched area is more likely sun-stressed than nutrient-starved.
Move the orchid a short distance back from the glass or add a translucent curtain, then let the plant stabilize. Do not move it into a dark corner as an emergency response: abrupt loss of light can reduce growth and delay flowering. The practical target is enough filtered brightness to keep leaves medium grassy green, with no hot patch of afternoon sun on the foliage.
Check the window, not just the room. A west or south window can be gentle in winter and intense in summer; a balcony can become much hotter than the forecast air temperature; and a decorative glass pot can magnify heat around exposed roots. Remove the heat source first, then watch new growth, because a bleached section of an existing leaf will not become green again.
3. Too little light over time
Low light usually causes a slower decline than sunburn, which is why it is easy to miss. Leaves may become deep green, growth may stall, the plant may stop reblooming, and older foliage can eventually yellow as the orchid cannot maintain every leaf at a low energy budget. A plant several feet from a bright window or behind heavy curtains may be underlit even though the room looks bright to you.
Increase light gradually by moving the orchid closer to a bright filtered window or using a suitable grow light on a timer. Avoid correcting months of low light by placing it straight into midday sun; that creates a second problem while the leaf is still adjusting. Keep the crown and leaves dry after watering and assess the plant by new growth and root activity, not by expecting old yellow tissue to reverse.
The American Orchid Society’s recent discussion of yellowing is useful here because it connects seasonal light and temperature changes with changing growth demand: an orchid entering active growth may reveal a nutrition or root problem that was hidden during a slower season. That does not mean light alone caused the yellowing; it means a change in light can expose the limits of the existing care routine.
4. Watering mismatch: too wet, too dry, or too shallow
Watering problems are often described as “overwatering,” but the real issue is the balance between moisture and oxygen around the roots. Watering a little every day can keep the core of a moss-filled pot wet while the outside looks dry; splashing a small amount onto bark may wet only the surface and leave the root mass thirsty. Both patterns can end with yellow leaves.
Lift the pot before watering and inspect the medium at depth. A very light pot, dry bark, silvery roots, and wrinkled leaves suggest the plant has been dry too long. A heavy pot, damp compacted medium, soft leaves, and roots that stay brown or mushy suggest excess moisture or root loss. Joy Us Garden’s Phalaenopsis watering notes make the important medium distinction: bark generally dries faster, while sphagnum moss holds water longer, so a calendar interval cannot work for every orchid (Joy Us Garden: How I Water My Phalaenopsis Orchids).
When it is time to water, wet the mix thoroughly with room-temperature water and allow it to drain completely. Then empty the saucer or cachepot; never let the pot stand in a hidden puddle. Water in the morning when possible so splashed foliage and the crown have time to dry, particularly in a cool or poorly ventilated room.
Do not use a rigid “once a week” rule as proof of good care. Frequency changes with pot size, bark particle size, moss density, humidity, temperature, airflow, season, and root quantity. The better routine is check, soak, drain, and check again when the plant approaches the dry side appropriate for its medium.
5. Root loss and root rot
Root trouble is the most important overlap to understand because it can mimic both thirst and overwatering. Rotting roots cannot move enough water into the leaves, so a yellowing orchid may be sitting in wet medium and still show limp, wrinkled foliage. University of Maryland Extension describes yellow, drying, and shriveling newer leaves as a distress signal and recommends checking the root system rather than assuming the plant simply needs another drink (University of Maryland Extension: What Causes Orchid Leaves to Turn Yellow and Shrivel?).
To confirm the direction, slide the orchid from its pot without pulling on leaves or aerial roots. Rinse away loose medium gently and inspect each root: keep roots that are firm and intact, even if their color changes when wet; be suspicious of roots that are hollow, papery, collapsing, or mushy. A sour odor, persistently wet medium, and a shrinking root system strengthen the case for rot.
If rot is spreading, use sterilized scissors to remove only dead tissue, then repot into fresh, appropriately sized orchid medium. Do not bury the stem or pack the mix tightly around the crown. Afterward, give the plant bright filtered light, good airflow, and a careful dry-down rather than compensating with frequent small drinks.
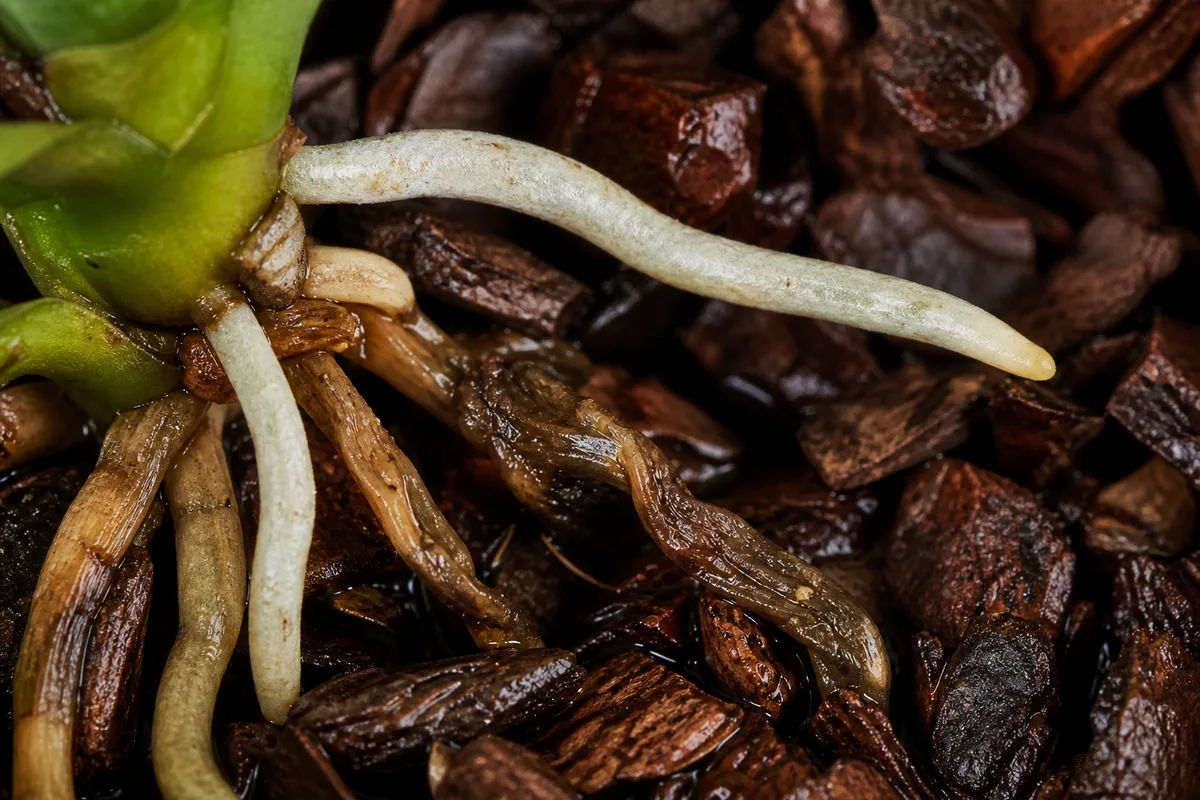
Root repair takes time. A yellow leaf may continue to decline after the cause is corrected because that tissue has already been damaged; judge recovery by firm remaining leaves, new root tips, and eventual new leaf growth. If most roots are gone, the plant may need a longer stabilization period and should not be pushed into flowering or heavy feeding.
6. A broken-down potting mix or unsuitable pot
Orchid bark is not permanent. As organic particles decompose, they become smaller, hold more water, and reduce the air spaces Phalaenopsis roots depend on. The American Orchid Society describes degraded mix as a gradual cause of root loss and yellowing; a pot that now feels more like dense dirt than loose bark deserves attention (American Orchid Society: Leaf Yellowing in Orchids).
Look for fine, compressed material, slow drainage, a sour smell, algae that stays wet, or roots circling in a dense core. A decorative pot without drainage can create the same problem even when the inner nursery pot has holes, because water left in the outer vessel wicks back into the mix. A pot that is much too large also dries slowly and keeps more unused medium wet around a small root system.
Repot when the medium has collapsed, the roots are unhealthy, or drainage cannot be corrected—not simply because one lower leaf is yellow. Use a fresh bark-based orchid mix suited to your home, a pot only slightly larger than the healthy root mass, and enough openings for water and air movement. Moss can work well when monitored carefully, but it gives less visual forgiveness than chunky bark because the surface may look dry while the center remains wet.
7. Cold drafts, heat, or sudden temperature changes
Phalaenopsis is a warm-growing orchid. A cold window at night, air-conditioning vent, hot radiator, or repeated swing between a steamy bathroom and a chilly hallway can damage leaves or disrupt water uptake. The RHS recommends keeping moth orchids above 16°C (61°F) and avoiding cold and draughts; its profile also emphasizes bright but not strong light and bark-based compost (RHS Moth Orchid profile).
Temperature injury often has a timing clue: yellowing begins after a cold snap, a delivery, a move outdoors, or a new position against glass. Severe injury may produce black, sunken, or water-soaked tissue rather than an even yellow leaf. Move the orchid to a stable warm room away from the vent, but do not place it directly beside a heater to “warm it up.”
If the plant arrived by mail, expect some acclimation stress, especially when a dying leaf released ethylene inside the package. Give it clean air, stable light, and normal root-zone care before making major changes. A leaf already triggered to age may still fall; the useful question is whether the youngest leaves and roots remain viable.
8. Dry air, trapped moisture, or poor airflow
Humidity affects how quickly an orchid loses water, but it does not replace watering and it cannot repair rotted roots. A dry room may leave leaves limp and roots desiccated; a sealed, stagnant setup may keep the crown wet and encourage rot even if the humidity number looks attractive. The goal is a stable balance of ambient moisture and moving air, not a permanently wet leaf surface.
Measure humidity near the plant with a hygrometer rather than guessing from a misted window. A humidifier can raise room humidity more consistently than repeated leaf misting, but it needs cleaning and should not blow a cold, saturated stream directly onto the plant. A pebble tray can slightly buffer the air immediately around a pot when assembled correctly, but the pot base must sit above the waterline; it is not a substitute for drainage.
Keep leaves and the crown dry after watering, leave space around the pot, and use a small fan only for gentle circulation rather than a harsh constant blast. Orchid Republic’s practical care guidance also stresses morning watering and avoiding stagnant water around the plant (Orchid Republic: Why Are My Orchid Leaves Turning Yellow?). If yellowing is paired with a soft crown, focus on drying and isolation before adding humidity.
9. Nutrient deficiency or fertilizer salt injury
Nutrition can contribute to yellow leaves, particularly when an orchid is actively growing in exhausted medium or receives very low-mineral water without a balanced fertilizer plan. Nitrogen deficiency often produces general paling and weak growth, while magnesium deficiency can show as yellowing between veins on older leaves. The RHS notes that leaf position and pattern matter: iron tends to affect young leaves first, while magnesium and nitrogen problems more often begin on older foliage (RHS chlorosis guidance).
Fertilizer injury can look deceptively similar. Too much feed, repeated concentrate in a small pot, or salt buildup from water and fertilizer can damage roots, which then makes leaves yellow because water uptake fails. A crust on the mix or pot, brown root tips, and worsening after feeding point toward salts rather than a simple deficiency.
Do not add Epsom salt or a stronger fertilizer because one leaf is yellow. First correct watering and root health, then use a balanced orchid fertilizer at the product label’s conservative rate while the plant is actively growing. Water the roots before feeding, allow the solution to drain, and periodically flush the medium with plain water when the label and your water quality make that appropriate. If you use rain, distilled, or reverse-osmosis water, remember that low-mineral water changes the nutrition equation; if your tap water is hard, salt accumulation may deserve testing rather than guesswork.
10. Sap-sucking pests
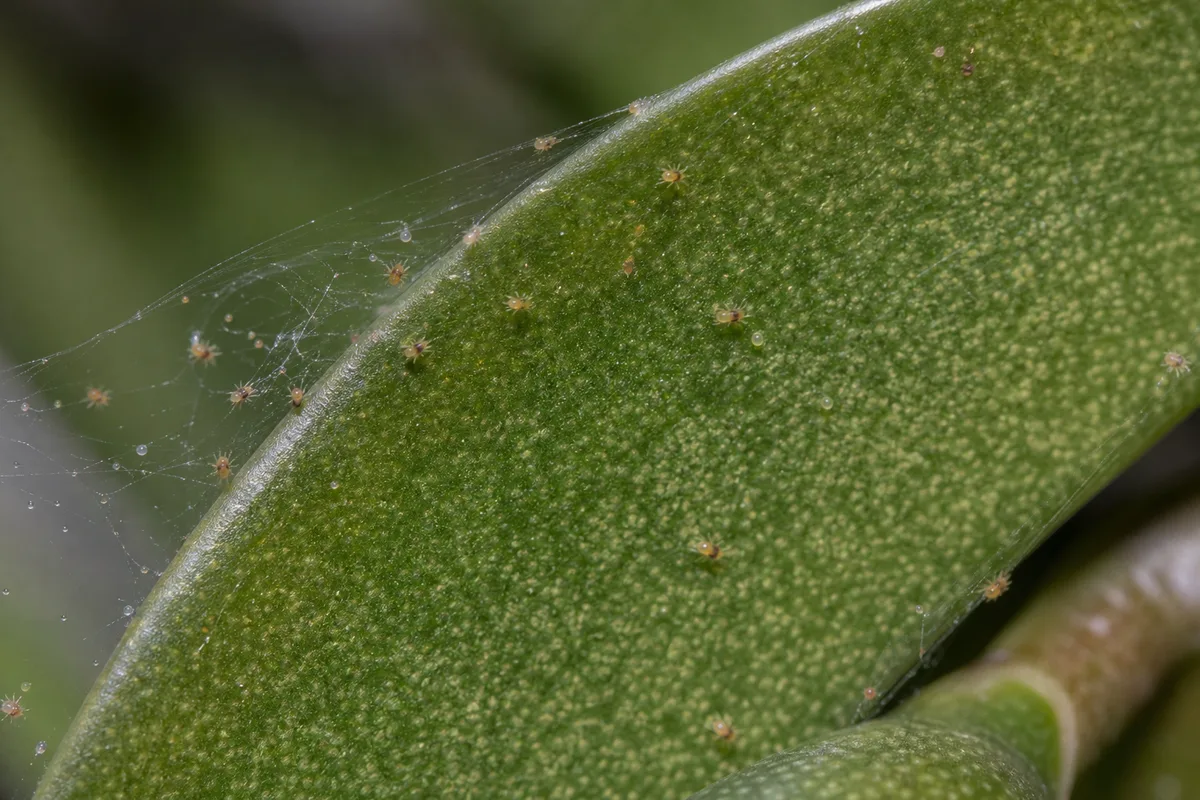
Scale, thrips, spider mites, and mealybugs can drain plant tissue and create scattered yellow stippling rather than a single uniformly fading leaf. Inspect leaf undersides, the midrib, crown edges, and the base of flower spikes with a bright light. Fine webbing suggests mites; silvery scarring or black specks can point toward thrips; cottony clusters suggest mealybugs; fixed bumps or shell-like discs may be scale.
A pest problem becomes more likely when yellow flecks appear across several leaves while the roots are firm and the watering pattern is reasonable. The American Orchid Society specifically recommends checking undersides when chlorotic spotting suggests scale, because the insects may be easier to find there than on the upper surface (American Orchid Society: Leaf Yellowing in Orchids).
Isolate the orchid from nearby plants and physically remove what you can with a damp cotton swab or soft cloth. For a larger infestation, use only a product labeled for the pest and plant, follow its directions, and test a small area first; oils and soaps can injure leaves under hot light or on stressed plants. Repeat treatment according to the label because one cleaning rarely reaches every life stage.
11. Bacterial or fungal disease
Disease is more likely when yellowing appears as a patch, ring, streak, or halo around brown or black tissue rather than as an even fade from the leaf base. Bacterial problems can move rapidly over hours or days, while fungal problems often progress more slowly over days or weeks, although the exact speed varies with species and conditions. The American Orchid Society uses the combination of yellow, brown, and black blotching or streaking as a warning that sanitation and closer diagnosis are needed.
Separate the orchid immediately, keep water off the leaves and crown, and improve gentle airflow. Photograph the progression, remove only clearly dead or spreading tissue with sterilized tools, and disinfect the tools between cuts and plants. Do not spray a random fungicide or bactericide simply because a leaf is yellow; products differ by pathogen, and a label is not a substitute for identification.
Some orchid diseases also begin in roots or the stem. Research reported through the International Society for Horticultural Science documents sheath and root rot of Phalaenopsis caused by Fusarium solani, which is one reason root inspection and clean tools matter when decline continues after surface care changes (Acta Horticulturae: Sheath and Root Rot of Phalaenopsis). If the crown is soft, the decline is fast, or multiple orchids are affected, contact a local orchid society or university plant clinic for a diagnosis rather than propagating from questionable tissue.
Use a 10-minute triage flow
When you first notice yellow leaves, resist the urge to do every possible rescue at once. This short sequence preserves evidence and prevents a well-intentioned fix from making the diagnosis harder:
- Photograph the plant from above and from the side, including the leaf undersides and pot.
- Mark the pattern: oldest lower leaf, newest leaf, window-facing side, scattered spots, or whole plant.
- Feel the pot and medium at depth; note whether it is light and dry or heavy and wet.
- Inspect roots through the pot or by sliding the plant out if the yellowing is spreading, the leaves are wrinkled, or the pot stays wet.
- Check the crown and leaf axils for trapped water, soft tissue, odor, insects, and webbing.
- Review the last change: shipping, repotting, fertilizer, window, outdoor move, cold night, or missed watering.
Choose one confirmed correction. If the roots are wet and failing, drainage and repotting outrank humidity. If leaves show sun damage, filtered light outranks fertilizer. If a single old leaf is fading with healthy new growth, waiting is safer than surgery.
What to cut, what to leave, and when to repot
Do not cut a yellow leaf just to make the orchid look tidy. A leaf that is still firm and partly green is still photosynthesizing and may still be supplying resources to new growth. Wait for natural separation when the cause is likely aging, or remove a leaf when it is fully dead, diseased tissue is clearly spreading, or the damaged surface creates a hygiene risk.
Use clean, sharp scissors sterilized between cuts. Never pull a partly attached leaf from the crown, and never cut into the central growing point to remove a cosmetic blemish. If the crown itself is soft or black, the priority is to keep water out, isolate the plant, and seek a diagnosis; leaf removal alone will not cure crown rot.
Repot because the medium is decomposed, the roots are rotting, or the pot cannot drain—not because a healthy orchid has one yellow lower leaf. If repotting is necessary while the orchid is in bloom, accept that disturbing roots may shorten the display; if the plant is stable, waiting until flowering finishes can reduce stress. Either way, use the smallest sensible pot for the healthy roots and do not bury the stem.
A recovery plan for the next four weeks
During the first week, stabilize the environment. Give the orchid bright filtered light, a warm position away from drafts, gentle airflow, and a watering routine based on the medium rather than the calendar. If roots were disturbed or rot was removed, keep the plant steady and avoid frequent handling.
During weeks two and three, watch for evidence of recovery. Healthy roots may show fresh green tips, leaves should stop becoming softer or more wrinkled, and no new spots should appear. A damaged yellow leaf may continue to fade; that is not necessarily treatment failure if the remaining foliage and roots are stable.
By week four, reassess the original hypothesis. If the pot is still wet far longer than expected, the mix or pot may be wrong. If yellow spotting continues despite sound roots and corrected light, inspect again for pests or disease. If the orchid is stable but not growing, do not keep escalating fertilizer; Phalaenopsis may simply be rebuilding roots before producing a new leaf.
Prevent yellow leaves from returning
Build prevention around observation, not perfect numbers. Keep the orchid in bright filtered light, protect it from hot glass and cold vents, and let the mix approach its appropriate dry point before watering thoroughly. Use a pot with drainage, leave the crown above the medium, and repot when the bark has broken down or the root system no longer has air.
Inspect the underside of leaves weekly, especially after bringing home a new plant. Quarantine newcomers when possible, keep tools clean, and remove standing water from cachepots. Fertilize lightly only when roots are hydrated and growing, and adjust for your water source and the medium’s condition rather than copying a greenhouse schedule.
Most importantly, learn your orchid’s normal baseline. One lower leaf aging slowly, green roots that alternate between wet and dry, and new growth that stays firm are reassuring signs. A cluster of yellow leaves, soft roots, black spots, a wet crown, or rapid spread is a reason to investigate today.
Conclusion
Yellow orchid leaves can mean natural aging, a light mismatch, watering stress, root rot, degraded bark, temperature shock, poor air balance, nutrition trouble, pests, or disease. The color alone cannot choose the fix; the combination of leaf age, texture, location, root condition, and speed of change can.
Start with the lowest-risk action: observe, check the root zone, stabilize light and temperature, and remove standing water. Leave a healthy aging leaf alone, repot only when the medium or roots justify it, isolate plants with pests or spreading spots, and judge recovery by new roots and leaves rather than trying to repaint an already yellow leaf green.



