How to Grow and Care for Russian Sage
Grow Russian sage with the right sun, drainage, watering rhythm, pruning cut, cultivar, and troubleshooting plan for fuller plants and longer blooms.
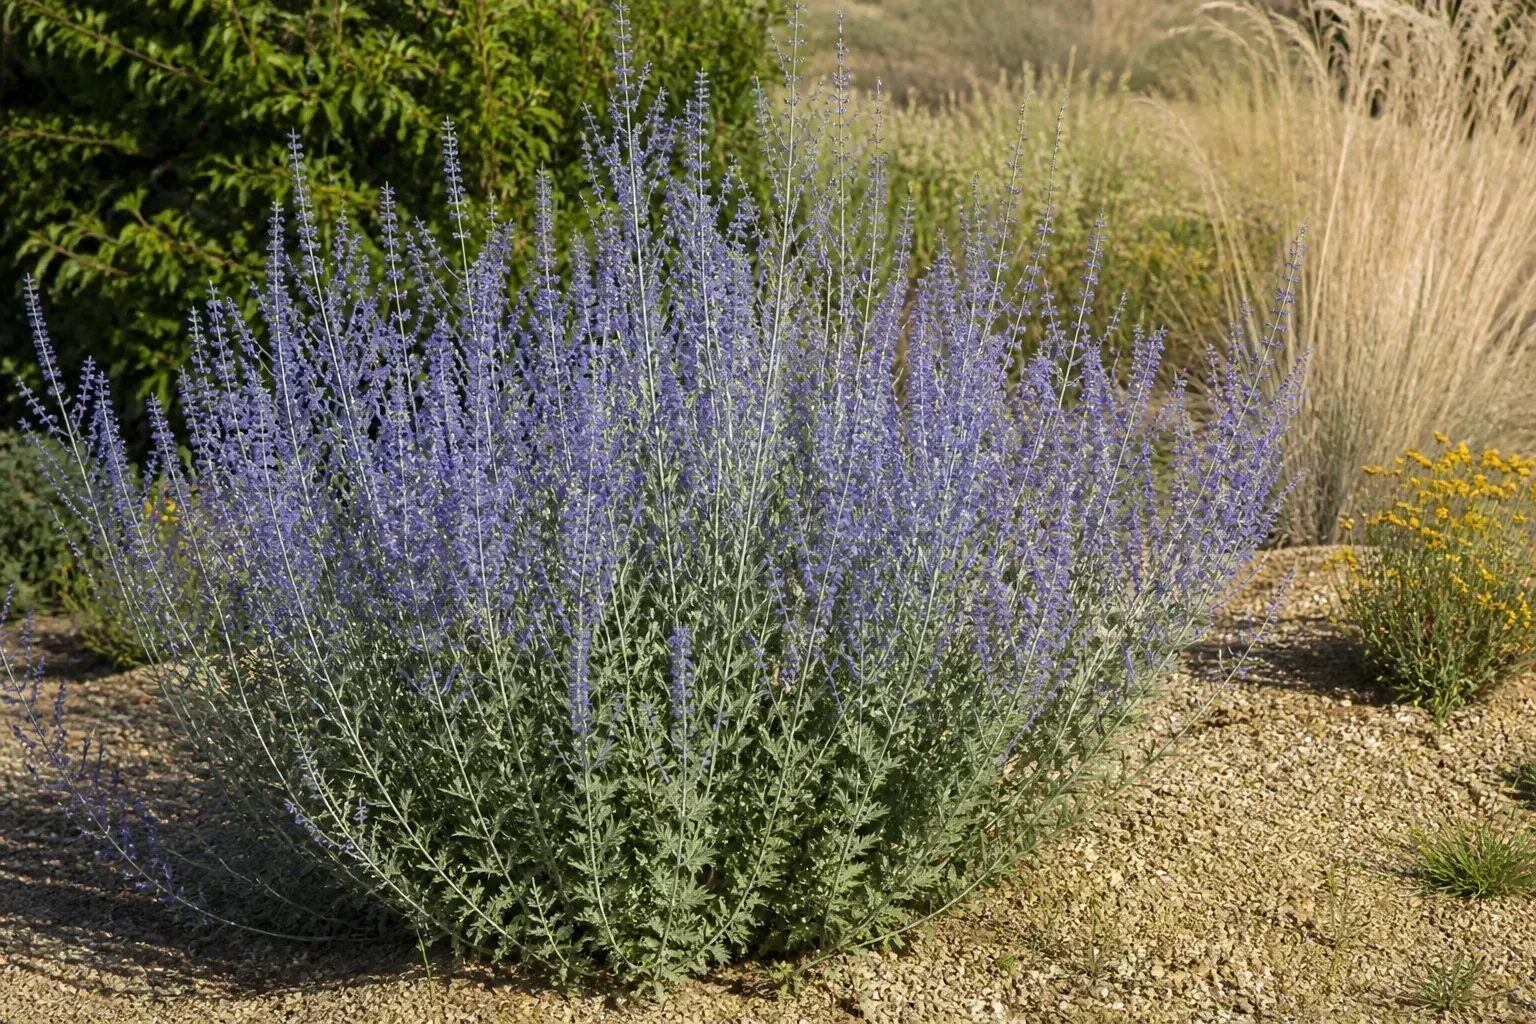
The best Russian sage plant care plan is simple: give it full sun, fast-draining soil, regular water while it establishes, and a firm spring cutback. Once the roots are deep and the crown is in the right place, this silvery perennial asks for far less attention than its height and long flower display suggest.
The catch is that Russian sage is not forgiving of the wrong site. Shade, rich wet soil, frequent shallow watering, and fall pruning can produce a floppy, flowerless, or short-lived plant. Treat it like a dry-border perennial with a woody base rather than like a thirsty bedding plant, and the care routine becomes much easier.
Russian Sage at a Glance
Russian sage is now commonly listed as Salvia yangii; many nursery tags and older gardening references still use Perovskia atriplicifolia. It belongs to the mint family, but it is not the culinary sage grown for cooking. The plant is native to dry regions of central and southwestern Asia and forms a woody base with upright, square stems, finely divided gray-green leaves, and small blue to lavender flowers carried on airy branched panicles.
Though shrub-like, it behaves as a deciduous, woody-based perennial. Plan for roughly 2 to 4 feet tall and wide, with cultivar variation. Extension references commonly list USDA Zones 4–9, but winter wet and local exposure can matter as much as the number. NC State Extension describes its growth, site preferences, seasonal cutback, and cultivar range, while the University of Wisconsin Horticulture profile gives practical spacing and establishment-watering guidance.
| What to plan for | Russian sage |
|---|---|
| Light | Full sun; aim for at least six hours of direct light |
| Soil | Average to lean, well-drained soil; sandy, rocky, chalky, or clay soil only if it drains |
| Water | Regular deep watering in the first growing season; low water after establishment |
| Bloom window | Usually midsummer into early fall, depending on climate and cultivar |
| Mature habit | Upright, airy, woody-based perennial that may widen or lean |
| Main risks | Wet winter soil, shade, rich fertilizer, late pruning, and poor airflow |
Its flowers are valuable in a late-season border because bees, butterflies, and other beneficial insects visit them. The aromatic foliage adds texture and scent near a walkway, but this is an ornamental plant rather than culinary sage.
Choose the Right Spot Before You Plant
Russian sage is easiest when the planting site does most of the work. Pick the sunniest practical place, check how long water remains after a hard rain, and imagine the plant at mature width before you dig. If the bed is shaded by a building for part of the day or sits at the bottom of a slope where winter water collects, moving the plant later will be much harder than changing the site now.
Light, airflow, and spacing decide flower strength
Give Russian sage six or more hours of direct sun, preferably with open sky and moving air around the stems. It can survive in less light, but the trade-off is usually longer, weaker stems, fewer flower panicles, and a greater need for staking. Full sun also helps the foliage dry quickly after rain.
Space plants according to the mature width of the cultivar, not the size of the nursery pot. Eighteen to twenty-four inches can work for compact selections or a dense drift, while larger plants may need two to three feet or more. In a humid or rainy climate, use the wider end of the range so leaves and stems do not stay crowded and damp. BBC Gardeners’ World lists full sun, airy late-summer flowers, and hard annual pruning as the basic culture for this plant.
Plan for the way Russian sage moves in a breeze. Its open architecture is part of the appeal, so do not force it into a tight clipped ball. Place it behind a lower perennial, beside an ornamental grass, or along a path where its pale stems and blue flowers can soften a hard edge without being asked to stand alone in a wind tunnel.
Soil and drainage decide winter survival
The ideal soil is well drained and not excessively rich. Russian sage tolerates sandy, rocky, chalky, and many clay soils when water can leave the root zone. It does not tolerate a bed that stays saturated. A plant can look drought tolerant in summer and still die from oxygen-starved roots during a wet winter.
Test the site before planting by filling a small hole with water and watching whether it drains away within a reasonable time. If water still sits the next day, plant on a raised mound or berm, redirect runoff, improve the bed’s drainage pattern, or choose a different location. Adding a small amount of compost may improve a poor soil’s structure, but repeatedly loading a dry-border bed with rich organic matter can hold more water and encourage soft, floppy growth.
Do not chase an exact pH number without a soil test. Russian sage generally handles neutral to alkaline soil and is especially comfortable in dry, chalky conditions. The RHS profile confirms its tolerance for well-drained chalk, loam, and sand and recommends a poor to moderately fertile site. For most gardens, drainage beats amendment.
Plant Russian Sage Without the Usual Setbacks
Plant nursery-grown Russian sage in spring once the soil is workable, or in early fall while there is enough time for roots to grow before hard frost. In very hot weather, delay planting if possible; a small root ball can dry faster than a mature plant can replace water. In cold climates, spring planting gives the crown a longer runway before its first winter.
Dig a hole no deeper than the root ball and about twice as wide. Set the plant so the crown and soil surface remain at the same level they had in the pot. Do not bury the woody base under a deep layer of soil or mulch. Backfill with the soil you removed, firm it gently, and water slowly until the entire root ball is wet.
Keep the first mulch layer modest. Two inches of coarse mulch can reduce weeds and moderate moisture, but leave an open ring around the crown and stems. Mulch piled against the base stays damp and can make the very problem you are trying to prevent—soft tissue and crown rot—more likely.
Give a new transplant temporary support only if wind or top-heavy growth demands it. If it needs permanent support, revisit the site: insufficient sun, rich soil, excess water, or a cultivar too large for the space is usually the deeper cause.
Watering: Establish Deep Roots, Then Step Back
Watering is where the phrase “drought tolerant” causes the most trouble. A new Russian sage has a compact nursery root ball, so it cannot yet use the dry soil several inches away. During the first growing season, water deeply enough to wet the root zone, then allow the surface to dry somewhat before watering again. Light daily sprinkles encourage shallow roots and leave the crown and foliage repeatedly damp.
Check the soil with a finger or narrow trowel several inches from the stem, where the roots are actually growing. If it is dry at root depth and the plant is wilting in the morning or staying limp into evening, soak slowly. If the soil is cool and wet, do not add more water just because the leaves look stressed; inspect drainage and roots instead.
In a dry first summer, a rough starting point is about an inch of total water per week from rain and irrigation, adjusted for heat, soil, wind, and container size. Drip lines or a soaker hose put water at the base without repeatedly wetting the flower stems.
Once the plant has grown through a full season and the root system is established, increase the interval between waterings. Mature Russian sage generally prefers a dry-down cycle and can handle short dry spells. Water during an unusually long drought, extreme heat, or visible morning wilt, but do not maintain summer-wet soil as a default. Penn State Extension summarizes the same pattern: regular moisture during establishment, then strong drought resistance, with spring cutback and well-drained soil.
Feeding, Mulching, and Supporting the Plant
Russian sage rarely needs a heavy fertilizer program. If the soil is reasonably fertile, skip routine feeding. If growth is weak after a soil test or the bed is genuinely depleted, use a light spring top-dressing of compost or a restrained balanced fertilizer according to its label. Avoid high-nitrogen lawn fertilizer, manure-heavy amendments, and repeated liquid feeding.
Too much fertility can produce a lush, soft canopy that outgrows its stems. The plant may look impressive in June, then collapse outward when the flower panicles arrive. Lean conditions are not neglect here; they are part of the plant’s natural design and help preserve the silvery texture that makes it useful in a dry border.
Use mulch to limit weeds and buffer sudden temperature changes, not to keep the soil permanently damp. In wet climates, coarse gravel or a thin organic layer around—but not touching—the crown can be safer than a thick blanket of moisture-holding mulch. Stake only the stems that need it, and tie loosely with a soft material so the plant can move without being strangled.
Prune Russian Sage in Spring for a Fuller Plant
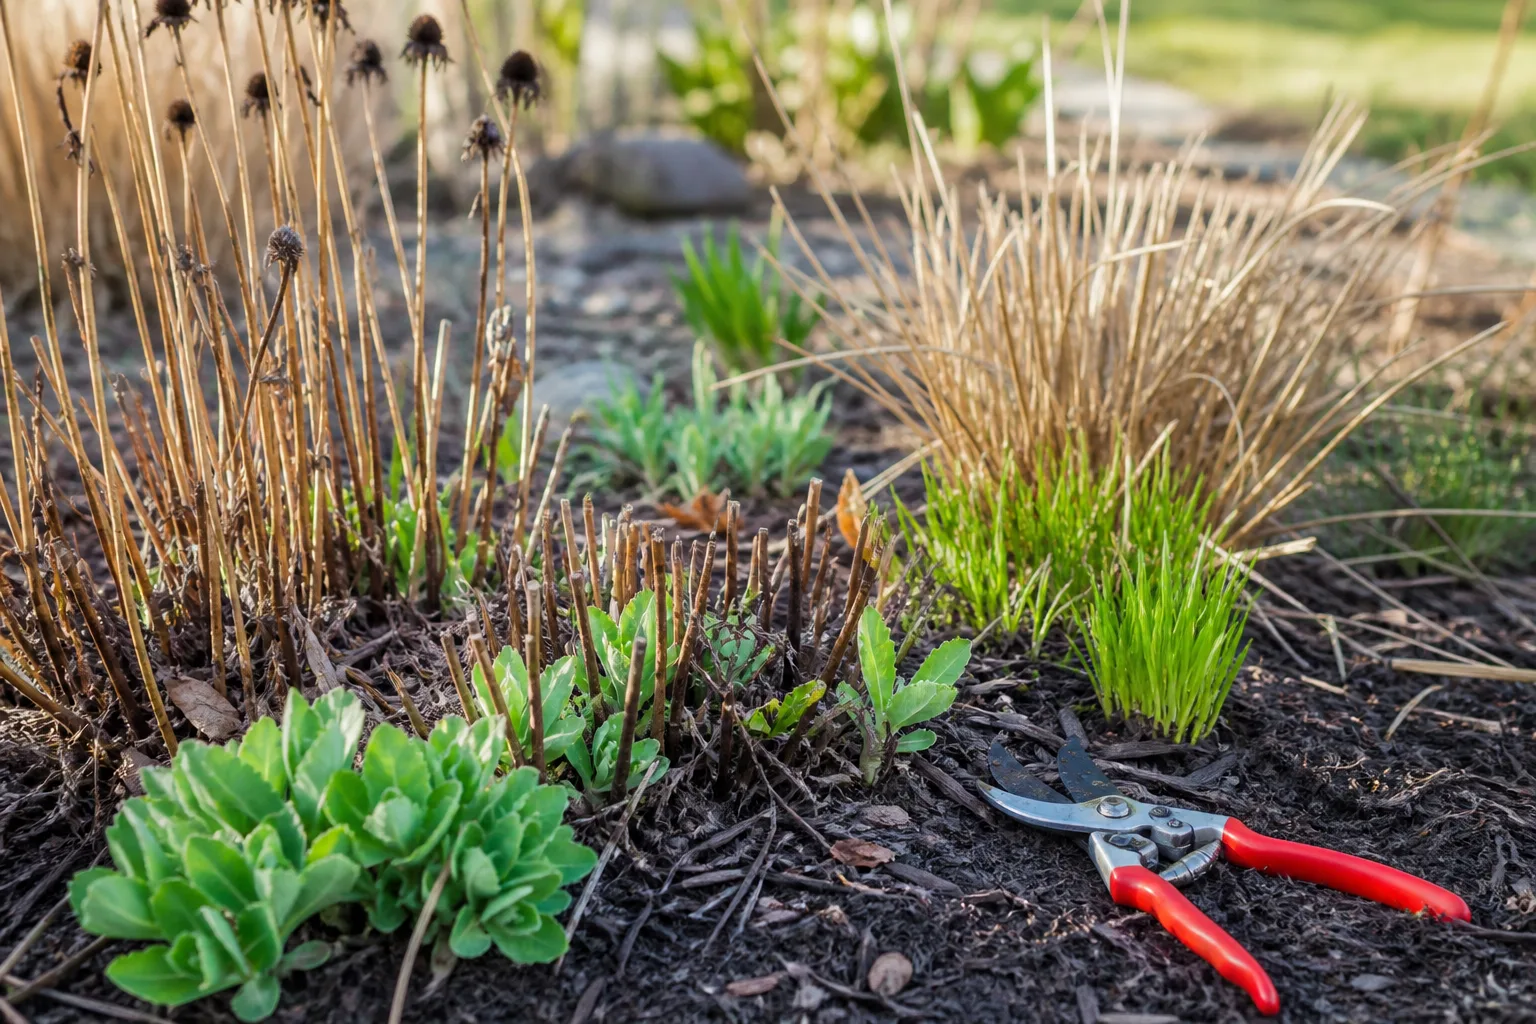
The most reliable pruning routine is one hard renewal cut each year. Leave the old stems standing through winter if they are healthy. They provide structure, catch frost, and add pale texture to the dormant garden. Then cut them back in late winter or early spring, once you can see live buds or fresh basal growth and before the new stems become tall.
Cutback timing and method
Use sharp bypass pruners and clean them before moving between plants. Start by removing obviously broken, blackened, or dead stems at their base. Then shorten the remaining old stems to roughly 6–12 inches above the soil, choosing the lower end for a compact, sturdy plant and the higher end when the crown is slow to wake, the site is cold, or you need a visible framework to mark where the plant is.
The range matters because Russian sage is not identical in every climate. In mild areas, a cut around six to eight inches can encourage a dense new mound. In colder zones, the top of the plant may be dead while the crown is alive, so wait for green buds and cut only to living wood. If stems remain brown and brittle, shorten them gradually rather than uprooting a plant that may simply be a late riser. NC State recommends an early-spring cutback to stimulate the season’s growth, and the RHS places Russian sage in a hard early-spring pruning group.
Do not shear the plant into a flat hedge. Cut individual stems so new shoots emerge from several points around the crown. This creates a more natural, branched framework and makes it easier to remove a dead section without sacrificing healthy wood. If you prune after tall new growth has already started, work around the shoots instead of flattening them; a late hard cut can delay flowering.
Avoid a routine hard cut in fall. Removing all top growth before winter can expose the crown, erase useful winter structure, and make it harder to judge what is alive in spring. The exception is a diseased or collapsed plant where sanitation requires removing compromised material; even then, fix the wet or crowded site rather than assuming the cut alone solves the problem.
Should you deadhead after flowering?
Deadheading is optional. Remove faded flower spikes if you want a tidier border, want to reduce self-sown seedlings, or are trimming a stem that has flopped into a walkway. Cut back to a leafy side shoot or a branching point rather than stripping the whole plant.
Do not deadhead because you expect it to rescue a plant in poor light or wet soil. Russian sage can continue flowering for weeks without constant clipping, and removing every spent spike is not a substitute for spring pruning. If you enjoy winter stems and seed structure, leave some heads in place and clean them out during the spring cutback.
Propagate Russian Sage by Cuttings, Seed, or Division
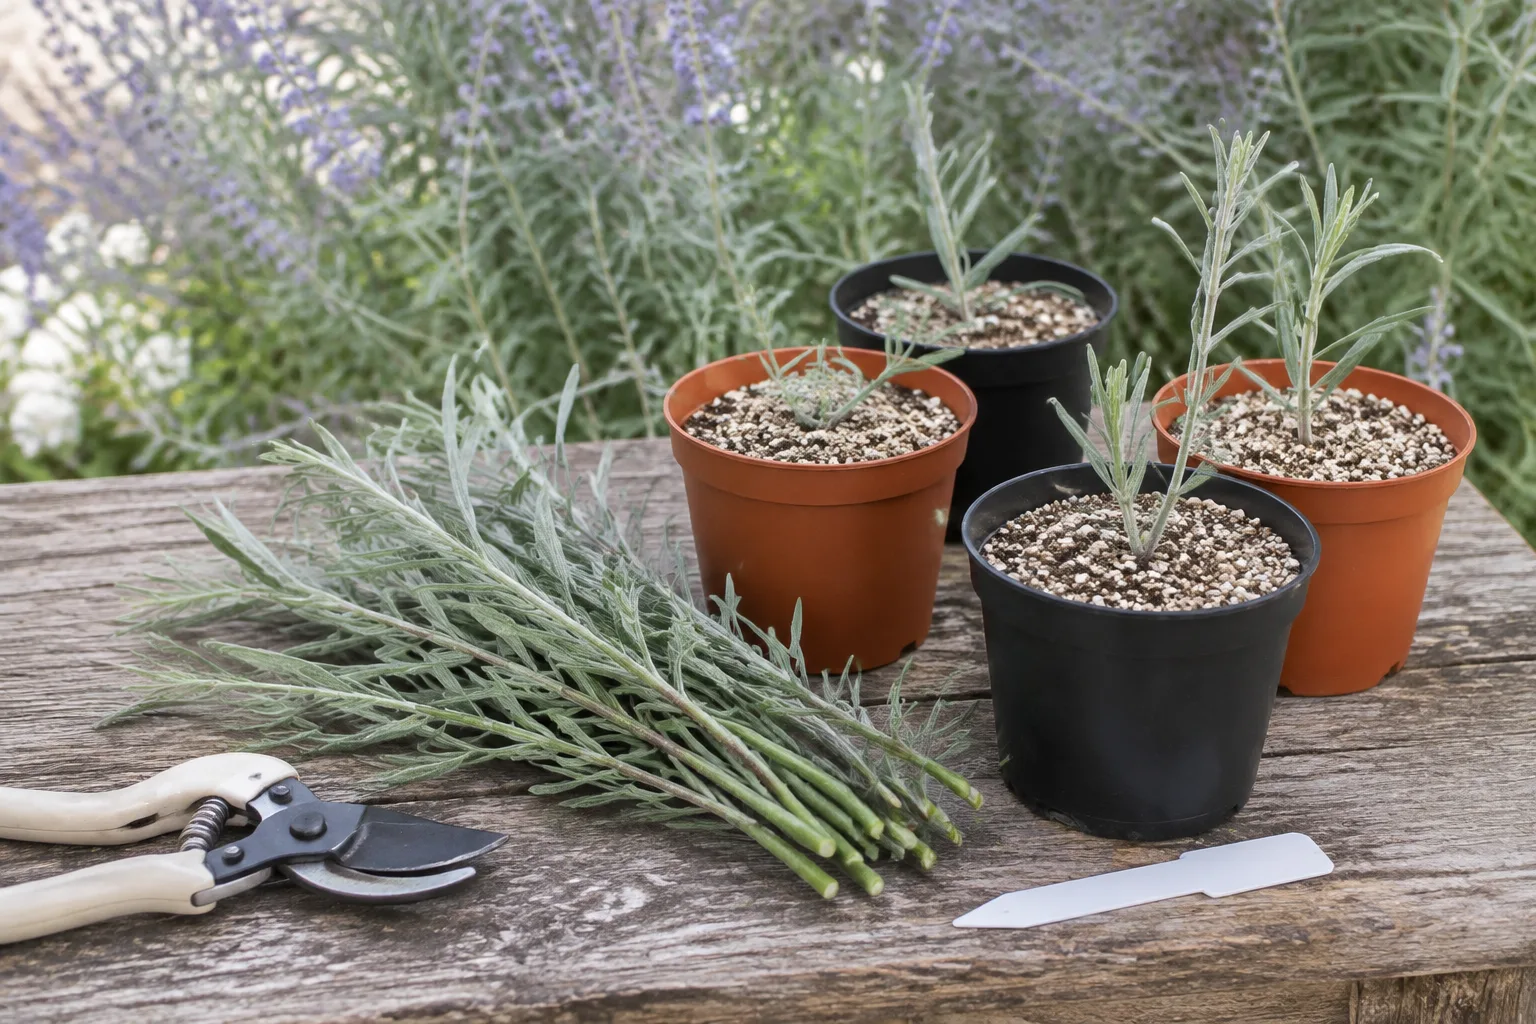
Choose the method according to your goal. Softwood cuttings are the best choice when you want a new plant that matches a named cultivar. Seed is inexpensive but slower and variable. Division can control an oversized clump, but it is more disruptive and often less dependable than taking cuttings.
Softwood cuttings are the best route for named cultivars
Take softwood cuttings in late spring or summer when stems are actively growing but before they are carrying open flowers. Choose several healthy, nonflowering tips about 3–5 inches long. Make each cut just below a leaf node with a clean knife or bypass pruner, then remove the lower leaves and any buds.
Fill a small pot with a sterile, airy rooting medium such as coarse perlite mixed with seed-starting mix or clean propagation sand. Moisten it first so the cutting does not need a soaking immediately after insertion. Set the bare lower node into the medium, firm it gently, and place the pot in bright indirect light with steady warmth and good airflow.
Rooting hormone is optional. Russian sage can root without it, but a light dusting may improve consistency for some cuttings. Keep the medium lightly and evenly moist, never saturated. A clear cover can reduce water loss, but leave enough ventilation to prevent condensation from staying on the leaves all day.
Expect roots in a few weeks, but use new top growth and gentle resistance when tugged as clues rather than treating a calendar date as proof. Once roots hold the medium, pot the cutting into a well-drained mix and gradually increase light. Harden it off before planting outdoors. A cutting that collapses at the base was usually kept too wet, cut from flowering growth, or placed in stale air.
Water propagation is possible, but soil rooting is the better default for this semi-woody plant because the transition adds stress and stagnant water can rot the cutting. If you try water, submerge only a node, change it frequently, and pot the cutting as soon as roots are useful.
Seed and division solve different problems
Seed is worthwhile when you want many plants or are curious about variation. Sow seed shallowly in a free-draining seed-starting mix and keep it evenly moist. An initial cold period can improve or speed germination; University of Wisconsin Horticulture reports germination can take one to four months at about 60–65°F and notes that a 10-day to six-week cold treatment may help.
Seedlings do not reliably reproduce the height, flower color, leaf shape, or habit of a named selection. Give them strong light after emergence, transplant without tearing the young roots, and harden them off before the move outdoors. Do not judge a seed-grown plant too quickly: it may spend its first season building roots and flower more strongly in its second year.
Division is useful when a mature clump has expanded beyond its space or has a healthy outer section you want to move. Divide in spring or fall before active bloom, dig wider than you think you need, and keep roots from drying while you work. Each division needs a crown and attached roots. Replant immediately at the original depth and water it in, then protect it from drying until new growth resumes.
Division is slower and more stressful than cuttings, especially in heavy soil. It is not the first move for a young plant that simply looks sparse. Correct the site and let the plant establish before deciding it needs to be split.
Cultivars and Companions That Fit Your Garden
Cultivar choice is one of the simplest ways to prevent a future pruning problem. Compact types suit the front or middle of a border and containers, while taller selections work best as a back-of-border haze or repeated drift. Named cultivars are also more predictable than seedlings. The University of Wisconsin profile summarizes trialed selections including ‘Blue Spire,’ ‘Denim ’n Lace,’ ‘Filigran,’ ‘Little Spire,’ and ‘Longin’.
| If you want… | Look for… | Watch for… |
|---|---|---|
| A smaller footprint | ‘Little Spire’ or a compact modern selection | Containers still dry and freeze faster than beds |
| Upright structure | ‘Longin,’ ‘Blue Spire,’ or strong-stemmed newer cultivars | Mature width may be greater than the label photo suggests |
| Dense color | Selections with compact flower spacing such as ‘Denim ’n Lace’ | Dense planting can reduce airflow in humid weather |
| Fine texture | ‘Filigran’ and other finely divided-leaf forms | Some selections may be less forgiving in colder sites |
Pair Russian sage with plants that share its sun and drainage requirements: ornamental grasses, sedum, coneflower, yarrow, coreopsis, lavender, or catmint. Put moisture-loving companions on a separate irrigation line or in a lower part of the garden. A visually compatible neighbor is not automatically a culturally compatible one; Russian sage should not be placed in the wet pocket simply because its blue flowers look good beside a thirsty perennial.
For pollinators, allow a patch to flower without constant clipping. For a tidy formal edge, remove a portion of spent stems and keep the plant within its allotted footprint. Proven Winners’ Russian sage guide is useful for comparing compact selections, landscape roles, deer resistance, and the difference between Russian sage, lavender, and catmint.
Container Growing and Winter Protection
Russian sage can grow in a container, but the container needs to be treated as a dry outdoor bed, not as a decorative pot that is watered on a schedule. Choose a large, heavy pot with several drainage holes and a gritty, free-draining potting mix. Avoid garden soil in a pot because it compacts and remains wet around the roots.
Compact cultivars are easier to manage. Place the pot where it receives full sun and moving air, water thoroughly when the mix has dried down, and empty any saucer after rain. A container can need more frequent checking than an in-ground plant in summer because its small root volume heats and dries quickly, yet watering too often can still cause root rot.
Winter is harder on roots in a pot than in the ground. In colder zones, move the container to an unheated sheltered spot, group it against a protected wall, or sink the pot into the ground before the soil freezes. Keep the mix on the dry side but do not let the root ball become bone dry for months. If the cultivar is large, planting it in the ground is usually the lower-maintenance choice.
In-ground plants generally benefit from being left standing until spring. A thin mulch layer around the root zone can moderate temperature swings, but do not bury the crown or create a wet collar. In a cold, exposed site, survival depends on the combination of cultivar, drainage, wind, snow cover, and how much healthy wood remains—not on mulch depth alone.
When Russian Sage Flops, Fails to Bloom, or Looks Sick
Russian sage problems are usually site or timing problems before they are pest problems. Start with the sequence that changes the diagnosis most: check light, then soil moisture, then roots and stems, then insects. Fertilizing or spraying before that check often adds stress without addressing the cause.
If it will not bloom
First rule out insufficient sun. A plant that receives bright ambient light but fewer than about six hours of direct sun may stay green and upright while producing disappointing flowers. Move it only during the dormant season if possible; transplanting a large summer plant adds unnecessary heat and root stress.
Next inspect the soil. Constantly damp, nutrient-rich soil can create lots of leafy growth and few flowers, especially when stems are soft. Let the bed dry between waterings, correct drainage, and skip high-nitrogen fertilizer. A soil test is more useful than adding lime or fertilizer by guesswork.
Pruning can also explain a blank season. A late hard cut may remove emerging flower-bearing growth or delay the plant long enough that the display is shorter. Conversely, never pruning an old, woody, open plant can leave the new growth concentrated at the tips. Return to the spring renewal cut, but do not make repeated emergency cuts during the bloom season.
Finally, consider age and winter. Newly planted divisions and seedlings may need a full season to establish, and a cold winter can kill the upper stems while the crown resprouts late. Wait for live basal buds before discarding the plant. If all of the culture is right but a selection repeatedly performs poorly, replace it with a cultivar better matched to your climate rather than feeding it harder.
If it flops or looks unhealthy
Flopping: Count the hours of direct sun and look for rich, wet soil first. Then check spacing and mature size. Stake lightly for the current season, but plan to improve the root environment or choose a sturdier, more compact cultivar. A floppy Russian sage is often a healthy plant in the wrong conditions, not a plant that needs more fertilizer.
Blackened or collapsing stems: Stop routine watering and inspect the root zone. Wet soil, poor drainage, or a saturated winter can lead to root and crown rot. If roots are pale and firm, improve drainage and allow the soil to dry. If the crown is mushy and the roots are broadly dark and decayed, removing the plant is safer than spreading the problem through a replacement in the same wet pocket. The RHS lists foot and root rots among the diseases that can affect Russian sage.
White powder on leaves: Powdery mildew is more likely when foliage is crowded, shaded, or slow to dry. Improve sun and airflow, water at the soil line, remove badly affected leaves, and clear fallen debris. Avoid using a generic fungicide without identifying the disease and checking the product label for the crop and site. A plant in a wet, crowded bed may keep relapsing until its growing conditions change.
Small insects: Aphids, leafhoppers, spider mites, whiteflies, and slugs can appear, but established Russian sage usually has few serious pest problems. Check leaf undersides and growing tips before treating; a strong water rinse may dislodge light aphid pressure. If feeding persists or the plant declines, get an identification from a local extension service before choosing a treatment.
Unwanted spread: Russian sage is not automatically invasive, but some plants can self-sow or widen through underground growth in favorable conditions. Remove seedlings while they are small, cut flower heads before mature seed if volunteers are unwelcome, and divide or dig out runners at the edge of a bed. Check your local invasive-plant list if you are planting near natural areas. Proven Winners notes that spread can vary by cultivar and that newer selections may be more restrained.
Conclusion
Grow Russian sage in the sunniest, fastest-draining place you have, water it consistently through its first season, then let the soil dry between deep drinks. Feed sparingly, leave healthy stems through winter, and cut the plant back to a low framework in spring before new growth gets tall.
If the plant flops, start with light and soil instead of fertilizer. If it fails to bloom, check shade, wet or rich soil, late pruning, and establishment age. Choose a compact named cultivar when space is tight, use softwood cuttings when you want an exact copy, and treat winter drainage as the deciding factor for long-term success.



