Spider Mites on Kale: Stippling, Webbing & Safe Fixes
Quick answer
Spider mites on kale show as pale stippling on older outer leaves plus fine silk on the undersides, usually after hot, dusty, or water-stressed spells. First step: isolate the plant, rinse the undersides of every leaf with a strong stream of water, then confirm live mites with a white-paper tap test before using soap or oil.
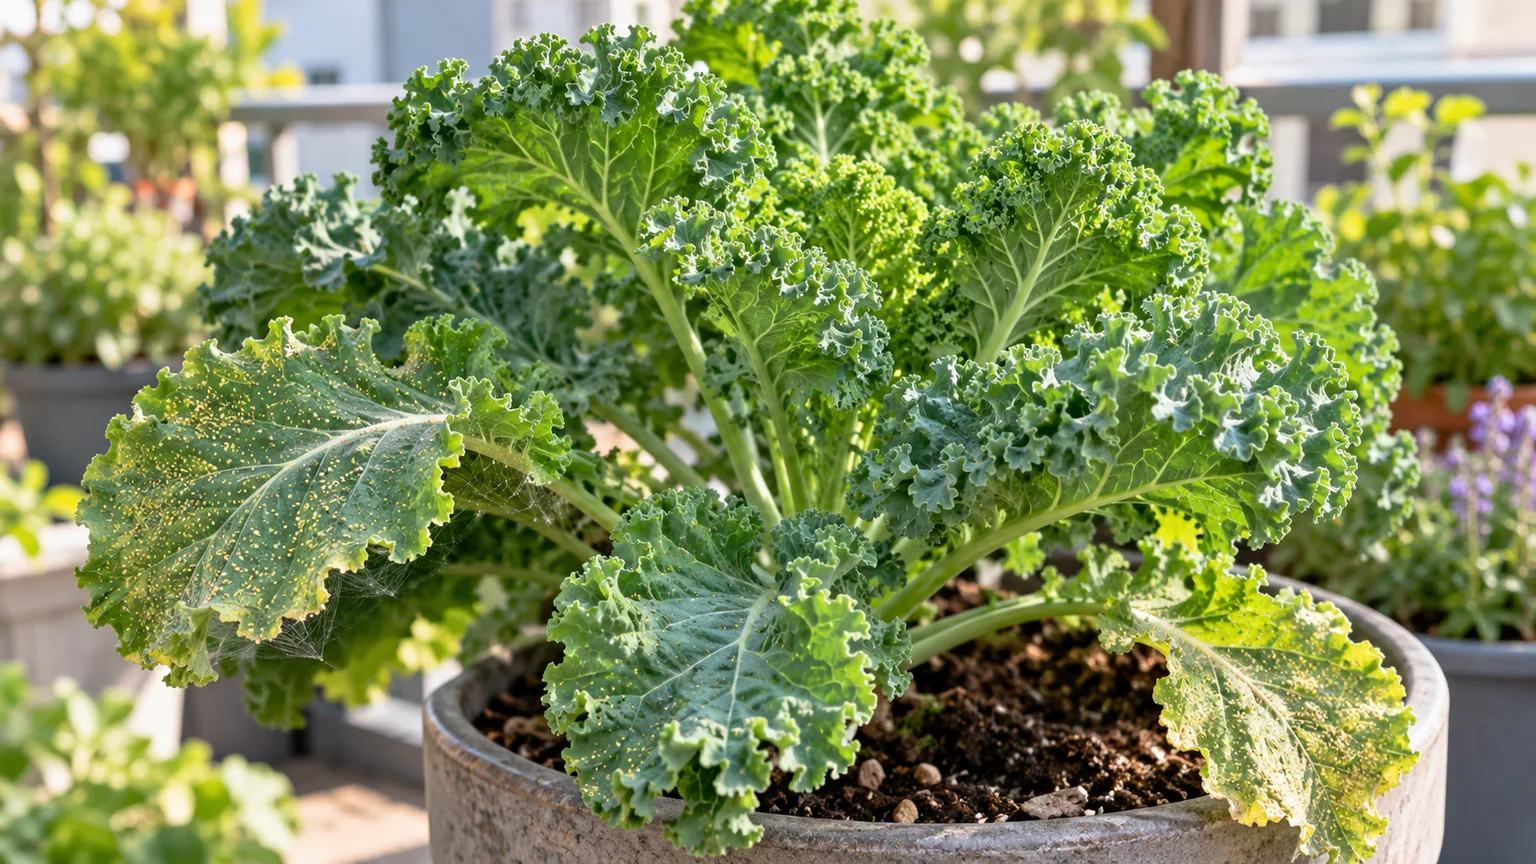
Spider Mites on Kale: Causes, Checks & Fixes
This guide covers spider mites on Kale. See also the general Spider Mites guide, watering, and light pages for this plant.
Spider Mites on Kale: Causes, Checks & Fixes
Quick answer
On kale (Brassica oleracea var. acephala), spider mites almost always mean the two-spotted spider mite feeding on leaf undersides. It sucks cell contents from the leaves, so the upper surface develops fine pale stippling that can turn bronze or yellow, and heavy colonies spin fine silk over leaf undersides and between leaves. Kale is a cool-season leaf crop, so outbreaks usually follow an unseasonable hot spell, a dusty balcony edge, or a stretch where shallow pots dried out.
For how spider mites feed, reproduce, and spread in general, see our spider mites pest guide. On kale, the practical pattern is stippled older outer leaves first, dust trapped in curly leaf folds, and harvest leaves that must be rinsed clean — not a generic houseplant misting routine.
First step: rinse the undersides of every leaf with a strong stream of water, then tap a suspect leaf over white paper to confirm live mites before spraying anything.
What spider mites look like on kale
Start with the leaves you harvest, not the crown. Unlike aphids, which pack into the central bud, spider mites usually colonize the undersides of the oldest full-size outer leaves first and move inward only as numbers build.
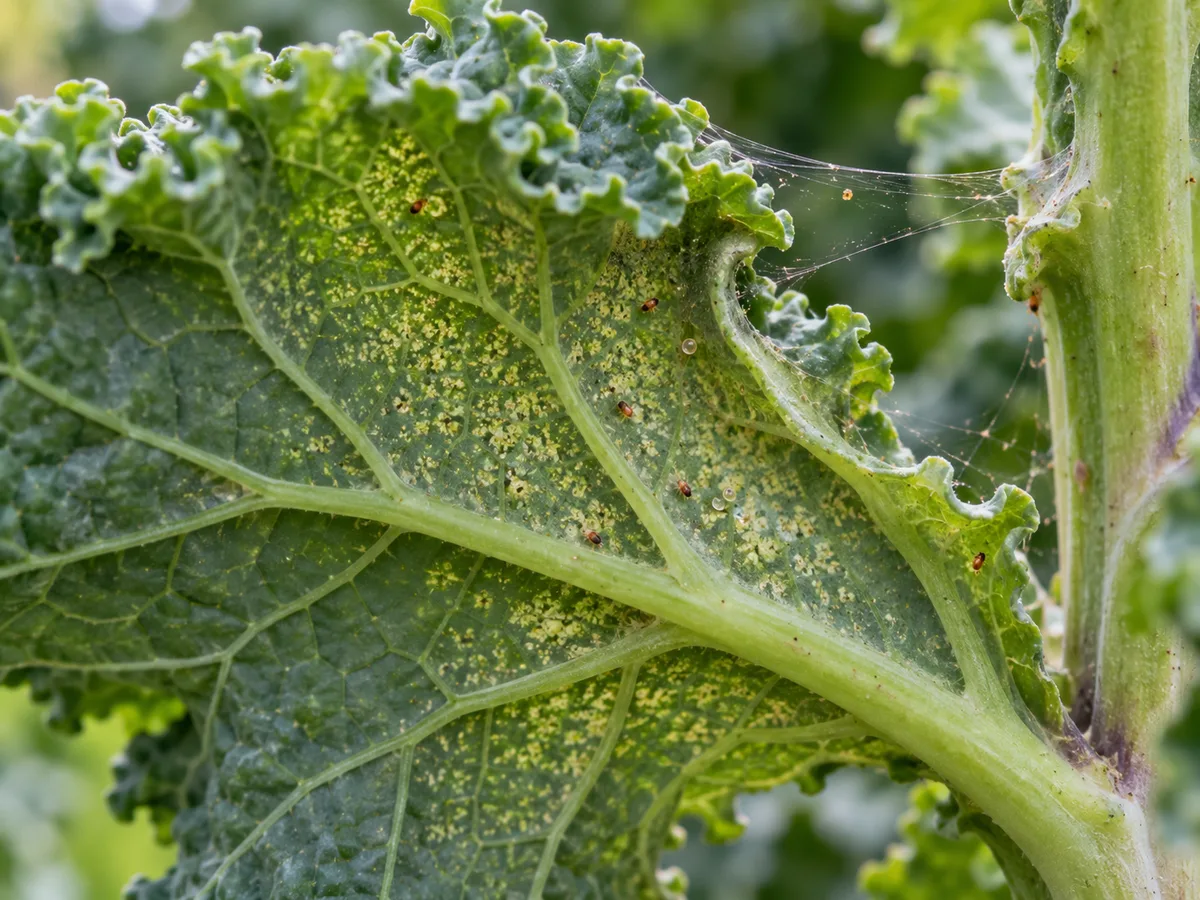
Pale stippling on the upper surface with fine silk and tiny mites on the underside of a kale leaf — compare with clean new growth from the central bud.
Typical signs on kale include:
- Pale stippling on the upper surface — hundreds of tiny light dots where mites emptied leaf cells; leaves later take on a yellowish or greyish cast
- Bronzing and crisping on heavily fed areas; badly infested leaves turn yellow and drop off
- Fine silk webbing on undersides and between leaf folds, easiest to see in low angled light — webbing is the fastest way to separate mites from aphids and thrips
- Dust caked in curly folds — curly and Savoy-type kale traps road and balcony dust exactly where mites establish first
- Tiny moving dots on the paper test; with a hand lens, adults are less than 1/20 inch long with eight legs, an oval body, and two eyespots, living in colonies of hundreds on leaf undersides
To the naked eye spider mites look like tiny moving dots best confirmed with a magnifying lens. Eggs are round and translucent on the undersides. If you see pear-shaped insects clustered in the bud with sticky honeydew, read aphids on kale instead; white cottony tufts in the axils mean mealybugs on kale.
Why kale gets spider mites
Kale does not invite mites the way it invites cabbage aphids. Mites are opportunists that exploit the exact moments a cool-season crop meets hot, dry, dusty stress.
A cool-season crop caught in hot dry weather. Kale produces its best leaves in winter sun, and in most Indian plains it runs October to March. Spider mites reproduce fastest in hot weather and commonly build from June through September, so late-season plants, overwintered seed stalks, and off-season summer attempts carry the highest risk. A warm balcony in April does to kale what a dusty roadside does to field vegetables.
Dust-trapping leaf texture. Curly kale, dwarf Scotch types, and Lacinato leaves are rugose — ridged, puckered, and folded. Those folds hold dust, and dusty conditions often lead to mite outbreaks. Smooth-leafed herbs on the same balcony may stay clean while the curliest kale plant stipples first.
Shallow roots that dry fast. Kale roots sit near the surface and need even moisture; containers that dry within a day leave plants water-stressed and highly susceptible to mite damage. Balcony pots beside a wall or road dry and dust over faster than beds, which is why one pot can flare while a ground bed stays clean.
Sprays meant for other pests. Kale growers spray for caterpillars, aphids, and whiteflies. Broad-spectrum insecticides, including carbaryl, some organophosphates, and some pyrethroids, kill mite predators and can trigger dramatic mite outbreaks within days. If stippling exploded a week after a caterpillar spray, the spray likely caused it.
Few predators on high balconies. Outdoors, predatory mites, lacewing larvae, minute pirate bugs, and lady beetles hold mites down. Pots behind mesh or many floors up get fewer of these visitors, so small colonies grow unchecked unless you rinse them off.
How to confirm the cause
Work in this order before mixing any spray:
- Read the upper surface — Even pale stippling across older outer leaves fits mites. Solid yellowing of the lowest leaves with no dots fits yellow leaves on kale from nutrition or watering instead.
- Flip and angle the leaf — Hold the leaf so light rakes across the underside. Fine silk strands and moving specks confirm mites; sticky honeydew with black film means aphids instead.
- Do the white-paper test — Hold white paper under a suspect leaf and tap sharply. Dislodged mites appear as tiny specks that move on the paper. Press-and-smear leaves a streak.
- Magnify before you decide — A hand lens or phone macro should show oval eight-legged mites and round eggs. Fast-running specks without webbing, white flying clouds when brushed, or cottony masses point to other pests in the kale problems hub.
- Check the stress history — Recent heat, dust storms, missed waterings, or a broad-spectrum spray in the last two weeks all raise mite likelihood. Whole-plant limp wilt with dry deep soil fits underwatering on kale; wilt with heavy wet mix fits overwatering on kale instead.
- Look for predators — Longer-legged, fast, teardrop-shaped mites among the slow feeders are likely predatory mites; leave them working and hold broad sprays so they finish the job.
Confirmed diagnosis needs stippling plus webbing or moving mites on the paper test — pale leaves alone are not enough.
First fix for kale
Rinse every leaf underside thoroughly, then re-inspect in three days.
Take the plant to a tap, hose, or shower and blast the undersides of all leaves — including curled bases and stem joints — until water runs off. A strong stream of water knocks most mites off the leaves, and sturdy kale foliage takes it well. Rinse all parts of the plant, not just the worst leaf.
Do not start with oil or soap on day one. Contact sprays only work where they touch mites, and webbing plus curled folds shield colonies from a first pass. Rinsing removes mites, dust, and webbing together, and the paper test three days later tells you whether living mites remain. Keep the plant isolated from other brassicas until the re-check.
Step-by-step recovery
When rinsing leaves live mites behind, escalate in this order:
- Strip the worst leaves — Harvest or clip badly bronzed outer leaves into a bag for disposal. Removing them takes thousands of mites and eggs off the plant in seconds and opens the crown for the next rinse.
- Repeat the water blast — Rinse undersides again, at least once a day on small gardens until numbers fall, always with good underside coverage. Morning rinsing lets leaves dry by evening.
- Apply insecticidal soap or horticultural oil — Use a product labelled for edible vegetables. Soaps and oils must contact mites to kill them, so cover the undersides completely, spray in the cool of the evening, and never spray water-stressed plants or when temperatures exceed 90°F. Test one leaf first and check the label’s waiting period before harvest.
- Repeat to catch hatchlings — Eggs survive contact sprays, so treat every five to seven days for two to three cycles. One spray never ends a mite outbreak on regrowing kale.
- Protect the predators — Avoid broad-spectrum insecticides while recovering; creating favorable conditions for naturally occurring predators beats repeated releases on a home balcony. If caterpillars need control, use targeted Bt on chewed leaves only.
- Fix the stress that invited them — Return to even moisture per the kale watering guide, hose dust off paths and foliage, and confirm the pot size and mix in the kale soil guide and kale repotting guide. Mites rebound fastest on plants that stay dusty and thirsty.
- Hold the fertilizer — Do not feed to push through the damage. Resume the seasonal schedule in the kale fertilizer guide only after new leaves open clean.
- Wash what you harvest — Rinse harvest leaves under running water and discard webbed or gritty outer leaves in the garden. Soaps and oils need their label waiting period; water rinsing does not.
Recovery timeline
Stippled and bronzed patches do not heal. Judge everything by the central bud and the newest leaves.
- 3 days — After rinsing, the paper test should show far fewer moving specks and no fresh webbing on the newest leaves.
- 7–14 days — With repeat rinses or soap cycles, new leaves should open flat and green with little stippling; predator mites may be visible hunting.
- 3–4 weeks — Steady cut-and-come-again harvest resumes if the bud stayed alive, following the rhythm in the kale pruning guide. Plants whose growing point stalled or that dropped most leaves late in the hot season are better replaced than nursed.
Worsening signs: webbing spreading to the crown and young leaves, continued yellowing and leaf drop despite two treatment rounds, whole-bed spread to cabbage or collards, or virus-like mottling and severe stunting after heavy feeding — the last case means removing the plant to protect its neighbors.
Lookalike symptoms
| Pattern | Read next |
|---|---|
| Grey mealy clusters packed in the growing point with sticky honeydew | Aphids — sap feeders in the bud, not stippling mites |
| White cottony tufts in leaf axils and stem joints | Mealybugs — stationary waxy masses, no webbing |
| Yellow lower leaves with no dots, silk, or insects | Yellow leaves — nutrition or watering |
| Whole-plant limp wilt, dry soil at depth | Wilting or underwatering — no stippling pattern |
| Droop with soggy heavy mix | Drooping leaves or overwatering — fix drainage first |
| Stunted pale growth, no pests found | Slow growth — light, pot size, or season limits |
| Tiny white insects flying up in a cloud when brushed | Cabbage whitefly — mealy aphid and whitefly controls differ; confirm with a lens |
Mistakes to avoid
Do not hose only the tops of the leaves. Mites live underneath, so a top-down shower leaves the colony intact while scattering webbing everywhere.
Do not spray soap or oil at midday in heat. Wet waxy kale plus oil above 90°F risks leaf injury; evening application on a day when leaves dry by night is the safer pattern.
Do not reach for a broad-spectrum insecticide first. It kills the predators holding mites down and commonly causes mite populations to spike within days.
Do not assume one treatment finished the job. Eggs hatch after every round, so skipped follow-ups rebuild colonies while you think the plant is cured.
Do not keep harvesting webbed leaves without washing. Strip the worst outer foliage in the garden and rinse the rest under running water before it reaches the kitchen.
How to prevent spider mites next time
Prevention on kale is mostly dust, water, and spray discipline, because the crop sits through the mite’s favorite weather at the edges of its season.
- Water evenly for shallow roots — Follow the finger test in the kale watering guide: water deeply when the top 2–3 cm dries and empty saucers after drainage. Even moisture keeps leaves tolerant when heat arrives.
- Wash dust away — Hose foliage undersides and nearby paths during dry spells. Applying water to dusty areas at regular intervals is a first-line cultural control around vegetables.
- Space for airflow and light — Give kale the sun and room in the kale light guide and kale overview so leaves dry cleanly and scouting stays easy. Crowded baby-leaf rows need closer underside checks.
- Scout undersides weekly in warm spells — Check the oldest leaves and curled bases on the same rhythm as outer-leaf harvests. Early colonies on one plant take minutes; webbed crowns take weeks.
- Keep predators alive — Avoid dusty conditions and unnecessary sprays so predatory mites, lacewings, and minute pirate bugs can hold mites down. A diversity of flowering neighbors helps more than a purchased bottle on a balcony.
- Rotate away from brassicas — Do not follow kale with cabbage, collards, or broccoli in the same soil, and clear old stalks that carry pests between plantings.
Match container size and seasonal timing to the cultivar with the kale repotting guide and the kale propagation guide so plants mature leaves quickly past the most vulnerable stage.
When to use this page vs other kale guides
Use this page when the main finding is pale stippling plus fine webbing or moving specks on the paper test. Start with the kale overview if you need cultivar identity, sowing windows, or harvest basics first.
If buds are packed with mealy clusters and honeydew instead, move to aphids. If leaves pale without dots or silk, move to the kale problems hub and compare nutrition and watering pages. For routine moisture rather than pests, the kale watering guide is the right entry.
Related kale guides
- Kale overview — cultivars, cool-season timing, and harvest basics
- Kale problems — full symptom index for this plant
- Kale watering — even moisture for shallow brassica roots
- Kale light — winter sun and heat-stress response
- Kale soil — fertile, moisture-retentive but drained mix
- Kale fertilizer — steady feeding without pest-friendly flushes
- Kale pruning — outer-leaf harvest without damaging the crown
- Kale repotting — final container size for vigorous plants
- Aphids on kale — bud-cluster lookalike with honeydew
- Mealybugs on kale — cottony axil-mass lookalike
Conclusion
Spider mites on kale are an outer-leaf and dust problem driven by hot dry stress — not a whole-garden mystery. Learn the stippling-plus-silk pattern, check undersides weekly when heat arrives, rinse before you spray, and reserve soaps or oils for colonies that survive rinsing. Clean new leaves from a living central bud are the recovery signal; old stippled foliage can be harvested away without guilt.
Related tool
Use the Pest Identifier Tool to narrow causes for spider mites on this plant before changing multiple variables at once.