Alocasia Sarian Care: Light, Water, Soil, and Growth
Grow Alocasia Sarian with a practical routine for light, water, humidity, soil, feeding and propagation, plus clear fixes for yellow leaves and brown tips.
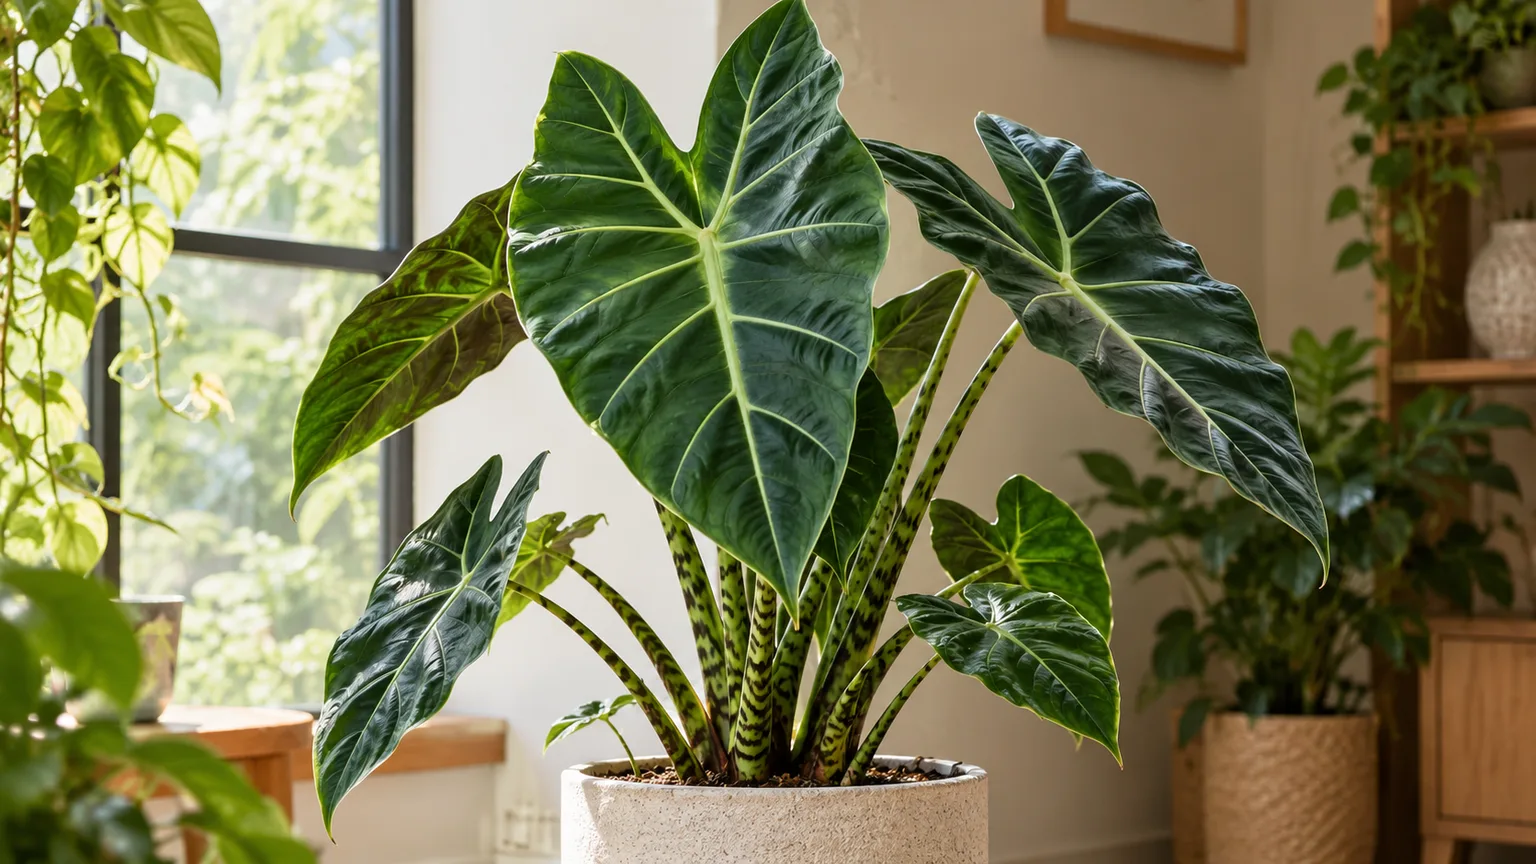
Alocasia ‘Sarian’ makes its biggest impression when the leaves have room to spread and the plant gets steady warmth, bright filtered light, and a root zone that stays lightly moist without turning airless. The routine is less about watering on a certain weekday and more about matching water to how quickly the pot dries in your room.
This is a tropical aroid, so a warm indoor spot with good light is usually easier than a dim bathroom or a summer outdoors without a plan for cool nights. Start with a pot that drains, check the mix before watering, and treat a yellow leaf as a clue to investigate rather than a diagnosis by itself.
Know What Alocasia ‘Sarian’ Is Before You Set It Up
The plant is usually sold as Alocasia ‘Sarian’ or elephant ear, not as a formally accepted species named Alocasia sarian. NC State Extension’s Alocasia profile lists ‘Sarian’ as a cross of A. zebrina and A. micholitziana. Kew’s Plants of the World Online entry for A. macrorrhizos recognizes that name as an accepted species, but that species status does not establish ‘Sarian’ as one of its varieties; check the nursery label and avoid treating the names as interchangeable.
This distinction matters most when you compare photos, mature-size claims, or care advice. Sellers may use “Sarian,” “Sarian hybrid,” or broader elephant-ear labels inconsistently, and plants grown under the same label can differ in leaf size and markings. NC State’s Alocasia profile is the clearest available horticultural listing for the hybrid name; the culture below combines that genus-level guidance with Sarian-specific grower advice rather than pretending every care number has been tested on one clone.
Look for upright, arrow-shaped leaves with prominent pale veins and long petioles that may show dark striping. The plant can become a substantial floor specimen: a Sarian-specific care guide reports about 3 to 4 feet indoors, but light, pot size, and the plant being sold under the name all affect the result. Plan for a broad canopy and a stable pot, and leave space between leaves and walls so you can inspect both sides of the foliage.
A Quick Care Profile for a Roomy, Warm Spot
Use the table as a starting point, not as a rigid recipe. A plant near a sunny window in a small plastic nursery pot will dry at a different rate from one in a large glazed planter across the room.
| Need | Practical starting point | What to watch |
|---|---|---|
| Light | Bright, filtered daylight; gentle morning sun can work | Bleaching or scorch suggests too much direct sun; long, weak petioles suggest too little light |
| Water | Water when the upper 1 to 2 inches of mix have begun to dry | Do not let the pot sit in runoff or dry bone-dry for extended periods |
| Mix | Rich but airy aroid mix with drainage holes | A sour smell, persistently wet mix, or soft roots points to poor aeration |
| Temperature | Roughly 65 to 80°F (18 to 27°C), away from cold drafts | Growth slows in cool conditions; protect it from chilly nights and frost |
| Humidity | Moderate to higher indoor humidity; measure near the leaves | Fix dry air only after checking watering, salt buildup, light, and pests |
| Feeding | Dilute balanced fertilizer while new leaves are actively growing | Pause when growth stalls and flush the pot if a crust forms on the mix |
The reliable setup is a bright room, an evenly warm position, and a potting medium that can hold water between checks while draining freely after a soak. If one condition is weak, changing several others at once makes it harder to see what helped; adjust one factor, then watch the newest leaf and the mix over the next few weeks.
Light: Keep It Bright Without Baking the Leaves
Place Sarian where it receives bright, indirect light for much of the day: near an east-facing window, behind a sheer curtain, or several feet back from a strong south- or west-facing window. The exact distance depends on glass, season, and outdoor shade, so use the leaf response instead of a measuring tape as your final guide. A little early morning sun can be tolerated after gradual acclimation, while concentrated midday or afternoon sun through glass may scorch the blade.
A quick test is to hold your hand between the plant and the window at midday. A hard-edged, dark shadow indicates stronger sun; a soft, blurry shadow suggests filtered light. If you move a plant from a dim shop or a shaded corner, shift it closer to the window over a week or two rather than exposing all its foliage to a sudden jump in intensity.
Light changes the watering routine. In brighter conditions Sarian can grow and use water faster; in winter or a dim room, the same pot may stay damp much longer. That is why moving a yellowing plant into stronger sun without checking its roots can compound stress, and why a north-facing room may call for a grow light rather than more fertilizer.
Water: Moisten the Root Ball, Then Give It Air
Water when the top 1 to 2 inches of mix feel dry, but the lower root zone is still slightly moist. Press a finger into the mix or use a clean wooden skewer near the pot wall; if it comes out cool and damp, wait and check again. A fixed weekly schedule is unreliable because a mature plant in bright warmth can drink quickly while a freshly repotted plant in cool, low light may stay wet for many days.
When it is time, water slowly over the surface until excess runs from the drainage holes. Let the pot finish draining, then empty the saucer or outer cachepot so the roots do not sit in standing water. If the mix has pulled away from the sides and water races straight through, apply it in two passes a few minutes apart so the root ball has time to absorb moisture.
The goal is not “wet all the time.” Roots need both moisture and oxygen, and a dense mix that stays saturated can deprive them of air even when the leaves look thirsty. Conversely, repeatedly letting the entire root ball dry hard can cause curling, crisp edges, and drooping; Sarian-specific guidance from Plantophiles and Quirky Plants both emphasize checking moisture rather than relying only on a calendar.
Before watering a struggling plant, inspect the pot and the base of the stems. A sour smell, mushy roots, or a softening corm is a reason to unpot and check for rot; a dry pot that feels unusually light points in the opposite direction. In the cooler, darker part of the year, check less often and water only when the mix reaches the same dry-down cue—do not cut water simply because a date changed.
Build an Aroid Mix That Drains but Holds Moisture
Sarian needs a medium that stays evenly moist between waterings but does not collapse into a dense, airless block. A useful home mix is two parts quality indoor potting mix or coco-based mix, one part orchid bark, and one part perlite or pumice. This is a practical starting blend, not a cultivar-specific formula; if your home is very warm and dry, keep a little more fine mix, while a cool room or heavy-handed watering calls for more coarse bark and drainage.
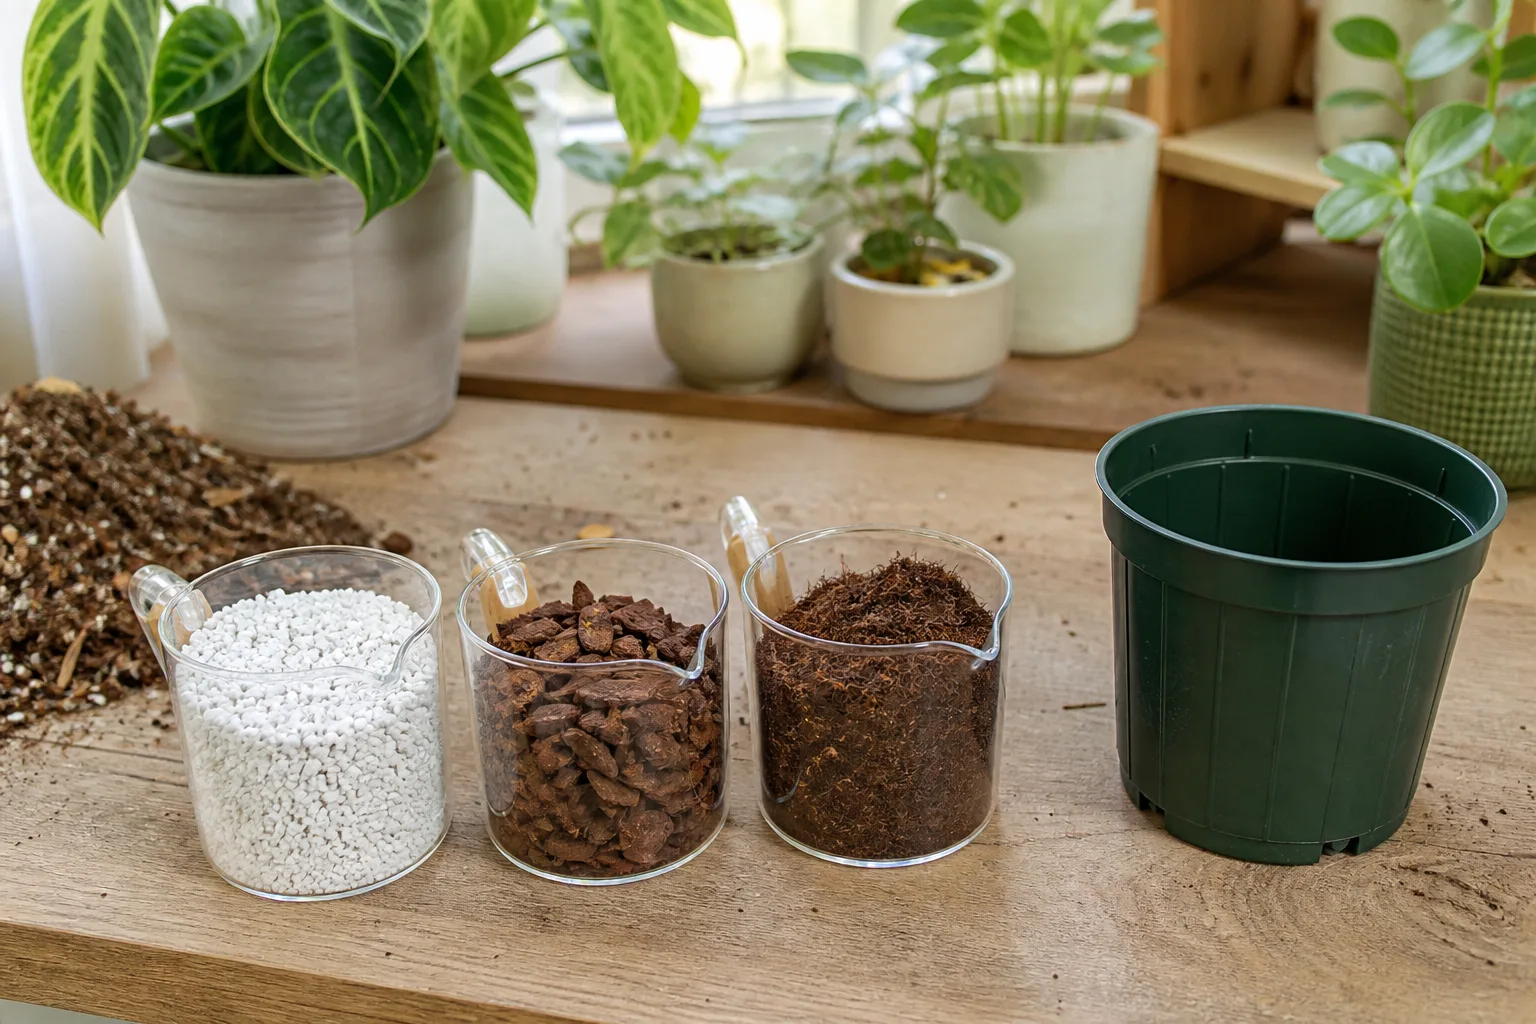
Avoid pure garden soil, heavy outdoor compost, or a potting mix that packs tightly after repeated watering. At the other extreme, an almost all-bark blend may dry too quickly for a large-leaved plant unless you can check it often. You do not need to chase a precise pH number indoors; focus on a fresh, slightly acidic-to-neutral mix that drains and still holds enough water for the roots between checks.
Choose a pot with several unobstructed drainage holes. A plastic nursery pot inside a decorative cachepot is easy to water and inspect; glazed ceramic also slows drying, while unglazed terracotta can dry a large plant faster and may require more frequent checks. Do not add gravel to the bottom to “improve drainage”—it reduces usable root depth without correcting a compact mix.
Temperature and Humidity: Warm, Steady Air Beats a Bathroom Label
Keep the plant in a comfortably warm room, roughly 65 to 80°F (18 to 27°C), away from cold windows, exterior doors, heating vents, and air-conditioning blasts. A brief dip is different from nights that repeatedly stay chilly; persistent cool conditions can stall growth and make a wet pot much slower to dry. Move it away from cold glass in winter, and do not leave it outdoors when nighttime temperatures are sliding toward 60°F (16°C).
Sarian appreciates moderate-to-higher humidity, but a hard minimum does not apply to every home or every plant. A hygrometer placed near the canopy can tell you whether air at leaf height is dry; a practical indoor target around 50 to 60 percent may help reduce crisp edges, yet leaves can still brown from underwatering, salt accumulation, direct sun, or root problems. Fix the cause you can observe rather than assuming every brown tip needs more moisture in the air.
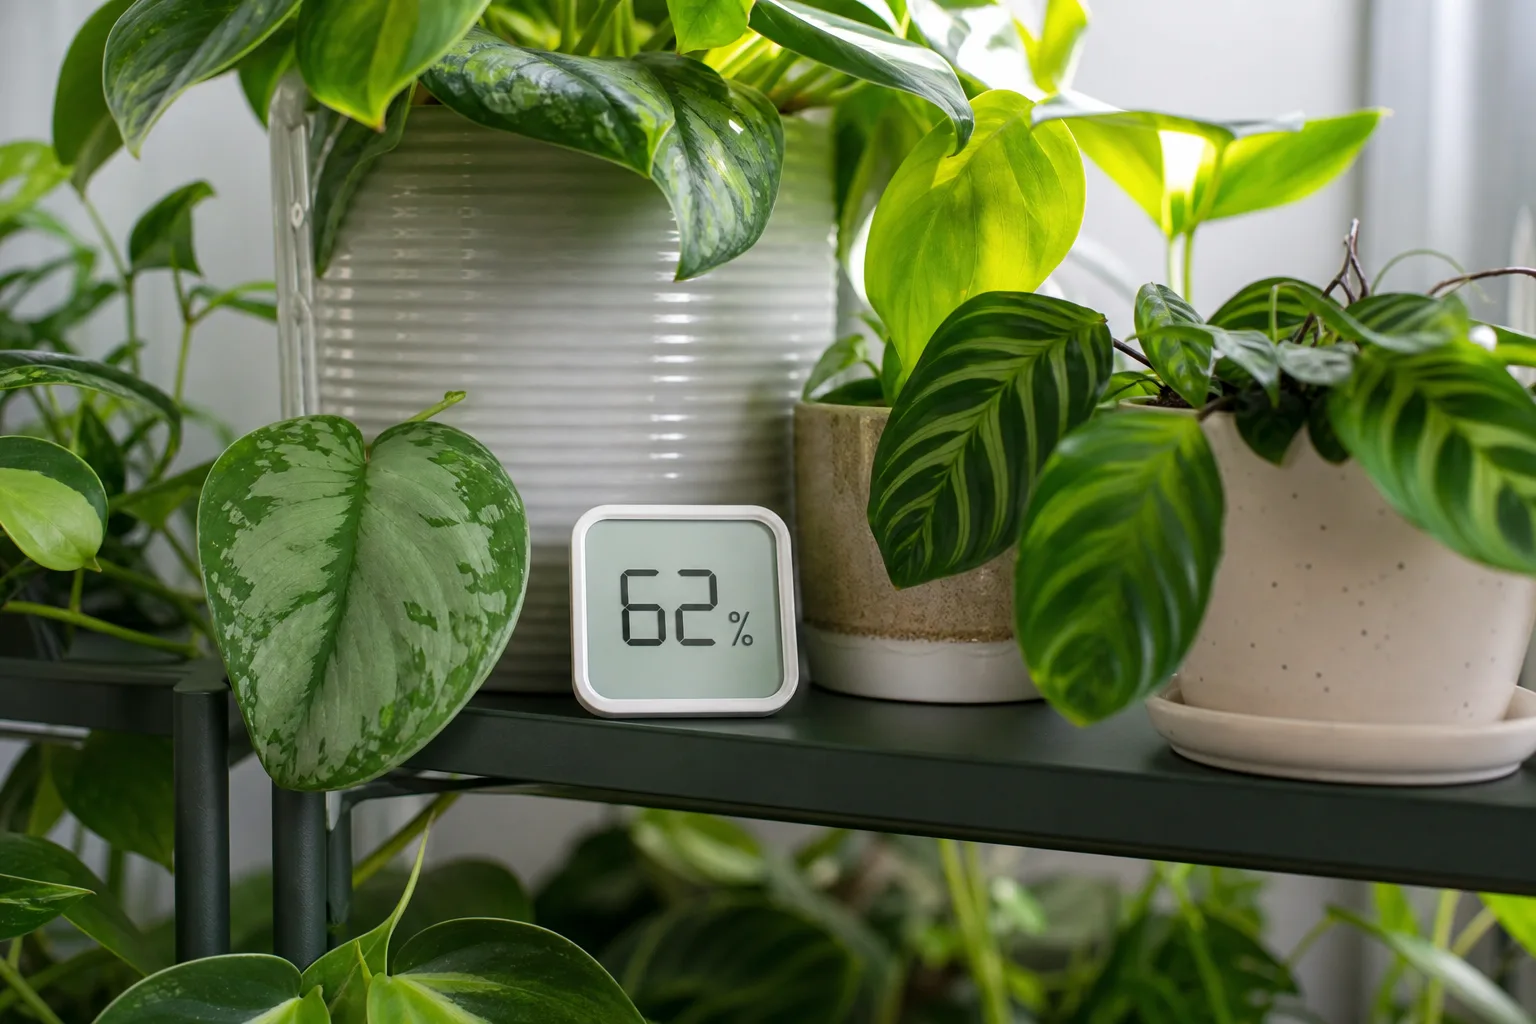
A clean room humidifier is the most predictable way to raise humidity around a collection; leave enough airflow that leaves are not constantly wet. Grouping plants can slightly buffer dry air, but misting gives only a short-lived change and can leave mineral spots. A bathroom is suitable only if it also has adequate natural or grow-light exposure and the plant stays warm: steam cannot compensate for darkness, and a bathroom that remains cool or poorly ventilated can create other problems.
Fertilizer: Feed Only While Leaves Are Growing
When Sarian is actively producing leaves, feed with a balanced liquid houseplant fertilizer diluted to about half the label rate every three to four weeks. The exact product strength varies, so follow its label and begin conservatively; a large dose does not make a new leaf appear faster if light, temperature, or root health is limiting growth. Sarian-specific sources differ on feeding frequency, which is another reason to begin with a modest amount and watch the plant rather than stack fertilizer products.
Pause or reduce feeding when growth slows in winter, after repotting, or when the plant is stressed. Water-soluble nutrients can accumulate as salts, especially when a pot is not flushed; a white crust at the soil surface, burned tips, or a decline after repeated feeding calls for a thorough flush with plain water and a break from fertilizer. If symptoms persist after salts are removed, inspect roots and light instead of adding a different nutrient by guesswork.
A mature plant in fresh, nutrient-containing mix may need less fertilizer for a while than a fast-growing plant in a small pot. Resume feeding gradually when a new leaf emerges and the room is warm and bright enough to support growth. Never fertilize a bone-dry root ball; water first or feed with a diluted solution during a normal watering.
Growth, Dormancy, and Ordinary Leaf Turnover
A new Alocasia leaf arrives rolled, then slowly unfurls and hardens. During that transition, the plant may shed an older leaf, especially after a move, repotting, or seasonal change; one aging leaf does not automatically mean the whole plant is failing if the corm feels firm and newer foliage looks healthy. Keep care steady while a leaf unfurls instead of moving the pot, increasing fertilizer, and changing the watering pattern all at once.
Growth often slows when days shorten and the room cools. Some Alocasias can lose much of their foliage during a pronounced dormant period, while others retain leaves indoors; the response depends on the plant and the conditions, so do not assume every Sarian will go fully dormant on a fixed schedule. If leaves decline, check whether the base is firm, whether the mix is staying wet, and whether the plant is still receiving useful light before deciding to reduce water or unpot it.
Sarian can also make a small aroid flower: a pale spathe around a spadix. Indoor bloom is not the main measure of success, and a flower does not replace the need to keep the leaves clean and the root zone healthy. Wipe dust from broad leaves with a damp soft cloth so light reaches the surface, supporting the plant without coating it in leaf shine.
Repot When Roots or Mix Show It, Not by the Calendar
Repot when roots are densely circling the pot, emerging through several drainage holes, or the mix has broken down and stays wet much longer than before. A calendar interval such as every one or two years is only a prompt to inspect, not an instruction; if the plant is stable and the medium drains well, repotting can add stress without fixing anything. After transport or a recent move, give a healthy plant time to acclimate before disturbing its root ball.
Choose a pot only one size larger—usually about 1 to 2 inches wider than the current root mass—with drainage holes. An oversized container holds a larger volume of wet mix around roots that cannot use it yet, extending dry-down and increasing rot risk. Slide the plant out gently, tease away only loose exhausted mix, and trim any distinctly black, mushy, or foul-smelling roots with a clean tool; leave firm roots intact.
Set the corm at roughly its prior soil level rather than burying the stem bases under several inches of new mix. Backfill around the roots, water until it drains, and return the plant to bright indirect light. Hold fertilizer until you see stable new growth, and do not repeatedly pull the plant out of the pot to check progress; a brief pause after repotting is common.
Propagate from a Corm or Offset, Not a Leaf
Sarian is propagated by separating a rooted offset or a viable corm, not by placing a leaf or cut petiole in water. NC State Extension lists division as an Alocasia propagation method, and Sarian growers describe offsets around the base of established plants. The easiest time is during active spring or summer growth, when warmth and brighter days give a small division a better chance to establish.
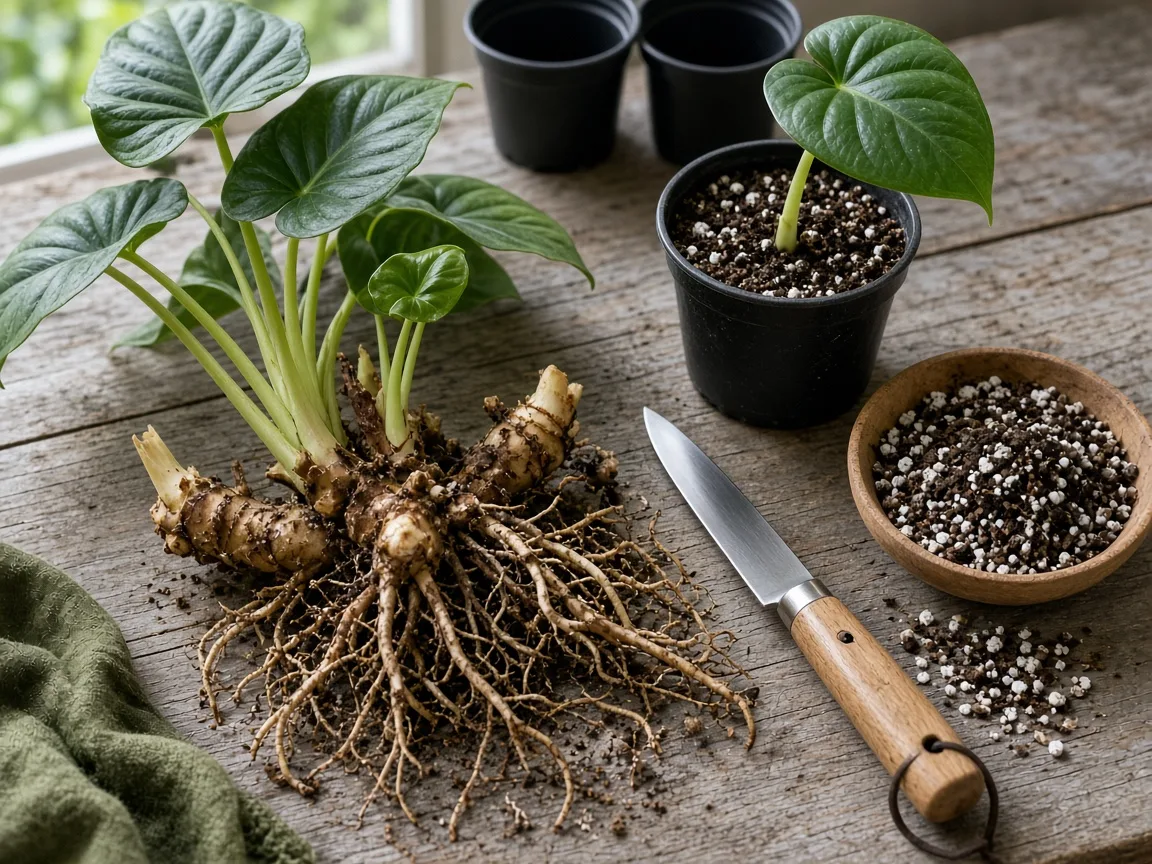
Look for a small plant with its own leaves and roots, or a firm corm that can be separated without tearing the parent apart. Wear gloves and use a clean, sharp knife if separation requires a cut, because Alocasia sap can irritate skin and mouth. Do not dig deeply just to harvest every tiny corm: a small, dormant corm may take a long time to sprout, and disturbing the entire root system can set back the main plant.
For an offset, pot it into a small container with drainage and fresh airy mix, keeping the base at the same depth it grew before. For a corm, orient the pointed growth end upward if visible and cover it lightly; keep the medium barely moist, warm, and bright but out of direct sun. A clear propagation box can conserve moisture, but open it regularly for air and remove condensation if the medium turns waterlogged.
New roots and a fresh leaf—not a calendar estimate—show that a division is establishing. Keep the parent and offsets away from cold drafts, and avoid heavy fertilizer until roots are functioning. If there are no offsets or corms visible, wait; Alocasia propagation is not improved by chopping a healthy leaf from the plant.
Move It Outdoors Only When Nights Stay Warm
In a frost-free tropical or subtropical climate, Sarian can grow outdoors in a sheltered position, but the plant name alone does not guarantee year-round hardiness in a given USDA zone. In colder regions, treat it as a warm-season container plant and bring it back inside before cool nights, not after frost threatens. A conservative trigger is to move it when nighttime temperatures are forecast to approach 60°F (16°C), especially if the plant is in a pot exposed to wind.
Acclimate it gradually over a week or more: start in bright shade, then offer gentle morning light if leaves remain undamaged. Avoid harsh afternoon sun and exposed wind, which can tear broad blades or dehydrate them faster than the roots can replace water. Outdoors, rainfall can keep the pot saturated, so check drainage after storms and move the container under cover during prolonged wet spells.
Before bringing it indoors, inspect leaf undersides, petiole joints, and the soil surface for mites, scale, aphids, and mealybugs. Rinse or wipe the foliage if needed, let it dry, and keep the plant separate from the collection while you monitor for hitchhikers. The outdoor season can add light and growth, but it also adds pest pressure and a sudden indoor transition; move it before the plant is chilled or covered in insects.
Catch Pests and Rot Before They Spread
Check both sides of the leaves and where each petiole meets the stem at least weekly. Spider mites may leave fine webbing, pale stippling, or a dusty look; mealybugs can resemble white cotton in protected joints, while scale insects cling as small bumps. NC State Extension notes that Alocasias can be affected by spider mites, aphids, and mealybugs, so isolate a suspect plant before treatment rather than waiting for nearby leaves to show damage.
Start with physical removal: rinse the foliage, wipe leaf surfaces, and remove heavily infested leaves if needed. If you use insecticidal soap or horticultural oil, choose a product labeled for indoor ornamentals and follow its directions, including any cautions about testing a small leaf area and avoiding strong light during application. Repeat inspection matters because an apparently clean leaf today does not prove the pest life cycle has ended.
Root rot is a root-zone problem, not a leaf color by itself. A pot that stays wet, a sour odor, and dark soft roots together justify unpotting, removing rotted material with a sterile blade, and moving the plant into fresh airy medium and a clean pot; a single yellow leaf with firm roots does not. Improve drainage and correct the watering rhythm before reaching for a fungicide, and discard contaminated old mix rather than reusing it.
Troubleshoot the Pattern, Not One Damaged Leaf
Several different problems can produce the same visible symptom, so check the newest growth, older leaves, pot weight, mix moisture, light, and leaf undersides before changing care. The most helpful question is whether damage is isolated or spreading across several leaves.

Yellow Leaves: Check Age, Water, and Roots
If the oldest leaf yellows slowly while a new one is unfurling and the rest of the plant stays firm, ordinary turnover is plausible. Remove the leaf only once it has mostly yellowed, using clean shears at the base; green tissue still contributes to the plant, so avoid stripping several leaves at once for appearance.
If several leaves yellow together, check the mix before adding water or fertilizer. A heavy pot with damp soil and soft roots points toward overwatering or poor drainage; a very light pot with dry mix suggests underwatering; pale stretched growth suggests inadequate light. Correct the condition that matches what you find, then give the plant time to respond rather than treating yellow as a nutrient diagnosis.
Brown Tips and Spots: Compare Air, Salts, and Sun
Dry, crispy edges can follow low indoor humidity, but they also occur when the root ball repeatedly dries too far or fertilizer salts build up. Check a nearby hygrometer and the soil surface; if the meter shows dry air, a humidifier may help, while a crusted mix or recent heavy feeding calls for flushing and a fertilizer pause. Brown areas on the window-facing side suggest sun scorch, especially when they appeared soon after moving the plant.
Small spots with webbing, sticky residue, or stippling call for a pest inspection rather than a humidity adjustment. Keep leaves dry overnight and allow air to circulate, particularly in a crowded corner. Trim only fully dead tissue; brown edges will not turn green again, so focus on protecting new leaves instead of cutting healthy sections into a different shape.
Drooping or Soft Petioles: Check the Root Ball First
A dry root ball can make leaves sag and petioles lose tension; if the mix is dry several inches down and the pot is light, water thoroughly and let it drain. A wet, heavy pot with droop calls for the opposite response: pause watering, confirm the drainage holes are open, and inspect the base for rot if the stems are soft or the odor is sour. Do not water simply because a leaf looks limp.
After a move or a new leaf unfurling, a petiole may lean temporarily while it firms up. Give the plant consistent bright indirect light and a stable position; a loose support can prevent a heavy leaf from tipping the pot while it recovers. If several petioles collapse and the corm itself is soft, treat the situation as a root or cold injury problem, not a posture problem.
Slow Growth or Smaller Leaves: Fix the Limiting Condition
Alocasia may pause during short, cool days, but repeated small leaves during warm active months often signal insufficient light, cramped roots, or a depleted mix. Move the plant to brighter filtered light first if its petioles are stretching toward a window, and inspect for root crowding if water runs through almost immediately or the pot dries unusually fast. Feed only after the plant is growing and the roots look healthy.
New leaves that remain smaller for one cycle may reflect the energy spent acclimating after purchase or repotting. Do not respond with multiple fertilizer doses or a much larger pot; either can create excess salts or wet soil without solving the cause. Compare the newest leaf over several weeks, keep the routine stable, and adjust one limiting condition at a time.
Keep People and Pets Away From the Sap
Treat Alocasia ‘Sarian’ as toxic if chewed or swallowed. The ASPCA’s Alocasia entry lists the genus as toxic to cats, dogs, and horses because of insoluble calcium oxalates, with mouth irritation, pain, drooling, vomiting, and difficulty swallowing among the signs. Poison Control’s Alocasia guidance explains that chewing plant material can irritate the lips, mouth, tongue, and throat; these are genus-level sources, not a separate safety test on every named cultivar.
Put the pot where pets and young children cannot chew leaves or reach fallen plant pieces. Wear gloves when pruning, repotting, or separating offsets, and wash skin and tools afterward; avoid touching your face or eyes while handling sap. If a person chews the plant or has a concerning reaction, follow local poison-center advice; if a pet ingests it, call a veterinarian or animal poison-control service promptly rather than waiting to see whether swelling worsens.
Conclusion
Give Sarian bright filtered light, steady warmth, an airy mix, and enough water to keep roots lightly moist while excess drains away. Check the mix before each watering, scale back when winter light slows drying, and diagnose yellow or brown leaves by looking at their pattern and the root zone. Once those basics are stable, repot only when needed and propagate only from a rooted offset or viable corm; keep the plant out of reach of children and pets.



