Should You Mulch a Vegetable Garden? The Real Answer
Should you mulch a vegetable garden? Learn which materials work, how deep to apply them, when to wait, and how to avoid rot, weeds, and nitrogen problems.
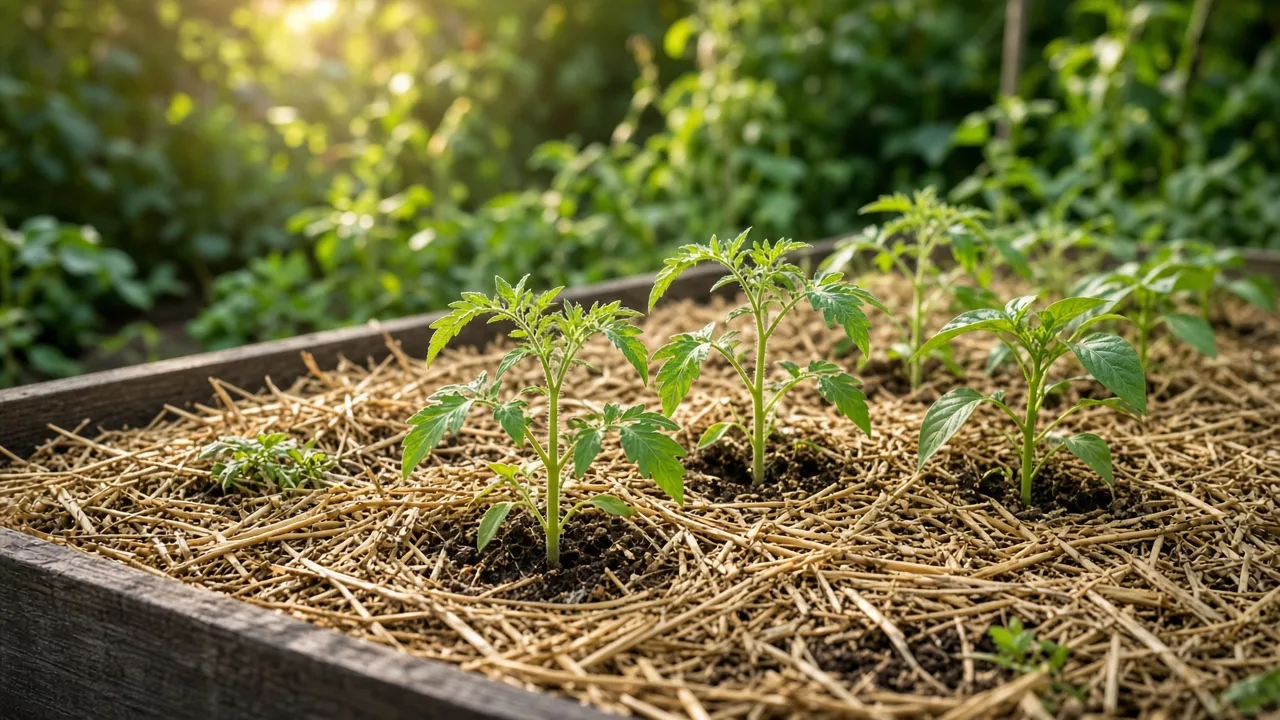
Yes—most vegetable gardens benefit from a layer of clean organic mulch, but “add three inches everywhere” is incomplete advice. Mulch works best when the soil is already prepared, the crop is established enough not to be buried, and the material is free of persistent herbicides, weed seeds, disease, and excess moisture.
The practical answer is to mulch the spaces between plants and rows after the soil has warmed and the seedlings have settled. Use a finer, faster-decomposing material around annual vegetables, reserve chunky wood products for paths or long-season plantings, and leave a small air gap around every stem. The goal is not a pretty brown surface. It is a controlled soil environment that needs less weeding and loses less water while still draining freely.
The short answer: mulch most beds, but not every situation
Mulch is particularly useful in an exposed in-ground bed, a raised bed that dries quickly, or a garden where rain repeatedly splashes soil onto leaves. It shields the surface from sun and wind, slows evaporation, softens the impact of heavy rain, and makes it harder for small weed seeds to reach light. As organic materials break down, they also add carbon and contribute to soil structure, although mulch is not a substitute for a balanced fertilizer or a properly made compost amendment.
You may want to wait when the soil is cold and saturated in spring. A dark, wet layer can slow warming and keep the crown of a small transplant damp. Wait until the bed drains and the crop has put on new growth. Skip or thin mulch where slugs are already severe, rodents are nesting, the surface stays waterlogged, or you need bare soil for direct-sown seeds to emerge.
What mulch changes at the soil surface
Moisture, temperature, and erosion
The top few inches of soil experience the sharpest swings in heat, drying, and raindrop impact. A loose organic layer acts as a buffer. Oregon State University Extension describes mulch as a way to conserve soil moisture, moderate temperature, and reduce erosion, while the University of Minnesota Extension emphasizes that the material and depth must suit the planting rather than being treated as a universal blanket. Oregon State University Extension’s mulching guidance and University of Minnesota Extension’s garden mulch guidance are useful references for that distinction.
Mulch does not make watering unnecessary. It changes how quickly the soil dries, so check the root zone rather than continuing an old schedule. Push a finger or a trowel below the mulch; if the soil is dry at the crop’s active roots, water slowly and deeply. If the soil is cool and sticky for days after rain, thin the layer and investigate drainage before adding more.
Weed suppression is a head start, not a guarantee
A thick, even layer blocks light from many annual weed seeds, but perennial weeds can grow through it and wind-blown seeds can germinate on top. Remove established weeds first. If you simply cover a patch of quackgrass, bindweed, or a mature taproot, the mulch may hide the problem while the roots continue feeding it.
A mulch layer is most effective when combined with early hand-weeding. Pull small weeds while the soil is damp, smooth the surface, then apply mulch so the bed is covered before the next flush. Fine Gardening’s practical discussion of mulch and weeds makes the same useful point: mulch reduces the work of weeding, but it does not replace observation or good bed preparation. See Fine Gardening’s mulch comparison.
Decide whether your bed is ready for mulch
When to mulch
For warm-season crops such as tomatoes, peppers, cucumbers, and squash, apply mulch after the soil has warmed and the transplants are actively growing. A simple readiness test is to look for new leaves and feel the soil several inches down: it should be moist but not cold and muddy. In a cool spring, black plastic or landscape fabric may be chosen for a specific heat or weed-management purpose, but organic mulch is usually the better long-term surface layer once the crop is established.
For cool-season greens and root crops, timing is more flexible. Mulch lightly after seedlings have several true leaves, leaving the planting row visible. As plants enlarge, widen the mulch zone. Gardeners’ World recommends using mulch when the soil is moist and weed-free and stresses keeping it away from stems. Its how-to guide on using mulch is especially helpful for the application sequence.
When to wait or skip
Wait if you have not identified the material’s source. Hay from a field treated with persistent herbicides can damage broadleaf vegetables long after application, and manure or compost that has not finished decomposing can contain weed seeds, salts, or compounds that harm seedlings. Ask what was sprayed, how the material was stored, and whether it has been screened or composted.
Wait if the bed is already too wet. Mulch reduces evaporation; that is helpful in a dry site and counterproductive in a poorly drained one. Also wait around newly sown carrots, lettuce, and other tiny seeds until the seedlings are visible. A heavy layer can prevent emergence or bend delicate stems.
The best mulch materials for vegetable gardens
Compost and finished leaf mold
Finished compost is a versatile top-dressing for vegetables because it is fine enough to spread around small plants and contributes organic matter as it breaks down. Use it as a surface layer, not as a promise of complete nutrition. Compost varies widely; a home pile should be dark, crumbly, and no longer heating, with recognizable woody pieces mostly gone.
Leaf mold or well-shredded leaves are similarly useful. Shredding matters because whole leaves can mat into a water-shedding sheet, especially when wet. A thin layer of chopped leaves can protect soil between rows; replenish it when it settles or blows away.
Chopped leaves and clean straw
Clean straw is a good choice for strawberries, potatoes, and sprawling crops because it is light, easy to lift, and less likely than fine compost to stick to fruit. Straw is the dry stalk left after grain harvest; hay includes leaves and seed heads, which makes hay more likely to introduce weeds. If you cannot verify the source, choose a different material.
Straw can also become a hiding place for slugs and earwigs in a cool, wet garden. Pull it back temporarily to inspect the soil and plant bases. In a hot, dry climate, that same insulating layer may be worth keeping. Match the material to the problem you actually have rather than to a fixed recipe.
Grass clippings, pine needles, and wood products
Grass clippings can work when they are fresh, pesticide-free, and applied in thin layers. Thick wet clippings mat, heat up, smell, and exclude water. Let lush clippings wilt briefly, then spread no more than a shallow layer at a time and mix with drier leaves if you have a large volume. This existing guide on applying grass clippings as mulch shows why thin, dryable layers matter.
Pine needles are slow to mat and make a useful mulch where they are available, especially on paths and around crops that need a breathable surface. They do not automatically make soil acidic in the dramatic way gardeners sometimes fear; the effect of a surface layer is limited and gradual.
Wood chips and bark are best used carefully around annual vegetables. Large pieces decompose slowly and can make seed sowing difficult. Fresh woody material at the surface is less likely to steal nitrogen from plant roots than material mixed into the soil, but microbes still need nitrogen as they break it down. Keep wood products on paths, around perennial vegetables, or in a mature bed, and use finished compost or straw around small annual crops.
Match mulch to the crop
Fruiting crops and sprawling vines
Tomatoes, peppers, eggplants, cucumbers, melons, and squash appreciate a clean surface that reduces soil splash and keeps moisture more even. Place mulch after the soil warms, spread it beneath the canopy as the plant grows, and keep it away from the main stem. Straw, chopped leaves, and finished compost are practical choices.
For tomatoes, mulch can help prevent the feast-and-famine watering pattern associated with cracking and blossom-end problems, but it does not correct irregular irrigation, root damage, or a nutrient imbalance by itself. Leave enough space to inspect the stem, and do not bury low leaves that touch the soil.
Root crops, potatoes, and leafy greens
Potatoes are often hilled with soil or topped with a loose organic material as stems grow. Straw makes harvest easier in some gardens, but it must be clean and deep enough to exclude light from developing tubers. Root crops such as carrots and beets generally need a lighter approach so the bed remains easy to thin and harvest.
Leafy greens tolerate a thin mulch once established, but very fine mulch can cling to low leaves and increase humidity near the crown. Keep the center of the plant open. For direct-sown rows, wait until germination is complete, then mulch between—not over—the rows.
How to mulch a vegetable garden step by step
- Identify the job. Decide whether you need weed suppression, moisture conservation, splash control, erosion protection, or a path surface. This determines material and depth.
- Check the bed. Remove perennial weeds, inspect drainage, and correct compacted or standing-wet areas before covering the soil.
- Water if needed. Apply mulch over evenly moist soil, not dust-dry soil that will repel water and leave roots dry underneath.
- Choose clean material. Avoid dyed waste wood, moldy material, unknown hay, fresh manure, and clippings treated with lawn herbicides.
- Spread evenly. Start with a modest layer and add more after it settles. Keep the surface loose rather than pressing it into a mat.
- Make the stem gap. Leave several inches around stems and crowns, widening the gap for large plants. Mulch should cover soil, not plant tissue.
- Recheck after rain. Look for crusting, runoff, slugs, buried leaves, and exposed roots. Rake or thin the layer where needed.
How deep should vegetable garden mulch be?
For most established vegetable beds, start at about 2 to 3 inches of loose organic mulch. Fine materials such as screened compost may need less because they settle and can seal the surface; coarse straw may need a little more to remain effective after settling. The finished depth matters more than the volume measured in the bag.
Do not pile mulch 6 or 8 inches deep simply because weeds are bad. Excess depth can keep the root zone wet, reduce airflow, shelter rodents and slugs, and make it difficult to see stem problems. Pull back old mulch before topping up. If the old layer is clean and loose, add only enough to restore coverage rather than burying it under a new mound.
The stem gap that prevents rot and hiding places.
Keep mulch off stems, crowns, and low leaves. A two- to four-inch bare ring is a useful starting point for most annual vegetables, with a wider gap around thick tomato stems or sprawling plants. The exact distance matters less than the principle: the stem base must dry after rain and remain visible for inspection.
This spacing also makes pest scouting easier. If a plant wilts despite damp soil, if the stem darkens at the surface, or if chewed leaves appear overnight, pull the mulch back before adding anything else. The problem may be a slug, stem disease, vole, poor drainage, or a damaged root—not a shortage of mulch.
Mulch, irrigation, and watering changes
Mulch changes the signal you get from the soil surface. The top may look dry while the root zone is damp, or the top may be damp after a storm while a raised bed below is drying quickly. Test below the mulch in several locations, especially along the edge of a bed where wind dries soil faster.
Drip lines work well beneath organic mulch once you have checked for leaks and confirmed that water is spreading laterally. Soaker hoses can also be covered, but inspect them before burying them for the season. Sprinklers still work, although very thick or hydrophobic dry mulch may initially shed water; water slowly enough for the layer to wet through.
Common mulch mistakes and how to correct them
Using hay because it is cheaper than straw: Pull it out if weeds erupt across the bed, then replace it with verified straw, chopped leaves, or compost. Do not assume every seedling is from your vegetable crop.
Mixing fresh wood chips into the soil: Move them to paths or leave them on the surface and add a separate nitrogen source based on a soil test and crop needs. Do not blindly add fertilizer; excess nutrients can be as damaging as too little.
Mulching cold, wet soil in spring: Rake the layer back temporarily and let the bed drain and warm. Reapply when the crop is growing and the surface is workable.
Making a mulch volcano around a plant: Pull it away from the stem and spread it outward. A broad, shallow layer protects more root zone than a tight mound.
Assuming mulch cures every weed: Remove perennial weeds first and patrol the surface weekly. Weeds germinating on top usually mean the layer has settled, decomposed, or received enough windblown soil to support seedlings.
Ignoring contaminated materials: If plants begin twisting, cupping, or failing to grow after a new mulch was applied, stop using that source. Keep a sample and contact your local extension office for help; do not spread the suspect material to more beds.
What to do with mulch at the end of the season
There is no universal need to remove organic mulch in autumn. Leave clean, airy material in place if it is protecting soil from erosion or feeding the bed through winter. Remove diseased leaves and fruit first, and do not carry visibly infected plant debris into the next crop.
In a wet climate, thin a dense layer so the soil can breathe. In a cold climate, a loose layer can reduce freeze-thaw heaving around shallow-rooted crops, but it should not bury crowns. For spring planting, rake the mulch aside from the seed row, let the soil warm, then return it once seedlings are established.
Conclusion: use mulch as a tool, not a rule
Mulching a vegetable garden is usually worthwhile because it reduces evaporation, cushions the soil surface, limits many annual weeds, and gradually returns organic matter. The strongest results come from the unglamorous decisions: verify the source, remove existing weeds, wait for suitable soil conditions, use a sensible depth, and keep mulch away from stems.
If your bed is dry and exposed, mulch it. If it is saturated, newly sown, or already crawling with slugs, solve that condition first. A good mulch layer is not a permanent blanket; it is an adjustable tool that you inspect, thin, refresh, and match to the crop as the season changes.



