How to Grow and Care for Turmeric at Home
Learn how to grow turmeric from a rhizome, choose a pot or garden bed, water by growth stage, spot rot, harvest at the right time, and save planting stock.
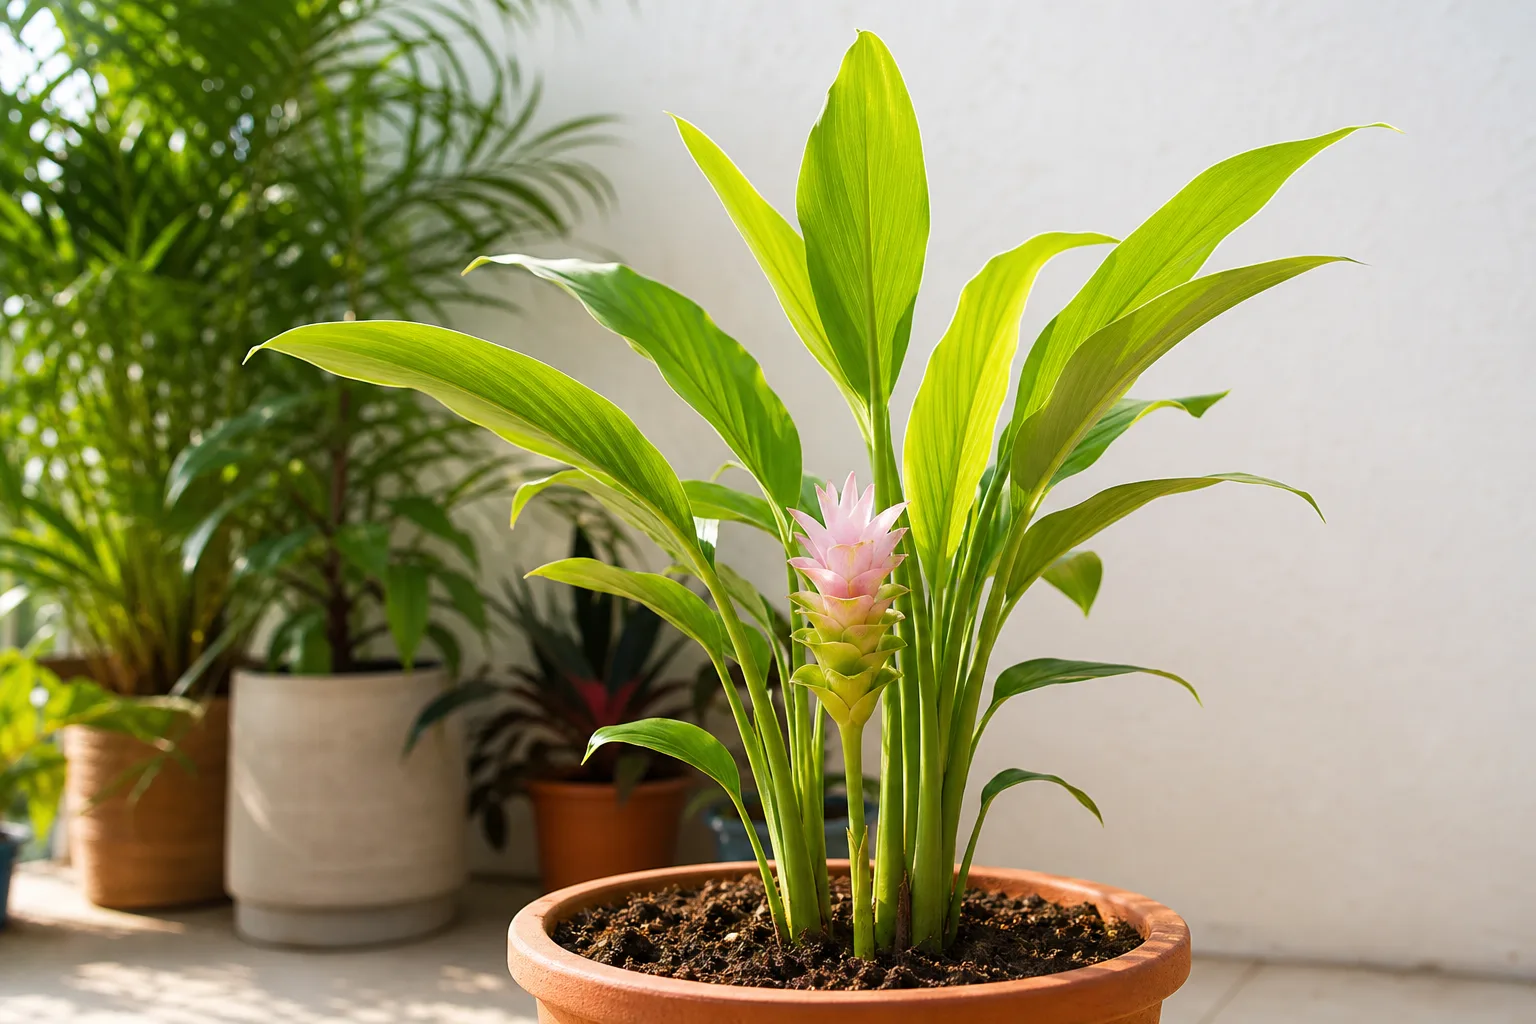
Turmeric (Curcuma longa) is a tropical perennial grown for the orange-yellow rhizomes used fresh or dried as a spice. Above ground, it makes a broad clump of lush, canna-like leaves; below ground, it gradually builds a branching harvest. The plant is straightforward once it is warm, but a short summer, cold potting mix, or excess water before sprouting can stall it before it gets going.
The key is to plan for a long, warm growing season. Start with firm, budded rhizomes, keep them warm and only lightly moist until shoots appear, then move the growing plant into rich, free-draining soil and maintain even moisture through summer. In a frost-free region, turmeric may stay in the ground as a perennial. In a cold climate, a container makes the season easier to extend, and lifting the rhizomes before frost protects the next year’s planting stock.
Turmeric Growing Conditions at a Glance
Turmeric is a member of the ginger family, Zingiberaceae, and the part gardeners harvest is a rhizome: a thickened underground stem, not a true root. It is generally hardy outdoors in USDA zones 8–11, though local drainage and winter conditions matter as much as the zone number. NC State Extension describes turmeric as a hot-climate plant that prefers humid conditions, rich soil, and moisture; it also notes that plants can be grown in containers or lifted where winters are too cold.
| Growing factor | What turmeric needs |
|---|---|
| Planting material | Firm rhizome sections with visible growing eyes |
| Season | A long stretch of warm growth; roughly 7–10 months to mature |
| Light | Bright light, with afternoon shade in hot climates |
| Soil | Fertile, organic-rich, moist but well-drained |
| Water | Light during sprouting, steady during leafy growth, reduced as foliage dies back |
| Container | Broad, sturdy pot with drainage; larger containers support larger clumps |
| Harvest cue | Natural autumn yellowing and dieback, before frost in cold climates |
| Propagation | Division of a healthy rhizome |
Treat these as a starting point rather than a rigid recipe. A plant in a warm greenhouse may build foliage faster than one on a cool windowsill, while a garden bed that stays saturated after rain may rot the rhizomes even when the air is hot.
Choose a Viable Turmeric Rhizome
The planting piece determines whether the season starts with a healthy plant or with a month of waiting. Choose turmeric that feels firm and full, not light, wrinkled, soft, or wet at the cut ends. Look for plump buds or small rounded “eyes” along the rhizome. Those are the points from which shoots can emerge; smooth sections without visible eyes are less promising.
Grocery-store turmeric can sprout, but the outcome is not guaranteed. Some pieces have been stored long enough to dry out, and some may have been treated to delay sprouting. An organic label does not promise that a rhizome is untreated or viable, so judge the actual piece and, if you have room, start more than one. University of Georgia Extension recommends selecting firm pieces with several eyes and allowing cut sections to callus before planting.
A nursery or seed supplier may sell rhizomes specifically for planting. Those are a more direct choice if supermarket pieces are consistently poor in your area. Rinse soil or residue from any rhizome before planting, but do not assume a rinse or soak will remove a growth inhibitor. If a piece is already plump and hydrated, soaking is unnecessary; if it looks slightly dry, a brief soak in lukewarm water can rehydrate it before you let its surface dry again.
If a large rhizome must be divided, cut between the buds and leave at least one or two healthy eyes on each section. Let the cut surfaces dry for a day or two before planting. This callusing step is useful because freshly cut tissue sitting in wet, cool medium is more vulnerable to rot.
When to Plant Turmeric and How Long It Takes
Turmeric grows slowly at first and needs warmth for much of its life cycle. A practical expectation is around seven to ten months from planting to a mature harvest, depending on the starting material, temperature, light, and whether it spends summer outdoors or under cover. In the tropics, the crop follows a warm, rainy growing season and naturally rests as conditions dry. At home, the calendar shifts with your climate and the growing setup.
In a region with freezing winters, start rhizomes indoors about eight to ten weeks before the last expected frost. That gives them time to sprout before they move outside, but it does not make them cold-tolerant. Wait until frost danger has passed and the weather is reliably warm before transitioning the plant outdoors. The Gardener’s Path growing guide also recommends an early indoor start in short-season climates because turmeric can need 200–300 days to mature.
In a warm climate with a long growing season, plant in early spring once the soil is warm and drains well. Where summer heat is intense, choose a position with morning sun and afternoon shade. Where summers are mild or short, keep the pot in a greenhouse, bright conservatory, or warm sheltered patio for as long as possible. The goal is not to follow a single month on a calendar; it is to give the plant the longest safe period of active growth before cool weather triggers dormancy.
Start Turmeric Indoors Without Encouraging Rot
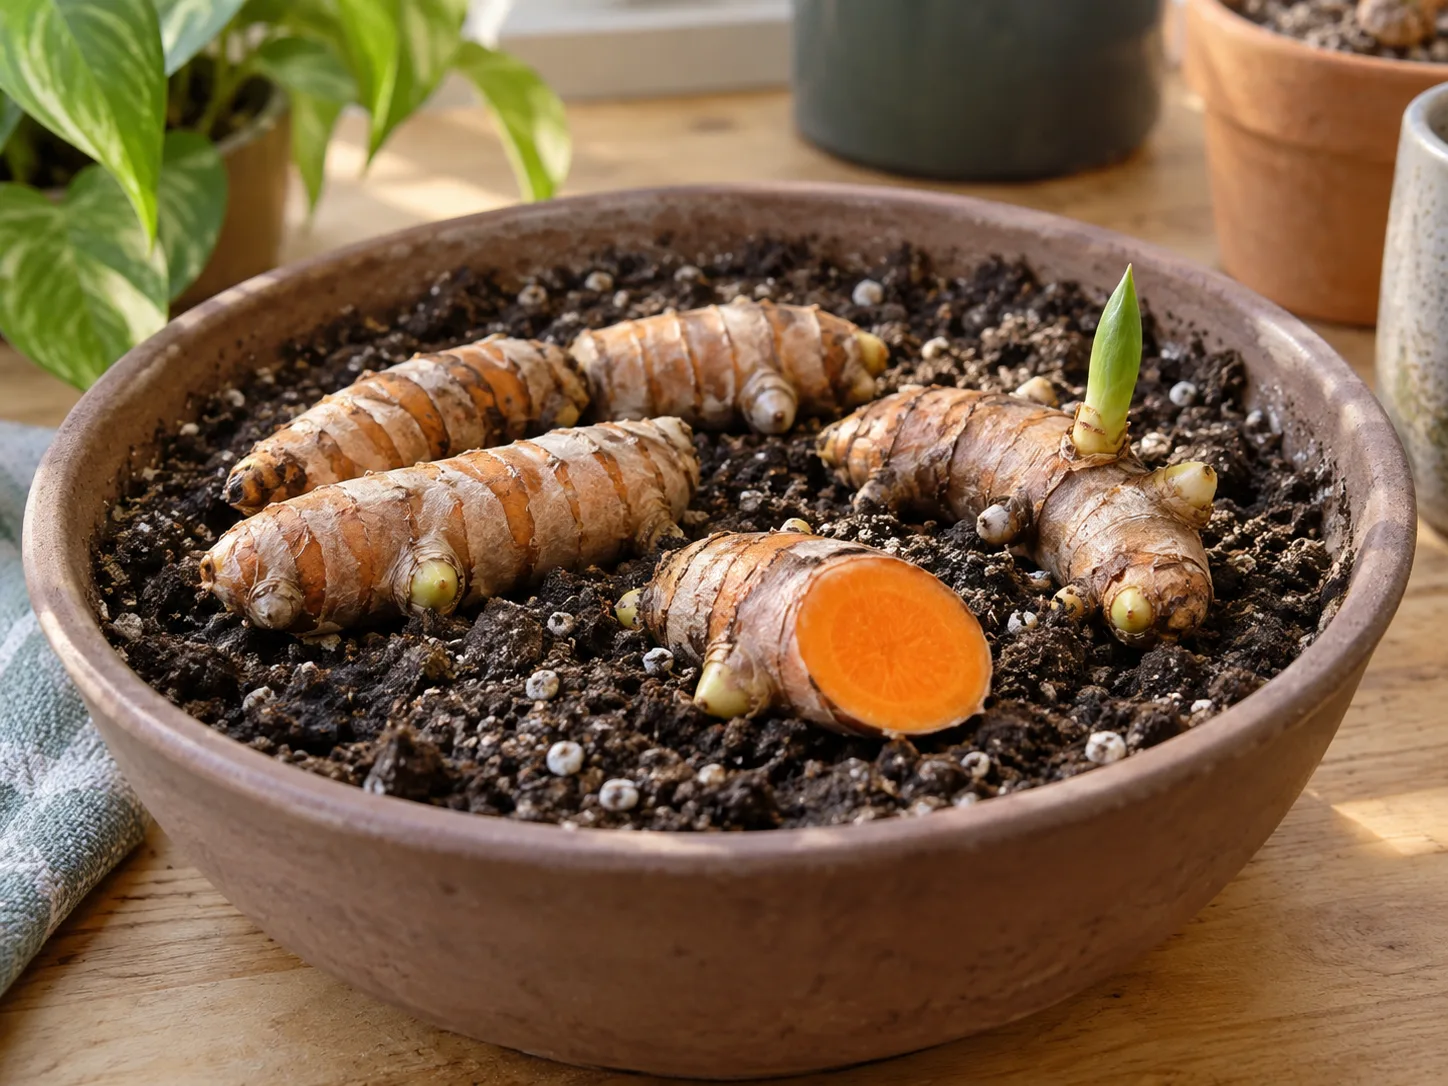
Use a shallow pot, nursery flat, or tray filled with a loose seed-starting mix for the sprouting stage. Lay rhizome sections horizontally with their eyes facing up, then cover them with roughly an inch or two of mix. If the piece has a curved shape, orient the buds upward as best you can instead of trying to force the entire rhizome into a tight pot.
Warmth matters more than fertilizer at this point. Aim for a warm room or a thermostatically controlled heat mat; a practical range for sprouting is roughly 70–85°F (21–29°C). Keep the medium slightly moist, not saturated. A pot with drainage holes is essential, and a waterproof saucer should be emptied after excess water runs through.
Do not keep watering just because there is no visible growth. Before a shoot emerges, the rhizome has few or no roots to absorb water, so a wet mixture can remain cold and oxygen-poor around it. University of Georgia Extension advises high temperatures and care not to overwater; Gardener’s Path gives an 80–85°F target for indoor sprouting. Expect several weeks rather than several days. Check occasionally for a firm rhizome and barely moist mix, then give it time.
Once shoots and roots are growing, move the plant into a larger final container or prepare its outdoor bed. If the rhizome has produced several shoots, keep the cluster intact unless you need to divide it; a larger clump can establish more quickly than several tiny pieces. For an adjacent crop with different harvest timing and care nuances, see our guide to growing ginger from store-bought rhizomes.
Choose a Garden Bed or Container
A garden bed is practical where winters are mild, soil drains freely, and there is room for a three- to four-foot clump. Work compost into the bed before planting and avoid low spots that remain wet after rain. If the winter is cold or unpredictable, a pot lets you move the plant under cover and later bring dormant rhizomes indoors. This flexibility often matters more than the small difference between a garden and container harvest. Horticulture writer Julia Dimakos documents planting turmeric in a pot alongside ginger, a useful demonstration of a movable setup; her seasonal note also reinforces that spring is the better start for sustained growth.
Set rhizome sections into warm soil with the eyes pointing upward. In a prepared pot or bed, planting a few inches deep gives expanding rhizomes a protective cover; keep the mix loose so new shoots can reach the surface. Space multiple sections far enough apart that their leaves can open and airflow can reach the center of the clump. The University of Georgia’s home-growing guidance uses 2–4 inches deep and 6 inches apart for pot-grown sections; adapt spacing to the width of your container rather than packing it full.
Give Turmeric Room to Spread in a Pot
Choose a wide, sturdy container with drainage holes rather than a narrow decorative pot. A single planting piece can grow into a broad clump, and the rhizomes expand sideways. A five-gallon grow bag is a workable starting point for one rhizome; a larger, broad tub gives the plant more room and more soil moisture buffer. Avoid leaving the plant in a small starter pot all season, because crowding can limit rhizome expansion and dense wet media can remain slow to dry.
Use a rich, airy potting mix that holds some moisture without turning into a dense, waterlogged block. A quality container mix blended with compost is a simple option; add perlite or another coarse material if your mix stays wet for days. In a fabric grow bag, expect to check moisture more often because the sides lose water faster than a glazed pot. Set the container where you can move it before frost and where the broad foliage will not be battered by strong wind.
Match Light, Soil, and Shelter to the Climate
Give turmeric bright light, then adjust direct sun to local heat. In a cooler region, several hours of gentle sun helps the plant build a strong leafy canopy. In a hot southern garden or against reflective pavement, afternoon shade reduces leaf scorch and slows moisture loss. NC State Extension describes turmeric as performing well with morning sun and afternoon shade in hot, humid conditions.
Soil should be fertile and moisture-retentive but not stagnant. Turmeric naturally grows through a warm, humid season, yet its underground stems still need oxygen. Heavy clay that stays saturated is a rot risk; very sandy or shallow soil can dry too quickly for steady growth. Improve a bed with organic matter and use a container mix for pots rather than garden soil packed into a planter.
Choose a sheltered spot with good airflow. Protection from drying wind helps broad leaves, while air movement discourages a persistently damp canopy. If the plant will live indoors, place it near a bright window or supplement light if the room is dim. A turmeric plant can stay alive in weak light, but it is less likely to produce a substantial rhizome harvest when leaf growth is thin.
Water According to the Plant’s Stage
The right watering routine changes as the plant moves from dormant rhizome to leafy growth and back to dormancy. During sprouting, keep the medium only lightly moist. After shoots and leaves appear, water thoroughly when the top layer starts to dry, then let excess drain. The root zone should feel evenly moist through active growth, not muddy or constantly waterlogged.
A fixed daily schedule is unreliable because a small nursery pot in a warm room dries differently from a large outdoor container after rain. Check the soil with a finger or a wooden stick, feel the pot’s weight, and note how quickly water runs through. If the surface looks dry but the deeper mix remains cool and damp, wait. If the top few inches are dry and the pot feels light, water slowly until a little drains from the bottom.
As foliage yellows naturally at the end of the season, reduce watering. A dormant, leafless rhizome no longer needs summer levels of moisture. If you are overwintering the plant in its pot, keep the medium barely damp or nearly dry according to warmth and drainage; never leave it in a cold, wet pot for months. NC State Extension describes turmeric rhizomes as harvested when foliage wilts and dries and recommends a cool, dry place for rhizomes lifted for winter.
Feed During Active Leaf Growth
Turmeric needs enough nutrition to build leaves before it can bulk up rhizomes. Start with compost-rich soil or a quality potting mix that contains a modest starter charge. Once shoots are established and leaves are expanding, use a balanced, general-purpose fertilizer according to its label. A diluted liquid feed every few weeks or a controlled-release product applied at the labeled rate can work; the right choice depends on what is already in the mix.
Do not fertilize a dormant rhizome or try to compensate for cold, low light, or soggy roots by adding more fertilizer. Those are environmental constraints, and extra salts can stress a plant that is not actively growing. If the foliage is pale, first check light, root warmth, drainage, and watering pattern. Feed only if those are reasonable and the plant has been growing for several weeks.
Diagnose Yellow Leaves, Brown Edges, and Soft Rhizomes
A leaf symptom is useful only when you look at timing and soil conditions together. Turmeric naturally sheds foliage as it enters dormancy, so autumn yellowing is not automatically a sign that the plant is dying. Yellowing in midsummer, brown edges that continue spreading, or a soft underground rhizome point to different problems and call for different first steps.
No Shoots or Very Slow Growth
If a planted section has not sprouted, first check temperature and moisture rather than digging it up. Cool soil can delay growth, while an overly wet mix can rot the piece before a shoot develops. Keep the container warm, lightly moist, and in a place where it will not be chilled overnight. Several weeks of waiting is normal; a piece that remains firm can be left longer if conditions are warm.
If the rhizome becomes soft, dark, moldy, or sour-smelling, it has likely rotted. Remove it from the pot, discard damaged tissue, and clean the container before replanting in fresh, airy mix. A firm section with healthy eyes may be salvageable if all rot can be cut away and the remaining piece is allowed to dry, but discard it if rot has reached the buds or the tissue smells bad.
Yellowing and Brown Leaf Edges
If the whole plant yellows in fall and growth slows, it is likely entering normal dormancy. Let the foliage fade rather than cutting green leaves early, because the plant is moving stored energy back into its rhizome. Reduce water and decide whether to leave it protected in the ground, move the container indoors, or lift the rhizomes before frost.
If leaves yellow during active summer growth, inspect moisture first. Persistently wet soil can impair roots and promote rhizome rot; bone-dry soil and hot afternoon sun can also cause stress. Brown or crisp edges often point to rapid drying, low humidity, wind, or too much direct heat, but pests such as spider mites can also become a problem in dry conditions. Check the undersides of leaves for fine webbing or stippling, and look for slug or snail feeding on young leaves. Correct the growing conditions before reaching for a pesticide, and follow local product labels if a treatment is truly needed.
Manage Flowers, Foliage, and Routine Pruning
Turmeric is grown mainly for its rhizomes, but it can be an attractive foliage plant. Mature plants may produce short flower spikes among the leaves in summer. The flowers are ornamental, but bloom is not a reliable indicator that the rhizomes are ready; harvest timing depends more on the plant’s season and natural dieback.
There is little routine pruning to do while the plant is healthy. Remove a damaged or diseased leaf with clean snips, but leave healthy green foliage in place to feed rhizome growth. At dormancy, let leaves yellow before removing them, or cut them back only after they have dried. Wear gloves if your skin is sensitive or you expect to handle cut rhizomes: NC State Extension notes that the orange pigment can stain skin and clothing and may cause contact dermatitis in some people.
Harvest Turmeric Without Sacrificing Next Year’s Planting Stock
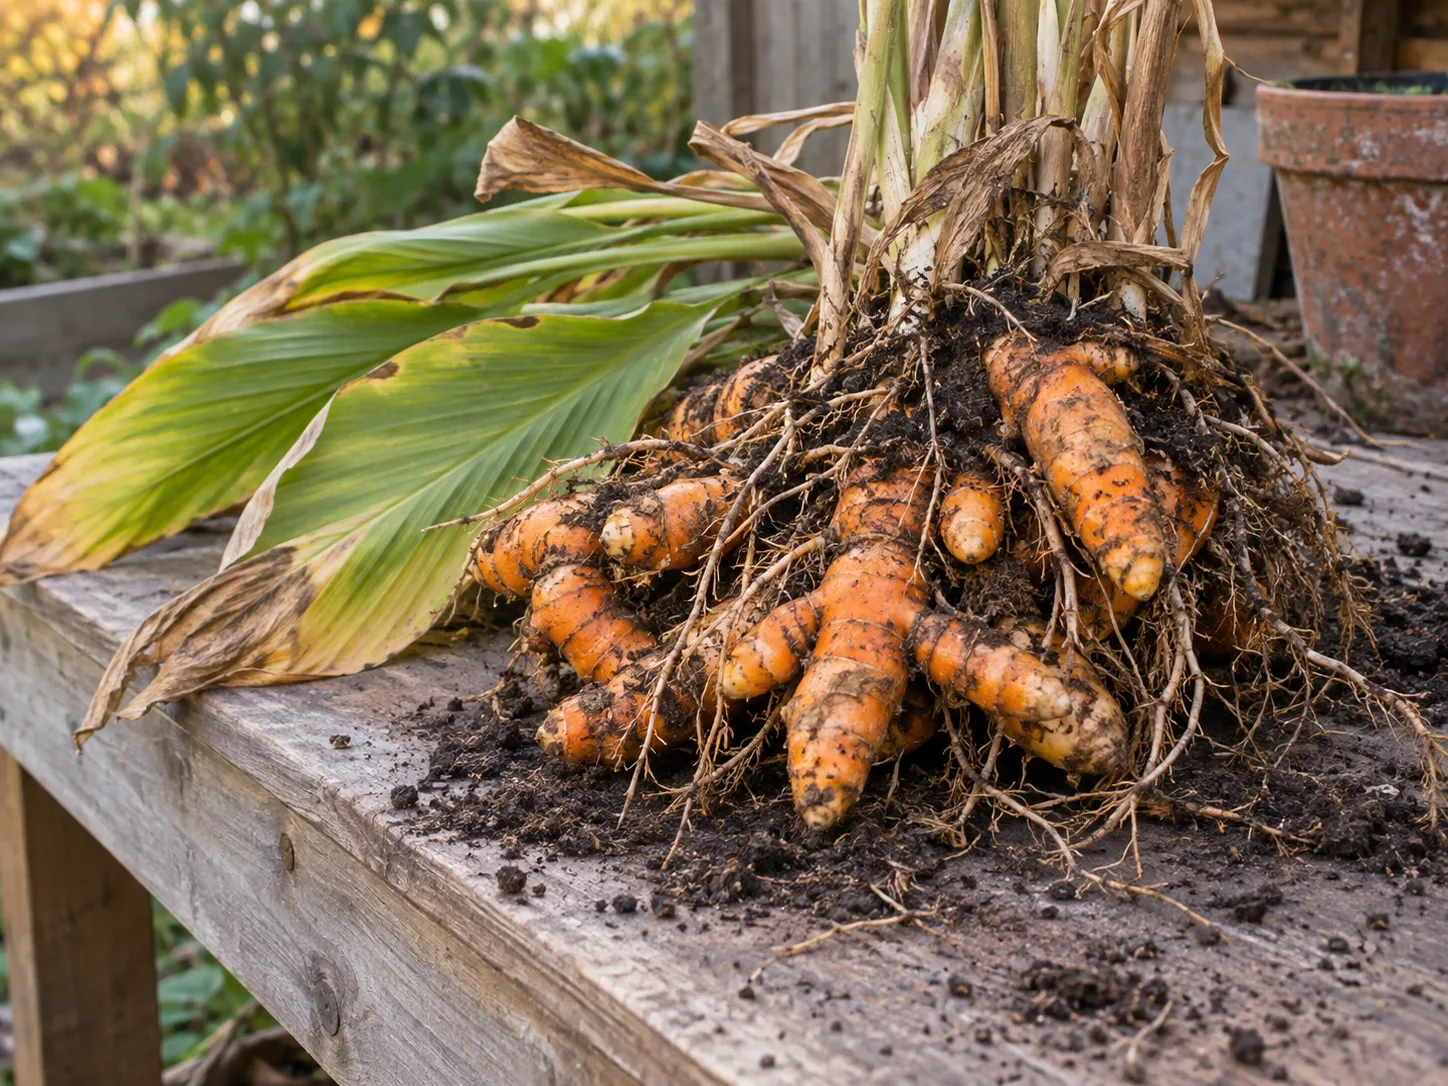
In a warm climate, begin checking in fall as foliage turns yellow and begins to wilt. That is the natural cue that the rhizomes are mature and the plant is entering dormancy. NC State Extension and University of Georgia Extension both connect turmeric harvest with foliage dieback. Do not lift the entire clump at the first yellow leaf if the rest of the plant is still vigorously green and frost is not imminent.
In a cold climate, frost sets the deadline. Move a container under cover before freezing weather, or dig garden-grown plants once leaves die back and before the ground freezes. Loosen the soil around the clump with a hand fork, starting well outside the stems, then lift it gently. Rhizomes bruise and snap more easily than they look; shaking away loose soil is safer than pulling hard on the stems.
Separate the clump into three groups: firm rhizomes for cooking, the largest healthy pieces with good eyes for replanting, and any soft or damaged material to discard. If you want a partial harvest, remove a few outer fingers while leaving the central crown and some roots undisturbed, especially in a container. A partial harvest is less disruptive but gives you less than a full lift and clean. Wear washable clothing and gloves if you want to avoid orange stains.
Fresh turmeric can be refrigerated for a few weeks. Rinse the pieces when you are ready to use them, then refrigerate the remainder in a breathable or loosely sealed container so condensation does not keep the skin wet. For longer kitchen storage, freeze clean whole pieces or grate and freeze in small portions. Keep culinary pieces separate from saved planting stock so food handling does not leave your best seed rhizomes wet or bruised.
Overwinter Turmeric and Store Rhizomes
Turmeric can remain in the ground year-round in warm regions where winter conditions stay mild and the soil drains well. In a colder zone, it may survive as a perennial only if you protect its dormant rhizome from frost and winter wet. If your garden freezes or stays saturated through winter, lifting the clump is the more reliable choice. Hardiness-zone ratings are useful, but local microclimate and soil drainage still matter.
For a container plant, let the foliage naturally yellow, then cut back dry stems and move the pot to a frost-free place. Keep it out of cold rain and reduce watering sharply while it is dormant. A warm, bright room can keep leaves active longer, but that is not necessary if the plant has already died back; the dormant rhizome mainly needs protection from freezing and rot.
For rhizomes lifted from a bed, shake off loose soil and allow them to dry on the surface before storage. Store seed pieces in a cool, frost-free place in a breathable medium such as dry sawdust or vermiculite, checking them periodically. They should not be sealed in a wet bag or left to desiccate into shriveled, unusable pieces. If the room is very dry, use a slightly moist medium and inspect often for softness or mold; if condensation appears, improve ventilation and let the medium dry.
Propagate Turmeric by Dividing the Rhizome
Turmeric is normally propagated from rhizomes, not seed. NC State Extension notes that its flowers are sterile and do not produce viable seed, so save healthy rhizomes rather than waiting for seed pods. Divide a mature clump during dormancy or just before the next active growing season, when you can see the buds and handle the pieces without breaking new shoots.
Use a clean, sharp knife to split the clump into sections, keeping at least one healthy eye on each division. Choose firm, unblemished material for next season and discard any piece that feels soft, has mold inside, or carries a foul smell. Let cut surfaces dry briefly, then start the sections in warm, lightly moist mix as described above. This allows you to carry a successful plant forward instead of relying on a new supermarket purchase each spring.
Conclusion
Turmeric rewards gardeners who plan for warmth and give it room to grow. Choose a firm, budded rhizome, start it in warm but lightly moist mix, and move the established plant to rich, free-draining soil once the weather is safe. Keep moisture steady while leaves are growing, ease off as the foliage fades, and let seasonal dieback—not a rigid date—guide harvest.
If winter freezes your garden, a wide container or careful rhizome lifting keeps the plant in reach for another season. Save a few of the healthiest budded pieces, store them frost-free without letting them sit wet, and restart them when spring warmth returns. That simple cycle is more dependable than treating turmeric like a quick annual herb.