Root Rot on Monstera Thai Constellation: Identification &
Quick answer
Root rot on Monstera Thai Constellation is an acute vascular emergency caused by opportunistic waterborne oomycetes and fungal pathogens (primarily Pythium, Phytophthora, and Rhizoctonia) colonizing anoxic, waterlogged substrate. Clonal tissue-culture root structures and reduced transpiration from chlorophyll-deficient cream sectors make this cultivar exceptionally vulnerable. Emergency intervention requires immediately unpotting the plant, washing away all infected soil, surgically pruning rotted mush back to firm white tissue with sterile shears, bathing the root system in 3% hydrogen peroxide, repotting into a sterile chunky aroid mix, and strictly withholding fertilizer.
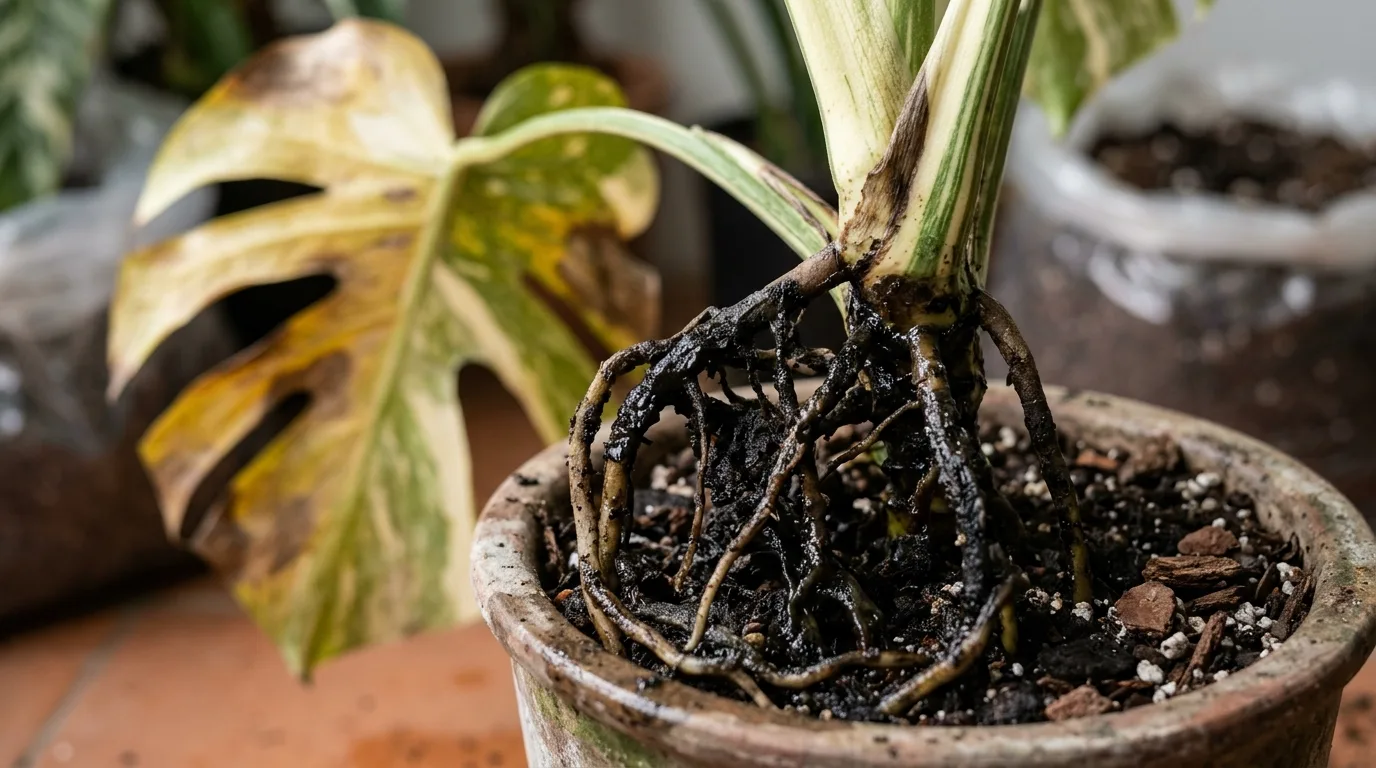
Root Rot on Monstera Thai Constellation: Causes, Root Surgery & Complete Salvage Guide
This guide covers root rot on Monstera Thai Constellation. See also the general Root Rot guide, watering, and light pages for this plant.
Root Rot on Monstera Thai Constellation: Causes, Root Surgery & Complete Salvage Guide
Quick answer
Root rot on Monstera deliciosa ‘Thai Constellation’ is an acute botanical crisis that requires prompt surgical action. Unlike standard, all-green Monstera deliciosa—which can tolerate moderate moisture fluctuations—Thai Constellation is notoriously susceptible to pathogen-induced root decay. Waterborne oomycetes (Pythium ultimum, Phytophthora nicotianae) and opportunistic fungi (Rhizoctonia solani, Fusarium spp.) colonize the root cortex when potting media remain waterlogged and depleted of oxygen.
Because Thai Constellation features substantial patches of achlorophyllous (cream-white) leaf tissue, its metabolic transpiration rate is significantly lower than wild-type monsteras. When planted in dense, peat-heavy commercial potting soils, the substrate retains water far too long. The root tips asphyxiate from oxygen starvation, pathogenic spores invade, and subterranean root sheaths collapse into black, mushy strings. Above ground, this manifests as sudden blackening and water-soaked melting of cream sectors, generalized petiolar collapse, and a foul, sulfurous odor emanating from the drainage holes. For global biological principles on root rot across indoor species, refer to our comprehensive root rot guide.
Immediate first step: Do not wait for the soil to dry out. Gently unpot your Monstera Thai Constellation immediately, wash all potting soil off the root ball under lukewarm water, surgically excise all darkened, slimy, and hollow roots back to firm white tissue with sterilized shears, submerge the remaining root structure in a 3% hydrogen peroxide bath, and repot in a sterile, ultra-porous chunky aroid mix.
When to use this page vs other Monstera Thai Constellation guides
Root rot symptoms are often confused with localized foliage drying, overwatering edema, or bacterial blights. Use this triage matrix to confirm whether your plant has systemic root rot or a different issue:
| Observed Symptom Pattern | Root Zone & Substrate State | Primary Diagnostic Indicator | Recommended Guide |
|---|---|---|---|
| Rapid blackening/melting of cream sectors; limp petioles; foul sulfur smell | Substrate wet/heavy; roots black, slimy, pulling away to string core | Pathogenic oomycete/fungal infection from soil anoxia | This guide (Root Rot) |
| Soft lower leaves turning translucent yellow; soil wet but roots firm & cream-colored | Saturated potting mix; no foul odor; root epidermis intact | Early overwatering edema prior to structural fungal decay | Overwatering Guide |
| Crispy, brittle brown leaf edges confined strictly to cream margins; zero yellow halos | Substrate dry 2–3 inches deep; pot feels feather-light | Atmospheric vapor pressure deficit or underwatering | Brown Tips Guide |
| Flaccid, drooping petioles throughout plant; substrate completely parched | Potting mix shrunken from container walls; roots dry, pale tan | Loss of hydraulic turgor pressure from drought | Drooping Leaves Guide |
| Water-soaked brown spots with bright yellow rings spreading on green leaf blades | Variable substrate moisture; roots healthy | Bacterial leaf spot (Pseudomonas / Xanthomonas) | Problems Directory |
| Pale bleached, paper-thin scorched patches on upper variegated surfaces | Normal soil moisture; roots firm and robust | Photodegradation / solar scorch from unfiltered midday sun | Light Requirements Guide |
Why Monstera Thai Constellation is exceptionally prone to root rot
To successfully treat and permanently prevent root rot in Thai Constellation, you must understand the interplay between its cellular genetics, propagation background, and respiratory physics.
┌────────────────────────────────────────────────────────────────────────┐
│     THE PATHOGENESIS CASCADE IN MONSTERA THAI CONSTELLATION            │
├────────────────────────────────────────────────────────────────────────┤
│ 1. Tissue Culture Legacy: Clonal roots lack suberin & thick cuticles   │
│                             │                                          │
│                             ▼                                          │
│ 2. Chimera Physiology: Low chlorophyll ──► 30-50% slower transpiration │
│                             │                                          │
│                             ▼                                          │
│ 3. Saturated Mix: Macropores flood ──► Interstitial oxygen drops < 2%  │
│                             │                                          │
│                             ▼                                          │
│ 4. Cortical Anoxia: Root respiration halts ──► Cells leak exudates     │
│                             │                                          │
│                             ▼                                          │
│ 5. Pathogen Chemotaxis: Pythium/Phytophthora zoospores invade cortex   │
│                             │                                          │
│                             ▼                                          │
│ 6. Tissue Liquefaction: Pectinase enzymes digest cortex to wire stele  │
└────────────────────────────────────────────────────────────────────────┘
1. Laboratory tissue-culture origins and juvenile clonal root morphology
Unlike wild Monstera deliciosa, which germinates from robust seeds on tropical forest floors, every single authentic Monstera deliciosa ‘Thai Constellation’ traces its lineage to laboratory micropropagation developed in Thailand. While micropropagation allows stable propagation of chimeric variegation, laboratory-cloned plantlets emerge with adventitious juvenile root systems optimized for sterile agar gel rather than natural soil microbiota.
When commercial nurseries scale these plantlets, they often transition them into dense peat plugs, compressed coco sponge plugs, or nursery mesh sleeves (“death plugs”). As the plant grows into a 6- or 8-inch container, this dense peat plug remains cemented around the central root crown. When home growers irrigate, this inner plug holds water like a sodden sponge for weeks after the surrounding soil has dried out, suffocating the original root crown at the core of the plant.
2. Reduced photosynthetic sink strength and sluggish transpiration
According to the Royal Horticultural Society (RHS), Thai Constellation is a genetically stable chimeric mutation characterized by creamy-white marbling and broad sectoral patches across the lamina. Because cream and ivory sectors contain zero functional chloroplasts, they produce no carbohydrates via photosynthesis.
As a direct physiological consequence:
- Transpiration Deficit: Leaves transpire water primarily through photosynthetic stomatal activity. With up to 50% less active green leaf area than wild Monstera deliciosa, Thai Constellation transpires at half the speed of an all-green monstera of equivalent size.
- Prolonged Substrate Wetness: Water remains in the container 2 to 3 times longer. A pot that an all-green Monstera would empty within 5 days can remain waterlogged for 14 to 20 days under identical conditions.
- Metabolic Starvation of Roots: Root cells require photosynthate (glucose) delivered from foliage via phloem to power cellular repair and maintain cell membrane integrity. Under low natural light, the plant cannot supply adequate energy to its root tips, leaving them weakened against opportunistic soil microbes.
3. Substrate anoxia and the cellular suffocation cascade
Roots are living, breathing subterranean organs that require atmospheric oxygen for aerobic cellular respiration. According to research from the University of Florida IFAS Extension, oxygen diffusion through water is approximately 10,000 times slower than through ambient air. As documented by the University of Wisconsin-Madison Extension, maintaining an open, well-draining substrate structure is essential for root aeration and preventing foliar collapse.
When a standard peat-and-soil mixture is saturated with water:
- Pore Space Occlusion: Water fills every micro- and macropore in the substrate, expelling air pockets.
- Hypoxia to Anoxia: Within 24 to 48 hours of saturation, microbial and root respiration consumes all dissolved oxygen in the pore water, plunging the root zone into anoxia (<2% oxygen).
- Metabolic Fermentation: Deprived of oxygen, root cells can no longer undergo oxidative phosphorylation. They switch to anaerobic fermentation, accumulating toxic metabolic byproducts like ethanol, acetaldehyde, and lactic acid.
- Membrane Rupture & Exudation: Acidification ruptures root cortical cell membranes. The dying cells leak sugars, amino acids, and potassium into the rhizosphere, sending out a biochemical beacon that attracts swimming pathogen zoospores.
4. Pathogen biology: Pythium, Phytophthora, and Rhizoctonia
Root rot is rarely an abiotic event; it is a biotic invasion facilitated by abiotic suffocation:
- Pythium ultimum and Pythium aphanidermatum: These waterborne oomycetes (“water molds”) produce biflagellate zoospores that actively swim through pore water films toward leaky root exudates. Once attached to the root tip, they penetrate the epidermis and secrete cellulases and pectinases that liquefy the parenchymal cortex.
- Phytophthora nicotianae: An aggressive oomycete that attacks both feeder roots and the basal root crown, causing vascular discoloration and rapid leaf wilting.
- Rhizoctonia solani: A soilborne fungus that thrives in warm, overly damp substrates, girdling roots near the soil line and causing cortical sloughing.
What root rot looks like on Monstera Thai Constellation
Detecting root rot early is critical to saving a prized specimen. Learn to identify both the foliar symptoms above the soil and the pathological root conditions below.
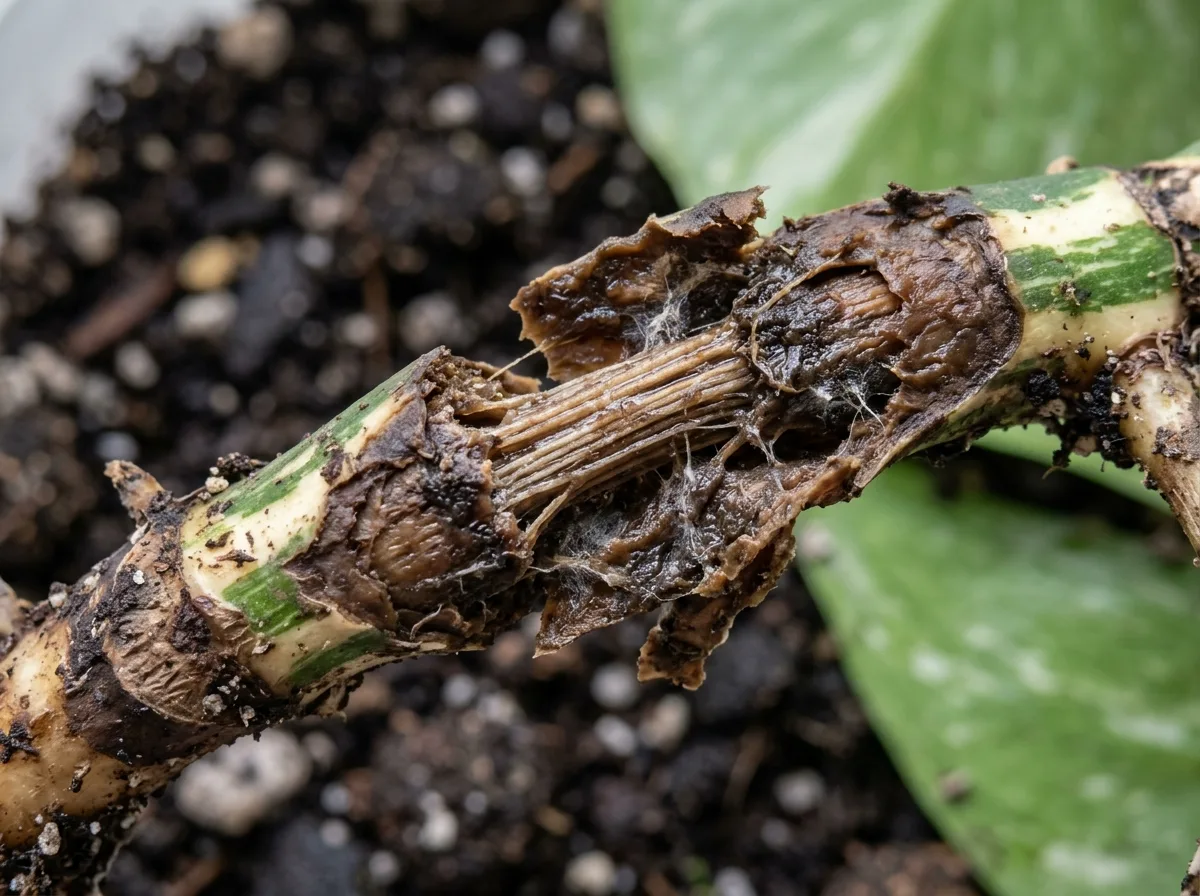
Microscopic and macro cross-section of root rot on Monstera Thai Constellation: root cortex liquefying away from central vascular stele alongside necrotic melting of cream foliage.
Above-ground foliar and stem warning signs
-
Rapid blackening of cream sectors (“Melting Leaves”): The earliest and most visible foliar indicator on Thai Constellation is the sudden discoloration of its cream-variegated patches. Because achlorophyllous sectors have thinner cellular walls, low mechanical turgor, and zero antioxidant reserve, they collapse first when the plant’s vascular cylinder fails or becomes flooded with fungal phytotoxins. Unlike crisp, papery brown tips caused by dry air, rot-induced lesions are:
- Soft, greasy, or water-soaked to the touch.
- Deep charcoal, chocolate brown, or jet black.
- Bordered by a distinct 2–5 mm chlorotic bright yellow halo.
- Fast-spreading, often engulfing half a leaf blade within 3 to 5 days.
-
Sudden generalized collapse (Paradoxical Wilting): The plant displays limp, downward-pointing petioles and drooping foliage even though the potting medium is visibly damp or soaking wet. Because decayed roots have lost their functional root hairs, they cannot uptake water. The foliage starves of hydration despite sitting in a pool of moisture.
-
Aborted or blackened emergent spears: If the plant is pushing a new leaf spike from the petiole sheath, the embryonic spear turns brown or black before unfurling, often rotting into a wet, foul-smelling core inside the stem groove.
-
Lower leaf chlorosis and premature drop: Oldest basal leaves turn a sickly, uniform pale yellow and drop off with minimal resistance.
Below-ground root and substrate symptoms
-
Foul anaerobic sulfur odor: Smell the drainage holes at the base of the container. Healthy aroid roots smell fresh, clean, and earthy—like a walk through a pine forest after rain. A root-rotted container emits an unmistakable, nauseating odor of stagnant ditch water, decaying cabbage, or sulfur (hydrogen sulfide produced by anaerobic bacteria like Desulfovibrio).
-
Cortical sloughing (The “Wire Core” or “String” Test): Healthy roots of Monstera deliciosa are thick (5–12 mm), rigid, fleshy, and white to light ivory or creamy tan with firm, crisp tips. When infected with Pythium or Phytophthora, the outer cortex becomes water-soaked, black or dark brown, and slimy. If you pinch a damaged root between your fingers and pull gently, the rotten outer flesh slides off effortlessly like a wet sleeve, exposing the thin, thread-like central vascular cylinder (the xylem and phloem “wire core”).
-
Absence of active white root tips: A thorough inspection reveals no translucent, actively growing white tips. The entire root ball appears dull, brownish-grey, and lifeless.
The diagnostic root inspection fork
Do not guess or assume your plant has root rot based solely on leaf appearance. Execute this systematic 3-step diagnostic check before unpotting:
[Inspect Monstera Thai Constellation]
                  │
                  ▼
       [Check Pot Weight & Smell]
        │                      │
        ├─ Heavy & Wet         └─ Light & Dry ──► Underwatered / Desiccated
        │  Foul/Sulfur Odor                        (Probe depth & bottom soak)
        │
        ▼
   [Unpot & Inspect Roots]
        │
        ├─ White, Crisp, Earthy Smell ──────────► Overwatering Edema
        │                                         (Aerate mix, withhold water)
        │
        └─ Black/Brown, Mushy, Sloughing ───────► CONFIRMED ACTIVE ROOT ROT
                                                  (Proceed to Emergency Surgery)
Step 1: Pot heft and substrate probe
Lift the container. If the pot feels heavy and dense like a wet sponge, insert a clean wooden skewer 3 to 4 inches into the root core. If the skewer emerges soaked and dark, but the leaves above are wilting, hydraulic vascular failure has occurred.
Step 2: The drainage hole olfactory test
Bring your nose directly to the bottom drainage holes of the nursery pot. If you detect even a faint hint of sourness, rotting vegetation, or swamp gas, anaerobic fermentation and pathogen proliferation are active.
Step 3: Tactile root examination
Slide the plant carefully out of its container. Gently brush away the outer layer of substrate near the base of the root ball. Pinch several root tips. If your fingers easily crush the root into black mush or if the outer sheath slips away leaving a bare white thread, active root rot is 100% confirmed.
Emergency surgical intervention: Step-by-step salvage protocol
Once root rot is confirmed, every hour of delay allows pathogens to climb further up the vascular bundles toward the central stem node. Follow this strict surgical protocol:
┌────────────────────────────────────────────────────────────────────────┐
│            EMERGENCY ROOT ROT SALVAGE WORKFLOW                         │
├────────────────────────────────────────────────────────────────────────┤
│ 1. Complete Unpotting ──► Wash all substrate away under lukewarm water │
│                                  │                                     │
│                                  ▼                                     │
│ 2. Surgical Debridement ─► Cut rotted tissue 1-2 cm into healthy white │
│                                  │                                     │
│                                  ▼                                     │
│ 3. 3% Peroxide Bath ────► 10-15 min immersion to oxidize pathogens     │
│                                  │                                     │
│                                  ▼                                     │
│ 4. Antifungal Callusing ─► Dust cuts with sulfur / air dry 30-60 min   │
│                                  │                                     │
│                                  ▼                                     │
│ 5. Sterile Repotting ───► Ultra-chunky aroid mix in ventilated pot     │
│                                  │                                     │
│                                  ▼                                     │
│ 6. Recovery Protocol ───► Zero fertilizer + bright light + hydration   │
└────────────────────────────────────────────────────────────────────────┘
Phase 1: Unpotting and root washing
- Remove from Pot: Lay the plant gently on its side on a clean work surface. Carefully compress the sides of the nursery pot to loosen the root ball, then slide the plant out. Never pull forcefully by the petioles, as rotted roots have zero tensile strength and the entire crown can tear away.
- Wash to Bare Roots: Do not attempt to salvage the old potting medium. Take the plant to a sink or washbasin and gently rinse the root system with lukewarm water (approx. 68–72°F / 20–22°C). Wash away every speck of potting mix until the entire root architecture is completely bare and clearly visible.
- Locate and Cut the Nursery “Death Plug”: Inspect the core of the root system directly beneath the main stem. In 80% of tissue-culture Thai Constellations, you will discover a dense, compacted cylinder of compressed peat or netting. Use tweezers or small shears to pick this plug completely apart and discard it.
Phase 2: Surgical debridement with sterilized tools
- Sterilize Your Shears: Sterilize a sharp pair of bypass pruners or heavy scissors using 70% isopropyl alcohol or hold the blades in an open flame for 5 seconds. Re-sterilize between major cuts.
- Excise All Dead Tissue: Cut away every millimeter of black, brown, soft, or hollow root tissue.
- Cut into Healthy Tissue: Make your cuts approximately 1 to 2 cm into healthy, firm white or light tan tissue. If a cut end shows a dark brown or black ring in the central vascular ring, the pathogen has traveled deeper into that root; cut further back toward the main stem until the cross-section shows pristine, creamy-white cellular tissue.
- Inspect the Stem Base: Examine the basal stem (caudex). If the lower node has soft, sunken, black lesions, scrape away all necrotic stem tissue with a sterile scalpel until clean green and white vascular tissue is exposed.
Phase 3: The 3% hydrogen peroxide (H2O2) therapeutic bath
Hydrogen peroxide is the gold standard chemical treatment for aroid root rot:
- The Mechanism: When 3% hydrogen peroxide comes into contact with organic fungal enzymes (catalase), it rapidly decomposes into pure water and nascent oxygen ($2\text{H}_2\text{O}_2 \rightarrow 2\text{H}_2\text{O} + \text{O}_2$). This vigorous fizzing creates intense oxidative stress that destroys the fragile cellular walls of Pythium zoospores and Phytophthora mycelium while instantaneously infusing oxygen into suffocated root tissues.
- The Bath Preparation: In a clean bucket or basin, mix 1 part standard 3% household hydrogen peroxide with 2 parts room-temperature filtered or tap water (e.g., 500 mL of 3% H2O2 mixed with 1,000 mL of water).
- The Soak: Submerge the entire bare-root system in the peroxide bath for 10 to 15 minutes. You will hear an audible fizzing and observe dense white bubbling as pathogens and dead cellular debris are oxidized.
- Undiluted Spray for Stubborn Cases: If root rot was advanced and involved the stem base, spray 3% H2O2 undiluted directly onto the cut surfaces and stem base using a clean spray bottle, allowing it to bubble for 3 to 5 minutes before rinsing with clean water.
Phase 4: Antifungal dusting and callusing
- Pat Dry: Remove the plant from the peroxide bath and gently pat the root system with clean, lint-free paper towels.
- Dust with Protectant: Lightly dust all open cut surfaces with horticultural sulfur powder, finely powdered activated charcoal, or ground cinnamon. Sulfur acts as an effective, broad-spectrum fungicide and bactericide that prevents reinfection.
- Air-Dry / Callus: Place the plant on a clean, dry towel in a warm, shaded room for 30 to 60 minutes. Allowing the cut root surfaces to dry slightly forms a protective suberized callus layer that prevents pathogen entry once repotted.
Phase 5: Repotting into a sterile, ultra-aerated chunky aroid mix
Never, under any circumstances, return the plant to its old potting soil or unsterilized container. Old soil contains millions of dormant oomycete oospores ready to reinfect damaged roots.
-
Container Selection:
- Choose a container that matches the new, reduced size of the pruned root ball. As emphasized by Penn State Extension, selecting containers with ample drainage holes and matching pot dimensions closely to root volume prevents persistent saturated zones that reinfect damaged roots. If 50% of the root system was removed, downsize the pot diameter by 2 to 4 inches. An oversized pot creates an expansive “perched water table” that remains soggy and guarantees a rot relapse.
- Use a clear plastic nursery pot with multiple bottom and side drainage slits. Clear pots allow you to visually monitor new white root growth over the coming weeks without disturbing the plant.
- If reusing a plastic container, wash it thoroughly with hot water and soap, then soak it in a 10% bleach solution (1 part bleach to 9 parts water) for 15 minutes.
-
The Optimal Chunky Aroid Substrate Formulation: Thai Constellation roots require a substrate with high air-filled porosity (at least 25–30% volume):
- 40% Coarse Orchid Bark: Medium-to-large fir or pine bark chunks (1/2 to 3/4 inch) to create massive structural air pockets.
- 25% Coarse Perlite or Pumice: Grade #3 or #4 coarse perlite or horticultural pumice to prevent compaction and provide drainage channels.
- 15% Horticultural Charcoal: Absorbs excess anaerobic toxins and resists bacterial breakdown.
- 10% Coarse Coco Husk Chips: Washed, low-EC chunky coconut husk chips for light, airy moisture buffering.
- 10% Peat Moss or High-Quality Coco Coir: To lightly bind the mix and provide a gentle moisture buffer without clumping.
For full recipe adjustments and ingredient preparation, explore our specialized Monstera Thai Constellation soil mix guide.
What to do if 80% to 100% of subterranean roots are rotted
If delayed diagnosis resulted in the complete destruction of the underground root system, your Monstera Thai Constellation can still be completely regenerated using vegetative propagation techniques.
┌────────────────────────────────────────────────────────────────────────┐
│     TOTAL ROOT SYSTEM SALVAGE (WATER / PERLITE PROPAGATION)            │
├────────────────────────────────────────────────────────────────────────┤
│ [Zero Roots Remaining] ──► Slice stem base to clean, firm green tissue │
│                                    │                                   │
│                                    ▼                                   │
│ [Preserve Aerial Roots] ─► Healthy aerial roots = New taproot network │
│                                    │                                   │
│                                    ▼                                   │
│ [Rehabilitation Medium] ─► Water + Air Bubbler OR 100% Coarse Perlite  │
│                                    │                                   │
│                                    ▼                                   │
│ [Environmental Support] ─► 72-78°F, 65% RH, 200-300 fc indirect light   │
│                                    │                                   │
│                                    ▼                                   │
│ [New Roots Reach 2-3"] ──► Transfer to chunky aroid mix                │
└────────────────────────────────────────────────────────────────────────┘
1. Aerial root transformation (The secondary lifeline)
According to NC State Extension, Monstera deliciosa is a hemiepiphytic climber that relies heavily on adventitious aerial roots to support its water and nutrient economy. If your Thai Constellation possesses one or more firm, undamaged aerial roots emerging from the stem nodes:
- Do not cut them off!
- Gently guide the aerial roots into a container of clean water or moist perlite.
- Within 10 to 14 days, the aerial root will produce thousands of fine, white subterranean feeder roots and lateral root hairs, transforming into a fully functional primary root system capable of hydrating the entire vine.
2. The aerated water rehabilitation method
- Clean the bottom stem node thoroughly and remove any rotted petiole sheaths.
- Submerge the basal node and aerial roots into a clean glass jar filled with filtered room-temperature water.
- Install a small aquarium air pump and airstone into the water jar. The constant stream of microscopic oxygen bubbles prevents anoxia and accelerates adventitious root primordia emergence while completely suppressing anaerobic fungi.
- Replace the water every 5 to 7 days.
3. The 100% coarse perlite or fluval stratum ICU box
Alternatively, place the cleaned stem cutting into a clear plastic cup filled with pre-moistened coarse perlite or a 50/50 mix of perlite and Fluval Stratum (aquarium volcanic substrate).
- Perlite provides near-total air porosity (50%+ oxygen) while maintaining 100% relative humidity around the stem node.
- Keep 1/2 inch of water at the bottom of the cup, ensuring the base of the stem sits suspended above the water line, resting solely in the damp perlite.
- Enclose the container inside a clear storage tub or clear plastic bag to create an ICU humidity chamber (70–80% RH), venting it for 15 minutes daily to prevent stagnant air molds.
Post-surgery rehabilitation timeline: What to expect
Recovering from extensive root surgery requires biological patience. Understanding the recovery phases prevents well-meaning growers from making fatal mid-course adjustments.
| Recovery Phase | Typical Duration | Observable Plant Responses | Required Care Protocols |
|---|---|---|---|
| Phase 1: Hydraulic Stabilization | Days 1 to 14 | Foliar limpness stabilizes; black margins cease expanding; yellow halos fade into dull tan. No new leaf growth. | Bright indirect light (200–300 fc); no direct sun; zero fertilizer; maintain 60–70% ambient humidity; do not saturate mix. |
| Phase 2: Root Primordia Activation | Weeks 3 to 5 | Tiny, firm, white root nubs emerge from stem nodes and cut root ends. Visible through clear pot walls. | Water only when top 50% of chunky mix dries completely; check pot lightness by hefting container. |
| Phase 3: Vascular Restoration | Weeks 6 to 8 | Hydrostatic turgor pressure returns to petioles; leaves lift 15–30 degrees toward light; geniculum joint stiffens. | Maintain strict dry-down cycle; calibrate watering schedule to container volume. |
| Phase 4: Vegetative Flush | Months 2 to 3+ | The newest petiole sheath swells; a pristine, firm variegated leaf spear unfurls with zero black rot. | Reintroduce 1/4 strength balanced urea-free fertilizer; anchor stem to moss pole. |
Critical mistakes that kill recovering Thai Constellations
Avoid these common pitfalls when rehabilitating your plant:
-
Fertilizing a recovering plant: This is the #1 cause of post-surgery plant death. When roots are severed, the plant’s surface area for water absorption is drastically diminished. Adding chemical or organic fertilizers introduces high concentrations of mineral salts into the root zone. This increases osmotic pressure outside the roots, drawing water out of regenerating root cells (chemical desiccation) and scorching the microscopic new root tips. Withhold all nutrition until firm, healthy vegetative growth is established.
-
Reusing contaminated potting mix or pots: Pythium and Phytophthora form thick-walled resting structures (oospores and chlamydospores) that survive for months in dried soil and on plastic surfaces. Repotting into contaminated medium results in a 100% reinfection rate. Always use fresh, sterile substrate and sanitized containers.
-
Repotting into an oversized container: Growers often believe a large pot gives roots “room to grow.” In reality, a large volume of potting mix without roots to drink it retains stagnant moisture indefinitely, creating a massive hypoxic dead zone. Pot snug: the container should be only 1 to 2 inches larger than the surviving root ball.
-
Watering on a calendar schedule: Never water every Tuesday or Sunday. Water strictly when physical substrate checks indicate the top 2 to 3 inches have thoroughly dried out. A recovering Thai Constellation consumes water at a fraction of its normal rate.
-
Misting foliage or enclosing leaves in airtight bags: While high humidity aids recovery, misting leaves with a spray bottle deposits free moisture droplets across structurally weak cream sectors, creating a paradise for bacterial leaf spot (Xanthomonas) and fungal blight (Colletotrichum). Use an ultrasonic cool-mist humidifier in the room instead.
-
Amputating every leaf with a blemish: Never strip off all damaged foliage simultaneously. Even a leaf with 30% black necrosis contains valuable green chlorophyll that converts light into carbohydrates necessary to fuel root regeneration. Trim away only the dead, black tissue (leaving a 1 mm brown border) and retain the living leaf until multiple new leaves have unfurled.
Long-term prevention & cultivation cross-checks
Preventing root rot from ever recurring on your Monstera Thai Constellation requires aligning your long-term cultivation practices with its specific botanical needs:
- Soil Mix Protocol: Maintain an open, chunky aroid substrate with 70–80% coarse amendments (orchid bark, perlite, pumice, charcoal) and no more than 20–30% fine moisture-retentive peat or coir.
- Watering Cadence: Follow the soak-and-dry protocol. Saturate the pot thoroughly until water flows freely from all bottom holes, then discard all saucer runoff after 15 minutes. Never let the pot sit in standing water.
- Light Requirements: Provide generous bright, indirect light (2,000 to 4,500 lux / 200 to 450 foot-candles) for 10 to 12 hours daily. Robust illumination drives cellular transpiration, allowing the plant to rapidly process root-zone moisture and replenish oxygen macropores.
- Potting & Drainage: Always use containers with abundant drainage holes. Unglazed terracotta or slotted clear aroid nursery pots promote maximum gas exchange across container walls.
- Comprehensive Troubleshooting Hub: Routinely inspect petiolar sheaths, root health, and leaf undersides for early signs of physiological stress, pests, or secondary bacterial infections.
Related tool
To eliminate guesswork and ensure your Monstera Thai Constellation receives the exact moisture volume and dry-down interval suited to your container size, pot material, and indoor climate:
Use our interactive Plant Watering Calculator to calculate precise, scientifically calibrated watering schedules tailored specifically to your plant’s setup.
Related Monstera Thai Constellation guides
Deepen your cultivation knowledge and protect your prized variegated collection with these specialized resources:
- Monstera Thai Constellation Care Overview: The complete foundational master guide covering botanical origins, climbing habits, node structure, and cultivar verification.
- Monstera Thai Constellation Watering Guide: In-depth analysis of substrate saturation, seasonal dry-down intervals, and moisture meter readings.
- Aroid Soil & Substrate Formulation: Custom recipes, ingredient sourcing, and aeration ratios engineered to prevent root hypoxia.
- Lighting Optimization for Variegated Aroids: How to supply sufficient photon energy to fuel transpiration without scorching sensitive cream foliage.
- Safe Repotting & Root Management: Step-by-step techniques for potting up, root ball untangling, and moss pole integration.
- Monstera Thai Constellation Problems Hub: Complete diagnostic index for identifying pest damage, chlorosis, edema, and leaf spots.