Mealybugs on Plumeria: Causes, Checks & Fixes
Quick answer
Mealybugs on Plumeria gather as white, cottony colonies on tender branch tips, leaf bases, and stem joints. First step: move potted plants away from clean stock and dab every visible cluster with a 70% isopropyl alcohol cotton swab. Repeat weekly until no new wax appears, and hold fertilizer while the plant is under treatment.
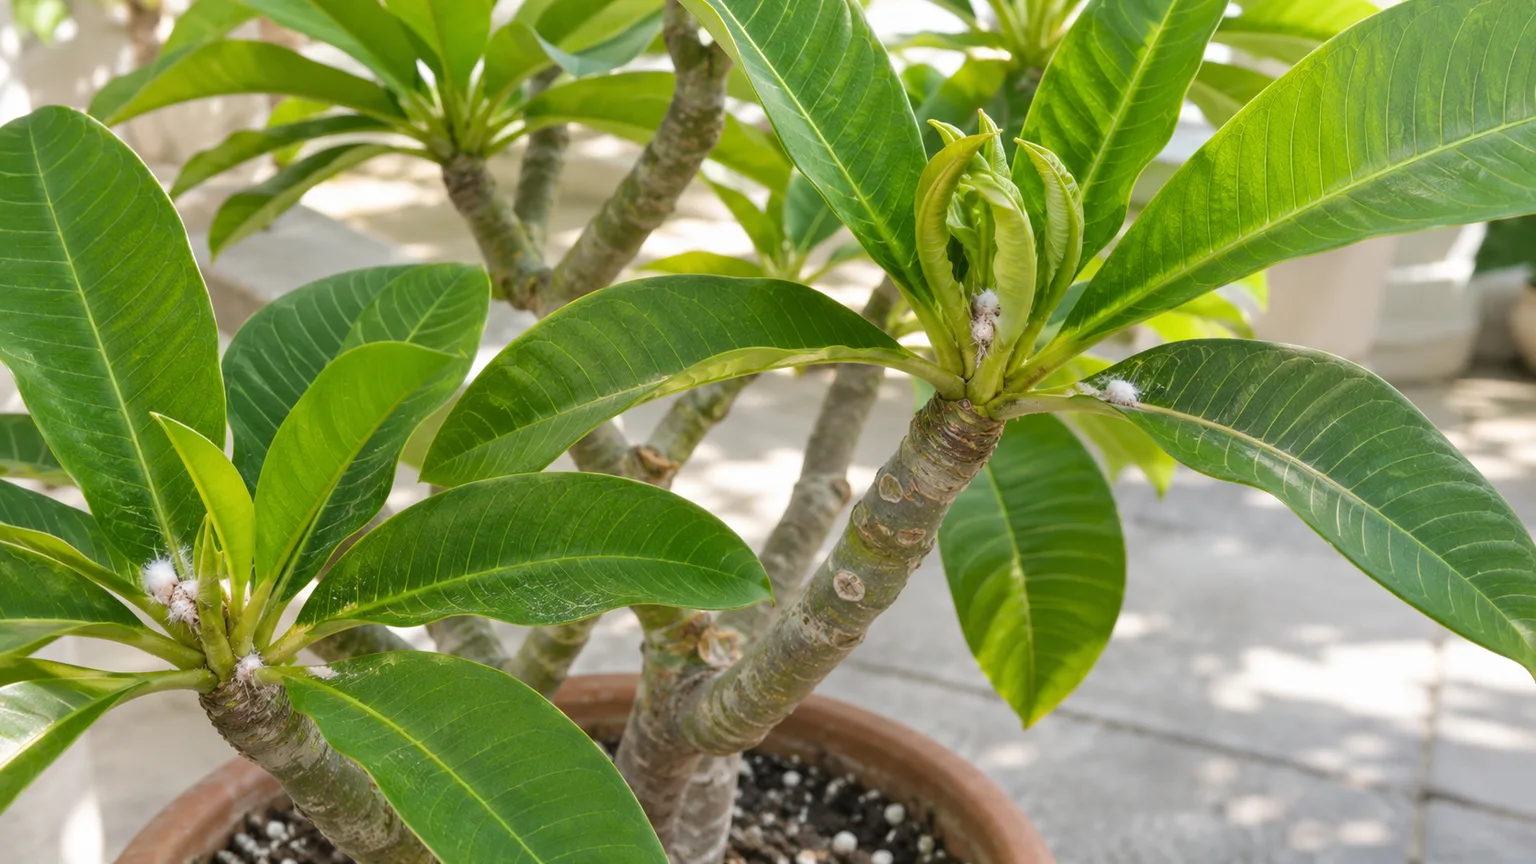
Mealybugs on Plumeria: Causes, Checks & Fixes
This guide covers mealybugs on Plumeria. See also the general Mealybugs guide, watering, and light pages for this plant.
Mealybugs on Plumeria: Causes, Checks & Fixes
Quick answer
Mealybugs on Plumeria (Plumeria rubra and hybrids) show up as white, cottony colonies packed into the plant’s softest architecture: branch tips, unfolding leaves, leaf bases, flower buds, and stem joints. These sap-sucking insects drain vigor and excrete sticky honeydew, which then grows black sooty mold over the leaves below.
First step: isolate the plant if it is potted, then dab every visible colony with a cotton swab dipped in 70% isopropyl alcohol. Work tip by tip, dissolving the wax until each insect is touched. For how mealybugs behave on plants in general, see our mealybugs guide. On Plumeria, the decisive detail is the branch tip — missed colonies in one folded tip can reinfest the whole crown within weeks.
What mealybugs look like on Plumeria
Plumeria concentrates all of its new growth at swollen branch tips, where large leaves spiral out in a rosette. Mealybugs exploit exactly that rosette:
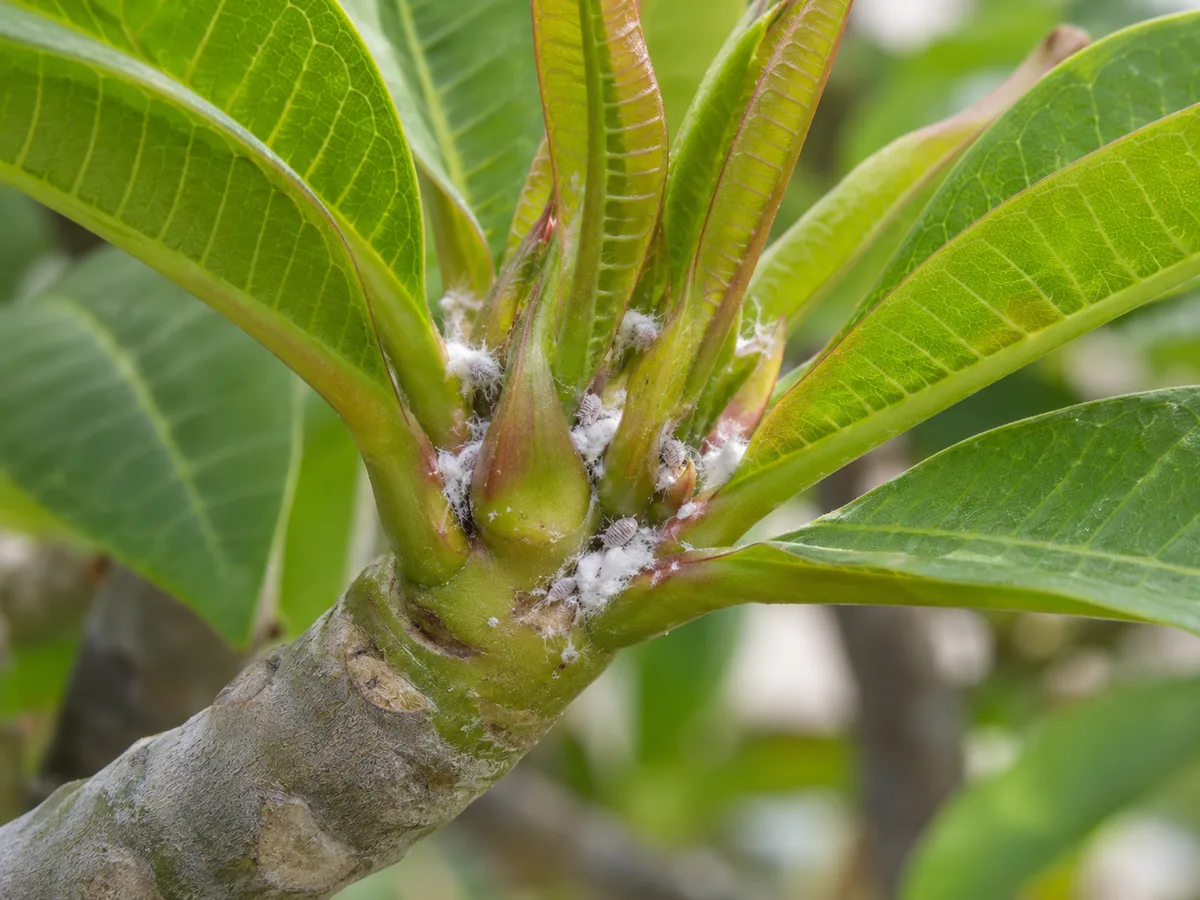
Check the folded leaf bases and stem joints at each branch tip for white wax and slow oval insects beneath it.
- Cottony white masses wedged where leaf petioles meet the tip, inside unfolding leaf spikes, and around flower bud clusters
- Slow, oval insects under the wax when you part it with a swab — colonies usually feed in groups, not as lone insects
- Sticky honeydew on leaves and stems below the colony, sometimes with black sooty mold growing on the honeydew
- Ants trailing up stems to tend the colonies
- Stunted or distorted new leaves, bud drop, and premature yellowing of infested growth
Large established leaves may look untouched while the tip is packed with wax — that mismatch is characteristic. Specialist Plumeria growers list tender tips, leaf bases, stem joints, and protected crevices as the standard hiding places, with the root zone as an occasional secondary site. Always flip leaves and check the undersides first, since colonies congregate there.
Why Plumeria gets mealybugs
Mealybugs arrive; they are not generated by bad watering. The usual entry routes are new nursery plants, cuttings, or a neighboring infested plant — crawlers walk across touching leaves, tools, and hands. Warm weather favors mealybugs, and indoor or greenhouse plants stay vulnerable year-round without natural predators, which is exactly the climate where Plumeria thrives outdoors.
Three Plumeria traits make infestations persistent:
- Tip-clustered growth. Every leaf and flower emerges from the same few centimetres of branch tip, so one missed joint shelters the colony that reinfests the next flush of leaves.
- Soft, nitrogen-pushed growth. Heavy feeding during the growing season produces the tender tissue sap feeders prefer. If colonies keep returning, compare your routine with the Plumeria fertilizer guide before increasing feeds.
- Ant partnerships. Ants protect mealybugs from their natural enemies, so a colony under ant guard survives predators that would otherwise suppress it outdoors.
Stress does not summon mealybugs, but a plant weakened by soggy mix recovers more slowly once they arrive. Plumeria is native to dry, hot areas of Mexico, Central America, and Venezuela and wants dry-to-medium, well-drained soil — chronically wet pots stall regrowth after pest damage. If drainage is suspect, review the Plumeria soil guide alongside treatment.
Plumeria dormancy hides winter colonies
This is the section most generic mealybug guides miss. Plumeria is a seasonally deciduous tree: most plants go dormant and lose their leaves in winter, then bloom prolifically once leaves return. The RHS describes the same rhythm — deciduous succulent branches that want an almost-dry winter rest.
A leafless Plumeria looks pest-free, but mealybugs can overwinter as wax tucked into bare tip crevices, old leaf scars, and bark joints. Inspect stored or overwintering plants in midwinter with a magnifier and dab any wax you find — one dormant colony becomes the spring infestation. Keep dormant pots nearly dry per the Plumeria watering routine; soaking a leafless plant does nothing to mealybugs and invites stem rot instead.
How to confirm the cause
Work through these checks before spraying anything:
- Wax location. Mealybugs pack into joints, tips, and crevices. Flat white film spread evenly across open leaf blades is more likely mildew residue or hard-water deposit.
- Insect under the wax. Part the cotton with a toothpick. Slow legs and a soft oval body confirm mealybugs; static fluff with nothing inside is old wax from a dead colony.
- Honeydew test. Sticky residue on leaves below the colony confirms active sap feeding.
- Ant activity. A steady ant trail to one branch tip strongly supports the diagnosis.
- Scope. Count affected tips and check every plant within touching distance, including recent cuttings.
Lookalikes to rule out:
- Scale insects — flat brown or tan disks glued to stems, not fluffy wax tufts
- Aphids — soft clusters on buds and new growth, but without the cottony wax coat
- Whiteflies — tiny white flies that flutter up when disturbed, rather than stationary wax
- Spider mites — fine stippling plus webbing on leaf undersides, no cottony masses
- Plumeria rust — orange-yellow powdery pustules on leaf undersides, a fungal disease with no insects or honeydew
First fix for Plumeria
Dab every visible mealybug colony with 70% isopropyl alcohol on a cotton swab.
Move potted plants away from clean stock first. Then work systematically from the oldest infested tip to the newest: pull each unfolding leaf gently aside, press the alcohol swab directly onto every white cluster until the wax dissolves and the insects turn dull brown. A 70% or weaker alcohol solution dabbed directly on mealybugs kills or removes them — but test on a small area one to two days beforehand and watch for leaf burn, since tender tip tissue marks more easily than mature leaves.
Do not prune, repot, fertilize, or spray on day one. Physical removal plus isolation is the whole first fix; it tells you within days whether colonies were confined to a few tips or spread across the crown.
Step-by-step recovery
After the first alcohol pass, run a weekly cycle until no new wax appears for at least two consecutive weeks:
- Repeat alcohol dabs weekly. Eggs and crawlers hatch on staggered schedules, so one pass never finishes the job. Repeat the procedure every week until the infestation is gone.
- Prune what the plant can afford to lose. Remove heavily infested leaves first to cut the population instantly, sealing them in a bag for disposal — never compost active colonies near the bench. Skip hard pruning of branch tips; Plumeria blooms from those tips and bleeds milky sap from every cut.
- Escalate stubborn colonies to soap or oil. Insecticidal soap, horticultural oil, or neem oil applied directly on mealybugs suppresses younger nymphs with less wax. Coat the insects thoroughly — wax and hidden joints defeat light misting — and test for burn first, avoiding heat-stressed plants and open flowers.
- Break the ant guard. Sticky barriers on pot rims and bench legs, plus removing nearby ant nests, lets predators reach the colonies. Outdoors, protect lady beetles, lacewings, and parasitic wasps rather than spraying broad-spectrum insecticides that wipe them out.
- Check the root zone if top growth stalls. If tips are clean but vigor never returns, unpot and look for white wax on roots and the stem base. Repot root-infested plants into fresh coarse mix following the Plumeria repotting guide.
- Reserve systemics for confirmed, persistent cases. Systemic products are less reliable against wax-protected mealybugs than many growers expect, and their use should be avoided on flowering plants because of pollinator exposure. Choose only a currently labeled product, and never as the opening move.
Hold fertilizer until new tip growth emerges clean for two weeks. Soft, overfed flushes give the next crawler wave ideal food.
Recovery timeline
Visible colonies should shrink within one to two weeks of consistent weekly alcohol dabs. Expect three to four weekly passes minimum — staggered hatching beats every single-treatment attempt.
The recovery marker is unmistakable on this species: clean new leaves unfolding from branch tips with no fresh wax in the joints. Old leaves with yellow stippling or sooty coating will not fully clear; wipe honeydew with a damp cloth so light reaches the blade, and let the next flush replace damaged foliage.
Worsening signs: wax reappearing in the same joints after four diligent weeks (missed crevice colonies, root mealybugs, or reinfection from an untreated neighbor), buds aborting across multiple tips, or a soft, dark stem base — the last one signals rot, not pests, and needs the drainage response in the Plumeria watering routine.
What not to do
Do not blast the crown with a broad-spectrum insecticide on day one. It rarely reaches wax-sheltered colonies and kills the predators that suppress mealybugs outdoors for free.
Do not apply systemic granules to a flowering Plumeria while pollinators visit the blooms. Keep systemics as a labeled last resort for persistent, confirmed infestations.
Do not soak a leafless dormant plant to fight pests. Dormant stems need near-dryness, and drenching the pot causes the rot that mealybugs never could.
Do not fertilize an infested plant to push through the damage. Extra nitrogen grows the tender tissue crawlers prefer.
Do not hard-prune every infested branch tip at once. Plumeria flowers from branch tips, each cut bleeds milky sap, and severe tip removal costs a season of bloom for a problem that alcohol and patience usually solve.
Avoid treating only the worst tip while skipping neighbors and recent cuttings. Confirm the full scope before declaring victory.
How to prevent mealybugs next time
- Quarantine new plants and cuttings two to four weeks before joining the collection — inspect plants for mealybugs before bringing them onto your property
- Inspect branch tips and leaf joints weekly through the growing season; Plumeria’s fast summer flush hides new colonies quickly
- Give full sun and air movement. Crowded, shaded crowns stay humid and hide wax longer — the Plumeria light guide covers placement that keeps tips exposed and inspectable
- Control ants around pots, benches, and trunk bases so predators can work
- Feed for firm growth, not maximum softness, per the Plumeria fertilizer guide
- Check bare winter stems for wax in tip crevices before spring leaf-out, and keep dormant pots nearly dry
When to worry
Escalate fast if multiple branch tips carry colonies, flower buds abort, sooty mold sheets across leaves despite honeydew wiping, or ants farm every colony in sight. Consider discarding a cutting only when most joints are packed, four-plus weeks of careful treatment fail, and it threatens a large clean collection — discarding a severely infested plant beats repeated insecticide rounds.
A single dabbed cluster on an otherwise vigorous plant is routine maintenance, not an emergency. The urgency is stopping crawler spread during warm growth, not panic.
Conclusion
Mealybugs on Plumeria are a tip-and-joint pest: cottony colonies wedge into branch tips, leaf bases, and buds, drain new growth, and coat leaves in honeydew and sooty mold. Confirm them by finding insects under the wax, isolate potted plants, and dab every colony with 70% alcohol on a weekly cycle until new tip growth unfolds clean. Control ants, hold fertilizer during treatment, and inspect bare winter stems before spring — on this species, the branch tip is both the hiding place and the recovery signal.
When to use this page vs other Plumeria guides
- Use the Plumeria overview when general health, placement, or seasonal leaf drop makes the pest diagnosis unclear.
- Use the Plumeria light guide when shaded, crowded growth keeps tips damp and hard to inspect.
- Use the Plumeria soil guide when soggy mix or poor drainage is slowing recovery after pests are controlled.
- Use the Plumeria watering routine when dormancy timing or wet-pot symptoms overlap with pest damage.
- Use the Plumeria problems hub to browse other Plumeria issues when symptoms do not match mealybugs.
Related Plumeria guides
- Plumeria care overview — seasonal growth, sun, soil, feeding, and dormancy in one place
- Plumeria light requirements — full-sun placement that keeps crowns open and inspectable
- Plumeria soil guide — coarse, fast-draining mix that supports regrowth after pest damage
- Plumeria fertilizer guide — feeding for firm growth without pushing soft pest-prone flushes
- Plumeria repotting guide — timing and technique when root-zone pests demand fresh mix
- Plumeria problems — all Plumeria problem guides when this page does not match
Related tool
Use the Pest Identifier Tool to narrow causes for mealybugs on this plant before changing multiple variables at once.