How to Grow and Care for Marble Queen Pothos
Learn Marble Queen pothos care from light and watering to soil, pruning, propagation, variegation, troubleshooting, and pet safety.
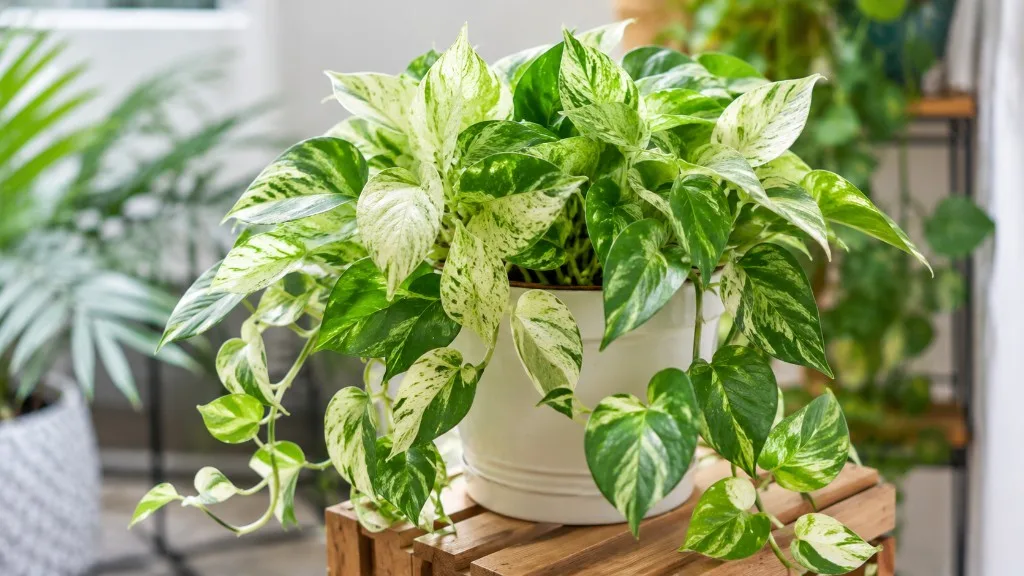
Marble Queen pothos (Epipremnum aureum ‘Marble Queen’) is forgiving in the way most pothos are, but its white-and-green leaves add one important condition: it needs enough usable light to keep producing variegated growth. The goal is not the brightest window or the wettest soil. It is a steady combination of filtered light, an airy root zone, and a partial dry-down between thorough waterings.
It is a trailing or climbing tropical vine that works well in a hanging basket, on a shelf, or against a support. Indoors, give it room to make several feet of vine, then prune strategically when the ends become bare. The plant is easy to maintain, but the right response to a yellow leaf, greener new growth, or a brown edge depends on what the soil, roots, and newest leaves are telling you.
Marble Queen pothos care at a glance
For a healthy Marble Queen, use this baseline and then adjust it to the pot and room rather than following a fixed weekly schedule.
| Care factor | Practical target | What to watch |
|---|---|---|
| Light | Bright, filtered or indirect light for most of the day | Low light produces greener, slower, leggier growth; harsh direct sun scorches pale tissue. |
| Water | Water thoroughly after the top layer has partly dried | A calendar is only a starting point; pot size, light, heat, and season change the dry-down time. |
| Soil | Light, airy houseplant mix that drains freely | Dense or constantly wet mix starves roots of oxygen and raises root-rot risk. |
| Temperature | About 65–80°F for active indoor growth | Protect it from chilly glass, drafts, and temperatures below the mid-50s. |
| Humidity | Average household humidity is usually workable | Dry air matters most when it comes with heater or AC drafts and crispy tips. |
| Fertilizer | Conservative feeding during active growth | Skip fertilizer for a stressed, newly repotted, dormant, or waterlogged plant. |
| Shape | Trail it or give it a support to climb | Pruning above nodes creates more places for new vines to emerge. |
This is a cultivar of E. aureum, not a separate pothos species with completely different roots. NC State Extension and the Missouri Botanical Garden both describe pothos as a low-maintenance vine that prefers bright indirect light, drains best in a loose mix, roots readily from stem cuttings, and can develop root problems in overly wet soil (NC State Extension’s plant profile; Missouri Botanical Garden’s Plant Finder). Marble Queen’s extra white tissue is what makes the placement and growth-rate decisions more specific.
Why variegation changes the care plan
The cream and white sections of a Marble Queen leaf contain less chlorophyll than the green sections. That means a heavily variegated leaf has less green tissue doing the work of photosynthesis, so the plant may grow more slowly than an all-green pothos under the same conditions. Epic Gardening’s cultivar guide makes the practical connection clear: low light encourages greener growth and weakens the appearance of the marbling, while bright indirect light supports stronger variegation (Epic Gardening’s Marble Queen guide).
Do not treat every change in color as a disease or a demand for fertilizer. New leaves can emerge with different proportions of green and white, and the pattern is naturally variable from leaf to leaf. What matters is the trend: if several new leaves are increasingly green and the vines are stretching, light is the first variable to correct; if white sections are crisping on the window-facing side, the plant may be getting too much direct sun.
An occasional almost-white leaf is not automatically a crisis. If a whole shoot repeatedly produces leaves with little or no green, it will usually be weaker than a shoot with balanced variegation. Give the plant brighter filtered light and, if the all-white growth continues, prune back to a node attached to a stem with healthy green-and-white leaves so the plant has a better chance of producing useful new growth.
Choose bright indirect light by looking at new growth
Marble Queen pothos tolerates dimmer conditions long enough to fool you. It may stay alive in a dark corner, but the trade-off is slower dry-down, wider gaps between leaves, smaller new leaves, and a gradual shift toward greener foliage. The New York Botanical Garden notes that pothos can survive poor light but may decline and lose attractive variegation, which is the distinction that matters for this cultivar (NYBG’s pothos care guide).
Use the newest leaves as your light meter. Healthy new growth should arrive with recognizable cream-and-green patterning and stems that do not need to reach dramatically toward the window. A plant can look attractive on its older leaves while the next few leaves reveal that its current location is too dim.
Place it near a window without scorching the white sectors
An east-facing window or a bright spot a short distance from a south- or west-facing window often works well. Sheer curtains, blinds, or a little extra distance from the glass can turn harsh afternoon sun into the filtered light the plant wants. Gentle morning sun may be tolerated, but introduce any direct light gradually instead of moving a shaded plant straight into several hours of intense exposure.
If the only available window gives strong direct rays, filter the window rather than solving the problem by placing the plant in a distant, dark room. Rotate the pot every week or two so one side does not stretch toward the light, and keep leaves from touching cold glass in winter. A grow light can help in a dim room; place it according to the fixture’s instructions and watch the leaves for bleaching or heat rather than assuming more hours is always better.
Use an airy mix and a pot with real drainage
The most useful soil test is what happens after you water. A good Marble Queen mix absorbs water, then lets excess leave the pot quickly enough that the root ball is moist rather than swampy. A standard houseplant mix amended with perlite and a moisture-holding material such as coconut coir is a practical starting point; orchid bark can add larger air spaces when the base mix is dense.
You do not need a complicated recipe or a layer of gravel at the bottom of the pot. A drainage hole, a reasonably porous mix, and a container that is not oversized do more for the roots than a decorative drainage layer. Epic Gardening specifically warns that Marble Queen should not sit in stagnant water or a cachepot filled with runoff because the roots are prone to rot (Epic Gardening’s Marble Queen guide).
Choose a nursery pot or planter with open drainage holes and a saucer that you can empty. If the pot has only one small hole, the mix stays wet for too long, or water pools under the container, fix that setup before changing fertilizer. A breathable terracotta pot may dry faster than plastic, but the best material is the one you can match to your watering habits without letting the plant swing from flooded to bone-dry.
Water after a partial dry-down, not by the calendar
Check the mix before watering by pressing a finger into the top inch or two, lifting the pot to compare its weight, or using a moisture meter as a second opinion. When the surface has dried and the lower root ball is no longer saturated, water slowly across the soil until a little runs from the drainage holes. Then let the pot finish draining and empty the saucer rather than returning it to standing water.
The right interval may be seven days in a warm, bright room and two or three weeks in a cooler, dim winter room, but those are examples, not instructions. A small pot in bright light may dry faster than a large pot in a shaded corner, while a recently repotted plant may stay wet longer because the new mix contains more unused volume. New York Botanical Garden recommends allowing the top of the soil to dry between active-growth waterings and watering less in winter’s lower light; it also emphasizes removing runoff from the dish (NYBG’s pothos care guide).
Adjust in small steps. If water runs straight down the sides because the mix has become hydrophobic, moisten it slowly in several passes or bottom-water briefly, then allow it to drain fully. If the center of the root ball stays wet for many days, do not keep adding small sips; inspect the mix, pot, and roots instead. Frequent little drinks can leave the middle constantly wet while the surface gives a misleading impression of dryness.
Water quality is usually not the first thing to change. If correct watering is not stopping crispy tips and you see white crust on the soil or pot rim, flush the pot with plain water and consider filtered water if the pattern persists; never use fertilizer to compensate for a moisture problem.
Keep temperatures warm and humidity practical
Marble Queen is happiest in a warm, stable room rather than beside a frequently opened exterior door, an uninsulated window, a radiator, or an air-conditioning vent. Aim for roughly 65–80°F during active growth and protect it from cold exposure in the mid-50s and below. A brief cool spell is not the same as a freeze, but cold roots plus wet soil are a poor combination.
Average household humidity is often enough for a pothos. If the air is dry, measure it near the leaves with a hygrometer before buying equipment; brown tips can also come from a hot draft, dry mix, or salt buildup.
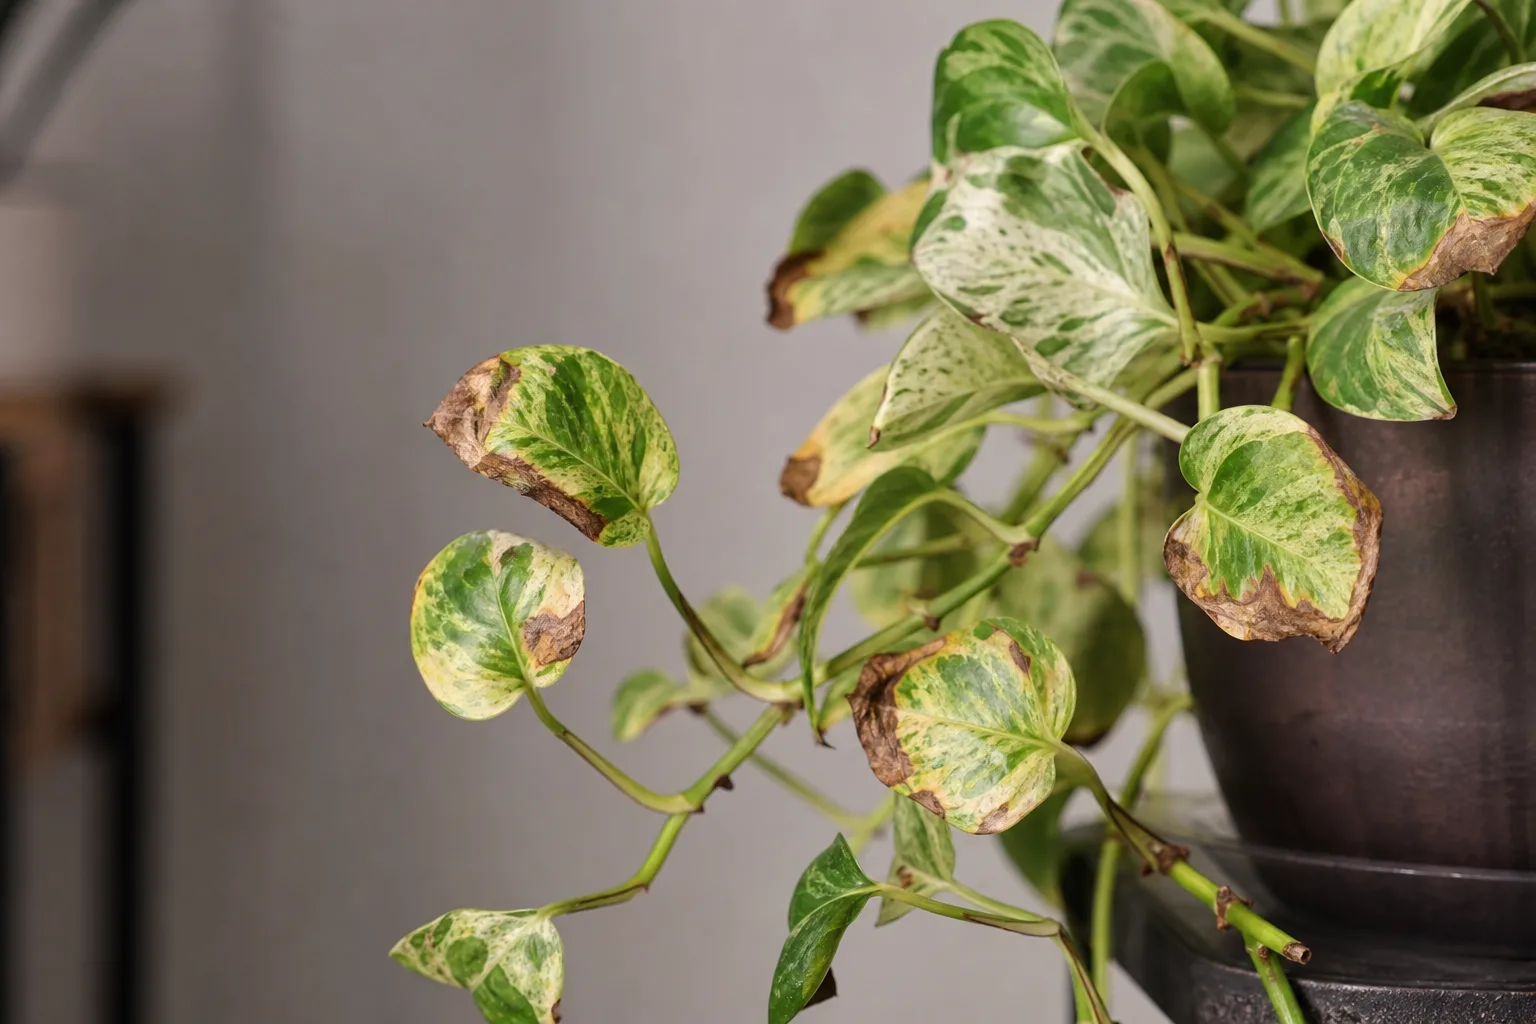
If humidity stays low and the plant is otherwise well-watered, move it away from drafts, group plants with airflow, or use a clean humidifier. Misting is short-lived and can leave foliage damp; a pebble tray may help slightly, but the pot must sit above the waterline.
Fertilize lightly during active growth
Feed only when Marble Queen is actively producing leaves and the root zone is functioning normally. A balanced liquid houseplant fertilizer diluted to half the label strength every four to six weeks from spring through early fall is a conservative routine for many indoor plants; follow the product label if its schedule is more restrictive. New York Botanical Garden gives a more frequent half-strength option for active growth, while NC State Extension recommends a more occasional feeding schedule, so the common safe point is restraint rather than a universal calendar (NYBG’s pothos care guide; NC State Extension’s plant profile).
Do not feed a plant whose pot stays wet, whose roots were recently disturbed, or whose leaves are browning after a drought. Watering a dry root ball with concentrated fertilizer can intensify salt stress, and adding more nutrients will not restore white tissue or fix low light. If fresh mix already contains slow-release fertilizer, wait until that initial supply is largely used according to the mix or product directions.
If pale new growth appears, check light, roots, and the underside of leaves before reaching for a stronger dose. Fertilizer is a maintenance input for a growing plant, not a rescue treatment for root rot, scorch, or a vine that has stopped growing because it is cold.
Prune for fuller vines and train the climbing habit
Pruning changes where the plant branches. Use clean, sharp scissors to cut just above a leaf node—the joint where a leaf and often an aerial root emerge. A cut can stimulate new growth from a node below it, while leaving long unpruned vines tends to concentrate foliage at the ends.
For a fuller pot, shorten several of the longest vines rather than removing every trailing stem at once. Gardening Know How’s pruning guidance notes that you can cut back to manage size and that new vines emerge from nodes; Epic Gardening recommends removing no more than about one-third at a time for a gentle maintenance approach (Gardening Know How’s pothos pruning guide; Epic Gardening’s Marble Queen guide). Use the healthy cuttings for propagation.
Marble Queen can trail from a hanging planter or climb a trellis or moss-covered support. A support lets the vine press aerial roots against a surface and may encourage larger, more mature-looking leaves when light and warmth are strong, while trailing is simpler and keeps the plant’s natural cascade. Choose the shape that fits the room; a support is not a requirement for health.
Wipe dust from leaves with a soft, damp cloth and support the vine rather than tugging it by the leaves. Clean foliage is easier to inspect for scale, mealybugs, and mites, but do not use leaf shine products that leave a coating or block the surface.
Propagate from a healthy stem cutting
Propagation is easiest while the parent plant is healthy and growing. Select a firm, green section with at least one visible node and one or two healthy leaves above it; a four- to six-inch cutting with multiple nodes gives you more options. Avoid taking material from a mushy stem, a pest-heavy section, or a vine with the exact symptom you are trying to escape.
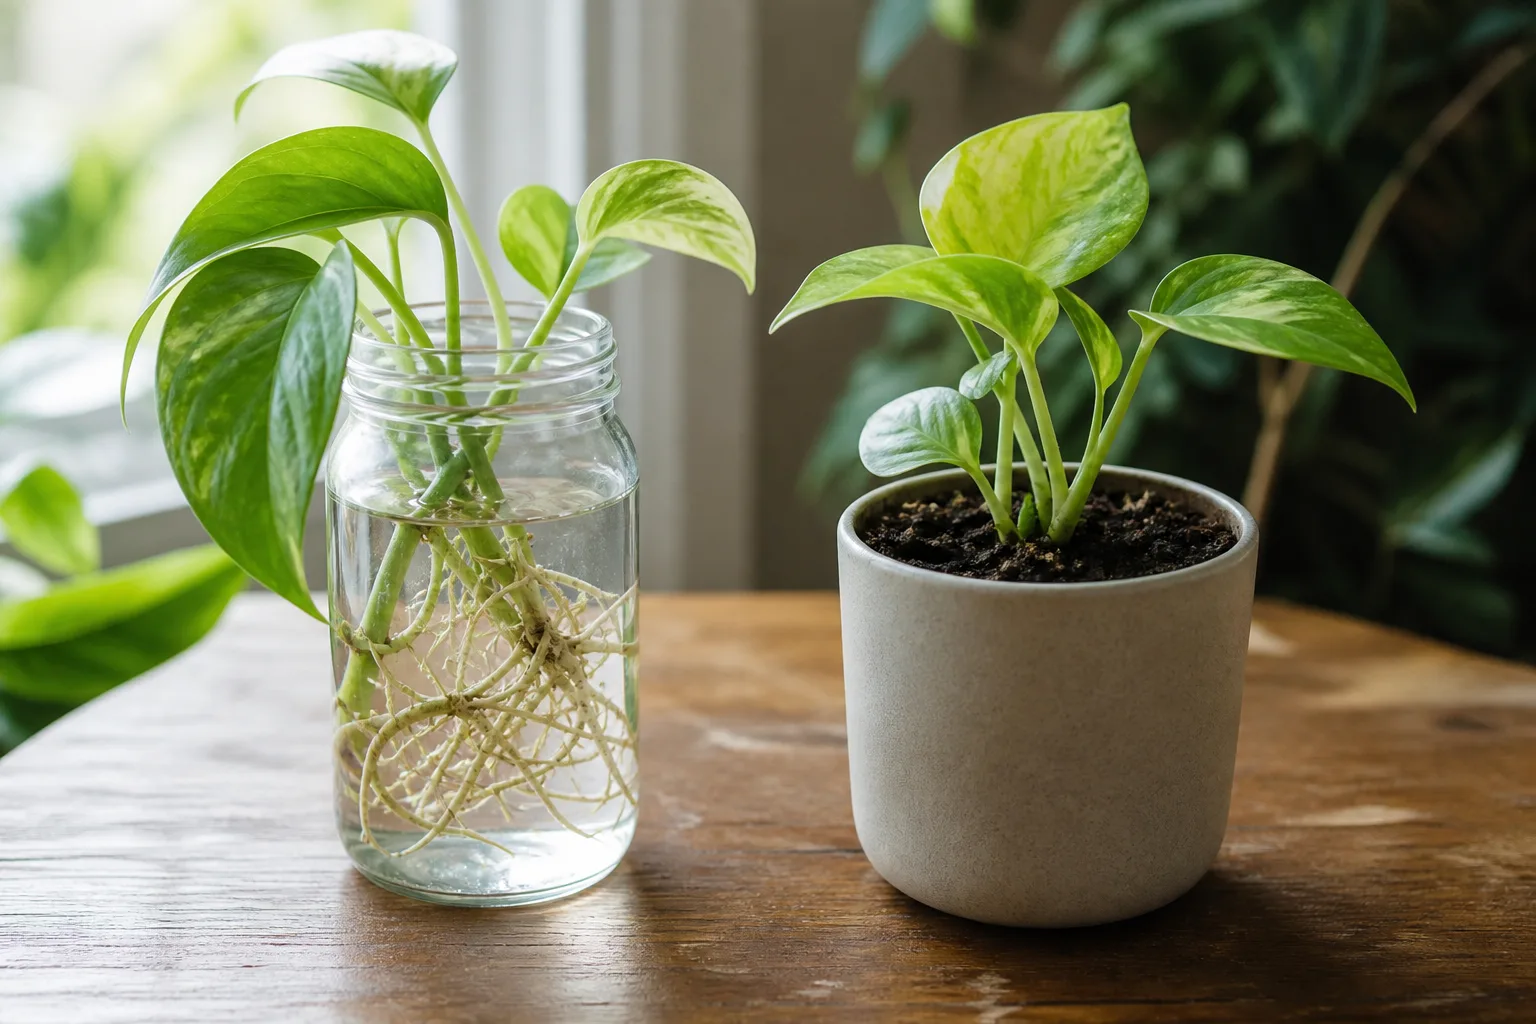
Make the cut just below a node with clean scissors. Remove leaves that would sit below water or soil because submerged or buried foliage can decay. If you are taking several cuttings, label the top ends or lay them out before planting; a cutting inserted upside down can waste time even though the node is present.
Choose water or soil rooting based on your next step
Water rooting is the easiest method to monitor. Place the node or nodes in a clean glass of water, keep the leaves above the surface, and set it in bright indirect light. Refresh the water completely when it becomes cloudy and otherwise every couple of weeks; Gardening Know How recommends replacing water rather than simply topping it off because oxygen is depleted over time (Gardening Know How’s water-propagation guide).
When roots are about one to two inches long, transfer the cutting to pre-moistened, airy mix or keep it growing in water as a small hydroponic display with appropriate nutrients. Water roots are not automatically identical to roots grown in potting mix, so make the transition while the root system is young, keep the mix evenly but lightly moist at first, and avoid moving a long-established water plant into a large pot of heavy soil.
Soil rooting skips that transition. Insert a node into a small pot of pre-moistened mix, firm the medium around it, and keep the pot in bright indirect light. The mix should be lightly moist, never saturated; too much water around a leafless buried node can rot the cutting before roots form.
Plant several rooted cuttings in one modest pot if you want a full plant quickly. A single cutting in a large container is more likely to look sparse and leaves too much unused mix around the roots, which increases the risk of staying wet.
Repot when the roots or potting mix give you evidence
Marble Queen does not need repotting just because a year has passed. Look for roots circling densely around the root ball, emerging from drainage holes, mix that has collapsed and stayed wet, or a plant that dries dramatically faster because roots have filled the container. A plant that is slightly snug can grow well; a root ball that has taken over the pot has little room to hold water and nutrients evenly.

Repot during active growth when possible. Choose a container only one size larger, or at most a couple of inches wider, with drainage holes. If the current pot is the right size but the mix has broken down, refresh the mix and reuse the clean pot instead of automatically upsizing.
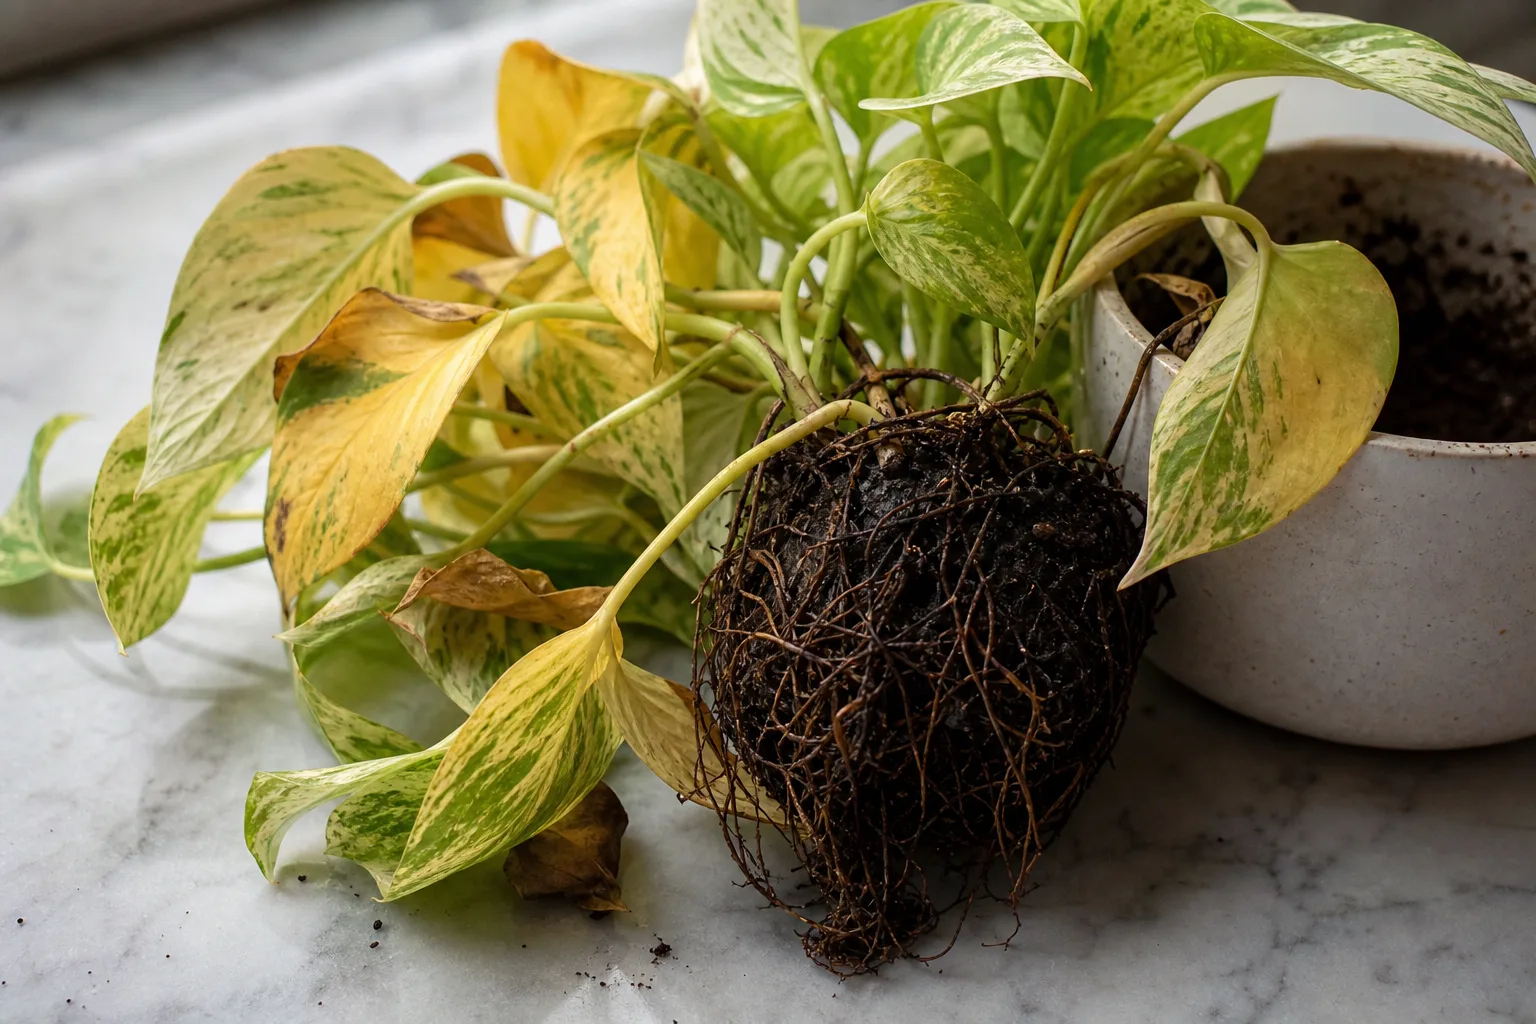
Slide the plant out gently and inspect the roots. Healthy roots are firm; roots that are dark, mushy, sour-smelling, or falling apart need attention. Remove only clearly damaged material with clean scissors, place the remaining roots in fresh airy mix at the same depth, water until runoff appears, and empty the saucer once the pot has finished draining.
Expect a short pause after repotting. Put the plant back in its stable bright-indirect location, keep the soil from swinging between drought and saturation, and wait before fertilizing if the new mix contains nutrients. Repotting is a chance to correct a bad root environment, not a reason to disturb a healthy plant repeatedly.
Diagnose yellow leaves before you change the routine
One older lower leaf turning yellow while the rest of the plant is firm and producing healthy new growth may simply be natural aging. Several yellow leaves appearing together, especially from the base upward, deserve a soil and root check before you add food.
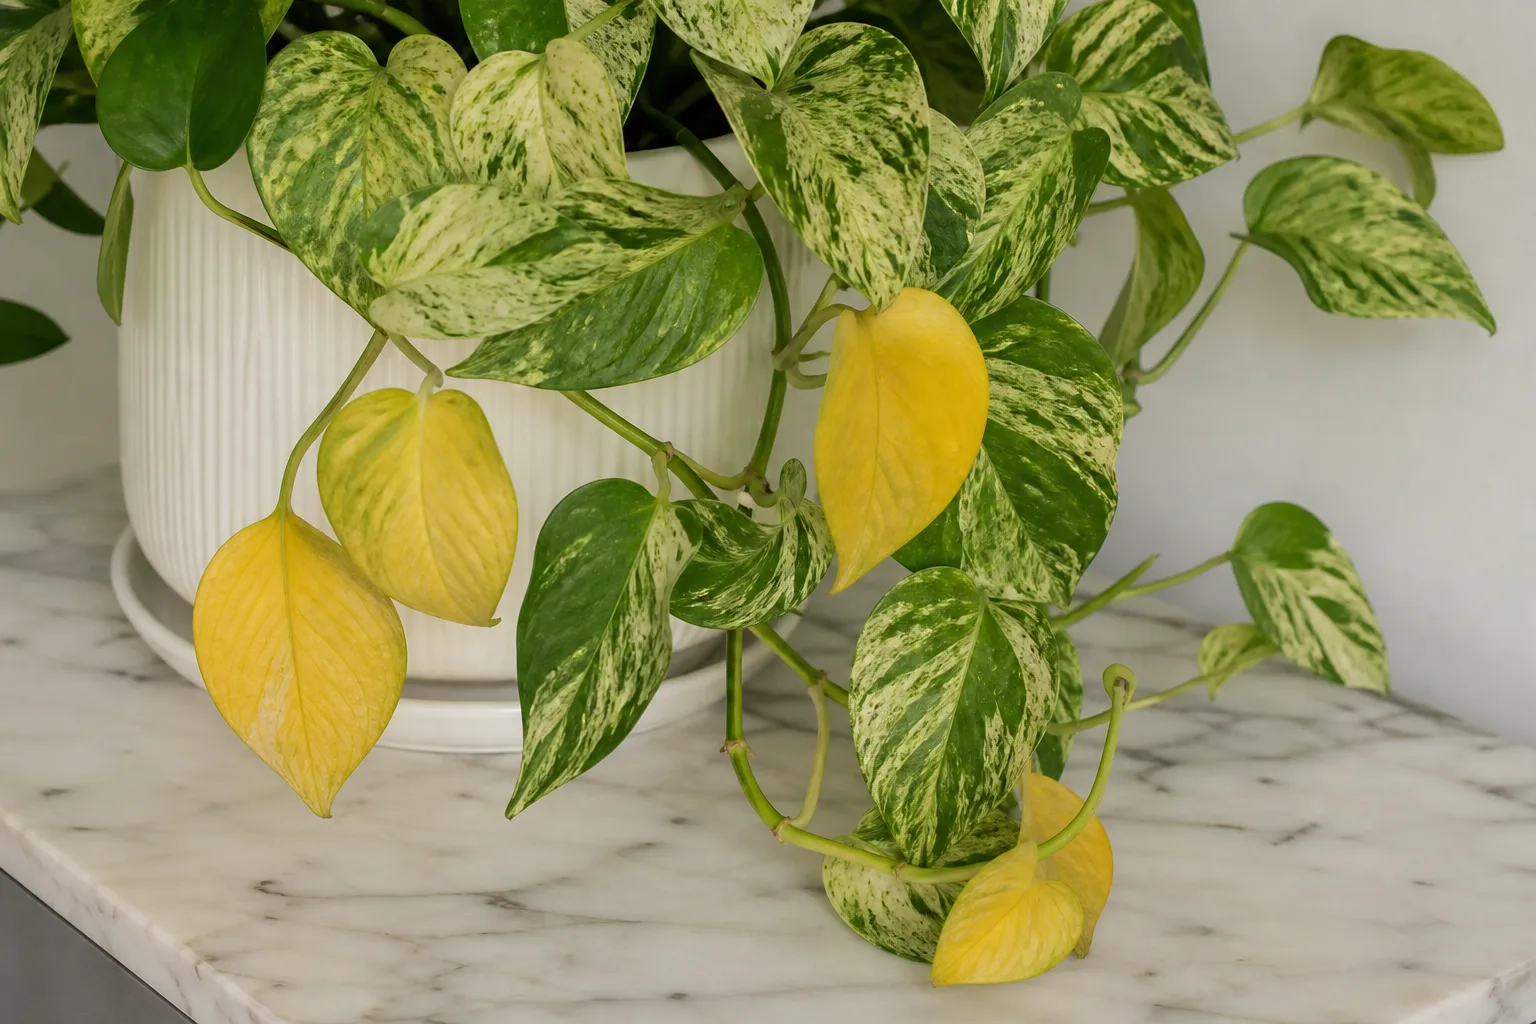
Start with the moisture pattern:
- Yellow leaves plus wet, heavy mix: Stop watering and inspect the drainage and roots. Overwatering and poor drainage can lead to root rot; NC State Extension lists root rot and blackened leaf margins among pothos problems associated with excess moisture.
- Yellow leaves plus a very light pot and dry mix: Water thoroughly, then change the future trigger so the root ball does not repeatedly dry completely. Remove only leaves that are fully dead.
- Yellow or faded leaves plus long gaps between them: Move the plant toward brighter filtered light. Low light can reduce variegation and slow growth, which then slows dry-down and makes calendar watering even riskier.
- Yellow leaves with a pest pattern: Check leaf undersides, nodes, and stems for scale, mealybugs, mites, or sticky residue before treating.
Do not expect a yellow leaf to turn green again after the cause is corrected. Judge recovery by the next leaves, firmer stems, a healthier root zone, and a watering interval that makes sense for the new placement.
Diagnose brown tips, edges, and pale patches
Brown tips are a pattern, not a diagnosis. Crispy tips on several leaves can follow dry soil, dry air, heater or AC drafts, or salt buildup; New York Botanical Garden also notes that brown edges and spots can follow a root ball that dries during the growing season. Trim the dead tissue for appearance, but first correct the condition that made it brown (NYBG’s pothos care guide).
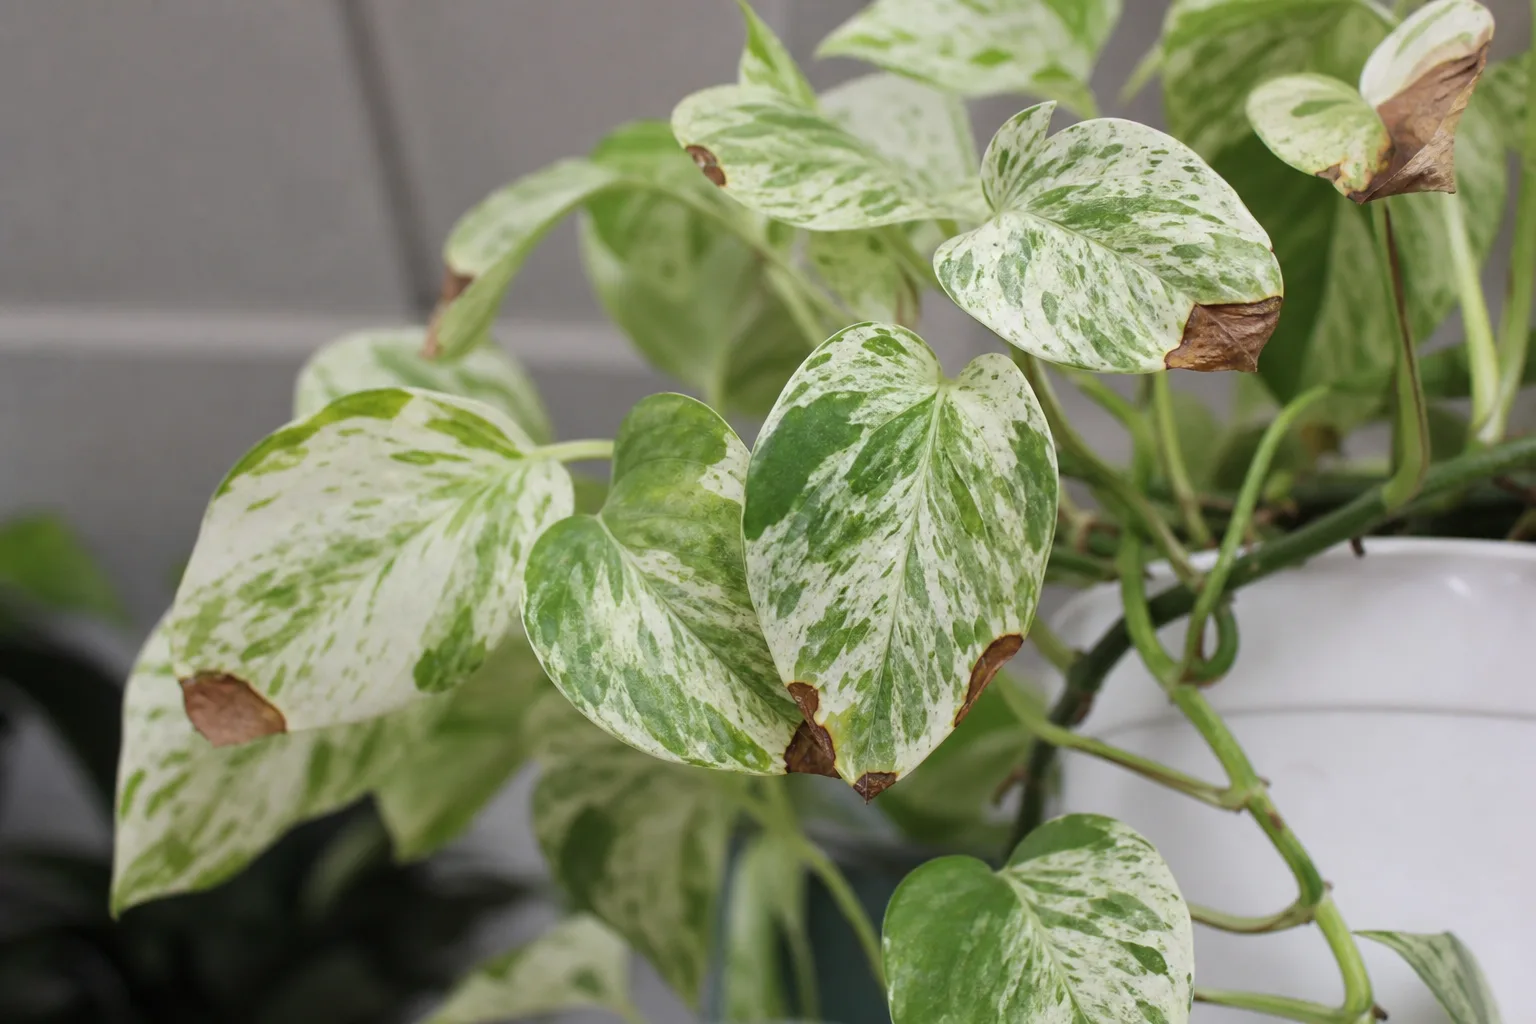
Brown, papery patches on the side of a leaf facing a strong window suggest scorch, particularly when the rest of the plant is watered normally. Filter the light or move the plant slightly back from the glass. If brown damage is soft, spreading, or accompanied by a dark stem base and persistently wet soil, treat it as a root or disease warning rather than as a humidity problem.
White or cream areas that turn brown first are especially vulnerable when the plant is exposed to harsh sun or inconsistent moisture. The white tissue has less chlorophyll, but that does not mean every brown patch is a variegation defect. Inspect the timing and location of the damage, check the soil, and look for pests before choosing a fix.
Humidity can help a plant cope with dry air, but it cannot replace watering a dry root ball or flushing accumulated salts. The most reliable order is to remove drafts and harsh sun, correct the soil moisture, check water quality and fertilizer use, then add measured humidity if the room is genuinely dry.
Handle pests, root rot, and leaf-spot risk early
Inspect Marble Queen when you water it, especially where leaves meet stems. Mealybugs look like small cottony clusters, scale can resemble fixed brown or tan bumps, spider mites may leave fine stippling or webbing, and fungus gnats are more likely when the mix stays wet. Missouri Botanical Garden lists scale, mealybugs, mites, fungal leaf spot, and botrytis among pothos problems, while NC State Extension also flags mealybugs and scale (Missouri Botanical Garden’s Plant Finder; NC State Extension’s plant profile).
Isolate a visibly infested plant before it touches neighboring plants. Remove small numbers of insects with a cotton swab or rinse the plant gently, clean the surrounding shelf, and repeat inspections because one treatment rarely reaches every life stage. If you use an insecticide, soap, oil, or other pesticide, choose a product labeled for the plant and pest, follow the label exactly, and test a small area first; never assume that “natural” means harmless to leaves, people, pets, or beneficial insects.
Root rot needs a different response. Yellowing, wilting despite wet soil, mushy stems, a sour smell, and dark collapsing roots together are more meaningful than any one symptom alone. Stop watering, remove the plant from its pot, cut away clearly rotten roots, discard saturated mix, clean the container, and replant only the sound roots in fresh, fast-draining mix; if almost the entire root system has collapsed, take healthy stem cuttings as insurance.
Avoid wetting the foliage late in the day and give the plant enough space for air movement. A few isolated spots may be old damage, but lesions that expand across leaves or stems, especially in a crowded and damp setup, warrant removing affected tissue and getting local extension guidance rather than repeatedly spraying an unidentified problem.
Grow it outdoors only as a contained seasonal plant
Marble Queen can spend warm weather outdoors in a container in bright shade or filtered light, but it is not a plant to move straight from a dim room into full sun. Acclimate it over a week or more, protect it from strong afternoon exposure and heavy rain, and bring it inside before chilly nights. Missouri Botanical Garden lists pothos for warm zones and part shade, while Epic Gardening cautions against planting Marble Queen into an open garden because pothos can spread aggressively in suitable climates (Missouri Botanical Garden’s Plant Finder; Epic Gardening’s Marble Queen guide).
Keep the container off soil where possible, check for hitchhiking pests before bringing it indoors, and make sure outdoor runoff cannot keep the pot submerged. Local invasive-plant rules and climate matter more than a generic hardiness number; if you live in a frost-free area, check regional guidance before growing pothos outside year-round.
Keep Marble Queen pothos away from pets and young children
Treat every part of Marble Queen pothos as unsafe to chew. NC State Extension lists calcium oxalate crystals and oral irritation, swelling, drooling, vomiting, difficulty swallowing, and skin irritation among the plant’s poison characteristics; the ASPCA identifies pothos as toxic to cats, dogs, and horses because of insoluble calcium oxalates (NC State Extension’s poison information; ASPCA’s Devils Ivy entry).
Place the pot where a child, cat, dog, or grazing animal cannot reach the leaves or fallen clippings. If a pet may have chewed it, the ASPCA advises contacting Animal Poison Control or a veterinarian as soon as possible; do not wait for symptoms to become severe. Wear gloves if the sap irritates your skin, wash hands after pruning, and dispose of cuttings where animals cannot pull them from the bin.
Conclusion
Marble Queen pothos is easiest when you care for its roots and read its newest growth. Give it bright filtered light to preserve the marbling, use a loose mix in a draining pot, water after a partial dry-down, and keep feeding modest while it is actively growing.
When something looks wrong, inspect in order: light, soil moisture, drainage, roots, temperature, pests, and only then fertilizer. Prune long or all-white growth back to useful nodes, root healthy cuttings in the medium that matches your next step, and keep the plant contained outdoors and out of reach of pets. That routine lets the cultivar stay both forgiving and beautifully variegated.



