Mealybugs on Monstera Peru: How to Find and Treat Hidden
Quick answer
First, isolate the Monstera Peru from nearby plants. Then inspect the leaf undersides, puckered folds, petiole joints, and stem nodes for live insects or cottony egg sacs; do not treat white residue as mealybugs until you can see the insect or a matching honeydew trail.
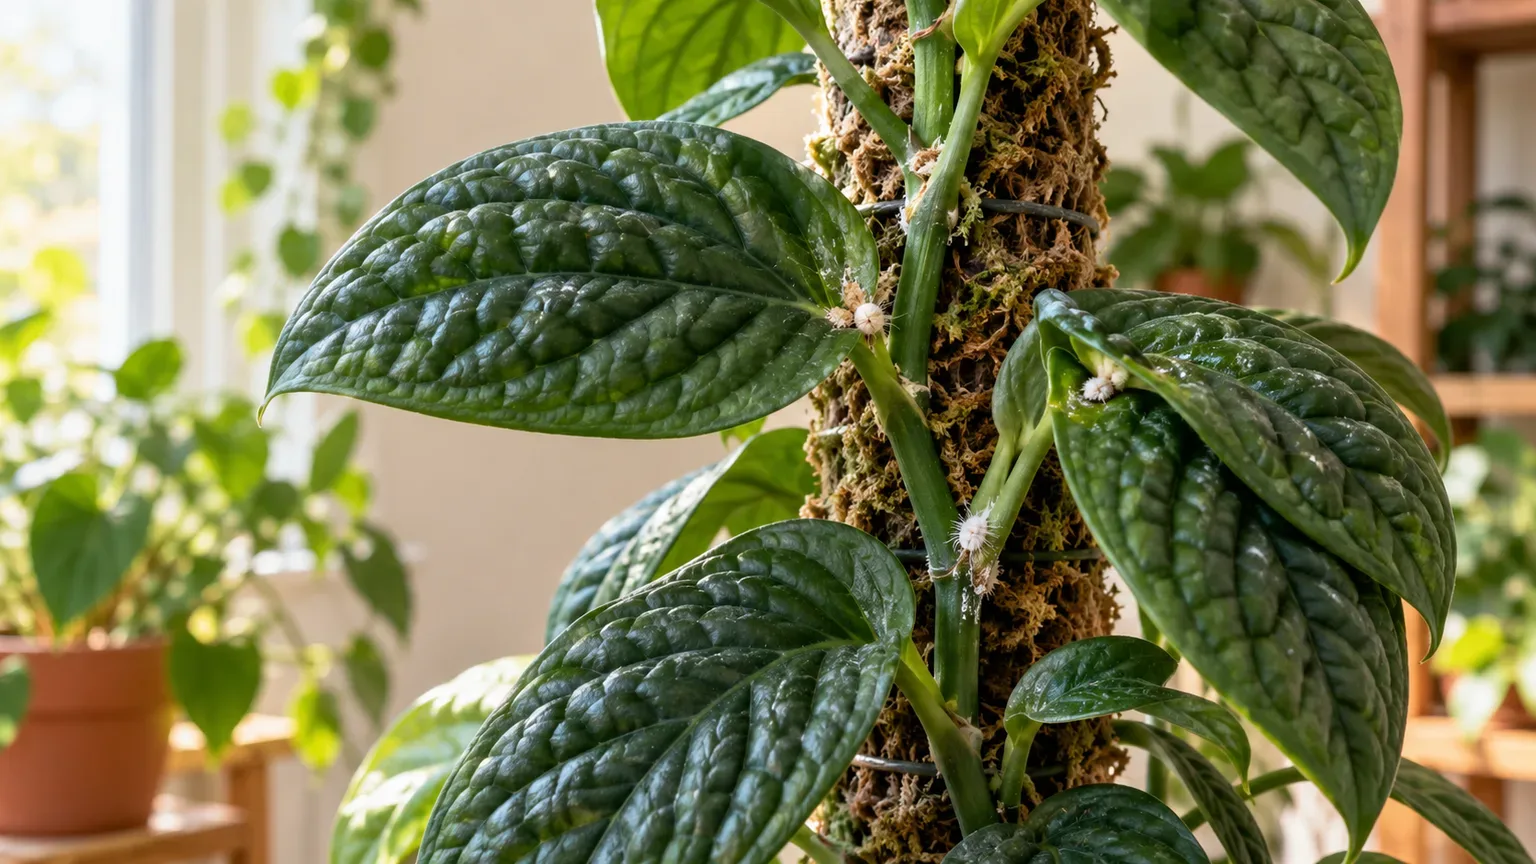
Mealybugs on Monstera Peru: Causes, Checks & Fixes
This guide covers mealybugs on Monstera Peru. See also the general Mealybugs guide, watering, and light pages for this plant.
Mealybugs on Monstera Peru: Causes, Checks & Fixes
Quick answer
First, move the Monstera Peru away from its neighbors and keep it separate while you check it. Its thick, puckered leaves create folds, and the vine may press against a board or pole, so a quick glance at the upper leaf surface can miss a colony. Turn over each leaf and inspect the petiole joints, the stem nodes, and every contact point with the support.
The soft, oval, wax-covered insects most often seen in plant crevices are female mealybugs. The white cottony material may be a denser egg sac rather than a patch on the leaf, so look for an insect beneath it, pale crawlers nearby, or sticky honeydew at the same location. A spot that wipes away like lint, with no insect, egg sac, or repeated appearance, is not enough to confirm a pest.
For general mealybug biology and control choices, see our mealybug guide. This guide focuses on where a colony can hide on the plant sold as Monstera Peru and how to treat the vine without turning routine care into unnecessary repotting or repeated spraying.
What mealybugs look like on Monstera Peru
On this plant, the first clue is often a few cottony white flecks at the base of a leaf stalk, on a stem node, or where two puckered leaves overlap. The dense cottony egg sac may look like a small tuft of cotton rather than a mark on the leaf. A trail of honeydew or sooty mold may appear beside a feeding colony; use it as a clue to inspect, not confirmation by itself.
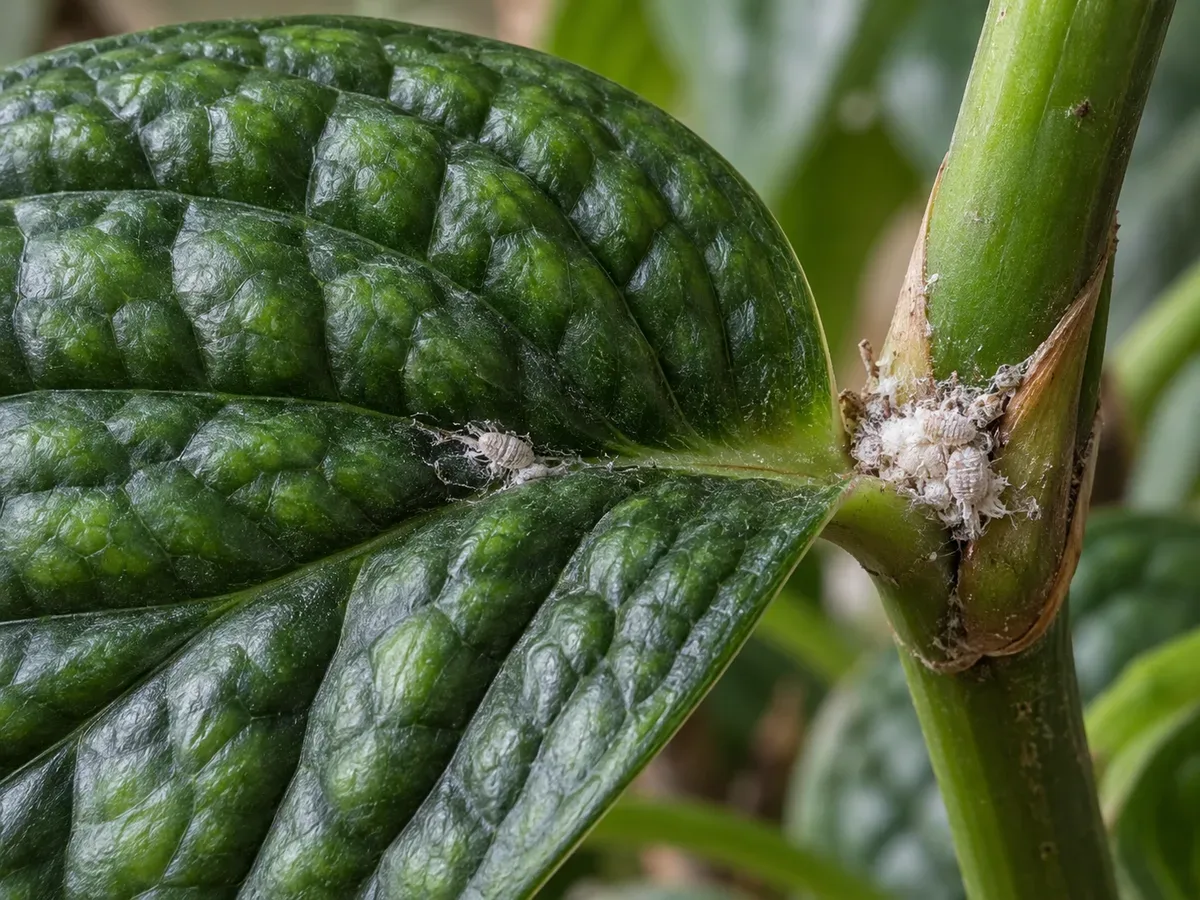
Small colonies often sit in the protected joint between a puckered leaf and its stem; check the nearby node and leaf underside as well.
The plant’s dark, corrugated surface makes a scattered colony easy to overlook from across the room. A cottony patch should look attached to a plant part or move when touched; examine it with a hand lens or phone camera before removing it. If you see an insect with a segmented oval body under the wax, or a trail of tiny pale crawlers near a mass, the pest diagnosis is stronger than color alone.
A leaf that has yellowed or curled is not a mealybug diagnosis by itself. The feeding can weaken a plant when colonies build up, but damaged foliage may also reflect normal aging, poor light, or a root-zone problem. Confirm the insect first; use the Monstera Peru care overview to compare its normal thick, puckered leaves and climbing habit with what is changing on your plant.
Why Peru’s leaf shape changes the inspection
Monstera Peru is commonly sold as a compact climbing aroid with firm, deeply textured leaves. The pronounced ridges and folds are part of the leaf, not evidence of disease. They also mean that a wipe across the top cannot clear the places where a leaf surface tucks toward its stalk. Check both faces and trace the narrow line where the petiole joins the stem.
Look especially where the petiole meets a node. Mealybugs commonly settle in sheltered plant joints, including between a stem and a touching leaf, so a tucked-away colony can remain after an exposed one is removed. On a Peru vine, the same geometry appears around the petiole bases and along the short spaces between leaves; treat these as inspection points, not proof that this plant is uniquely prone to mealybugs.
If the plant is being trained to shingle against a board or plank, inspect the back of the vine too. Lift a loose tie gently and look at the node, aerial root, and the narrow area between stem and support. A mealybug colony may sit where plant tissue touches the board, beyond the view from the front. Do not pull a firmly attached vine away from its support just to search; loosen only what can move without tearing roots or stems.
The important plant-specific distinction is that the folds make inspection slower, while the pest itself is diagnosed by insect evidence. Dust, dried sap, a bit of perlite, or an old pale leaf scar can all look white in a textured surface. If the material has no oval bodies or egg sac and does not return at a joint, keep checking rather than applying a pesticide based on a white speck.
A ten-minute inspection that follows the vine
Keep the plant separated while you inspect. Use bright indirect light, a clean white sheet of paper, and a flashlight or phone camera. The paper makes pale crawlers easier to notice if they fall from the leaves; it is not a substitute for looking at the plant itself.
- Start with the leaf joints. Turn each leaf over and look where the petiole begins. On Monstera Peru, inspect each fold at the base of the leaf, the edge of a deeply puckered section, and the point where the petiole reaches the stem. Do not assume that a clean top means the underside is clean.
- Follow the stem from tip to base. Check each node, the seam under a tie, and any place a leaf rests against another leaf. If the vine is on a support, look along the side facing the board or pole. Newly hatched crawlers move short distances before settling, so check more than one node after finding a mass.
- Look for a matching sign. Cottony wax, a live insect, and a clear sticky film at the same joint support one another as evidence. Honeydew can remain after the insect has moved, so it is a clue to search more closely, not confirmation by itself.
- Check the newest leaf and the growing tip. Look at the petiole, the sheath around an emerging leaf, and any tight fold that has not opened fully. Do not force a rolled or unfolding leaf apart; inspect the exposed seam and return to it when the leaf opens.
- Check the pot only if the aboveground inspection does not explain decline. White wax at the soil line, on the outside of the nursery pot, or emerging from a drainage opening is a reason to suspect root-feeding mealybugs. These are a different problem from the cottony insects on leaves and stems. Root mealybugs can leave white fluffy patches on roots and may be associated with wilting despite regular watering, but a wilted leaf alone does not prove that they are present.
Do not unpot a healthy-looking vine just because a white patch is present on a leaf. Root disturbance is not a useful first diagnostic step for a visible stem colony, and it adds a second stress at the same time you are trying to evaluate the infestation. Reserve a root inspection for evidence at the pot or ongoing decline that does not match the visible leaf-and-stem colony.
Confirm mealybugs rather than a lookalike
| What you see | What it may mean | What to do next |
|---|---|---|
| White, oval insects under a waxy fringe or cottony egg sac at a stem or petiole joint | Mealybugs are likely | Isolate, photograph the location, and remove the visible colony |
| A loose white fiber or dust that lifts away cleanly and does not return | Debris is more likely | Wipe the area with a damp cloth and inspect it again during routine care |
| Small hard bumps attached to a stem, without the soft cottony wax | Scale may be a better fit | Compare with a scale-specific identification; the hard bump alone does not confirm mealybugs |
| Pear-shaped insects clustered on tender growth, often with shed skins | Aphids are another possibility | Use the Monstera Peru aphids guide if that is what you can see |
| Fine pale stippling, bronzing, or webbing rather than cottony clusters | Spider mites fit better | Follow the Monstera Peru spider-mite guide if this is the pattern; do not treat a webbed leaf as mealybugs without finding wax-covered insects |
| White, powdery material on roots or the root ball, with persistent decline | Root mealybugs are possible | Keep the pot isolated and inspect roots only when the evidence points below the soil line |
Mealybugs and root mealybugs do not require the same response. Aboveground mealybugs are visible in protected leaf and stem joints. Root-feeding species live below the surface, so they may not appear in a surface inspection; conversely, an old white mark on the pot is not enough to establish a root infestation. If you need to inspect roots, use the Monstera Peru repotting guide for a careful root-ball check and avoid moving the infested mix around the collection.
First fix: isolate the plant
If you find a live mealybug or a cottony egg sac, the first action is to move the Monstera Peru away from other plants. Put it in a separate room if possible, or at least far enough away that leaves, support boards, and tools do not touch neighboring plants. New plants and tools are common introduction routes for mealybugs. Isolation buys time to inspect and treat without spreading the problem.
Before moving it, look at the support and pot. If a board or pole is attached to the vine, carry the whole setup without brushing it against a shelf. Keep the plant’s usual light as much as possible during quarantine; a sudden move to a dim corner makes it harder to judge whether new yellowing is pest feeding or a care change. The Monstera Peru light guide can help you keep the quarantine location within its normal bright-indirect-light range.
After it is isolated, photograph the affected joints and remove the most obvious cottony mass with a damp cotton swab or tissue. Wipe rather than crush the insects into the leaf folds, then bag the used material and dispose of it. This is a limited first cleanup, not proof that the colony is gone. Mealybugs may occupy several nodes, and an egg sac can remain tucked under a leaf or beside a support.
Treat the textured leaves in a repeatable pass
Treatment works best as a careful sequence, not a pile of products. The waxy covering and hidden plant crevices reduce contact treatment coverage, so one spray or wipe is not a reliable all-clear; follow-up checks still matter.
For a few visible colonies
Use a damp cotton swab to lift off each visible insect and its cottony egg material. Roll the swab gently through the petiole joint and along the nearby node, then use a clean swab for the next pocket so you are not dragging material from one leaf to another. If you choose to use isopropyl alcohol on a small infestation, do not apply it broadly first: UC IPM recommends 70% or weaker isopropyl alcohol dabbed on the insects after a small-area patch test one to two days beforehand, with weekly repeat applications until the infestation is gone. Repeat inspection and removal rather than assuming that one pass reached protected eggs.
For this plant, pay extra attention to the underside of each thick leaf and the seam at the petiole base. A swab that reaches only the exposed cotton may leave insects at the edge of the fold. Use gentle pressure; a textured leaf can hide a small mark after rubbing, so do not scrape the waxy surface with a fingernail or stiff brush.
For a larger but still manageable vine
If many leaves are affected, start by removing the most heavily colonized leaves or short stem sections when that can be done without stripping the whole vine. Wipe every remaining node and inspect the underside of the support-facing leaves. A shower or steady stream can reduce exposed insects on a sturdy plant, but it cannot reach every sheltered seam, and hard pressure can injure a tender growing tip. If you rinse the vine, support it as you turn it, keep the potting mix from becoming saturated, and let the leaves dry before the plant returns to its board or shelf.
If manual removal is not enough, choose a product whose label specifically permits indoor use on ornamental plants and lists the pest or its control. Insecticidal soap or horticultural oil must contact the insect, and protected adults or egg sacs may escape the first pass. Test a small area first, follow the product label exactly, and keep the plant separate while you monitor. UC IPM says soaps and oils can suppress exposed immature mealybugs but warns that wax and hidden sites reduce contact control; it also advises against relying on broad-spectrum insecticides when more targeted approaches are feasible. Do not combine soap, oil, alcohol, and neem in a homemade mix.
Treatment may take weeks of repeated inspection because crawlers can emerge after visible adults have been removed. The Spruce describes eradication as a multiweek or sometimes longer process, depending on severity. Use the treatment label’s interval if you apply a product; do not spray more often just because a single inspection found a speck. Between passes, look for new cottony material and live insects at the same nodes.
If the evidence points to the roots
Do not use a foliar spray to treat a suspected root colony. If white wax appears on roots or repeatedly emerges from the drainage openings, isolate the pot and inspect the root ball carefully. A mealybug-free surface does not rule out a root pest, but a wilted vine with no root evidence does not justify immediate repotting either.
If you confirm root mealybugs, remove loose infested mix and wash the pot and saucer before they return to the collection. Replace the mix with a clean, free-draining aroid mix and clean the work area; avoid reusing old soil or a support that still carries insects. The Monstera Peru soil guide covers the well-drained mix this plant needs after a necessary repot. Because root mealybugs are difficult to reach, consider discarding a severely infested plant rather than treating it beside healthy plants.
Keep care steady while you treat
Mealybugs are not evidence that Monstera Peru needs more water, fertilizer, or a new pot. Do not change all three conditions while you are trying to judge whether the pest treatment worked. Keep the plant in bright indirect light and check the pot’s moisture before watering. The care guide recommends letting the top 3–5 cm of mix dry before watering; use the watering guide to check the pot rather than a fixed calendar.
Avoid adding extra fertilizer to push fresh leaves while colonies remain. Mealybugs feed on plant sap, and high nitrogen can stimulate tender growth that pests may use; the important response is to control the insects and return to the plant’s normal care, not to force a growth flush. Keep the support stable so the vine does not acquire new creases or torn petioles during treatment. If the leaves are dusty, wipe them gently after treatment residue is gone, but do not confuse a clean leaf surface with proof that hidden nodes are pest-free.
Recovery: follow the new leaf, not old marks
Old leaves may stay sticky, yellowed, or cosmetically scarred after the insects have been removed. Those marks do not always reverse, and pruning every imperfect leaf can leave a climbing vine with too little healthy foliage. Remove only tissue that is dead, badly damaged, or still holding a concentrated colony. If you prune, use clean shears and inspect the cut area and the remaining node before you return the plant to a shared space.
During recovery, inspect the same locations that held the first colony: petiole joints, the back of the puckered leaves, stem nodes, and the vine-support contact points. Record the date and location of each new finding. Seeing no live insects on one day is encouraging, but not a guarantee, because waxy egg sacs and concealed crawlers may escape a single wipe. Repeat the inspection at the interval on any product label, and continue routine checks for several weeks after the last visible colony.
The clearest success sign is a clean new leaf and no fresh crawlers or cottony masses at the nodes during repeated checks. A new leaf that opens normally is more useful than waiting for an old leaf to turn fully green again. If the new growth continues to distort or yellow, recheck for insects before changing light or watering; if no pests appear, compare the symptom with the plant’s care overview and the relevant light or watering guide.
A short section of vine can sometimes be removed if the infestation is confined to it, but do not take a cutting from a node until you have inspected the leaf axil and stem closely. Mealybugs can hide where leaves or stems touch, so a cutting is not clean simply because its visible leaf looks fine. Keep any possible salvage cutting separate while you monitor it. If most nodes remain infested, the root ball is affected, or the pest returns after careful repeated control, discard the plant in a sealed bag rather than moving an unresolved colony through the collection.
Prevent mealybugs from returning to the support
Inspect new plants before they share a shelf with Monstera Peru. Look under the leaves, at each petiole base, around the soil line, and at the support or nursery pot before you place a new arrival beside the vine. Keep it separate while you watch for new waxy patches or crawlers. A clean first glance is helpful, but a brief quarantine gives you another chance to notice a colony that was hidden at purchase.
During ordinary care, use the leaf folds as a reminder to look behind as well as across the foliage. When you rotate the pot or check moisture, trace the vine from its growing tip to the base and look at the points where a leaf or aerial root touches a plank, pole, or tie. A dense shingling arrangement can hide a pest from the room-facing side, so once-a-week visual checks are more useful than occasional spraying.
Keep the plant’s growth steady. Provide its usual bright filtered light, water only after the top layer has dried, and avoid heavy feeding that drives soft growth. These habits support a stable vine, but they do not make the plant pest-proof. A new infested plant, a shared pruning tool, or an overlooked egg sac can restart the problem, so continue checking the tucked joints even after the leaves look clean.
Related tool
Use the Pest Identifier Tool if the white material is too small to identify confidently. Treat its result as a prompt for another close inspection; confirm the insects on the vine before selecting a treatment.
Related Monstera Peru guides
Use this page when you can find wax-covered insects, egg sacs, or a matching honeydew trail on the vine. The Monstera Peru problem index helps you compare unrelated symptoms; it is not a substitute for confirming a pest.
If the leaves instead show fine stippling or webbing, use the spider-mite guide linked in the lookalike table. If you see clusters of soft insects on new growth without white wax, use the aphid guide. For persistent decline with white material at the roots, start with the repotting and soil guides. The overview, light, and watering guides help keep the plant’s normal care steady while you treat the infestation.