Overwatering on Neem: Causes, Checks & Fixes
Quick answer
Overwatering on Neem (Azadirachta indica) induces anaerobic root asphyxiation, depriving its deep taproot and lateral feeder roots of oxygen. This triggers progressive chlorosis starting on lower mature compound leaves, physiological edema, and paradoxical wilting in soggy soil. First step: Cease watering immediately, empty standing saucer runoff, lift the root ball to inspect for soft dark decay, and transition to a free-draining sandy loam potting mix.
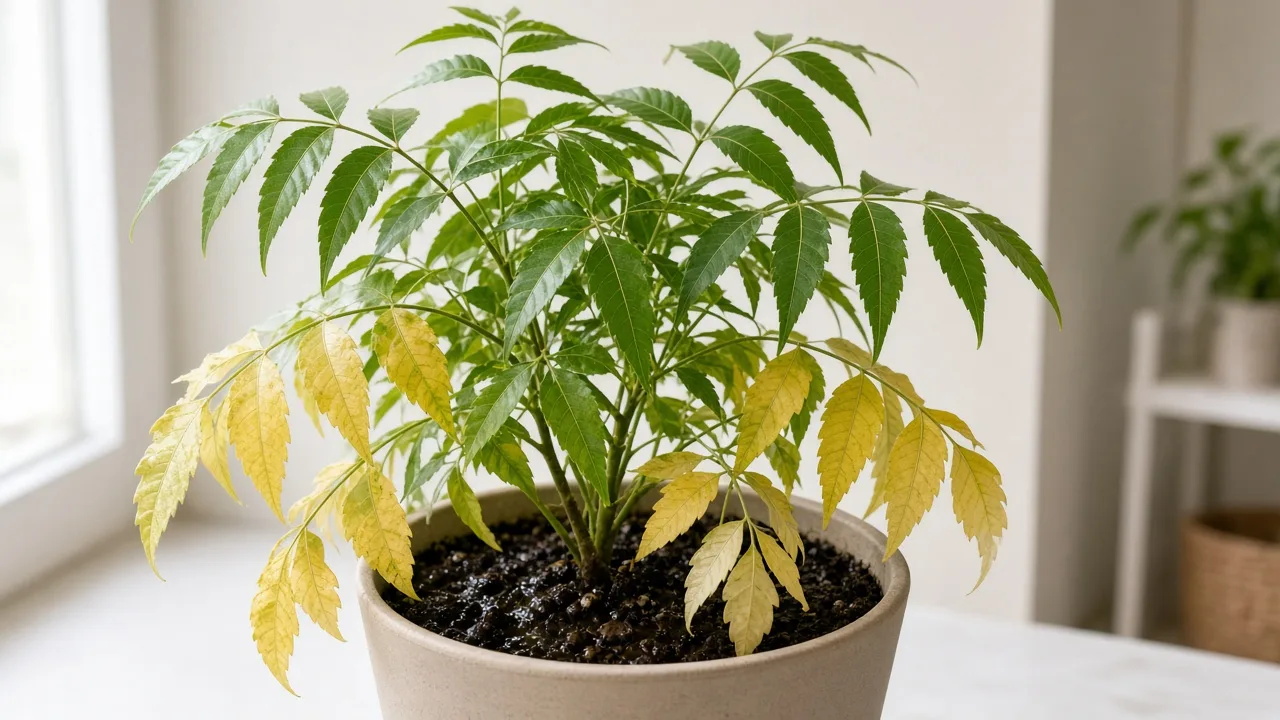
Overwatering on Neem: Causes, Checks & Fixes
This guide covers overwatering on Neem. See also the general Overwatering guide, watering, and light pages for this plant.
Overwatering on Neem: Causes, Checks & Fixes
Quick answer
Overwatering on Neem (Azadirachta indica) is a severe physiological crisis driven by root-zone hypoxia. When potting media remains continuously drenched, water displaces atmospheric oxygen from the soil macropores, starving the root system of the oxygen required for cellular respiration. Because the tree cannot sustain aerobic metabolism, root cells lyse and die, shutting down vascular water and nutrient transport. This leads to a diagnostic paradox: the tree begins wilting and dropping foliage even while sitting in soaking wet soil.
As cataloged by the Missouri Botanical Garden, Azadirachta indica is an evergreen to semi-deciduous tree native to the seasonally dry, semi-arid regions of South Asia. It evolved to endure prolonged droughts in coarse, well-aerated soils and has virtually no biological defense against stagnant moisture. For universal principles of soil saturation across houseplants, consult our global guide to overwatering symptoms and causes. To review foundational cultural care, see our comprehensive Neem tree overview.
First step: Cease watering immediately, drain any standing water from catch trays or saucers, and check the drainage holes. If the container feels heavy, smells sour, or exhibits stem-base softening, unpot the tree to inspect the taproot for hypoxic decay.
What overwatering looks like on Neem
Overwatering symptoms on Neem unfold in a distinct, predictable chronological sequence. Recognizing these signs early allows you to intervene before secondary opportunistic fungal pathogens destroy the subterranean root system:
- Progressive basal chlorosis: Chlorosis begins on the oldest, lower compound leaves near the base of branches or the main trunk. Because the damaged root system can no longer absorb essential nitrogen and magnesium, the tree metabolically scavenges mobile nutrients from mature tissues to sustain the growing tip. Leaflets fade from deep forest green to dull pale green, then bright yellow.
- Premature leaflet and petiole abscission: Unlike drought-stressed leaves that turn brittle and brown while clinging to stems, overwatered Neem leaflets drop while still soft, pliable, and pale yellow. A light brush of your hand against a lower branch often dislodges dozens of leaflets. In severe cases, the entire central leaf rachis detaches cleanly from the woody stem.
- Physiological edema (oedema): When roots absorb moisture from warm, damp potting mix faster than the canopy can transpire it, excessive internal turgor pressure builds up within leaf cells. As documented by Clemson University Cooperative Extension, this hydraulic overpressure causes spongy mesophyll and epidermal cells to burst, forming water-soaked blisters that eventually heal into rough, raised, corky brown warts on the abaxial (underside) surfaces of the leaflets.
- Paradoxical wilting: Even though the potting soil is drenched, the compound foliage droops limp and lifeless. With feeder roots drowned and decaying from oxygen deprivation, the tree loses the hydraulic suction needed to draw moisture up through the xylem.
- Cold, soggy potting media and sour odor: The potting mix stays persistently wet for more than 7 to 10 days, feeling cool and dense to the touch. Anaerobic bacteria multiply rapidly in oxygen-depleted soil, emitting an unmistakable sour, marshy, or sulfurous odor. Green moss or white saprophytic mold often colonizes the soil surface.
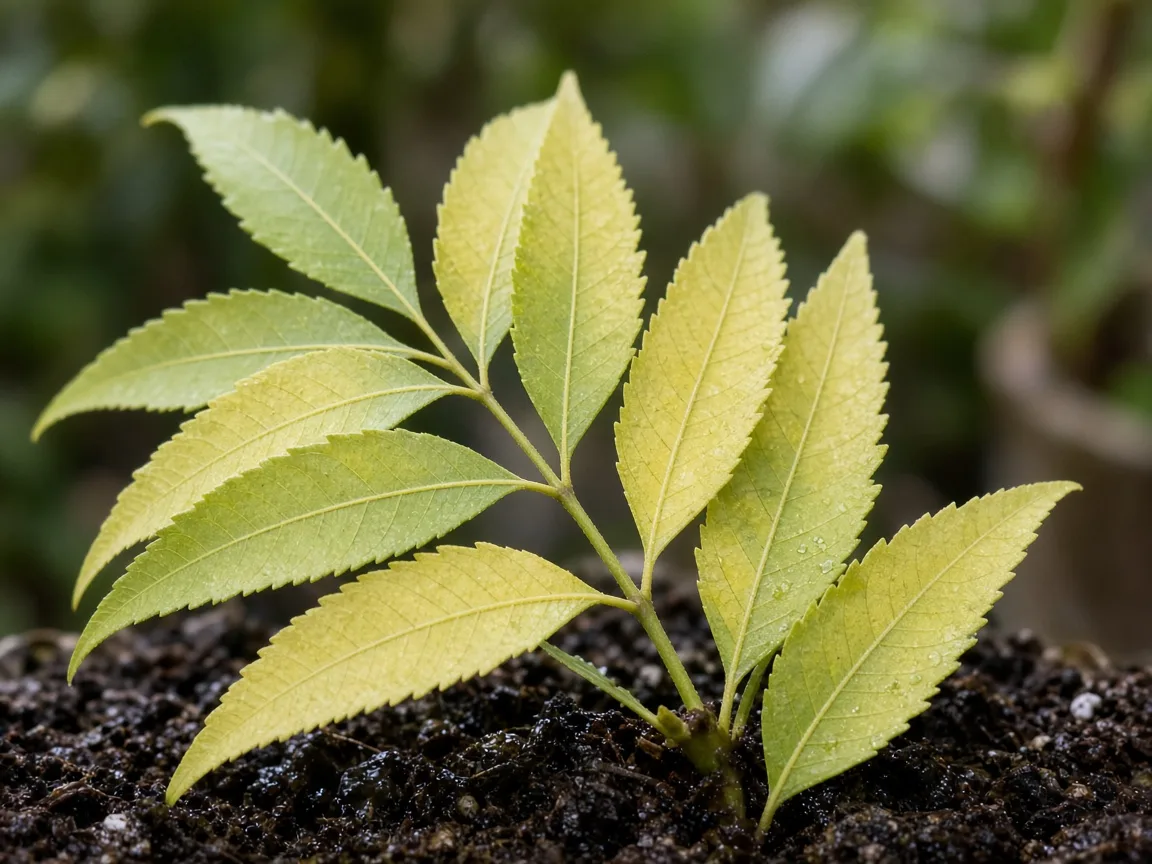
Macro detail of physiological edema on an overwatered Neem leaflet. Severe internal turgor pressure causes abaxial epidermal cells to rupture, creating raised, water-soaked bumps that later suberize into tan, corky blisters.
Botanical vulnerability: why Neem cannot tolerate wet feet
To understand why Azadirachta indica collapses so rapidly in damp soil, one must examine its natural evolutionary adaptations and root architecture.
Native semi-arid ecology and edaphic requirements
In its native habitats across the Indian subcontinent and Myanmar, Neem thrives in open scrub woodlands, dry deciduous forests, and arid plains characterized by monsoonal downpours followed by extensive dry periods. Plants For A Future emphasizes that while Neem exhibits extraordinary drought resilience and adapts to diverse soil chemistries (including stony, shallow, and calcareous grounds), it strictly cannot tolerate waterlogged soils or stagnant water tables. The species evolved under sharp edaphic drainage where monsoon rain percolates rapidly through gritty subterranean layers, pulling fresh atmospheric air into the soil profile behind it.
Taproot architecture and anaerobic root asphyxiation
From germination, a seedling neem tree prioritizes the development of a stout, deep vertical taproot accompanied by vigorous lateral branching roots. As detailed in botanical evaluations by the National Research Council, this profound taproot functions as an anchoring mechanism and a deep moisture probe, enabling the tree to extract water from deep subsoil layers during multi-month dry seasons.
However, in container cultivation or compacted garden soils, this anatomical feature becomes a severe liability:
- Vertical root confinement: In a container, the taproot reaches the bottom of the pot, curls horizontally, and sits in the “perched water table”—the saturated zone that forms naturally at the bottom of any potted soil column.
- Oxygen starvation (Hypoxia): Healthy root respiration demands a continuous exchange of gases, with roots consuming oxygen and releasing carbon dioxide. Saturated potting mix fills macropores with capillary water, slashing the rate of gas diffusion by more than 10,000-fold.
- Cellular lysis and ATP depletion: Deprived of molecular oxygen, root cells can no longer produce adenosine triphosphate (ATP) via oxidative phosphorylation. Cells switch to anaerobic fermentation, accumulating toxic ethanolic byproducts and lactic acid. The cell membranes lose semi-permeability, leading to cellular collapse (asphyxiation).
- Secondary opportunistic pathogens: As Missouri Botanical Garden explains, suffocated root tissues become prime targets for waterborne oomycetes and fungal pathogens like Pythium, Phytophthora, and Fusarium. These organisms rapidly liquefy outer root cortices, turning firm cream-colored roots into hollow, slimy brown threads.
How to confirm overwatering on your Neem
Accurately diagnosing overwatering requires hands-on verification of moisture levels, pot dynamics, and root integrity rather than guessing from foliage appearance alone:
- The container lift test: Pick up the pot. A container suffering from chronic overwatering will feel exceptionally dense and heavy, indicating that the perched water table is completely saturated. If the pot feels feather-light, the drooping is caused by underwatering.
- Deep soil core probe: Insert a dry wooden dowel, moisture meter, or your finger at least 5 cm (2 inches) into the mix, halfway between the trunk and the pot rim. If the dowel emerges dark, damp, and coated in sticky potting particles, the root zone is waterlogged.
- The abaxial leaflet inspection: Examine the undersides of yellowing leaflets with a 10x hand lens. Confirm whether the bumps are physiological edema (firm, non-moving cellular blisters integrated into the leaf tissue) rather than scale insects or mealybugs, which can be scraped off cleanly with a fingernail.
- Root ball extraction: For containerized trees, gently slide the root ball out of the pot. Healthy Neem roots are creamy-white or light tan, brittle, and smell earthy. Overwatered roots appear dark brown or black, feel mushy or slimy when rolled between your fingers, easily slough their outer cortex away from the thin inner vascular stele, and give off a distinct sewer-like odor.
- Stem-base scratch check: Use your thumbnail to lightly scratch the bark at the soil line. If the cambium layer beneath is moist and vibrant green, the tree’s vascular core is intact and capable of recovery. If the inner tissue is mushy, brown, or water-soaked, root rot has transitioned into fatal collar rot.
Lookalike symptoms on Neem
| Observed Symptom | Primary Cause | Distinguishing Diagnostic Feature |
|---|---|---|
| Basal chlorosis, soft leaflet drop, soggy heavy pot, corky edema | Overwatering / Hypoxia | Pot remains heavy for >7 days; soil smells sour; see this guide |
| Wilting foliage, brittle crispy leaflet tips, bone-dry light pot | Underwatering / Drought | Pot is feather-light; leaves curl inward and feel papery; see our Neem watering guide |
| Stretched internodes, pale green leaflets, general slow growth | Not Enough Light | Soil dries slowly but no root rot; see our Neem light guide |
| Uniform pale yellowing across old leaves without edema or wet soil | Nitrogen Deficiency | Soil drains well; foliage is uniformly chlorotic without shedding; see Neem soil guide |
| Yellow stippling, fine webbing, dull foliage in hot, dry conditions | Spider Mites | Microscopic mites visible under hand lens; no soil wetness; see Neem problems hub |
| Sudden leaf drop and petiolar flagging following cold night (<10°C / 50°F) | Cold Shock | Leaves flag without prior chlorosis; occurs after sudden temperature drop; see Neem care overview |
For broader diagnostic questions across all leaf, stem, and root conditions, browse our comprehensive guide to all Neem problems.
The first fix: emergency triage for an overwatered Neem
When you confirm that your container neem is waterlogged, immediate intervention is critical. Do not adopt a wait-and-see attitude; root rot can consume the delicate feeder system within 72 hours.
Execute this targeted initial correction:
- Cease irrigation immediately: Do not add a single drop of water.
- Elevate and unblock drainage holes: Check that the container’s bottom drainage holes are not clogged with silt or sitting flush against a flat surface. Prop the container up on pot feet or wooden shims to allow gravitational drainage.
- Empty saucers and outer pots: Discard all standing runoff sitting in collection trays or decorative cachepots. Never let a neem tree sit in water for more than 15 minutes.
- Wick away excess moisture: If the pot is plastic, slide the entire root ball out intact and place it on a thick pad of dry newspapers, corrugated cardboard, or dry towels. Capillary action will draw excess perched water out of the lower soil column within 4 to 8 hours without disturbing the roots.
- Optimize atmospheric recovery: Move the tree to a warm spot (22°C to 28°C / 72°F to 82°F) receiving bright, indirect sunlight and gentle, continuous air circulation from an oscillating fan. Avoid placing a stressed, waterlogged tree under direct scorching midday sun, as the damaged root system cannot supply enough water to meet intense transpirational demand.
Step-by-step root recovery and repotting protocol
If the soil remains swampy after 48 hours or you detected foul-smelling, necrotic roots during inspection, standard drying techniques will not suffice. You must execute an emergency repotting and root-pruning procedure to eliminate anaerobic decay.
1. Root inspection and surgical pruning
Gently tease away the sodden potting mix from the root ball using your fingers or a tepid water rinse to expose the root architecture. Identify all damaged tissue. Using bypass pruning shears sterilized in 70% isopropyl alcohol, prune away all brown, black, soft, or hollow roots back to healthy, firm, creamy-white tissue. If the main taproot exhibits localized surface decay, scrape away the soft necrotic tissue until you reach clean, pale wood.
2. Disinfect the root system
Submerge or spray the pruned root system with a 3% hydrogen peroxide solution diluted 1:3 with room-temperature water (one part 3% H₂O₂ to three parts water). This gentle effervescent rinse oxidizes anaerobic bacteria and fungal spores on contact while delivering a direct micro-burst of oxygen to the surviving root cells.
3. Formulate an aerated, free-draining substrate
Neem will never thrive in dense, peat-heavy commercial potting soils that retain excessive water. Formulate a gritty, open-structured potting mix that ensures rapid percolation and at least 20% to 25% air-filled porosity:
- 40% Coarse Horticultural Sand or Pumice: Provides structural weight, rapid drainage, and gritty texture mimicking native sub-tropical river plains.
- 30% Quality Loam or Well-Aged Compost: Provides baseline cation-exchange capacity and gentle organic nutrition.
- 30% Perlite, Coarse Vermiculite, or Crushed Lava Rock: Creates durable macropores that resist compaction and maintain subterranean air pathways even when watered.
For complete soil recipes and mineral balances, refer to our detailed Neem soil guide.
4. Select a breathable container
Discard plastic, glazed ceramic, or metal containers in favor of unglazed, porous terracotta. Terracotta pot walls are microporous, allowing moisture to evaporate through the container sides and facilitating gas exchange directly into the root zone. Ensure the container has at least one large, unobstructed central drainage hole (or multiple holes). The pot should only be 2 to 5 cm (1 to 2 inches) wider than the remaining root mass; oversized pots contain excess soil that stays damp indefinitely.
5. Replant and stabilize
Center the tree in the container, ensuring the root flare (the junction where the primary taproot widens into the trunk) sits precisely level with the soil surface. Never bury the trunk, as buried bark quickly succumbs to collar rot. Backfill with the dry-to-barely-damp gritty mix, gently tapping the pot sides to settle air pockets.
Do not soak the pot immediately. Wait 24 to 48 hours before applying a modest volume of water around the perimeter. This dry interval allows root cut wounds to suberize and callus over, preventing opportunistic pathogens from invading fresh vascular incisions.
Recovery timeline and what to expect
Rebuilding an asphyxiated root system requires physiological patience. Monitor your tree against this recovery benchmark:
- Weeks 1 to 2 (Stabilization phase): Leaf drop should decelerate and eventually halt. Saturated soil will gradually dry out. Foliage that was already severely chlorotic or edematous will continue to drop, but remaining green compound leaves should stabilize. The tree will show no new top growth, as all metabolic energy is routed into subterranean root repair.
- Weeks 3 to 4 (Root regeneration): As surviving roots produce fine white root hairs, the tree regains hydraulic uptake. Petiolar turgidity improves. Apical and axillary buds along the woody branches will begin to swell, turning pale green or reddish.
- Weeks 5 to 8 (Vegetative flush): Vibrant new compound pinnate leaves, described botanically by Oregon State University as alternate leaves with 20 to 30 serrated leaflets, will emerge from branch tips.
Diagnostic reality check: Understand that damaged, blistered, or yellowed leaflets will never turn green again. Cellular chlorosis and ruptured edema walls are permanent anatomical injuries. True recovery is measured strictly by the emergence of clean, vigorous new foliage flushes and a firm, well-aerated root zone.
Common mistakes to avoid
Avoid these well-meaning but destructive errors that frequently kill recovering neem trees:
- Applying fertilizer to a waterlogged tree: Never fertilize a tree suffering from overwatering or root hypoxia. Damaged root hairs cannot process nitrogen or mineral salts. Introducing synthetic fertilizer creates an osmotic gradient that pulls moisture out of surviving roots, causing severe chemical burn. Delay all fertilization until the tree has produced two full flushes of healthy new growth.
- Watering on a fixed calendar schedule: Pouring water into your Neem pot every Saturday regardless of weather or soil moisture is the primary cause of container failure. Temperature, humidity, seasonal day length, and cloud cover drastically alter moisture consumption. Always probe the soil first.
- Overpotting into massive containers: Placing a small neem in a gigantic pot guarantees chronic overwatering. The disproportionate volume of soil holds far more water than the small root system can absorb, creating a permanent stagnant reservoir.
- Leaving water in cachepots or saucers: A plant saucer should catch runoff, not serve as a permanent wading pool. Submerged root tips quickly exhaust dissolved oxygen and begin rotting within 24 hours.
- Drastic defoliation: Avoid stripping off leaves that are still partially green. Even flagging leaves carry out minimal transpiration that pulls stagnant water out of the soil. Only remove leaflets that have completely browned, shriveled, or detached on their own.
How to prevent overwatering next time
Sustaining a healthy container Neem tree long-term is straightforward once you align your cultivation practices with its native dry-climate biology:
1. Adopt the soak-and-dry irrigation technique
Neem performs best with a deliberate cycle of deep soaking followed by substantial drying. Water generously until water flows freely from the drainage holes, ensuring the entire soil column is moistened. Then, withhold water completely until the top 5 cm (2 inches) of soil is completely dry to the touch. In cooler winter months, allow the root ball to dry out nearly two-thirds of the way down before watering again. Review seasonal watering intervals in our Neem watering guide.
2. Maximize direct sunlight and thermal warmth
Neem is an obligate sun-lover. Ensure your tree receives at least 6 to 8 hours of direct, unfiltered sunlight daily. Full sun drives active photosynthesis and transpiration, rapidly pulling moisture through the plant and preventing water from stagnating in the potting substrate. Maintain ambient temperatures above 20°C (68°F), and protect your tree from chilling drafts. Consult our Neem light guide to optimize seasonal lighting arrangements.
3. Maintain rapid soil percolation
Every 12 to 18 months, inspect the container for soil compaction. Fine silt and decomposed organic matter settle over time, clogging lower drainage pores. If water ponds on the soil surface for more than 15 seconds after pouring, gently aerate the top layer with a wooden chopstick or top-dress with coarse grit.
When to use this page vs other Neem guides
- Use this guide when lower leaves turn yellow and drop, the potting soil stays soggy for days, or leaflet undersides develop corky edema blisters.
- Use our Neem watering guide to calibrate seasonal irrigation cadences, water quality parameters, and drought-recovery protocols.
- Use our Neem light guide if branches are stretching, internodes are elongated, and foliage is pale due to insufficient illumination.
- Use our Neem soil guide to mix custom gritty substrates, adjust container pH (6.2 to 7.0), and optimize air porosity.
- Use our All Neem problems hub when symptoms involve pests like aphids, mealybugs, or spider mites, or fungal leaf spot diseases.
Related Neem guides
- Neem tree overview — Botanical characteristics, native dry forest ecology, and container cultivation fundamentals.
- Neem watering guide — Season-by-season irrigation schedules, soil testing methods, and dry-down checks.
- Neem light guide — Full-sun requirements, indoor grow light supplementation, and photoperiod management.
- Neem soil guide — Formulating free-draining sandy loam substrates for optimal container aeration.
- All Neem problems — Diagnostic guide to identifying pests, environmental disorders, and root diseases.
Related tool
Use the Watering Calculator to calculate an accurate dry-down interval for your container neem based on pot size, substrate porosity, sunlight exposure, and ambient temperatures.