How to Grow Lavender: Planting and Care Guide
Grow healthy lavender in beds or pots. Get climate-aware planting advice, a dry-side watering routine, pruning limits, propagation steps, and root-rot fixes.

Quick answer: give lavender sun, drainage, and restraint
The reliable way to grow lavender is to match a suitable cultivar with full sun, fast-draining soil, and a watering routine that lets the root zone dry between deep drinks. Lavender is not difficult because it needs constant attention; it is difficult when it is planted in a cool, wet pocket and then cared for like a thirsty bedding plant.
For a new plant, choose a spot with at least six hours of direct light, loosen or raise soil that stays wet, and water regularly during the first growing season. Once an in-ground plant is established, water only during prolonged dry weather. In a pot, use a gritty mix and check more often in summer, but keep the container much drier in winter. Lightly shape lavender every year after flowering while leaving leafy growth on the stems.
Lavender belongs to the genus Lavandula in the mint family. Species and cultivars differ in mature size, bloom time, fragrance, and cold tolerance, so the label matters more than a generic “lavender likes zones” rule. For a broader overview, the lavender plant hub is useful; this guide focuses on choosing, planting, and maintaining the shrub successfully in real garden conditions.
Choose the lavender type that fits your climate
The first decision is not flower color. It is whether the plant can handle your winter, summer humidity, and intended use. The RHS lavender growing guide separates English lavender and its hybrids from French and other tender types because their hardiness is meaningfully different.
English lavender (Lavandula angustifolia) is the safest starting point for many temperate gardens. Cultivars such as ‘Munstead’ and ‘Hidcote’ stay relatively compact, have strongly scented purple flowers, and are usually better candidates for outdoor overwintering than tender French types. They are also the usual choice when you want culinary flowers, although you should use only correctly identified, unsprayed plants.
Lavandin (Lavandula x intermedia) is a hybrid group valued for larger plants, long flower stems, and strong fragrance. It works well for drying, informal hedges, and mass planting, but its eventual size can surprise a gardener who spaces it like a small English lavender. Check the cultivar’s mature width before you plant a row.
French or Spanish lavender is a common source of disappointment in cold or wet regions. Lavandula stoechas and related tender types often have conspicuous bracts or “ears” above the flower head and can bloom earlier, but they generally need warmer, more sheltered conditions. The RHS recommends treating tender types as container plants or giving them frost-free winter protection where they cannot reliably survive outdoors.
If your garden has hot, humid summers, do not automatically choose the most exposed, hottest position. NC State Extension notes that Lavandula prefers very well-drained soil, may struggle in the Southeast, and can benefit from protection from intense afternoon heat. (NC State Extension) Morning sun with bright afternoon light and excellent airflow can be a better compromise than baking a stressed plant beside heat-reflecting paving.
Pick and prepare a planting site
Think of lavender as a small, woody Mediterranean shrub rather than a soft perennial. It wants light on the foliage, air moving through the canopy, and roots that can breathe after rain. A site that is merely “sunny” but holds water for days is still a poor lavender site.
Test drainage before planting
Dig a hole about 12 inches deep and wide, fill it with water, and let it drain once. Fill it again and watch what happens. If water remains pooled for hours, especially after ordinary rain, do not put lavender straight into that ground. Improve the site with a raised mound or bed, choose a different location, or grow the plant in a container where you can control the mix.
The RHS recommends planting lavender on an 8- to 12-inch mound, ridge, or raised bed when soil is heavy. That is a useful decision rule because simply adding a little compost to a clay planting hole can create a basin that stays wetter than the surrounding soil. A raised root zone changes the depth at which water sits; it does not just make the soil look lighter.
The Sunday Gardener’s lavender guide makes the same practical point from a wetter-garden perspective: if ground stays saturated, a raised site or container may be more dependable than repeated attempts to amend one soggy hole.
Lavender prefers lean, moderately fertile, sandy, rocky, or chalky soil. A soil test is worth doing before you add lime or other amendments: the BHG lavender guide reports a preferred pH range around 6.5 to 8.2, while NC State describes neutral to alkaline soil as a fit. Do not add lime on guesswork alone, and do not chase a precise number if drainage is still the primary problem.
Give each plant enough room for its mature width. Eighteen to 24 inches may suit a compact cultivar, while larger lavandins need more. For a grouped planting, the RHS gives about 3 feet as a general spacing reference, with closer spacing reserved for a low hedge and adjusted for cultivar size. Crowding looks full at first but traps humidity later, which increases leaf-spot risk and makes pruning harder.
Plant lavender step by step
The best planting window is spring after the soil begins to warm and the risk of hard frost has passed. In regions with mild, dry autumns, fall planting can work if the root system has time to settle, but do not plant a young lavender into cold, waterlogged winter soil. The RHS specifically cautions against winter planting because young plants rot easily in those conditions.
Buy a plant that is compact, evenly colored, and firmly rooted rather than one that is tall and floppy from a dim sales bench. Slide it from the nursery pot and check that roots are light-colored and firm. If the root ball is tightly circling, tease only the outer roots enough to encourage them outward; do not shred the entire ball.
Dig a hole about twice as wide as the root ball and no deeper than the existing root ball. Set the plant so the crown and soil surface remain at the same level as in the pot. Burying the woody base invites moisture problems, while planting high and leaving roots exposed makes establishment needlessly difficult.
Backfill with the excavated soil, using only a modest amount of mature compost if the site is genuinely poor. Lavender does not need a rich, nitrogen-heavy planting pocket. Firm the soil gently, water deeply once to settle air gaps, and then let the surface begin to dry before watering again.
Keep weeds and thick mulch away from the crown. A thin gravel or mineral mulch can reduce splash and visually suit lavender, but any mulch that stays wet against the stems defeats the reason you chose a well-drained site. Water at the soil line rather than repeatedly wetting the foliage.
Growing lavender in containers
A container is not a compromise for lavender; it is often the smartest solution for heavy clay, small patios, cold climates, or humid gardens where you cannot change the ground. Choose a pot about 12 to 16 inches wide for a typical young plant, with large drainage holes and enough weight that the shrub will not tip in wind. The RHS recommends containers about 30 to 40 cm in diameter for lavender.
Use a free-draining potting mix amended with coarse grit, perlite, pumice, or another open mineral component. The RHS suggests mixing coarse grit at up to about 25 percent by volume in a suitable container compost. Avoid substituting fine play sand, which can compact, and avoid placing gravel only in the bottom of a pot as a supposed drainage layer; that does not fix a water-holding mix above it.
Choose a pot only modestly larger than the root ball. Excess unused soil stays wet longer and makes a dry-loving plant harder to manage. Terracotta can help the root zone dry more quickly, but it also dries faster in hot weather and can crack in freezing conditions. The pot material changes the schedule; it does not replace a drainage hole.
After watering, let excess water run freely and empty any saucer. Keep the container in full sun with space around it, and move it to a rain shadow or sheltered wall before prolonged winter wet. Container roots have less insulation than roots in the ground, so a cultivar that survives your outdoor zone in a bed may still need protection in a pot.
Build a watering, feeding, and winter routine
Lavender care becomes simple once you stop using a fixed calendar. The right interval depends on whether the plant is newly planted, established in the ground, in a container, under rain, or in a heat wave. Check the soil and the weather before you reach for the hose.
Water by establishment and container status
For the first growing season, water a new lavender regularly enough to keep the root ball from repeatedly drying to dust. A deep soak is more useful than a daily splash because it encourages roots to move into the surrounding soil. Check the soil a few inches down before repeating the soak; if it is still cool and damp, wait.
Established in-ground lavender is drought tolerant and usually needs supplemental water only during severe, prolonged drought. That does not mean it benefits from deliberate neglect during a record heat wave. If leaves wilt at the same time the soil is dry well below the surface, water slowly at the base, then reassess the site and root depth rather than watering automatically every evening.
Container lavender needs more frequent checks because the root volume is limited and warm air moves around the pot. Water thoroughly when the mix has dried significantly through the upper portion, then allow free drainage. In winter, reduce watering sharply; cold, wet compost is a more common container killer than a short spell of cold air.
Protect roots through winter
English lavender and many lavandin cultivars are the best choices for outdoor wintering, but hardiness is not a promise that ignores drainage. A hardy lavender in saturated soil can fail, while a tender plant in a dry, sheltered container may survive a mild winter. Read the plant label and consider how exposed the roots are.
For plants in the ground, keep the crown open to air and avoid piling wet mulch directly over the woody base. In climates with repeated freeze-thaw cycles, a loose, breathable layer around the root zone after the ground cools can reduce temperature swings, but it should not become a soggy blanket. In containers, move pots beside a wall or under cover from heavy rain before the coldest period; keep them cool and bright rather than warm and dim.
Do not bring outdoor lavender into a heated room and then keep it in a dark corner. Low light, warm air, and frequent watering produce weak growth and root decline. If you must overwinter a tender cultivar, a cool greenhouse, unheated porch, or bright sheltered space is generally easier to manage than a centrally heated living room.
Lavender usually does not need routine fertilizer. It performs in relatively lean soil, and excess nitrogen can produce lush, floppy foliage at the expense of the compact, flower-rich habit you wanted. Start with good drainage and light before diagnosing slow growth as a feeding problem.
Prune lavender without cutting into old wood
Annual pruning keeps lavender compact, encourages fresh flowering shoots, and prevents the shrub from becoming a hollow woody mound. The safest general timing is after the main flush of flowers has finished, while there is still time for the plant to make a little leafy growth before winter. The RHS recommends removing spent flower stalks and about an inch of leaf growth, while warning not to cut into bare wood because lavender does not reliably break new growth from it.
Use sharp, clean shears and shape the plant lightly into a rounded mound. Cut just above visible green leaves or short leafy side shoots. Do not shear every stem down to the brown interior to make the plant look tidy; that shortcut can leave permanent gaps or kill an otherwise healthy shrub.
In a cold climate where flowering ends late, deadhead the spent spikes and postpone major shaping until spring growth shows where the live wood is. In spring, remove clearly dead or frost-damaged tips and trim only into living leafy growth. In a warm, long-season climate, a post-bloom trim may be followed by a light second cleanup, but repeated hard cuts are not a substitute for adequate light.
Old lavender eventually becomes sparse despite good care. If most of the plant is bare wood with a thin green fringe, take cuttings from the best remaining growth and plan to replace it. Rejuvenation pruning is limited because the shrub’s old stems may not contain dormant buds capable of refilling the base.
Propagate lavender from cuttings
The most predictable way to make a duplicate of a lavender you already like is a softwood or semi-ripe cutting, not seed. Cuttings produce a genetic copy of the parent; seeds from named cultivars can vary in color, shape, fragrance, and hardiness. The RHS confirms that softwood and semi-ripe cuttings can be taken from young plants in early to midsummer, with hardwood cuttings possible after flowering in late autumn.
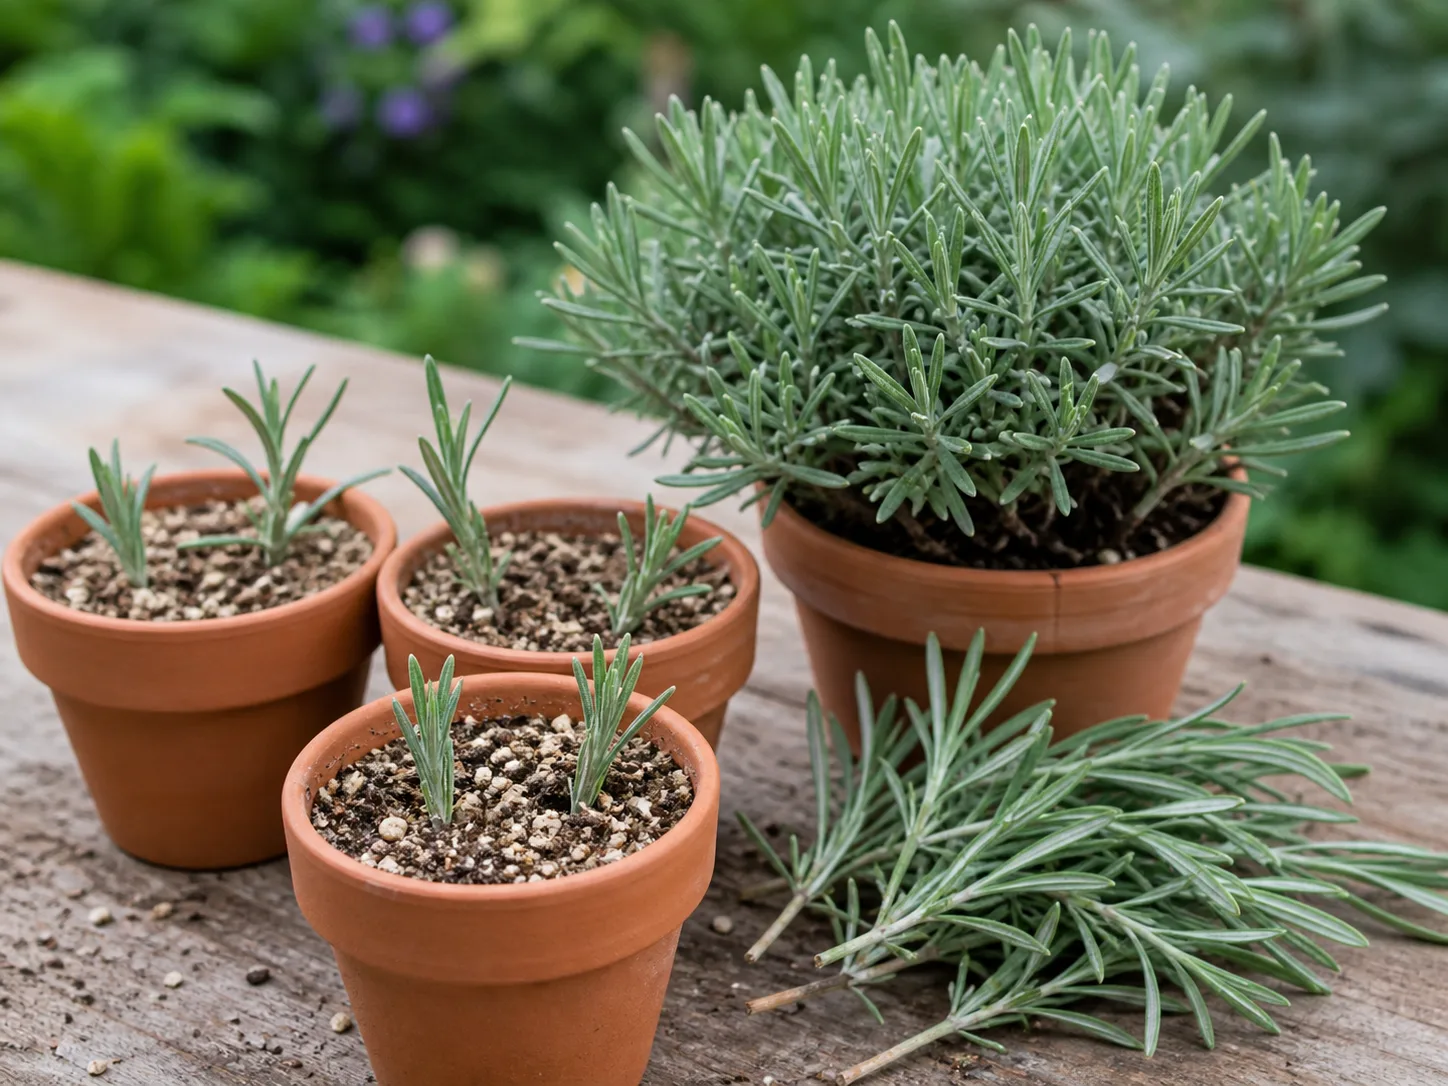
Take cuttings from healthy, nonflowering new growth when the plant is hydrated but not heat-stressed. Make 3- to 4-inch cuts with clean shears, strip leaves from the lower half, and insert the bare stem into a small pot of damp, gritty propagation mix. Do not bury leaves, pack the mix tightly, or use a sealed cover that keeps the stem base constantly wet.
Set the pot in bright indirect light rather than hot midday sun. A loose clear cover can slow moisture loss while roots form, but vent it when condensation is heavy or the temperature rises. Keep the mix lightly and evenly moist, never saturated. Tug gently after two to four weeks; resistance usually means roots are beginning, but semi-ripe or hardwood material may take longer.
Once rooted, pot the cutting into a slightly larger container and acclimate it gradually to brighter light. New plants need regular water during their first season, yet they still need the same drainage as a mature lavender. For the full sequence, see the step-by-step guide to propagating lavender.
Seed is useful when you want variation or many plants and have patience. Sow in a sterile, free-draining seed mix, barely cover the seed, and expect uneven germination. A seedling will not necessarily resemble the lavender beside it, so buy a named plant or use a cutting when a specific habit matters.
Harvest and dry lavender flowers
Harvesting can double as gentle maintenance. For dried bunches and sachets, cut flower stems when the first buds are beginning to open or just before peak bloom. Flowers cut too late shed more readily while drying and may have a duller color; flowers cut too early may have less fragrance and visual fullness.
Use clean shears and take long stems without stripping more than a reasonable share of the plant at once. Bundle a small number of stems rather than making a dense, damp fistful. Hang them upside down in a dark, warm, low-humidity place with good air movement, a practice also described by the Ontario Ministry of Agriculture.
When completely dry, strip flowers into an airtight container and store them cool and dry. If you want to cook with lavender, use an accurately identified culinary-suitable cultivar that has not been treated with ornamental pesticides. Do not assume that a fragrant nursery plant is safe to eat simply because the species is also used in food.
Lavender is valuable in pollinator plantings and works naturally beside other sun-loving, relatively dry-soil herbs. Combine it with plants that accept the same watering rhythm, such as thyme, sage, rosemary, or oregano, rather than forcing it beside moisture-hungry crops. The lavender companion plants guide can help with the design decision; the key is matching cultural needs, not assuming every “companion” claim repels pests.
Prevent pests and diseases
Healthy lavender in sun and airy soil is generally low maintenance, but poor conditions create openings for trouble. Root rot and crown problems are most strongly associated with wet or heavy soil. Leaf spot and fungal issues become more likely when foliage stays damp, plants are crowded, or air cannot move through the shrub.
The Ontario Ministry of Agriculture identifies four-lined plant bug and Septoria leaf spot as significant concerns in its Ontario observations, and notes that site selection and good air movement reduce disease pressure. (OMAFRA lavender crop profile) Small leaf lesions or cosmetic chewing do not automatically justify spraying. Identify the pest first, remove badly affected material, and follow the product label and local regulations if a treatment is truly necessary.
Avoid routine overhead irrigation, especially late in the day. Give plants enough spacing that rain and dew can dry, remove fallen diseased leaves, and never propagate from a parent with unexplained decline. On edible herbs, be especially cautious about using any product that is not explicitly labeled for the crop and intended harvest.
If pets can reach the plant or dried material, keep them from chewing it and store concentrated lavender oils securely. The ASPCA lavender listing directs owners to contact its Poison Control service or a veterinarian promptly after suspected ingestion. That is a sensible safety boundary: do not use a gardening article to assess a pet’s dose or symptoms.
Troubleshoot yellow leaves, weak growth, and few blooms
Diagnose lavender in this order: soil moisture, drainage, light, plant age, then pests or nutrition. Gardeners often add fertilizer or spray first, even though the root zone is the part failing. Look at the plant and the pot together; a symptom means different things in a dry terracotta pot and a rain-soaked clay bed.
Yellow leaves, drooping, or a bad smell
Yellow lower leaves with damp soil point first to overwatering, slow drainage, or root damage. Stop watering until the root zone has had time to dry, then investigate the soil. If the plant smells sour, the base is soft, or roots are brown and mushy, remove it from the pot, trim only clearly dead tissue with clean tools, and repot into fresh gritty mix. A severely rotted plant may not recover; taking healthy cuttings is often more realistic than repeatedly disturbing the same root ball.
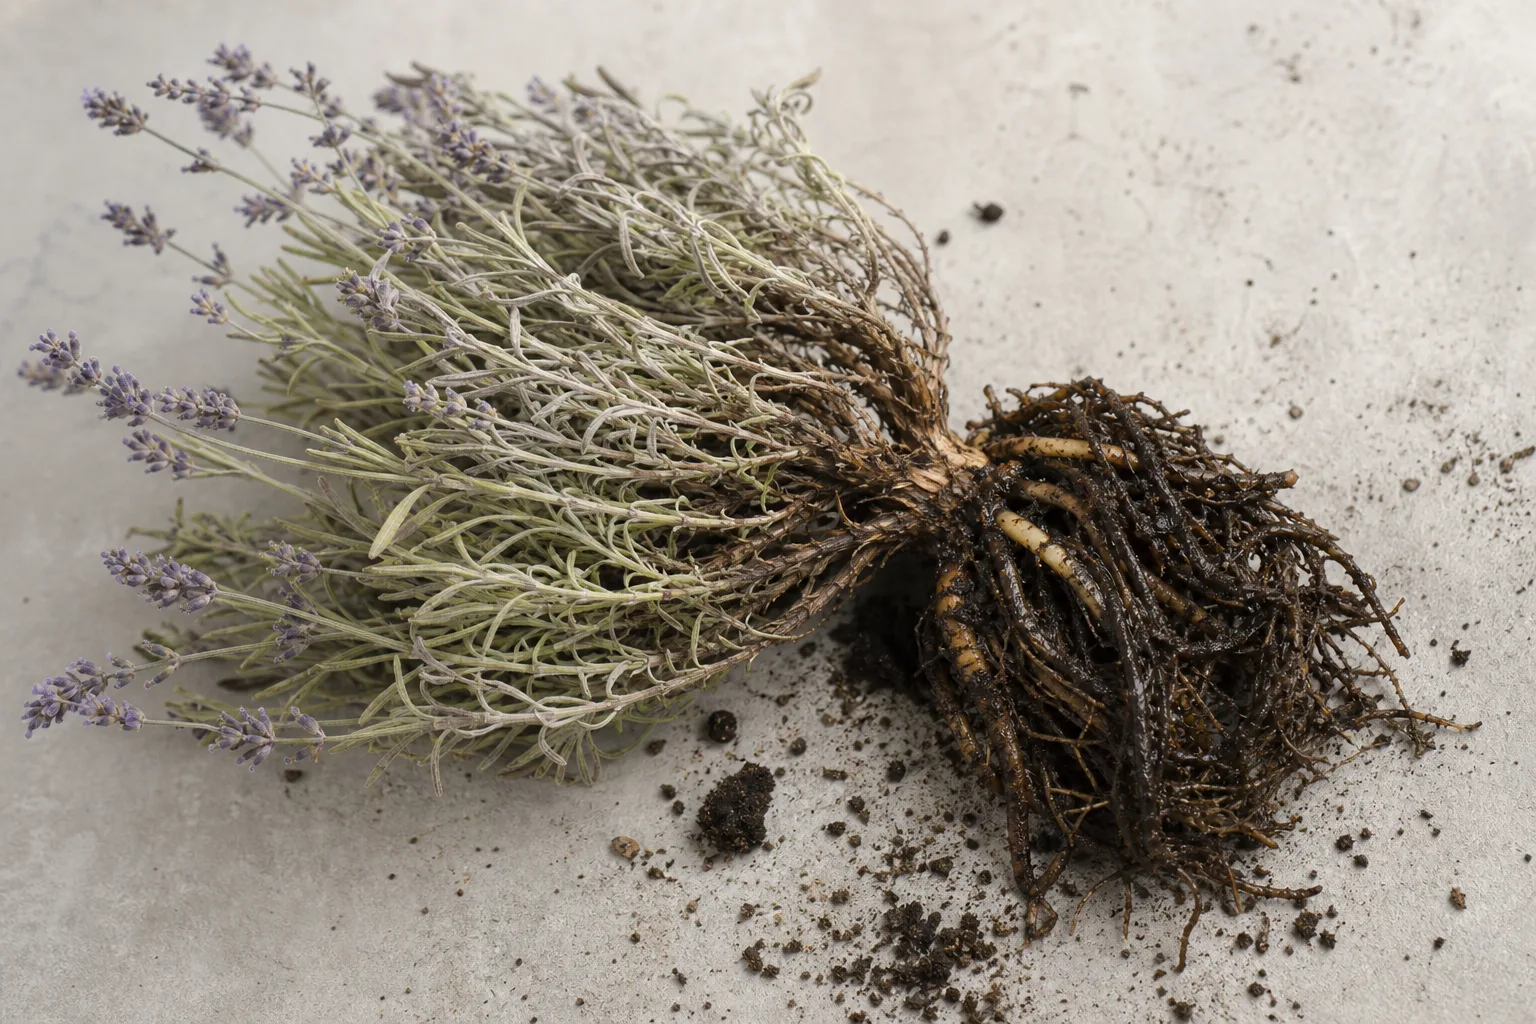
Drooping with dry soil is more consistent with underwatering, transplant stress, or heat stress. Water deeply once, move a newly planted specimen out of reflected heat if necessary, and check whether the root ball is actually accepting water. Extremely dry potting mix can pull away from a pot wall and shed water down the sides, so a slow soak may be needed before normal watering resumes.
Yellowing with constantly wet soil in a garden bed will not be solved by moving the hose schedule alone. Raise the plant, improve the bed, or relocate it. A lavender planted in the wrong hydrology is a site-design problem.
Woody growth, leggy stems, and no flowers
Leggy, weak growth usually reflects insufficient direct light, crowding, late pruning, or a cultivar growing larger than expected. Increase light and airflow, then prune only the green portions after flowering. Do not cut the entire leggy shrub back to the base in an attempt to reset it.
A plant with green tips and a bare woody center is partly an age problem. Light annual pruning can delay decline, but it cannot force old wood to produce new shoots reliably. Propagate from healthy green stems and replace the original when the shape or bloom quality no longer meets your needs.
Few flowers are usually a light, cultivar, or root-zone issue before they are a fertilizer issue. Too much shade, nitrogen-rich soil, waterlogged roots, a tender cultivar in a stressful climate, or pruning at the wrong time can all reduce bloom. Move a potted plant to brighter light, stop feeding, correct drainage, and confirm that the plant has enough time to mature before changing several variables at once.
Brown flower spikes or leaf spots need context. A few spent blooms are normal; widespread browning after prolonged rain, with lesions on older leaves, calls for better airflow and careful removal of affected material. If damage is expanding quickly or the plant is collapsing at the base, use a local extension diagnosis rather than guessing from a photograph.
Conclusion
To grow lavender well, make the root zone your priority: choose a cultivar that fits your winter, plant it in the brightest practical site, and make sure rain can leave quickly. Water new plants while they establish, then let established in-ground lavender live on the dry side; treat containers as a separate watering and winter-management job.
Prune after flowering without cutting into bare wood, propagate favorite plants from healthy green cuttings, harvest flower spikes as buds open, and interpret yellow leaves or weak growth through the lens of moisture and light before adding fertilizer. If the ground is heavy or winters are wet, a raised bed or gritty container is not overengineering—it is the simplest way to give lavender the conditions it actually needs.



