Black Spots on Ashwagandha: Causes, Checks & Fixes
Quick answer
On Ashwagandha, scattered dark spots with yellow halos on hairy gray-green leaves usually mean Alternaria leaf spot after foliage stayed wet in humid air—not drought. First step: move the plant to full sun, stop misting and overhead watering, and water only at the soil line when the top 3–4 cm is dry.
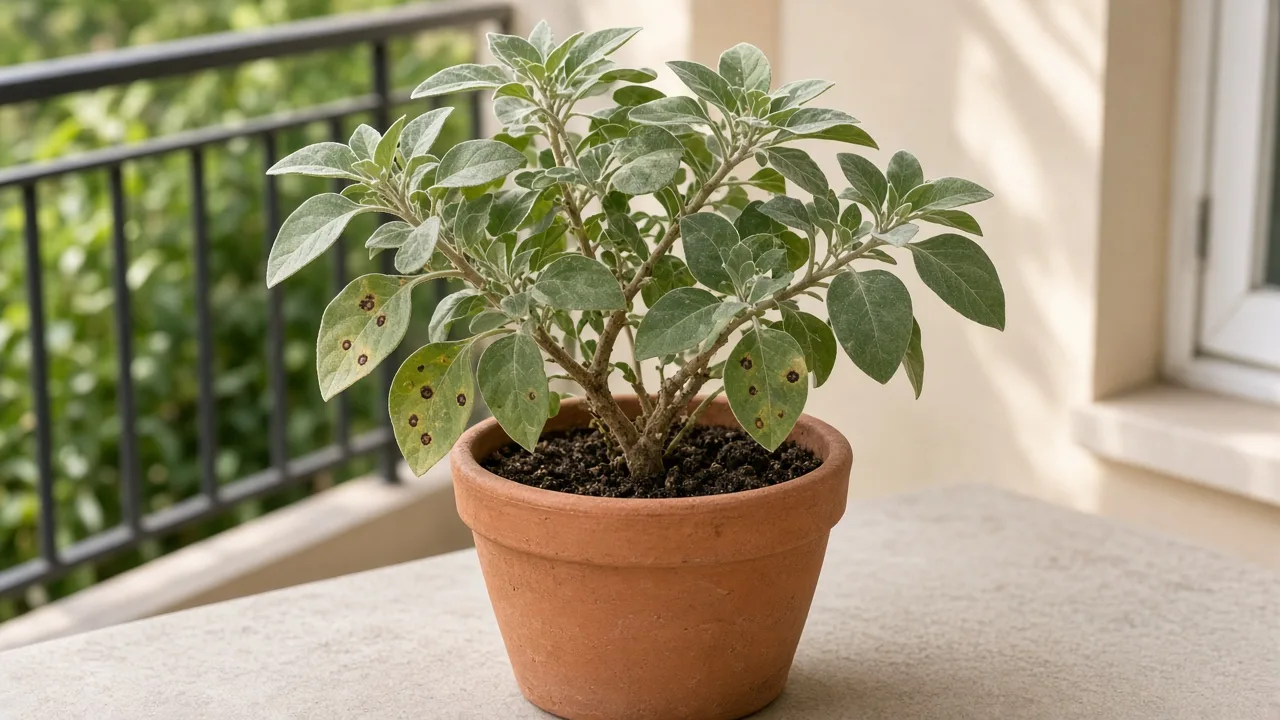
Black Spots on Ashwagandha: Causes, Checks & Fixes
This guide covers black spots on Ashwagandha. See also the general Black Spots guide, watering, and light pages for this plant.
Black Spots on Ashwagandha: Causes, Checks & Fixes
Quick answer
Black spots on Ashwagandha (Withania somnifera) are most often Alternaria leaf spot—a fungal disease that flourishes when warm, moist air keeps foliage wet. Field research identifies Alternaria alternata as a major leaf spot pathogen on ashwagandha, producing dark lesions on the hairy gray-green leaves growers rely on to judge plant health. This pattern usually follows misting, overhead watering, rainy outdoor spells, or a move to a dim, humid room—not simple underwatering.
First step: move the plant to the sunniest spot you have and keep leaves dry. NC State Extension notes Ashwagandha needs full sun and dislikes wet feet—it cannot grow in shade. While you relocate it, press woody stems at the base: firm tissue supports a leaf-fungus diagnosis; soft, mushy stems mean switch to root rot or overwatering checks before treating leaves.
For how fungal leaf spots spread on houseplants in general, see our black spots guide. On Ashwagandha, the trigger is almost always wet hairy foliage in a plant built for dry, sunny arid beds—not a generic humidity problem on soft tropical leaves.
When to use this page vs other Ashwagandha guides
This page is the symptom-first entry for dark lesions on Ashwagandha foliage. Use it to decide whether you are dealing with fungal leaf spot, care stress, or rot.
- Overwatering — go here when soil stays soggy, stems soften at the crown, or yellow lower leaves appear without classic spot halos
- Root rot — go here when the base smells sour, stems collapse, or probing reveals mushy roots despite dry-looking spots
- Yellow leaves — go here for uniform yellowing without enlarging black lesions
- Brown leaves — go here for dry crispy margins or sun-scorched tips without yellow halos around dark circles
- Mold on soil — go here when white fuzz sits on the pot surface while leaves still look mostly clean
- Light guide — go here when weak indoor placement is the underlying issue keeping foliage damp
- Watering guide — go here for the dry-down rhythm after spots stop spreading
What black spots look like on Ashwagandha
On this nightshade shrub, Alternaria leaf spot starts as small dark brown to black dots on the dull, silvery-gray, finely hairy leaves. Many lesions develop a faint yellow halo as surrounding tissue reacts. Spots often begin on lower or inner leaves where airflow is weakest, then climb toward newer growth if moisture persists.
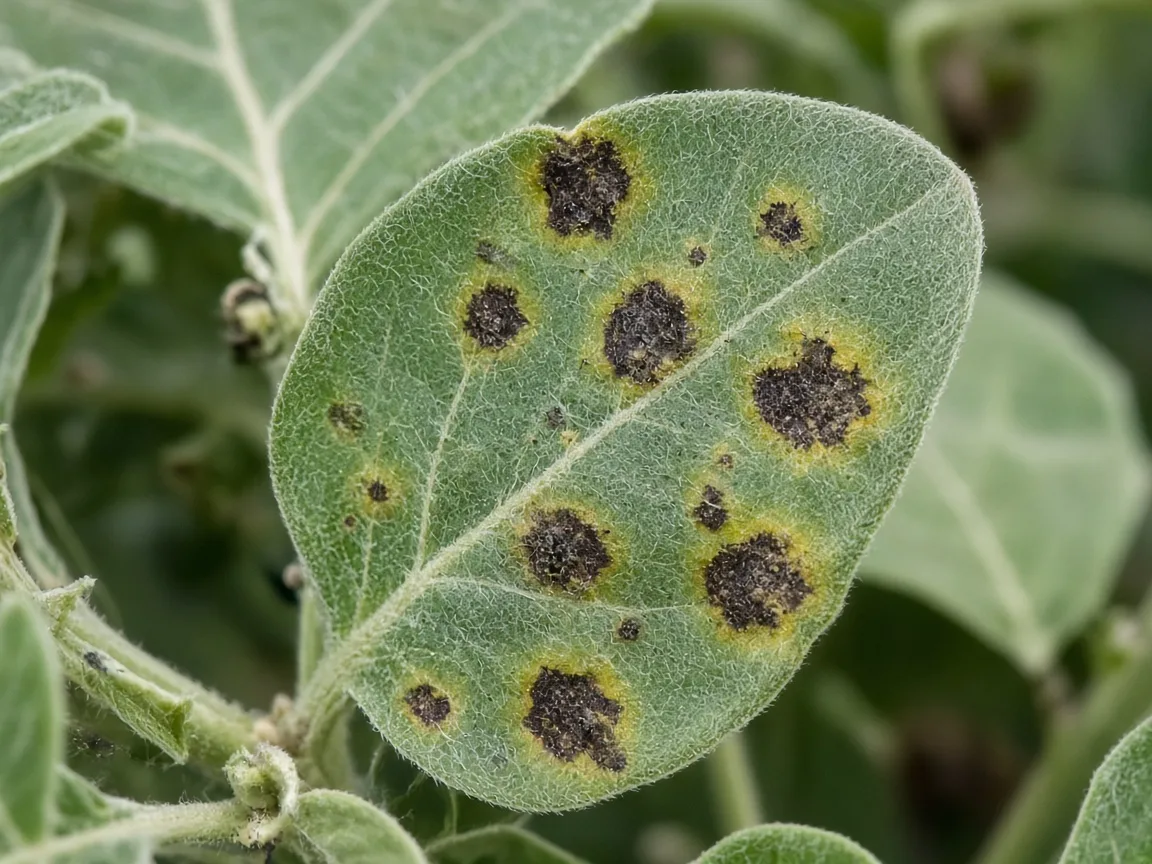
Black spot lesions on Ashwagandha’s hairy gray-green foliage—compare halos and spot edges with healthy tissue on the same plant.
Details that separate this from other Ashwagandha problems:
- Texture: spots are dry and papery, not water-soaked or greasy (bacterial leaf spots often look wet and collapse faster)
- Leaf type: damage sits on broad ovate, slightly fuzzy leaves opposite flowering shoots—not thin herbaceous foliage like basil
- Stem check: mild leaf spot keeps woody stems firm; blackening that travels down a softening stem is escalation, not cosmetic spotting
- Pattern: scattered lesions with halos on multiple leaves after a wet period; static dark flecks on one old bottom leaf may be leftover mechanical damage
Because Ashwagandha leaves are covered in fine hairs, water beads and lingers longer than on smooth-leaved houseplants. That hairy surface is one reason this drought shrub spots easily when growers treat it like a humidity-loving tropical.
Why Ashwagandha gets black spots
Ashwagandha evolved in open, disturbed, dry regions with sandy, fast-draining soil and intense sun. It tolerates drought far better than chronically wet roots or damp leaves. Alternaria species thrive in warm, moist conditions and infect many hosts when spores land on wet tissue—commercial ashwagandha fields report significant losses from Alternaria leaf spot when humidity and leaf wetness stay high.
Several Ashwagandha-specific factors make black spots likely:
Wet foliage on a dry-climate shrub. Misting, overhead watering, rain splash, or evening drinks that wet the hairy leaf surface give fungal spores the hours they need to germinate. Fungal leaf spots spread when infected tissue stays moist and crowded.
Weak light indoors. NC State Extension is clear: Ashwagandha cannot grow in shade. Dim living rooms slow transpiration, keep leaves damp longer after incidental wetting, and weaken tissue—see not enough light if placement is the root issue.
Humid, stagnant air. Grouped herb pots on a sheltered balcony, greenhouse benches without ventilation, or bathroom-adjacent shelves trap moisture around hairy leaves. Ashwagandha accepts low to moderate humidity in nature; constant damp air is not normal for this species.
Overwatering stress without immediate rot. Soil that stays wet weakens the plant and can coincide with leaf spotting, but isolated dry black lesions on firm stems usually mean fungus on leaves first. If soil smells sour or stems soften, overlap with overwatering and root rot is likely.
Medicinal-crop density. Growers packing plants for root harvest often crowd beds. Inner leaves shade each other, dry slowly after dew or irrigation, and spot first—home growers copying dense herb-garden spacing see the same pattern in containers.
How to confirm the cause
Work through these checks before fungicide or repotting:
- Wet-leaf history. Did spots appear after misting, rain, relocation to a humid room, or overhead watering? Timing that matches wet foliage supports Alternaria leaf spot.
- Spot appearance. Dark circles with yellow halos that enlarge over days fit fungal leaf spot. Crispy brown margins without halos suggest brown leaves from sun or salt stress. Uniform yellowing without lesions points to yellow leaves.
- Stem firmness. Press woody stems at the base and along lower branches. Firm: continue leaf-focused care. Soft or malodorous: assess rot before any leaf treatment.
- Soil moisture. Stick a finger 3–4 cm into the mix—the same depth as the watering guide. Soggy soil plus spots may mean overlapping issues; dry soil with spots still points to humidity on leaves, not thirst.
- Undersides and new growth. Look for webbing (spider mites), aphid clusters, or ragged chewed holes (caterpillars). Insects do not produce classic yellow-halo black circles.
- Spread speed. New spots on the newest leaves over a week confirm active disease. Static old marks on one leaf after you corrected moisture may be leftover damage only.
If checks align with wet foliage, yellow halos, and firm stems in full sun placement, Alternaria leaf spot is the working diagnosis.
The first fix to try
Move Ashwagandha to full sun and stop wetting leaves immediately.
That single step removes the condition leaf spot needs to keep spreading. Specifically:
- Place the pot where it receives six or more hours of direct sun daily—a sunny balcony, terrace, or south-facing sill, not a dim kitchen counter
- Stop misting and overhead watering; never shower the foliage to “clean” spots
- Water at the soil line only, in the morning, when the top 3–4 cm is dry
- Increase spacing or run a fan on low nearby so air moves across leaves without blasting the crown
- Pull outdoor pots under cover before prolonged rain
Wait two to three days after the move before removing heavily spotted leaves. Cultural correction—dry hairy foliage, strong light, no splash—is the foundation; chemicals only protect tissue that has not yet infected.
Step-by-step recovery
Once the plant is in bright sun with a dry-leaf policy, proceed in order:
Remove heavily spotted leaves. Cut leaves that are more than half black or yellow. Bag and discard them—do not compost. Sterilize scissors between cuts if you move to healthier tissue.
Wear gloves when pruning. NC State Extension classifies all Ashwagandha parts as poisonous if eaten, including leaves and the orange winter-cherry berries. Keep cuttings away from pets and children; wash hands after handling.
Adjust watering to the pot, not the calendar. Water only when the top 3–4 cm dries. In summer heat that might be every four to seven days; in cool slow growth, much less. Never increase watering because spotted leaves dropped—defoliation from fungus is not thirst.
Improve drainage if needed. Sandy, fast-draining mix with perlite or coarse sand matches this plant’s native conditions—see the soil guide. If the surface stays glossy after watering, the mix may be too peat-heavy even with correct watering.
Monitor new growth weekly. The next flush of silvery-green leaves should emerge without spots. Clean new growth within two to three weeks means cultural correction was enough.
Escalate to fungicide only if spots keep appearing on new leaves after two weeks of dry culture. Protective fungicides guard healthy tissue; they do not heal blackened areas already present. Read the label, apply in early morning so leaves dry quickly, and test one leaf before treating the whole plant. Do not fertilize a stressed Ashwagandha to force recovery.
Do not repot on day one unless soil is waterlogged and sour. Repotting adds stress and can splash spores. Fix dryness and light first; repot in early spring only if drainage is clearly failing—see the repotting guide.
Recovery timeline
| Phase | What to expect |
|---|---|
| Days 1–3 | No new wetting; existing spots may darken as tissue dies. Some leaf drop from already-infected leaves is normal. |
| Week 1–2 | Shedding slows. Stems stay firm. No new spots on the newest leaves is the first positive sign. |
| Week 2–3 | Clean new growth at branch tips. Plant may look sparse until fresh leaves fill in. If every new leaf still spots after three weeks of dry culture, escalate to labeled fungicide. |
| Month 2+ | Normal warm-season growth if full sun and dry-down watering hold. Old scarred leaves may persist until you prune them. |
Alternaria leaf spot rarely kills a mature Ashwagandha with firm stems and sound roots. Failure looks like continued spotting on every new leaf despite dry culture, or a softening crown—switch focus to rot rescue if that happens.
Lookalike symptoms
| Symptom pattern | Likely cause | Key differentiator |
|---|---|---|
| Dark spots with yellow halos, firm stems | Alternaria leaf spot | Follows wet foliage; spreads leaf to leaf |
| Dry brown margins, no halos, sudden sun move | Sun scorch | After relocation to harsh midday sun without acclimation |
| Uniform yellow lower leaves, soggy soil | Overwatering | Yellowing without enlarging black circles; stems may soften |
| Yellow leaves, soft base, sour soil | Root rot | Crown tissue fails before isolated dry spots on firm stems |
| White fuzz on soil surface only | Mold on soil | Fungus on mix, not classic leaf lesions |
| Ragged holes, visible insects | Caterpillars or leaf miners | Chewing damage, not fungal halos |
| Tiny yellow dots, fine webbing | Spider mites | Stippling, not enlarging black blotches |
Bacterial leaf spots can also darken tissue on nightshades, but they often look water-soaked and collapse faster than the dry, papery lesions typical of Alternaria. When in doubt, dry the leaves and recheck in three days—bacterial patches usually keep spreading in humid stagnant air even without fresh splash.
Mistakes to avoid
- Misting or showering leaves to clean them—this extends wetness on hairy foliage and spreads spores
- Watering more because leaves dropped—defoliation from fungus is not drought; wet soil invites stem and root rot
- Keeping Ashwagandha in a dim room while fighting spots—without full sun, leaves never dry fast enough
- Immediate fungicide without drying the environment—chemicals cannot substitute for dry culture
- Stacking repot, prune, feed, and spray on one day—change one variable, watch the response, then add the next if needed
- Composting infected leaves—spores survive and can reinfect
- Handling cuttings bare-handed around pets or children—all parts are toxic if ingested
How to prevent black spots next time
Prevention on Ashwagandha is mostly aligning care with its arid native biology:
- Grow in full sun—six or more hours of direct light daily on the sunniest ledge or balcony you have
- Use sandy, fast-draining mix with perlite or coarse sand; avoid heavy peat that holds moisture at the crown
- Water at soil level only when the top 3–4 cm is dry; skip misting entirely
- Shelter from prolonged rain during humid seasons if you grow outdoors
- Space pots so air moves between plants; do not cram Ashwagandha on a sheltered, windless shelf
- Quarantine new plants for two weeks and inspect hairy leaves before mixing collections
- Reduce winter watering when growth slows so cool, damp soil does not compound any lingering spores
For full species context, see the Ashwagandha overview and problems hub.
When to worry
Treat black spots as urgent if:
- Stems soften at the base or smell unpleasant—shift to root rot protocol, not leaf-spot care
- Every new leaf spots within days despite two weeks of dry, bright culture—escalate to labeled fungicide or isolate the plant
- Black lesions climb stems while tissue turns mushy—rot may be outpacing a cosmetic leaf issue
- You grow for root harvest and leaf loss is heavy before flowering—chronic spotting reduces the photosynthetic canopy that feeds root development
Leaf spot alone on a firm, sunny Ashwagandha is manageable. The dangerous overlap is wet leaves and wet soil together—watch the crown as closely as you watch the spots.