Compacted Soil on Marigold: Causes, Checks & Fixes
Quick answer
Compacted mix starves marigold fibrous roots of air, so water pools on top while lower leaves yellow and blooms stall despite full sun. First step: stop watering, probe to mid-depth with a dry skewer, and plan a full repot into fresh open mix if the core resists — not surface fluffing.

Compacted Soil on Marigold: Causes, Checks & Fixes
This guide covers compacted soil on Marigold. See also the general Compacted Soil guide, watering, and light pages for this plant.
Compacted Soil on Marigold: Causes, Checks & Fixes
Quick answer
Marigold roots need air between drinks. When container mix or a bed surface collapses into a dense layer, water pools on top or runs down the pot wall while the core stays airless. Lower leaves yellow, growth stalls, and buds fail to open even though the plant stands in bright light.
For how compaction damages roots in general, see our compacted soil guide. On marigold, the pattern usually shows up as stalled flowering plus a heavy pot that stays wet for days — not simple thirst.
First step: stop watering and probe. Push a dry wooden skewer to mid-depth. If it meets hard resistance and pulls out dark and clinging, treat as compaction and plan a repot into fresh open mix rather than watering more.
What compacted soil looks like on marigold
Watch substrate behavior first, then the plant. Marigold (Tagetes erecta and French types) has a shallow fibrous root system that spreads horizontally, so a sealed surface quickly cuts off the whole root zone.
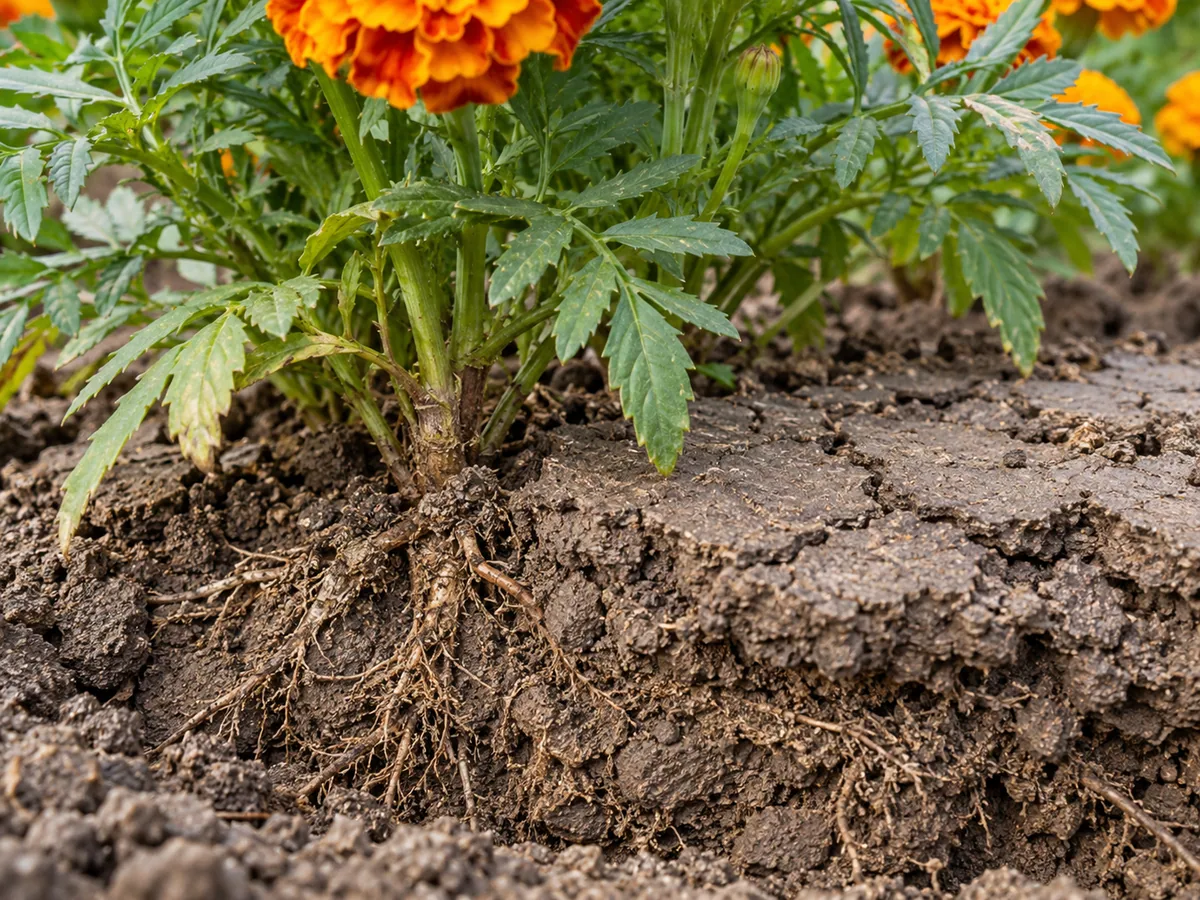
Compacted mix on marigold: sealed crust, water channeling, and few white root tips — compare with loose crumbly mix on the same plant.
Surface and watering clues:
- Water beads on a pale crust or pools for minutes instead of soaking in
- Water exits the drainage hole almost immediately while the center stays dry — channeling down the pot wall
- Pot stays heavy for several days after one watering in warm weather
- White mineral rings on the rim from repeated shallow top watering
Plant clues on marigold:
- Lower leaves yellow while new buds stall; yellow leaves on marigold from compaction come with a hard pot, not a light dry one
- Wilting at midday that does not recover after watering — roots cannot take up water in airless mix
- African types flop or need staking more than usual because anchoring roots cannot penetrate the brick-like layer
- Flower heads stay small or fail to open on sunny days despite full sun exposure
Unpot clues:
- Solid root mat pressed against dense peat with few white fibrous tips
- Sour or musty odor from drainage holes after the mix should have aired out
- Mix comes out as one hard plug instead of crumbling apart
Why marigold suffers in compacted soil
Marigold is a fast, sun-driven annual that flowers in 6–8 weeks from seed. That speed depends on oxygen at the shallow fibrous roots between waterings. USDA research notes that compaction reduces root penetration and restricts water and air movement in the soil, which is exactly the failure mode in a collapsed container.
Three marigold-only factors make compaction hit harder here than on many houseplants:
1. Fibrous annual roots with no storage organ. Unlike bulbs or succulents, marigold cannot ride out an airless week on stored reserves. Once the surface seals, the whole horizontal root mat suffocates at once, so drooping leaves and bud stall appear together rather than one old leaf at a time.
2. Full-sun water demand meets sealed mix. Marigold performs best in full sun with well-drained soil and well-drained soil at pH 6 to 7 as a low feeder. In 6–8 hours of direct sun the top growth keeps transpiring while sealed roots cannot resupply it — the classic midday wilt with a heavy wet pot.
3. Bloom-or-bust annual season. A perennial can wait out a bad month. A seasonal marigold that spends three weeks suffocating in July has lost a large share of its flowering window. That is why slow growth plus closed buds on a heavy pot deserves a repot decision within days, not a wait-and-see month.
Container peat and compost-heavy blends compress under repeated top watering, heat, and foot-tight root pressure. Garden beds compact when clay is worked wet or rain pounds bare soil into a cap. Both deliver the opposite of the average, evenly moist, well-drained soils in full sun marigold prefers.
How to confirm compaction on your marigold
Work in order. One probe test beats guessing from leaf color.
- Water behavior: Pour slowly. In open marigold mix water soaks in evenly and drains within a minute or two. Pooling on top or instant side-channeling points to a sealed layer.
- Skewer probe: Push a dry skewer to mid-depth 24 hours after watering. Hard resistance with a dark clinging core confirms compaction. Loose dry mix throughout points to water stress instead.
- Pot weight: Lift after watering and again two days later. A pot that stays heavy in warm sun while leaves wilt signals trapped moisture, not drought.
- Surface check: White crust alone can be salt build-up from fertilizer and tap water. Crust plus probe resistance means compaction with salts — flush thinking alone will not fix it.
- Root check: Slide the plant out. Dense brick-like plug with circling fibrous roots and no white tips confirms structural failure. Brown mushy roots with sour smell mean root rot on marigold has followed compaction.
- Site check: Is this marigold actually getting full-day sun, or bright shade that keeps a dense mix wet for a week? Cross-check routine rhythm in the marigold watering guide before blaming soil alone.
First fix for marigold
Stop watering and open the root zone. Do not pour more water to soften hard mix — that deepens anaerobic conditions around fibrous roots.
If only the top centimetre is crusty and the skewer slides easily below with neutral smell, break the crust gently with a chopstick, water deeply once until a little drains, empty the saucer, and return the plant to full sun. If the core resists, smells sour, or the plant unpots as a solid plug, skip in-place aeration and plan a full repot into fresh mix. Poking holes through a sour brick leaves pathogens and airless peat around the roots.
Step-by-step recovery
- Hold water until the surface dries unless stems are actively collapsing — slightly dry roots are easier to inspect than mud.
- Unpot gently. Support tall African stems; tap the rim. Note smell, root color, and whether mix holds a plug shape.
- Discard collapsed or sour mix. Do not reuse a brick-like or foul core. Tease the fibrous mat lightly so new tips can reach fresh substrate.
- Trim only clearly rotted roots with clean shears. Firm pale roots stay even if stained.
- Repot at the same depth into fresh standard potting soil amended with about 15% perlite, per the marigold soil guide. Match pot volume to the root mass. Tall types may be planted slightly deep with lower leaves stripped, but never bury the crown.
- Water once lightly until a small amount drains, then empty the saucer immediately. Marigolds tolerate drought better than being overly wet, so err dry after repotting.
- Place in full sun with airflow — at least six hours of direct light — so the new mix dries predictably.
- Hold fertilizer until firm new growth and opening buds return. Marigolds are low feeders; feeding stressed roots risks fertilizer burn.
- Resume base watering only when the top 3–5 cm is dry, as described in routine marigold watering practice.
African marigolds dislike very acidic mix below about pH 5.8 and perform best near pH 6.0 to 7.5 in moist sand or loam. If you garden in heavy clay, build beds per the soil guide rather than dropping container peat into a clay hole.
Recovery timeline
Mild surface crust caught early: water soaks in evenly again within one dry-down cycle, and new buds open within 2–3 weeks. Judge by fresh buds and firm stems, not old yellow leaves re-greening.
Full repot for a brick-like core: one to two full dry-down cycles in a right-sized pot with strong light before steady blooming resumes. White root tips at the drainage holes and a pot that lightens within days after watering are the working signs.
Advanced damage with rot: soft stem bases, spreading black at the crown, or mostly mushy roots may fail despite repot. If crown rot or stem collapse follows, replacement is often more practical than rescue for a seasonal annual.
Improving: probe meets loose mix at depth; pot lightens between waterings; new leaves emerge clean; buds open on sunny days. Worsening: sour smell returns within a week; stems indent under gentle pressure; flowers turn brown and collapse; wilt persists in a heavy pot.
Causes to rule out
| Pattern | More likely compaction | More likely something else |
|---|---|---|
| Skewer test | Hard resistance, dark clinging core | Loose dry mix throughout — water stress |
| Mix history | Once drained well, sealed mid-season | Heavy garden soil from planting — wrong soil mix |
| Pot weight | Heavy for days, leaves wilt anyway | Light pot, papery leaves — underwatering rhythm |
| Roots | Dense plug, firm roots until late | Brown mush with sour smell — root rot |
| Surface | Crust plus channeling | Fuzzy growth on damp top only — mold on soil |
| Light | Full sun, still stalled | Leggy pale stems in shade — not enough light |
| Pests | No sticky residue or webbing | Fine webbing, stippling — spider mites |
Practical marigold growing notes for containers and beds emphasize drainage first — when drainage behavior and probe resistance both fail, soil structure is the diagnosis even if leaves suggest thirst.
What not to do
- Do not water more to soften hard mix — that suffocates fibrous roots further.
- Do not add sand alone to clay or peat and expect drainage; small sand fractions can set tighter.
- Do not lay gravel at the pot bottom instead of using open mix throughout.
- Do not repot into a much larger container of fresh peat — excess wet volume around shallow roots repeats the failure.
- Do not fertilize stressed roots on day one; added salts worsen salt build-up on an already sealed surface.
- Do not fluff sour-smelling mix in place and replant into it — discard it.
How to prevent compacted soil on marigold
Start open, stay open. Use standard potting soil with about 15% perlite for containers, as detailed in the marigold soil guide. In ground beds, loosen 15–20 cm deep and blend compost plus coarse grit so rain drains within hours, not days.
- Match pot size to the fibrous root ball; oversized plastic tubs hold wet mix below shallow roots.
- Water at the base, deeply but infrequently, and empty saucers — avoid daily shallow splashes that crust the surface.
- Keep full sun so pots dry on schedule; shaded corners keep dense mix anaerobic for weeks.
- Refresh container mix each season. Marigold is grown as an annual sown directly in its final container, so last year’s collapsed peat should not carry over.
- Probe monthly in peak bloom season. Catching resistance before buds stall avoids a mid-season emergency repot.
- Test pH before liming; most garden soils already sit near the marigold-friendly 6–7 range.
Compaction vs wrong soil mix
Compaction is time-based structural failure of a mix that once drained. Wrong soil mix is a choice error at planting — straight garden soil, moisture-control blends, or heavy peat used from day one. Both suffocate shallow roots and stall blooms, and both end in a full repot, but the diagnosis path differs: probe resistance plus mid-season collapse points here, while heavy clumps and saturation from the first watering point to wrong mix. High-pH or chalky problems belong on the soil too alkaline page instead.
When to worry
Escalate within days if stems soften at the base, blackening spreads from the crown, soil smells sour, or unpotting shows mostly mushy roots — follow root rot rescue after repotting into dry open mix. Fungal pressure rises fast when high humidity meets sealed mix and wet foliage.
Lower urgency when stems are firm, smell is neutral, and the only signs are slow buds plus probe resistance — schedule a repot before softness reaches the crown. For landscape clay beds covering large areas, contact your local extension office for amendment rates suited to your site.
Conclusion
On marigold, compacted soil shows as pooling water, a heavy pot, yellowing lower leaves, and buds that refuse to open in full sun. Confirm with skewer resistance and pot weight, stop watering, discard brick-like or sour mix, and repot into fresh perlite-amended substrate in a right-sized pot. Even soak-in after watering and buds opening on sunny afternoons within weeks is the simple test that air has returned to the fibrous root zone.
When to use this page vs other Marigold guides
- Marigold watering guide - Use for routine moisture checks before assuming compacted soil is the main issue.
- Marigold problems hub - Browse all common issues on this species.