Chives Care Guide: Sun, Water, Soil and Harvest
Allium schoenoprasum
Grow chives in sun or partial shade with steady moisture and good drainage. Learn when to water a pot, harvest leaves, enjoy flowers, and divide the perennial clump.
Chives Care Guide: Sun, Water, Soil and Harvest
Start with wateringThe most common care mistake for ChivesWatering guide →Chives care essentials
Light
Water
Keep chives evenly moist but well-drained while they establish. Established garden clumps usually need extra water only during prolonged dry spells; container plants dry faster and need more regular checks.
Soil
Moderately fertile soil with organic matter that stays lightly moist while draining freely; a container mix around pH 6.0–7.0 suits chives.
Humidity
Temperature
Fertilizer
About Chives
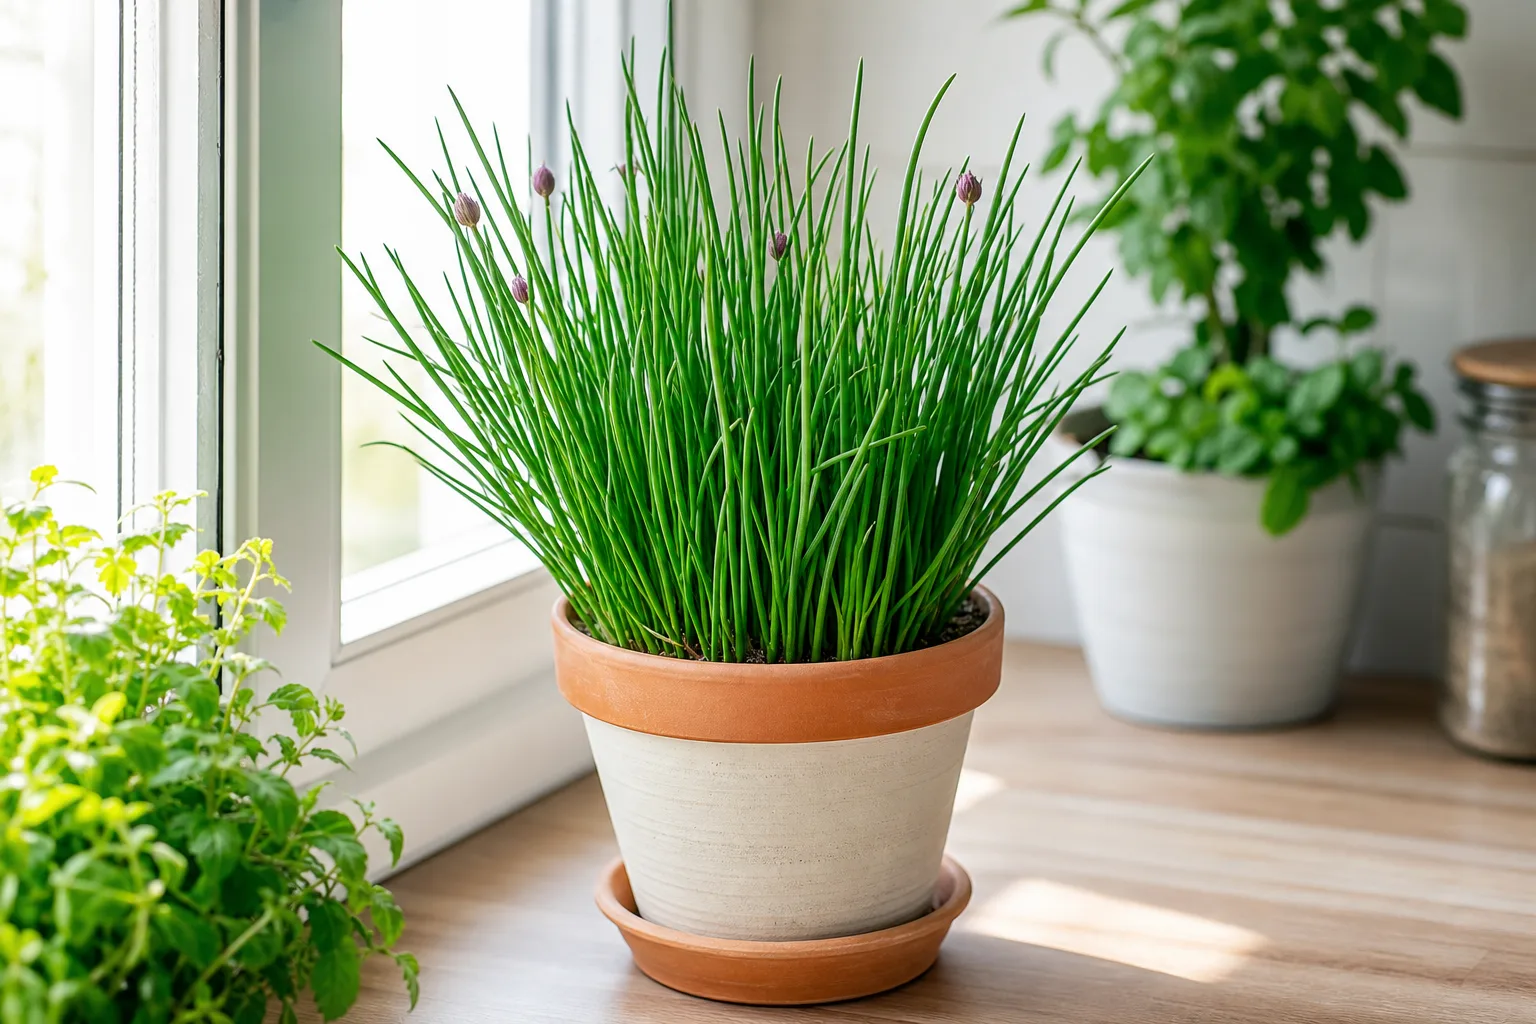
Chives is native to Temperate regions of the Northern Hemisphere, including northern North America, northern Europe, Mongolia, and Japan, typically reaches About 30–46 cm tall and 30–43 cm wide; flower stems can rise above the leafy clump indoors, with moderate; leaves regrow after regular cutting growth. Chives has a clump forming, bulbous herbaceous perennial grown for its hollow leaves and edible purple flowers growth habit and part of the Amaryllidaceae family. It is also known as Wild Chives and Flowering Onion.
| Detail | Information |
|---|---|
| Also known as | Wild Chives, Flowering Onion |
| Native region | Temperate regions of the Northern Hemisphere, including northern North America, northern Europe, Mongolia, and Japan |
| Mature size | About 30–46 cm tall and 30–43 cm wide; flower stems can rise above the leafy clump |
| Growth rate | Moderate; leaves regrow after regular cutting |
| Growth habit | Clump Forming, Bulbous Herbaceous Perennial Grown For Its Hollow Leaves And Edible Purple Flowers |
| Scientific name | Allium schoenoprasum |
| Family | Amaryllidaceae |
Chives Care Guide: Sun, Water, Soil and Harvest
Quick answer
Grow common chives (Allium schoenoprasum) in full sun or light shade, in soil that drains freely and stays lightly moist while the plant establishes. Water pots more often than garden clumps, which become fairly drought tolerant once settled. Cut some leaves near the base rather than shearing every stem; leave enough green growth for the bulbs and roots to keep producing. Wisconsin Extension describes chives as a low-nutrient perennial, so feed lightly with compost only when the soil needs organic matter. First, check that the growing spot has good drainage and several hours of sun.
Identify common chives
Common chives form tight clumps of small bulbs with upright, hollow, round leaves and purple flower heads. The leaves are milder and finer than onion leaves, while garlic chives (Allium tuberosum) have flat blades and usually flower white later in the season. Those are different plants with different harvest and flowering habits, so check the leaf shape before using advice written for garlic chives. NC State lists common chives in the Amaryllidaceae family and describes them as a bulbous perennial with edible leaves and flowers (NC State Extension).
How chives grow through the year
Chives send new leaves from the crown as the weather cools into spring, flower later, then slow or die back during cold winters or severe heat. In a mild climate, foliage may persist longer, but growth still responds to season and moisture. A quiet clump is not automatically dying: inspect the bulbs and crown, then wait for suitable growing conditions before digging or feeding it. Wisconsin Extension notes that established plants tolerate drought, yet grow best with consistent moisture (Wisconsin Horticulture).
Choose full sun or light shade
A sunny bed encourages firm, upright leaves and reliable flowering. Chives tolerate some shade, but a dim site can leave the clump thin and reduce flowers; if it receives only brief direct sun, observe new growth before moving it. The Royal Horticultural Society and NC State both list sun to partial shade as suitable positions, so full afternoon sun is not a strict requirement in every climate (RHS). In a hot, exposed spot, light afternoon shade can reduce stress while preserving bright morning light.
Keep moisture steady without waterlogging
Water newly planted divisions and seedlings when the upper soil begins to dry, then allow excess water to drain. Once a garden clump is established, rain may be enough except during a prolonged dry spell. A pot loses moisture faster, so check the mix with a finger rather than following a fixed weekly schedule. Savvy Gardening recommends even moisture for container chives and emphasizes that a pot needs drainage; Harvest to Table likewise distinguishes the regular water needed during establishment from the drought tolerance of mature plants (Savvy Gardening, Harvest to Table).
Plant in well-drained, moderately fertile soil
Use a loose garden soil or potting mix that lets excess water escape. Chives grow in a range of soils, but prolonged wetness around the shallow bulbs can encourage rot; improve drainage or use a raised bed instead of adding more water to a weak plant. A soil pH near 6 to 7 is a useful range, but do not chase a number if the plant is growing well. Better Homes & Gardens and Harvest to Table both describe chives as suited to organic matter and free drainage; their pH guidance is a reference, not a requirement to test every pot (BHG).
Grow chives in beds or containers
A garden bed gives the clump room to expand and generally buffers moisture and temperature better than a small pot. For a container, choose a stable pot with an open drainage hole and enough depth for the bulbs and roots; a very small pot dries fast and makes harvest uneven. Use fresh potting mix rather than heavy garden soil, and empty the saucer after watering. Chives can grow indoors in a bright window, but limited winter light often slows leaf production, so treat a windowsill pot as a seasonal supply rather than expecting continuous heavy harvests.
Start from seed or set a division
Seed is a low-cost way to establish a new clump, but it takes longer than planting a division. Sow in a small group, keep the seedbed evenly damp, and do not transplant delicate seedlings until they have several true leaves and a stable root ball. A division is faster: lift a healthy clump in spring or early autumn, separate it into small rooted pieces, and replant at the original depth. GrowVeg notes that dividing a crowded clump every few years helps prevent a weak centre; the RHS also recommends dividing established chives as part of routine care (GrowVeg).
Let new plants establish before taking much
Seedlings have less stored energy than a mature clump, so wait until they have produced several sturdy leaves and are growing steadily before taking kitchen harvests. Newly divided pieces also need time to root into their new soil. Keep their moisture even, but do not compensate for slow early growth with a strong fertilizer dose; roots disturbed by division need an open, aerated mix and steady conditions. Wisconsin Extension recommends waiting until leaves reach about six inches before harvesting, a useful practical threshold for a developing clump as well as an established one (Wisconsin Horticulture).
Harvest a little at a time
Wait until the leaves are established and long enough to handle cleanly, then snip a few outer leaves near the base with sharp scissors. Avoid pulling leaves upward, which can loosen the bulbs, and do not cut every stem to ground level on a young or recently divided plant. Regular light picking gives the clump time to replace leaves and keeps the harvest tender. Wisconsin Extension says leaves can be harvested once they reach about six inches and warns that a complete cutback takes several weeks to regrow; Savvy Gardening similarly recommends cutting rather than pulling (Wisconsin Horticulture, Savvy Gardening harvest guide).
Manage flowers and self-seeding
Purple flower heads are normal and attract pollinators; they do not mean the clump has failed. Keep some flowers if you enjoy them or want seed, and remove fading heads if you do not want seedlings around the bed. After the bloom, a gentle trim can encourage fresh leaves, but avoid a hard cut if the clump is already weak or drying out. Better Homes & Gardens recommends deadheading fading flowers to reduce self-seeding, while the RHS notes that the edible blooms are part of the plant’s seasonal display (BHG, RHS).
Protect pets from chives
Although people grow chives as an edible herb, the plant is not safe for pets to chew. The ASPCA lists Allium schoenoprasum as toxic to cats, dogs, and horses and identifies N-propyl disulfide among its toxic principles (ASPCA Animal Poison Control). Place pots and cut leaves out of reach, and wash tools or work surfaces after harvest if pets can access them. For a suspected ingestion, contact a veterinarian or animal poison-control service rather than trying a home remedy.
Read slow or weak growth
If leaves are sparse, check light, moisture, and the centre of the clump before adding fertilizer. A wet pot can hide root trouble; a dry pot can make leaves limp or brown at the tips, while old, crowded clumps may thin in the middle. Remove dead foliage and divide a congested healthy clump during active growth, but delay major disturbance if the soil is saturated or the plant is heat-stressed. For specific leaf symptoms, compare what you see with the Chives watering guide and Chives soil guide before changing several conditions at once.
Avoid common care mistakes
The most common setbacks are keeping the mix wet, placing a pot in deep shade, and feeding repeatedly when growth slows for seasonal reasons. Chives have relatively modest nutrient needs; Wisconsin Extension says routine fertilizer is unnecessary (Wisconsin Horticulture), and BHG recommends compost only when the soil lacks organic matter (BHG). Another avoidable mistake is cutting the whole clump every week: leave enough green leaves for recovery. If the plant is established but crowded, dividing it is usually more useful than moving it into an oversized pot or adding a strong fertilizer.
When to use this page vs other Chives guides
Use this overview to set the basic growing conditions and identify the clump’s seasonal rhythm. The Chives light guide covers windows, shade, and heat; the watering guide explains soil checks for beds and pots. Use the soil guide for drainage and mix choices, the fertilizer guide for feeding, and the repotting guide or propagation guide when a clump is crowded.
Related Chives guides
For pruning and harvest timing, read the Chives pruning guide. For a quick plant identification and profile, start at the Chives plant hub. These pages separate routine light, water, soil, feeding, division, and cutting decisions so you can change the condition that actually needs attention.
Conclusion
Chives are easiest to manage when their bulbs sit in free-draining soil, receive sun or light shade, and stay lightly moist while establishing. Harvest a few leaves at a time, divide a crowded clump every few years, and avoid routine feeding unless the soil needs organic matter. Keep cats, dogs, and horses from eating the plant, then use the topic guides above when one part of the routine needs a closer look.
How to care for Chives?
When should you water Chives?
Keep chives evenly moist but well-drained while they establish. Established garden clumps usually need extra water only during prolonged dry spells; container plants dry faster and need more regular checks.
- Check the upper 2–3 cm of potting mix. Water when it is starting to dry - Established garden clumps usually need extra water only during prolonged dry spells; container plants dry faster and need more regular checks.
- then let excess drain freely from the container - Established garden clumps usually need extra water only during prolonged dry spells; container plants dry faster and need more regular checks.
- Drain excess water - Keep chives evenly moist but well-drained while they establish.
What soil works best for Chives?
Moderately fertile soil with organic matter that stays lightly moist while draining freely; a container mix around pH 6.0–7.0 suits chives.
- Peat-free multipurpose potting mix with some added compost - Moderately fertile soil with organic matter that stays lightly moist while draining freely; a container mix around pH 6.0–7.0 suits chives.
- Add perlite or horticultural grit if the mix holds too much water - Moderately fertile soil with organic matter that stays lightly moist while draining freely; a container mix around pH 6.0–7.0 suits chives.
- Use a container with an open drainage hole and empty its saucer after watering - Moderately fertile soil with organic matter that stays lightly moist while draining freely; a container mix around pH 6.0–7.0 suits chives.
Grower notes for Chives
Grow chives as a returning clump
Chives are bulbous perennials that form dense clumps of hollow, onion-flavoured leaves. They suit herb beds, borders, small gardens, and pots. In a mild winter, established clumps return each spring; their compact size also makes them useful near a sunny kitchen door.
Choose sun, with partial shade as a backup
Full sun supports strong leafy growth, but chives also tolerate partial shade. Aim for six or more hours of direct sun when you can, especially for container plants, and move a pot to a brighter position if it produces sparse leaves.
Keep moisture steady and drainage open
Newly planted chives need water during dry spells in their first summer. Established plants in the ground are drought-resistant and rarely need extra water except during a long dry spell. Check pots more often because they dry faster; keep the mix evenly moist without leaving roots in standing water.
Harvest leaves low and often
Begin cutting when the leaves are about 15 cm tall. Snip a few leaves near the base with clean scissors, leaving enough foliage for the clump to keep growing. Regular harvest encourages fresh leaves, and the mild onion flavour is best retained when the leaves are used raw or added near the end of cooking.
Enjoy flowers, then decide whether to deadhead
Rounded purple flowerheads appear in late spring and summer. Their individual flowers are edible and attract pollinating insects. After flowering, remove spent stalks to keep the clump tidy and limit self-seeding, or leave some flowerheads to set seed if you want new plants.
Divide old clumps before they thin out
Lift and split crowded clumps in spring, replanting the divisions in fresh soil. Division every few years keeps the centre from becoming weak and gives you plants for another pot or garden bed. Chives can also self-seed if faded flowers are left in place.
Keep chives away from pets
The ASPCA lists chives as toxic to cats, dogs, and horses. Keep pets from chewing the leaves or flowers, and contact a veterinarian promptly if a pet eats the plant.
Are Chives Safe for Pets?
The ASPCA lists chives (Allium schoenoprasum) as toxic to cats, dogs, and horses. It identifies N-propyl disulfide and reports vomiting, red-blood-cell breakdown, blood in urine, weakness, elevated heart rate, and panting. Keep pets from chewing chives and contact a veterinarian promptly after ingestion.
ASPCA lists chives (Allium schoenoprasum) as toxic to cats, dogs, and horses and names N-propyl disulfide as the toxic principle. Reported signs include vomiting, red-blood-cell breakdown (hemolytic or Heinz body anemia), blood in urine, weakness, elevated heart rate, and panting. Keep the plant out of reach and contact a veterinarian promptly if a pet eats it.
Watering Chives
For Chives, check the upper 2–3 cm of potting mix. Water when it is starting to dry, then let excess drain freely from the container. and water water newly planted chives during dry spells in their first summer. For a pot, check the mix every few days in warm weather and water when it begins to dry. In-ground clumps need little extra water once established, except during extended drought. Containers dry more quickly in warm weather; reduce watering in cool or rainy periods while keeping the mix from staying saturated.
| Detail | Information |
|---|---|
| How often | Water newly planted chives during dry spells in their first summer. For a pot, check the mix every few days in warm weather and water when it begins to dry. |
| How to check | Check the upper 2–3 cm of potting mix. Water when it is starting to dry, then let excess drain freely from the container. |
| Seasonal changes | In-ground clumps need little extra water once established, except during extended drought. Containers dry more quickly in warm weather; reduce watering in cool or rainy periods while keeping the mix from staying saturated. |
Signs of overwatering
- Potting mix or garden soil stays saturated between waterings
- Water collects in the saucer or the container has no drainage hole
- Chives in poorly drained soil develop root rot
Signs of underwatering
- A container mix is dry several centimetres below the surface
- Leaves lose firmness during a prolonged hot, dry spell
- New growth slows while a pot dries rapidly
Soil & potting for Chives
Use a mix of Peat-free multipurpose potting mix with some added compost, Add perlite or horticultural grit if the mix holds too much water, Use a container with an open drainage hole and empty its saucer after watering for Chives. Use well-drained soil and a pot with a drainage hole. Chives tolerate some dryness, but persistently wet soil can cause root rot. Target soil pH around 6.0–7.0. Repot divide or repot a crowded clump about every three to four years, or sooner if the roots fill the container., ideally in spring, as new growth begins; established garden clumps can also be divided in autumn.
| Detail | Information |
|---|---|
| Recommended mix | Peat-free multipurpose potting mix with some added compost, Add perlite or horticultural grit if the mix holds too much water, Use a container with an open drainage hole and empty its saucer after watering |
| Drainage | Use well-drained soil and a pot with a drainage hole. Chives tolerate some dryness, but persistently wet soil can cause root rot. |
| Soil pH | 6.0–7.0 |
| Repotting frequency | Divide or repot a crowded clump about every three to four years, or sooner if the roots fill the container. |
| Best season to repot | Spring, as new growth begins; established garden clumps can also be divided in autumn. |
Signs it needs repotting
- Roots fill the pot or emerge from its drainage hole
- The clump becomes congested or weak in the centre
- A crowded pot dries very quickly after watering