Mold on Soil on Neem: Causes, Checks & Fixes
Quick answer
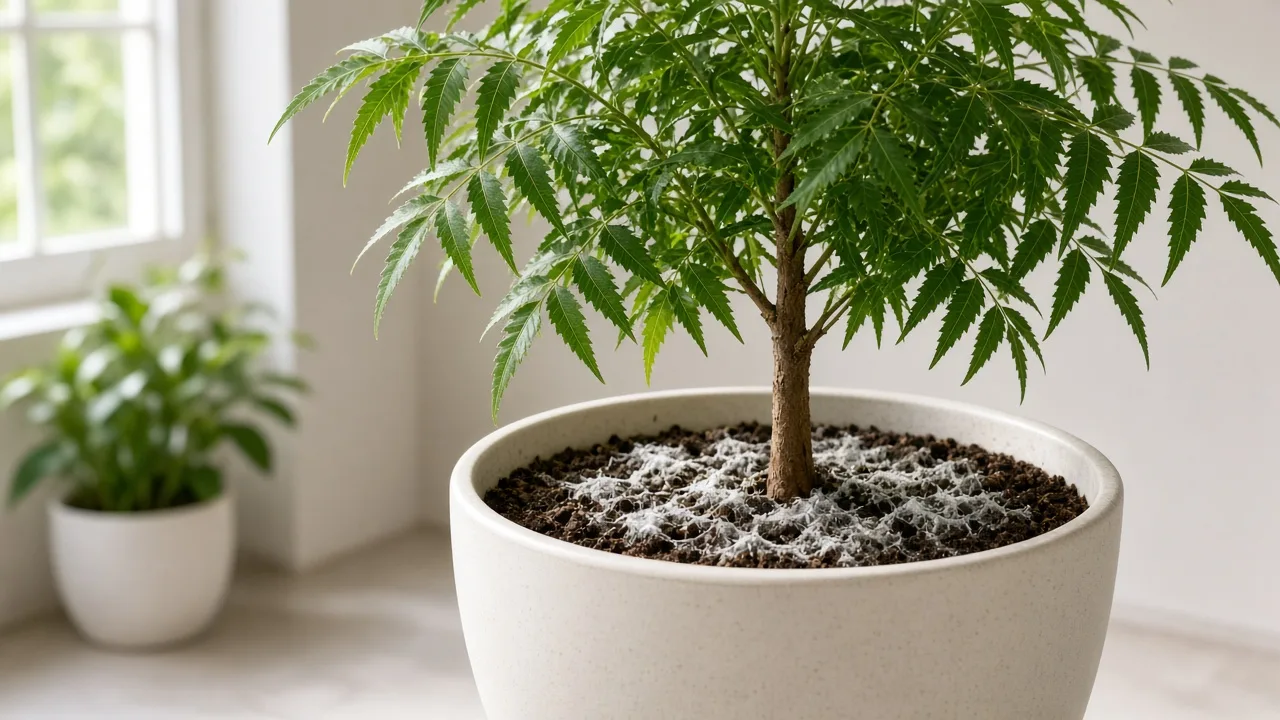
White mold on Neem potting soil is usually a harmless saprophytic fungus feeding on organic matter, but on Azadirachta indica it serves as an early warning for poor drainage and excessive moisture. First step: gently scrape away the top 1–2 cm of fuzzy mold, aerate the surface, move the pot into direct sunlight, and withhold water until the upper 5 cm of soil is completely dry.
Mold on Soil on Neem: Causes, Checks & Fixes
This guide covers mold on soil on Neem. See also the general Mold on Soil guide, watering, and light pages for this plant.
Mold on Soil on Neem: Causes, Checks & Fixes
Quick answer
Discovering a layer of white, cottony fuzz carpeting your Neem tree’s potting mix can trigger immediate panic, but the fungus itself is almost always a harmless saprophyte rather than a disease attacking the tree’s living tissue. However, for a dry-forest native like Azadirachta indica, white mold on soil is a high-priority environmental signal: your potting medium is staying damp for far too long, and airflow around the root collar is severely restricted.
Before you make any drastic changes, run this essential triage check:
- Firm root flare and trunk base: If the main stem feels woody, solid, and firm beneath your fingertips, the root system is still functioning normally. This is a surface-level moisture imbalance that you can resolve with cultural adjustments.
- Soft, spongy, or discolored stem base: If the trunk base yields to gentle pressure, smells sour, or shows dark water-soaking, stagnant moisture has already progressed beneath the surface. Transition immediately from surface mold management to our Neem root rot protocol.
The immediate first fix (for firm trees): Stop watering immediately. Gently scrape away the top 1 to 2 cm of fuzzy growth, lightly aerate the crust with a clean fork, relocate the container into direct sunlight, and allow the potting mix to dry out significantly before applying any more water. For broader context on how fungal blooms behave across houseplant media, consult our comprehensive guide to mold on soil.
By sai-ananth · Reviewed by LeafyPixels Review Board · Last expert review: August 2026
What mold on soil looks like on Neem
On container-grown Neem, mold typically manifests as an uneven, spiderweb-like or cottony white-to-light-gray mycelial mat sprawling over the topsoil. It often congregates around wood chips, bits of uncomposted bark, or near the shaded inner rim of the pot where moisture lingers longest after irrigation.
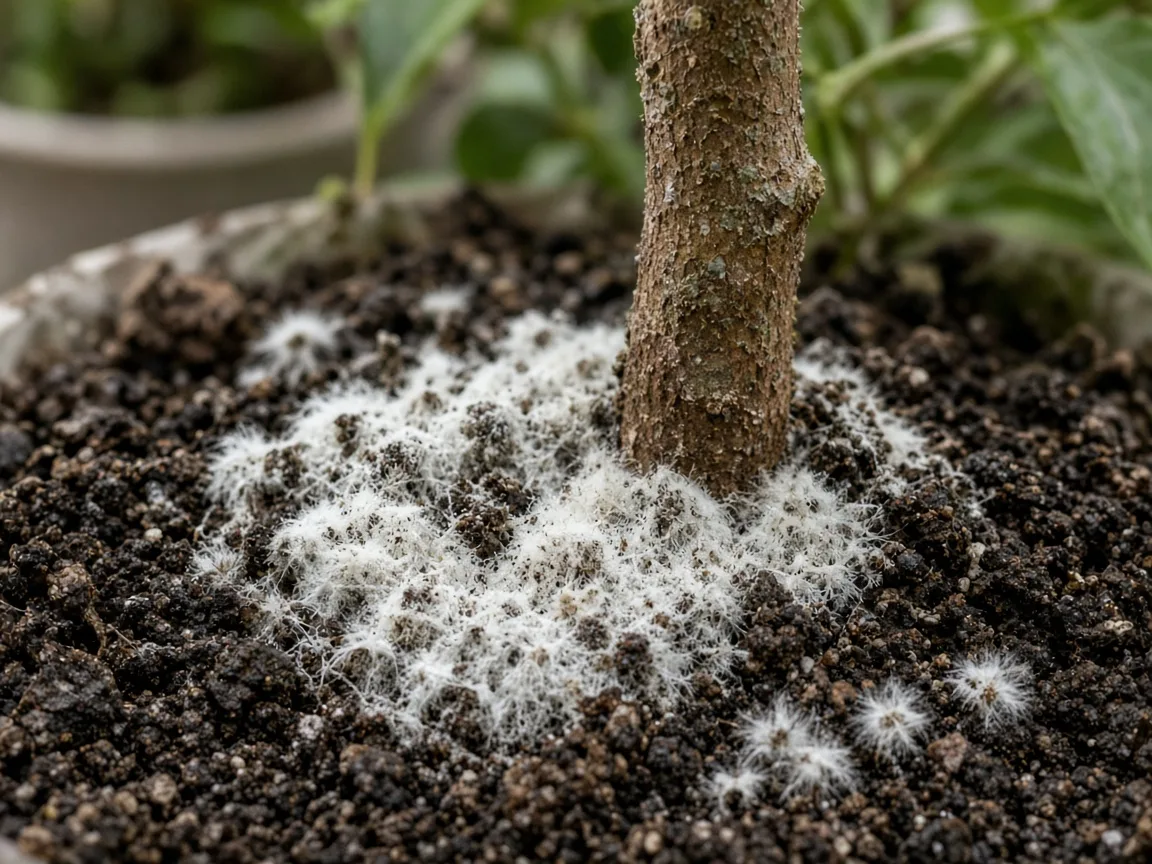
White saprophytic mold mycelium growing across moist topsoil of a container-grown Neem tree.
It is crucial to differentiate saprophytic mold from other common surface phenomena:
- Saprophytic fungal mycelium: Soft, fluffy, fibrous, or velvety texture. It can be easily scooped away with a spoon and disintegrates into organic fuzz. It often gives off an earthy, damp forest floor scent.
- Mineral and fertilizer salt crust: Hard, chalky, brittle, or crystalline deposits that cling tightly to soil particles and the pot rim. Unlike mold, mineral crusts do not have a fibrous texture and will bubble or dissolve if tested with a drop of household vinegar.
- Damping-off or stem canker: Pathogenic fungi that actively infect the collar of young seedlings or soft sapling stems. Damping-off causes the stem at the soil line to turn dark, pinch inward, and collapse, whereas surface saprophytic mold simply rests on top of the soil particles without penetrating healthy bark.
Healthy container Neem trees thrive when their soil surface dries out to a dusty, pale appearance within two to three days of deep watering. If the potting medium remains dark, damp, and spongy for a week or more, fungal spores will inevitably take advantage of the prolonged dampness.
Why Neem gets mold on soil: Biology vs. container dynamics
In its native range across the Indian subcontinent and Southeast Asia, Azadirachta indica grows in open, sun-drenched landscapes. The Missouri Botanical Garden notes that neem thrives in deep, sandy, dry to medium, well-drained soils with high drought tolerance, but notes container plants have less reserve than field trees. Similarly, Oregon State University highlights that neem prefers deep, permeable sandy soils in sub-arid to sub-humid tropical climates. When grown in containers, however, potted neem trees are frequently forced into rich, heavy soils that contradict their evolutionary adaptations.
As documented by Plants For A Future, neem tolerates nutrient-poor ground but dies quickly in waterlogged soils. Surface mold is the direct consequence of several overlapping environmental factors:
1. Organic potting soil retention
Most standard commercial potting mixes are formulated with high percentages of peat moss, coconut coir, or composted forest products designed to retain water for tropical understory houseplants. In a potted Neem setup, these fine organic particles remain saturated for days. UF/IFAS Extension research highlights that airborne fungal spores colonize organic nursery media whenever ambient humidity and surface moisture persist. Penn State Extension explains that these organisms are harmless saprophytic fungi decomposing dead organic matter rather than infecting the plant’s vascular system. Nevertheless, because Neem evolved to thrive in lean, sandy earth, soil that stays wet long enough to culture fungi is far too wet for Neem root health.
2. Porous terracotta vs. plastic containers
The material of your container plays a pivotal role in soil moisture dissipation. Non-porous containers—such as standard plastic pots, glazed ceramic planters, or decorative cachepots without drainage—trap moisture against impermeable walls. Water can only escape by draining out the bottom holes or slowly evaporating through the top soil surface.
In contrast, NC State Extension emphasizes that porous unglazed clay pots allow air and moisture to move freely through their permeable sidewalls. In terracotta containers, excess water wicks horizontally through the clay and evaporates into the surrounding air, creating rapid, uniform root-zone dry-down. Planting Neem in plastic pots in humid indoor rooms or during wet monsoon months frequently leads to stagnant moisture pockets where mold flourishes.
3. Inadequate sunlight and sluggish transpiration
Neem is an obligate sun-loving tree that requires direct solar exposure to fuel rapid photosynthesis and root water uptake. When kept indoors in low-light corners, on shaded balconies, or during prolonged overcast spells, the tree’s metabolic rate slows dramatically. Because the plant draws very little moisture from the pot, the soil surface remains damp for days on end. Furthermore, direct sunlight contains natural ultraviolet (UV) radiation, which acts as a powerful inhibitor against surface fungal spore germination. Low light deprives the soil of both heat-driven evaporation and natural UV sterilization.
4. Overpotting and perched water tables
Planting a young Neem in an excessively large pot creates a large reservoir of soil that the immature root ball cannot reach or dry out. Clemson Cooperative Extension cautions that container media must maintain adequate aeration and sharp drainage to prevent waterlogging. An oversized pot creates a dense, soggy perched water table that stays cold and anaerobic, feeding saprophytic mold at the top while suffocating feeder roots below.
How to confirm the cause: Triage and diagnostic checks
Before treating the soil, systematically assess your Neem tree and its growing environment using these diagnostic steps:
- Stem and collar firmness test: Place your index finger and thumb at the base of the Neem stem where it meets the soil. Gently squeeze. A healthy tree has a rigid, woody trunk. If the tissue feels soft, spongy, or slips under your fingers, the problem is not merely superficial mold—it is active fungal decay at the root collar.
- Subsurface moisture probe: Press a wooden skewer or your finger 5 to 8 cm (2 to 3 inches) into the potting mix. If the skewer emerges dark and covered in wet, sticky soil, the lower core is waterlogged, even if you thought you watered conservatively.
- Lift and weight evaluation: Lift the container. A pot with healthy moisture content feels light and balanced. If the pot feels heavy and waterlogged days after irrigation, excess water is trapped in the bottom third of the vessel.
- Drainage check: Inspect the drainage holes. Ensure they are not blocked by compacted soil, root mats, or sitting flush against a saucer filled with standing runoff water.
- Foliage condition: Check the lower leaves. Healthy leaves on a Neem with surface mold confirm an early catch. If lower leaflets are turning translucent yellow and dropping en masse, review our Neem overwatering guide.
Diagnostic triage table
| Visual & Physical Finding | Likely Root Cause | Immediate Action Required |
|---|---|---|
| Firm stem + fuzzy topsoil + dry core below 5 cm | Recent surface watering in low airflow; early saprophytic bloom | Scrape topsoil; relocate to full sun; withhold water until fully dry |
| Firm stem + fuzzy topsoil + soggy core below 5 cm | Peat-heavy soil mix; plastic pot trapping moisture; chronic overwatering | Scrape topsoil; dry out completely; schedule repotting into gritty mix |
| Soft or spongy collar + sour odor + yellow leaf drop | Root rot or collar rot (Phytophthora / Pythium) active | Unpot immediately, prune black rotten roots, apply fungicide |
| White fuzz returning within 48 hours after scraping | Extremely high indoor humidity and stagnant dead air | Add oscillating fan for air movement; apply Bacillus subtilis bio-fungicide |
| Crusty white deposits that flake or dissolve in vinegar | Mineral and fertilizer salt accumulation (not mold) | Flush substrate with distilled water; reduce fertilizer dose |
First fix: Scrape, aerate, and sun-expose
If your tree passes the firmness check, implement this four-step physical reset to clear the mold and safeguard the root zone:
Step 1: Scrape away the fungal mat
Using a clean metal spoon or small garden trowel, gently scrape off the top 1 to 2 cm (0.5 to 1 inch) of soil containing the visible white mycelium. Collect the scraped debris in a plastic bag and discard it directly into household trash. Do not toss it into an indoor compost bin or garden bed, where spores can easily spread back into container plants.
Step 2: Aerate the surface crust
Over time, repeated surface watering compacts fine particles, creating an impermeable crust that traps moisture underneath. Take a clean wooden skewer or fork and gently scratch the remaining top 2 to 3 cm of soil, being careful not to tear surface feeder roots. Loosening this crust immediately introduces oxygen into the upper root zone and accelerates evaporative drying.
Step 3: Maximize direct sunlight exposure
Move your Neem into the brightest location available. If growing indoors, place it directly in an unobstructed south-facing window. If outdoor temperatures exceed 15°C (60°F), move the container to a bright, open balcony or patio where natural breezes circulate. Solar heat warms the soil matrix, driving moisture out of the root zone, while solar ultraviolet rays disrupt fungal spore vitality. If your Neem has been in deep shade, acclimate it over two to three days to prevent sunscald on tender foliage, as detailed in our Neem light guide.
Step 4: Enforce an extended dry-down cycle
Do not add a single drop of water to the container until the top 5 cm (2 inches) of soil is completely dry and the pot feels significantly lighter when lifted. When you eventually resume watering, follow the structured soak-and-dry approach outlined in our Neem watering guide.
Bio-fungicides and gentle controls
In severe or persistent cases where topsoil scraping alone does not prevent fungal recurrence, incorporate targeted biological or natural controls rather than toxic synthetic chemicals:
Beneficial bio-fungicides
Beneficial microbial inoculants are the safest and most effective biological control for container media:
- Bacillus subtilis: A naturally occurring soil bacterium that colonizes the root zone and out-competes pathogenic and saprophytic fungi. Applying a dilute soil drench of Bacillus subtilis suppresses fungal mycelium while enhancing root resilience.
- Trichoderma harzianum: A beneficial fungus that actively feeds on unwanted fungal hyphae and builds symbiotic root protection in porous, well-aerated substrates.
Natural household remedies
- Ground Ceylon cinnamon: Cinnamon bark contains cinnamaldehyde, an organic compound with recognized natural anti-fungal properties. After scraping off the topsoil mold, lightly dust pure ground cinnamon across the disturbed soil surface. It acts as a safe, non-toxic barrier that inhibits returning spores without damaging tender Neem roots.
- Dilute hydrogen peroxide (3%) drench: If mold has penetrated deeper into the mix, combine 1 part household 3% hydrogen peroxide with 4 parts clean water. Gently pour the solution over the soil surface. The solution fizzes on contact with fungal cell walls, oxidizing spores while breaking down into pure water and extra oxygen that invigorates the root zone.
Why harsh synthetic fungicides should be avoided
Growers often rush to drench houseplant containers with broad-spectrum chemical fungicides upon spotting surface fuzz. On container Neem trees, this is counterproductive. Saprophytic surface fungi are not attacking the living tree; sterilizing the soil with heavy chemical drenches destroys beneficial soil bacteria and mycorrhizal fungi that help Azadirachta indica absorb micronutrients. Correcting moisture and airflow provides a permanent cure without chemical intervention.
Long-term container and soil correction
If surface mold recurs every time you water, your container and potting medium are fundamentally ill-suited for Neem. Resolving this permanently requires switching to a breathable pot and a sharp-draining, mineral-heavy substrate.
The advantage of unglazed terracotta
For Neem trees, unglazed terracotta pots are vastly superior to plastic or glazed containers. The porous clay acts as an evaporative wick: moisture travels through the microscopic pores of the pot wall and dissipates into the air. This side-evaporation prevents water from stagnating around the lower root zone and cools the soil during intense summer heat. When repotting, always select a pot with ample, unobstructed drainage holes, as discussed in our Neem repotting guide.
Formulating a sharp-draining Neem mix
Azadirachta indica requires a lean, sandy, gritty substrate that allows irrigation water to drain through freely within seconds. Avoid dense commercial potting bags rich in peat moss or moisture-retentive vermiculite. Instead, mix your own blend as detailed in our Neem soil guide:
- 50% Sandy loam or clean garden soil: Provides structural support, mineral content, and a stable root anchor.
- 25% Coarse river sand, pumice, or perlite: Ensures sharp drainage and maintains large macropores for root oxygenation.
- 25% Well-rotted compost: Supplies gentle, slow-release organic nutrients without turning the medium into a soggy sponge.
This gritty matrix dries evenly from top to bottom, making it impossible for surface saprophytes to maintain the continuous moisture they need to survive.
What not to do
When addressing mold on Neem potting soil, avoid these widespread grower mistakes:
- Do not apply fertilizer to moldy soil: Feeding a waterlogged, stressed plant burns tender root hairs and adds soluble salts that compound root stress.
- Do not put a layer of gravel at the bottom of the pot: Placing gravel or pebbles beneath potting soil does not improve drainage; it raises the perched water table higher up into the root zone, keeping the soil wetter for longer.
- Do not seal the plant under a plastic humidity tent: Neem trees dislike high, stagnant relative humidity. Trapping moisture under an enclosed dome causes mold to spread up the stems and foliage.
- Do not repot a heavily stressed plant on day one: Unless roots are actively rotting, do not subject the tree to immediate transplant shock. Scrape the surface and allow the pot to dry down first.
- Do not spray synthetic leaf shine or oil on the soil: Neem oil is derived from this very species (Azadirachta indica) and makes an exceptional foliar pest spray, but spraying heavy oils directly onto wet potting soil smothers soil pores and worsens fungal dampness.
Recovery timeline and prevention
After scraping the surface mold, moving your Neem into sunlight, and enforcing dry-down, the soil surface should remain clean and dry. Within 5 to 7 days, the topsoil will take on a lighter, crumbly texture. Monitor the tree’s response: firm, vibrant green terminal foliage confirms that the root zone is healthy.
To prevent mold from returning in future care cycles:
- Water by soil dryness, not a calendar: Always verify that the top 3 to 5 cm of soil is completely dry before soaking the pot again.
- Empty drainage trays immediately: Never allow the bottom of the pot to sit in standing drainage runoff. Discard saucer water 15 minutes after watering.
- Adjust for seasonal shifts: In rainy monsoon or cool winter periods, reduce watering frequency substantially. When ambient evaporation slows, your Neem needs far less water to maintain turgor.
- Maintain active room ventilation: Ensure fresh air circulates freely around the plant canopy and pot surface, especially in indoor environments.
By respecting Azadirachta indica’s dry-forest heritage with lean, free-draining soil, porous clay containers, and abundant sunshine, you eliminate the wet conditions mold needs while setting up your tree for vigorous, resilient growth.