Spider Mites on Turmeric: Causes, Checks & Fixes
Quick answer
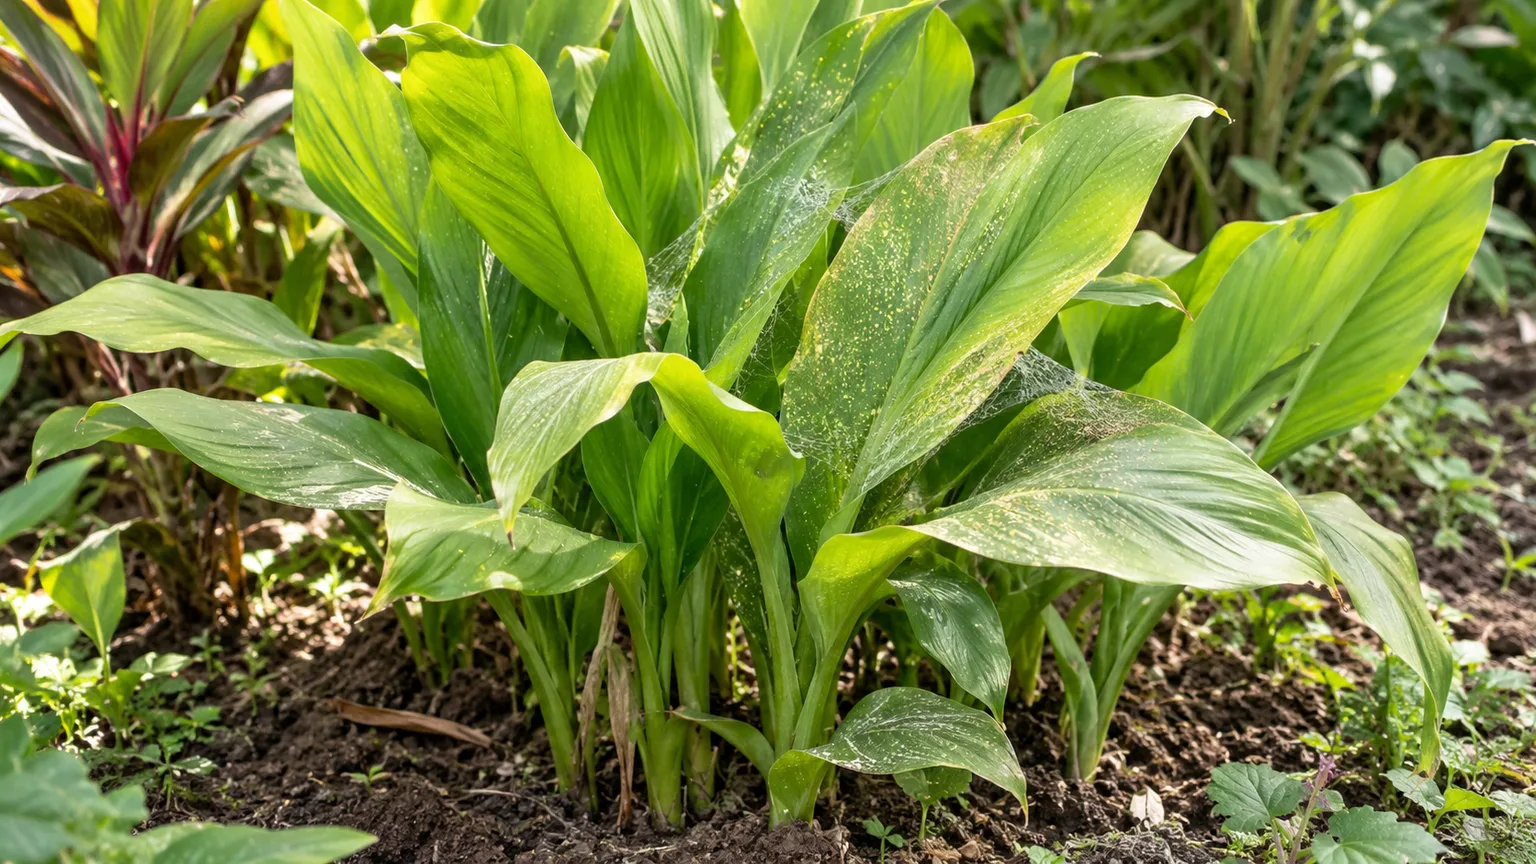
Spider mites on turmeric show as pale stippling and dusty bronzing on broad paddle leaves, usually starting on older lower foliage when pots dry out in heat. First step: isolate the plant and rinse every leaf underside with lukewarm water, then correct the dry-soil spell before reaching for any spray.
Spider Mites on Turmeric: Causes, Checks & Fixes
This guide covers spider mites on Turmeric. See also the general Spider Mites guide, watering, and light pages for this plant.
Spider Mites on Turmeric: Causes, Checks & Fixes
Quick answer
Spider mites on turmeric (Curcuma longa) look like pale stippling and dusty bronzing across the broad paddle leaves, usually starting on the older, lower foliage. Fine silk webbing along the midrib undersides and where leaf stalks meet the stem confirms an active colony. For general mite biology and life cycle, see our spider mites guide. On turmeric, outbreaks almost always follow a dry-soil spell — NC State Extension notes that red spider mites in older plants on dry soil are the characteristic pest pattern on this species.
First step: isolate the plant and rinse every leaf underside with a firm stream of lukewarm water. That single wash knocks colonies down and tells you whether live mites are present before you consider soap, oil, or anything stronger.
What spider mites look like on turmeric
Turmeric grows as an upright clump of broad, canna-like blades up to a metre long rising from an underground rhizome. Mites colonise the undersides of those big leaves, where each feeding puncture drains a single cell. From above you see the damage, not the pest:
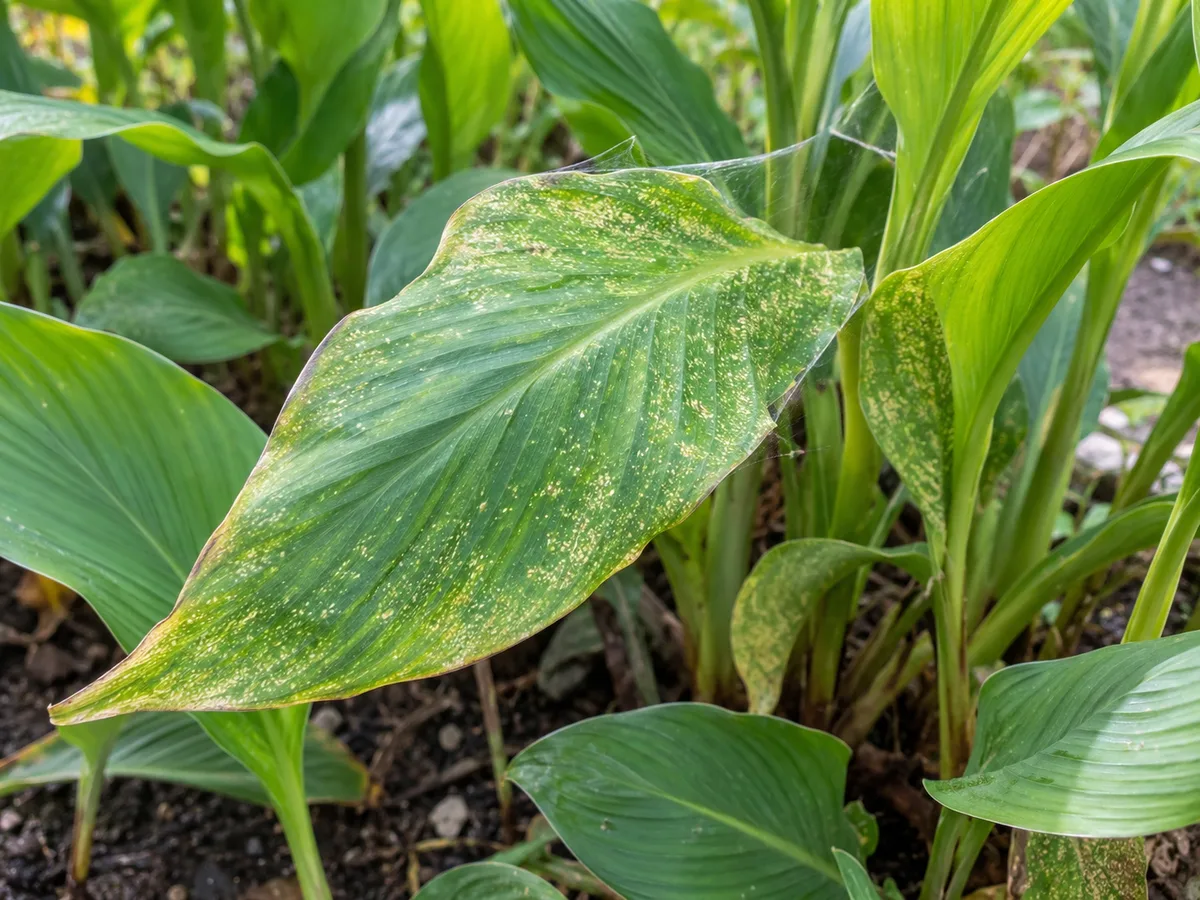
Pale stippling and fine silk on a turmeric leaf underside — compare with healthy tissue on the same plant.
- Stippling: thousands of tiny pale dots that merge into a dusty, bleached look on the upper blade
- Bronzed or papery patches on older lower leaves while the newest spear still looks green
- Fine webbing along midrib undersides, leaf-stalk junctions, and unfurling spears when numbers climb
- Crisping leaf edges and premature drop of lower blades mid-season, while the rhizome stays firm
Because turmeric blades are so large, early stippling reads as sun fade or dust until you flip a leaf and look with a hand lens. By the time webbing is obvious, colonies have usually been feeding for weeks — UC IPM describes colonies of hundreds on leaf undersides with dense webbing at high numbers.
Mites differ from the other common turmeric pests: mealybugs on turmeric leave cottony wax in stalk joints, and aphids cluster visibly on soft spears with sticky honeydew. Mites produce no honeydew and no cotton — just stippling plus silk.
Why turmeric gets spider mites
Turmeric is a monsoon plant: warm, humid, consistently moist growth followed by a dry dormant rest. Spider mites exploit every gap in that moisture story.
Dry pots in hot weather are the main trigger. Containers in peak heat can dry within a day of watering, and the thick rhizome masks stress until leaves already show damage. Plant Delights Nursery warns that in containers or in soil that is too dry, spider mites and mealybugs become a problem on curcumas. Their grower’s rule — “treat them to monsoon conditions — warm, wet and well fed in summer” — is the direct inverse of mite-friendly culture.
Older lower leaves are colonised first. Mites establish on mature blades with the most surface area, which is why NC State ties them to older plants. New spears unfurling from the rhizome crown are usually attacked only after lower foliage is heavily infested.
Hot, dry, dusty air multiplies them. Populations of spider mites increase with dryness and warm temperatures, and UC IPM notes damage is worst in hot, dusty conditions on water-stressed plants. A turmeric on a scorching balcony with afternoon sun fits that profile exactly — see the turmeric light guide for why morning sun with afternoon shade suits this plant better.
Winter-dry indoor storage invites them. Rhizomes overwintered indoors in heated rooms sit in dry air for months. Any foliage still attached becomes a mite nursery, and colonies move onto spring spears the moment growth resumes.
Reassuring context: turmeric has no serious insect or disease problems overall, so a mite outbreak is a correctable care gap, not a doomed plant.
How to confirm the cause
Work through these checks in order, on a warm day when mites are active:
- White-paper tap test — Hold white paper under a stippled leaf and tap sharply. Tiny crawling specks mean live mites and settle the diagnosis; Gardening Know How calls this the definitive home confirmation because tiny, moving spots on the paper prove an active infestation.
- Underside inspection — Flip older lower leaves and examine midribs with a hand lens. Look for moving amber, green, or reddish dots plus fine silk — check the undersides to see if spider mites are present whenever stippling or webbing appears.
- Spear check — Unfurl the newest spear gently. A clean spear with damage confined below points to early infestation; a stippled emerging spear means colonies have reached the crown.
- Moisture audit — Lift the pot and probe the top 2–3 cm. A light pot with powder-dry mix confirms the dry-soil trigger; follow the turmeric watering guide to reset the rhythm.
- Dormancy cross-check — If it is late season and foliage is yellowing uniformly with no moving specks on the tap test, that is natural dieback, not mites. Compare with yellow leaves on turmeric before treating.
- Neighbor scan — Check touching container plants. Mites walk across contacting leaves, so inspect the whole bench, not one pot.
Confirmed when the tap test shows moving specks plus stippling and webbing on undersides. Treat on that evidence; stippling alone in late season without live mites points elsewhere — see root rot on turmeric if bases soften in wet mix.
First fix for turmeric
Isolate the plant and rinse every leaf underside with a firm stream of lukewarm water.
Move the pot away from other containers first — mites travel on touching leaves and hands. Then wash systematically: tilt each broad blade, spray the full underside including the midrib channel, and flush the crown where stalks emerge. UC IPM recommends a water spray or mist to the undersides of leaves at least once a day for infested plants.
Rinse in the morning so foliage dries before evening, and keep the jet off the soil surface where possible — the goal is knocking mites off leaves, not saturating an already stressed root zone. Repeat the rinse every few days for two weeks before deciding whether sprays are needed. Make this one correction before repotting, dividing, or fertilising.
Step-by-step recovery
Once isolation and the first rinse are done, follow this sequence:
- Days 0–3 — Rinse undersides thoroughly; restore consistent moisture per the turmeric watering guide so the mix never bakes dry during treatment.
- Days 5–7 — If the tap test still shows live mites, apply insecticidal soap or horticultural oil, completely covering the undersides of leaves. UC IPM advises to use an insecticidal oil or insecticidal soap only once mites are confirmed present.
- Days 10–14 — Repeat the soap or oil application. Generations tend to overlap, so eggs hatching after the first spray restart the colony if you stop early.
- Week 3 onward — Return to weekly tap tests. If two consecutive weeks show no moving specks and new spears unfurl clean, drop to monthly scouting.
- Tidy once, late — Only after mites are gone, trim fully crisped blades at the stalk base for appearance. Leave partly green stippled leaves attached while the plant is recovering — they still photosynthesise for the rhizome.
Do not spray oil or soap on a plant with dry, wilted foliage in midday heat — UC IPM warns: don’t spray when plants are water-stressed or if it is very hot. Water the pot the evening before any spray day.
Because turmeric leaves are sometimes harvested for cooking, prefer contact options (water, soap, horticultural or neem oil) over systemic insecticides, and wash any harvested leaves thoroughly. Montana State notes miticides, horticultural oil, neem oil, and insecticidal soap all work while sparing natural enemies — and broad-spectrum insecticides should be avoided since mites resist many of them and predators die first.
Recovery timeline
Stippled blades never regain their solid green — the drained cells are permanently marked. Expect damaged lower leaves to look dusty until they are shed or trimmed. What recovery actually looks like: new spears unfurling clean and glossy within two to three weeks of consistent treatment, no fresh webbing, and negative tap tests.
Because the rhizome stores energy, a cleared turmeric usually pushes fresh foliage fast in warm weather — faster than most houseplants recover from equivalent damage. If three weekly treatment cycles pass with no improvement and stippling reaches every new spear, escalate: check the whole collection, switch between soap and oil, or cut foliage back and let the rhizome restart if the season still has warmth left.
Lookalike symptoms on turmeric
| What you see | More likely cause | How to tell apart |
|---|---|---|
| Pale stippling + fine webbing + moving specks on tap test | Spider mites | This page — underside colonies confirm it |
| Uniform yellowing of whole plant in late season, no specks | Natural dormancy | Yellow leaves guide — foliage dies back on schedule |
| Chewed holes and slime trails on young unfurling leaves | Slugs and snails | NC State flags slugs on young leaves — night feeders, not stipplers |
| Scorched patches on upper blades after harsh afternoon sun | Sun scorch | Not enough light guide covers placement; scorch lacks webbing and specks |
| Soft brown bases, sour mix, collapsing stalks | Root rot / overwatering | Overwatering guide and root rot guide — wet roots, not dry air |
| Crispy edges with light, dry pots but no stippling | Simple underwatering | Underwatering guide — rehydration alone fixes it |
| Wilting despite moist soil | Wilt / root damage | Wilting guide |
What not to do
- Do not drench the pot to “fix” mites — mites live on leaves, and soggy mix invites root rot while mites persist above. Water to the plant’s normal moist rhythm, not beyond it.
- Do not spray upper leaf surfaces only — colonies feed underneath; top-only coverage misses nearly all of them.
- Do not stop after one spray — overlapping generations mean eggs survive a single application; repeat on a 5–7 day cycle through at least three rounds.
- Do not use broad-spectrum insecticides — they kill mite predators first and mites resist many of them, often making outbreaks worse.
- Do not fertilise a mite-stressed plant — extra nitrogen pushes soft growth that sap feeders prefer; feed only once clean spears are emerging.
- Do not treat late-season dieback as mites — yellowing with no live specks on the tap test is dormancy. Let the plant rest and store the rhizome instead of spraying a retiring plant.
- Do not divide or repot mid-outbreak — disturbing the rhizome while foliage is under attack stacks two stresses; see repotting timing once the plant is clean.
Turmeric care cross-check
Mites exploit care gaps more than they override good practice. While treating, verify the basics:
- Watering — Keep the mix consistently moist in active growth (every 2–4 days in heat, top 2–3 cm as the gauge) per the turmeric watering guide. Pots that dry within a day need bigger containers or shade, not more calendar discipline.
- Light — Morning sun with afternoon shade keeps growth vigorous without baking foliage into mite territory; details in the turmeric light guide.
- Soil — Rich, organic, draining mix per the turmeric soil guide holds moisture evenly so dry pockets do not form around the rhizome.
- Humidity — High ambient humidity (60–80%) suppresses mites; group pots or mist foliage while keeping soil drainage intact — see low humidity on turmeric.
- Airflow and spacing — Crowded leaves trap dust and let mites walk between plants; space containers so blades do not touch.
How to prevent spider mites next time
- Scout leaf undersides weekly during hot spells — flip two older lower leaves per plant every time you water.
- Never let active-season pots bake dry; in peak heat check pot weight daily and mulch the surface lightly.
- Rinse broad blades occasionally with a gentle hose to dislodge dust and early colonists.
- Quarantine new rhizome purchases and nursery pots for two to three weeks before benching them beside established clumps.
- Space containers so foliage does not touch; mites migrate across contacting leaves.
- Ease watering only when foliage genuinely yellows toward dormancy — and inspect stored rhizomes and any remaining foliage before spring regrowth.
A turmeric held at steady monsoon moisture with humid air around clean, spaced blades rarely hosts more than a transient mite colony.
When to worry
Escalate quickly if:
- Webbing spans multiple blades or binds unfurling spears shut.
- The newest spear emerges already stippled despite two treatment rounds.
- Lower leaves crisp and drop mid-season while the plant should still be growing strongly.
- Mites appear on neighbouring containers after isolation.
- Three weekly soap-or-oil cycles still show live specks on every tap test.
At that point, cut all foliage to the crown, keep the rhizome barely moist, and let it push a fresh flush — or discard a heavily infested pot to protect the collection. In hot dry weather, infestations are particularly severe, so late-summer outbreaks on heat-baked balconies deserve the faster, harsher response.
Practical checks
Urgency check
Treat as urgent when webbing is visible without a lens, stippling reaches the newest spear, or mid-season leaves drop while roots are firm. A few stippled dots on one older leaf with a clean tap test gives you time to correct watering first.
Best inspection order
For turmeric, inspect older lower-leaf undersides first, then midrib channels, then the unfurling spear, then pot weight and mix moisture, then neighbouring pots — and confirm with a white-paper tap test before spraying.
Severity note
This issue is marked medium for turmeric — a triage clue, not a guarantee. A small early colony on lower leaves is routine; webbing across the crown with defoliation in peak season is high severity in practice.
Spider mite confirmation rule
Do not treat as spider mites until the tap test shows moving specks plus stippling or webbing on undersides. Uniform late-season yellowing without live mites is dormancy — compare the turmeric overview seasonal rhythm before assuming pests.
Turmeric dormancy note
Turmeric naturally sheds all foliage as it enters dormancy, and dry-stored rhizomes need no leaf treatment at all. If mites struck late in the season, the cleanest reset is often letting the plant go dormant, discarding the infested tops, and starting spring with inspected rhizomes in fresh mix.
When to use this page vs other turmeric guides
- Turmeric watering guide — Use for routine moisture rhythm when the tap test is negative and pots simply dry too fast.
- Turmeric problems hub — Browse all common issues on this species when the diagnosis is still open.
- Yellow leaves on turmeric — Different entry point when discoloration appears without stippling, webbing, or moving specks.
- Mealybugs on turmeric — Different entry point when cottony wax appears in stalk joints rather than stippling plus silk.
- Underwatering on turmeric — Different entry point when crisping comes with light pots but no mite evidence.
Related turmeric guides
- Turmeric overview
- Turmeric watering
- Turmeric light
- Turmeric soil
- Yellow leaves on turmeric
- Overwatering on turmeric
- Underwatering on turmeric
- Root rot on turmeric
- Mealybugs on turmeric
- Aphids on turmeric
- Turmeric problems
How we wrote and verified this guide: Recommendations were checked against NC State Extension, UC IPM Pest Notes, Montana State Urban IPM, Gardening Know How, and Plant Delights Nursery references cited inline. Author: sai-ananth. Reviewer: LeafyPixels Review Board. Methodology: plant problem guidance is reviewed against botanical references, extension resources, and LeafyPixels plant-care data before publication. Last reviewed: 2026-08-19.